We Painted the Kitchen Cabinets White!

January 21, 2010

in Budget Decor,DIY,Inspiration

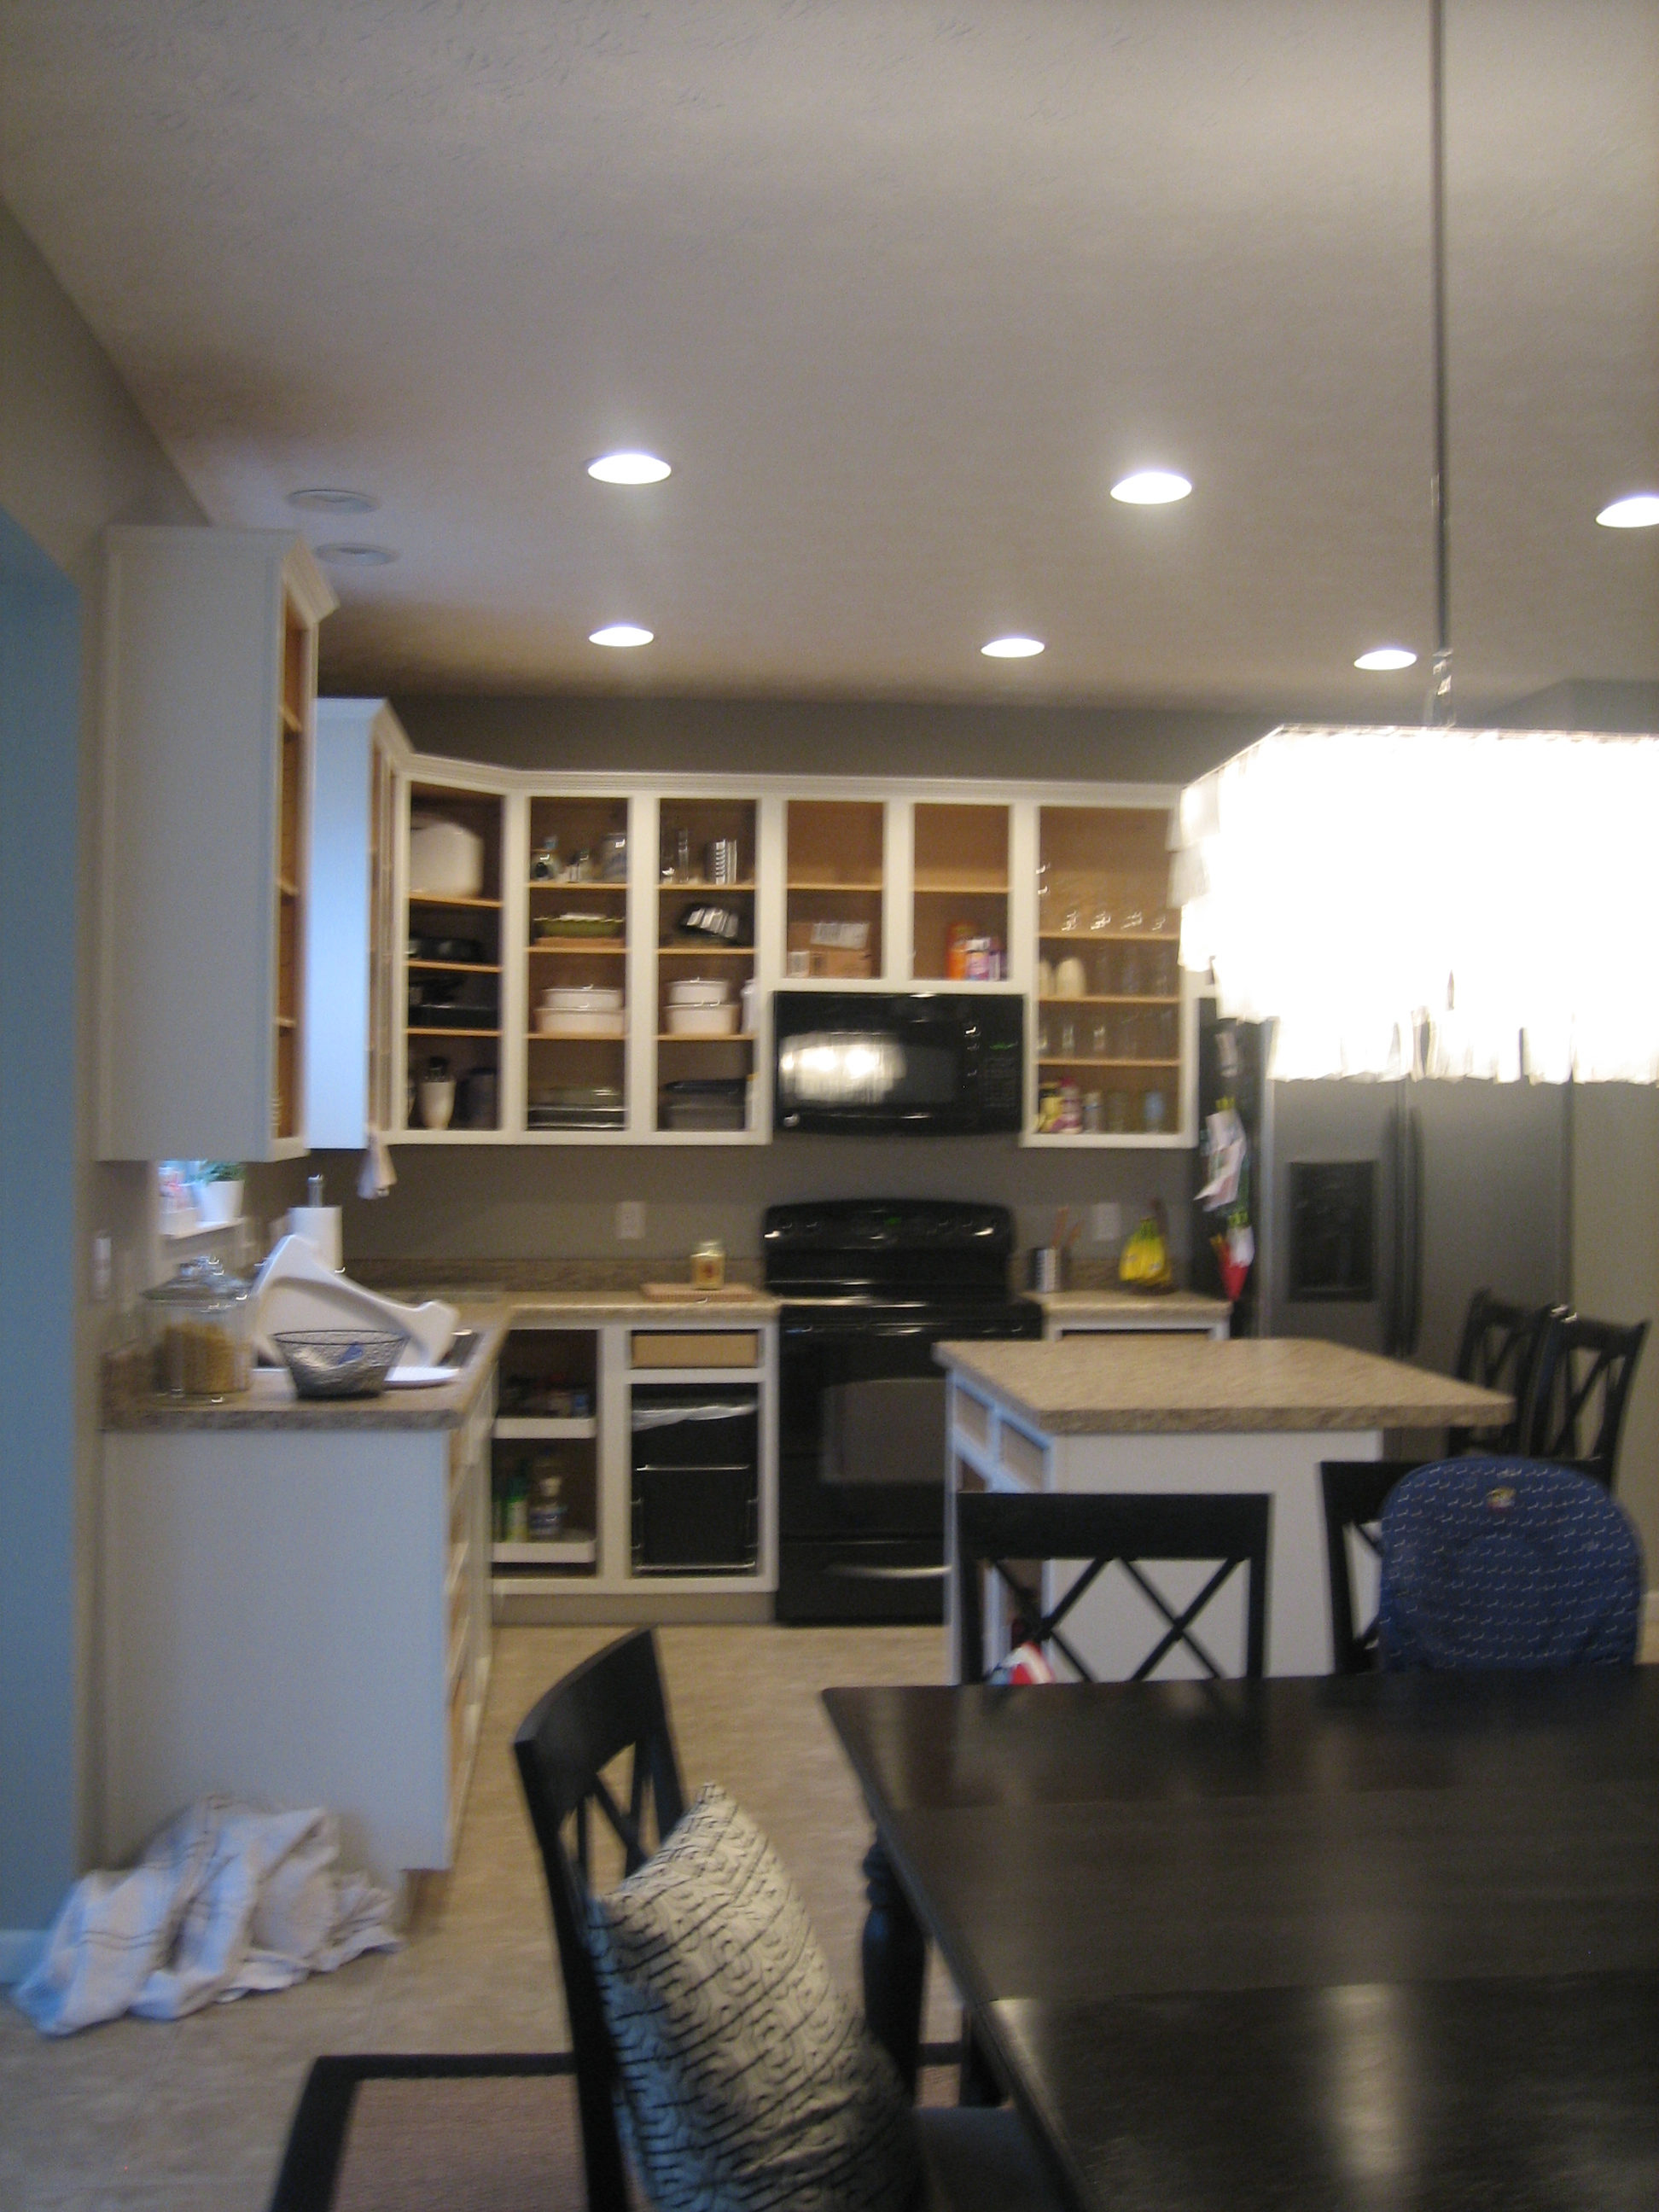
So, remember me dreaming of a white kitchen?  Well, I finally got me a white kitchen!  And I didn’t spend a fortune on it either.  Take a look at our builder basic kitchen before we painted the cabinets white.

builder basic kitchen

Nothing awful but I’m not an orangey-oak, grainy wood kinda gal.  All the kitchen pictures in my inspiration folder are of light, airy kitchens with either white or light gray cabinets.

white kitchen inspiration

inspiration gray kitchen

Since our walls are already a gray color, I thought white cabinets would fit in nicely.  However, I didn’t have $10,000 sitting around (nor did I want to slap that down on a credit card) for new, custom white cabinets.  Needless to say, it was pretty easy to decide on PAINTING our current oak cabinets white.  Yes, that’s right, I said PAINTING over oak cabinets.  (My dad and grandpa are uneasy over this latest turn of events…being quite the handymen and thinking it a crime to paint oak.)

First, we removed all the cabinet doors and drawer fronts (and by ‘we’ I mean my hubby) and emptied the cabinets of their contents.  Our entire kitchen contents lived on/under our dining table for about a week.

The next step was to lightly sand and degloss all cabinetry surfaces.

 kitchen1

Then we (this time I really mean ‘we’) primed and painted the cabinet frames that remained on the walls.  For maximum benefit, we let the primer cure well longer than the recommended time.  Same for the two coats of paint.

We chose an oil-based primer and latex enamel paint for durability.  (These cabinets have to put up with our two little boys.)  Both were purchased from Sherwin-Williams at one of their 20% off weekend sales.  The total cost in primer and paint was less than $80!  Once the frames on the wall were painted, our kitchen looked like this for 2 months while we celebrated Thanksgiving, Christmas and New Year’s.

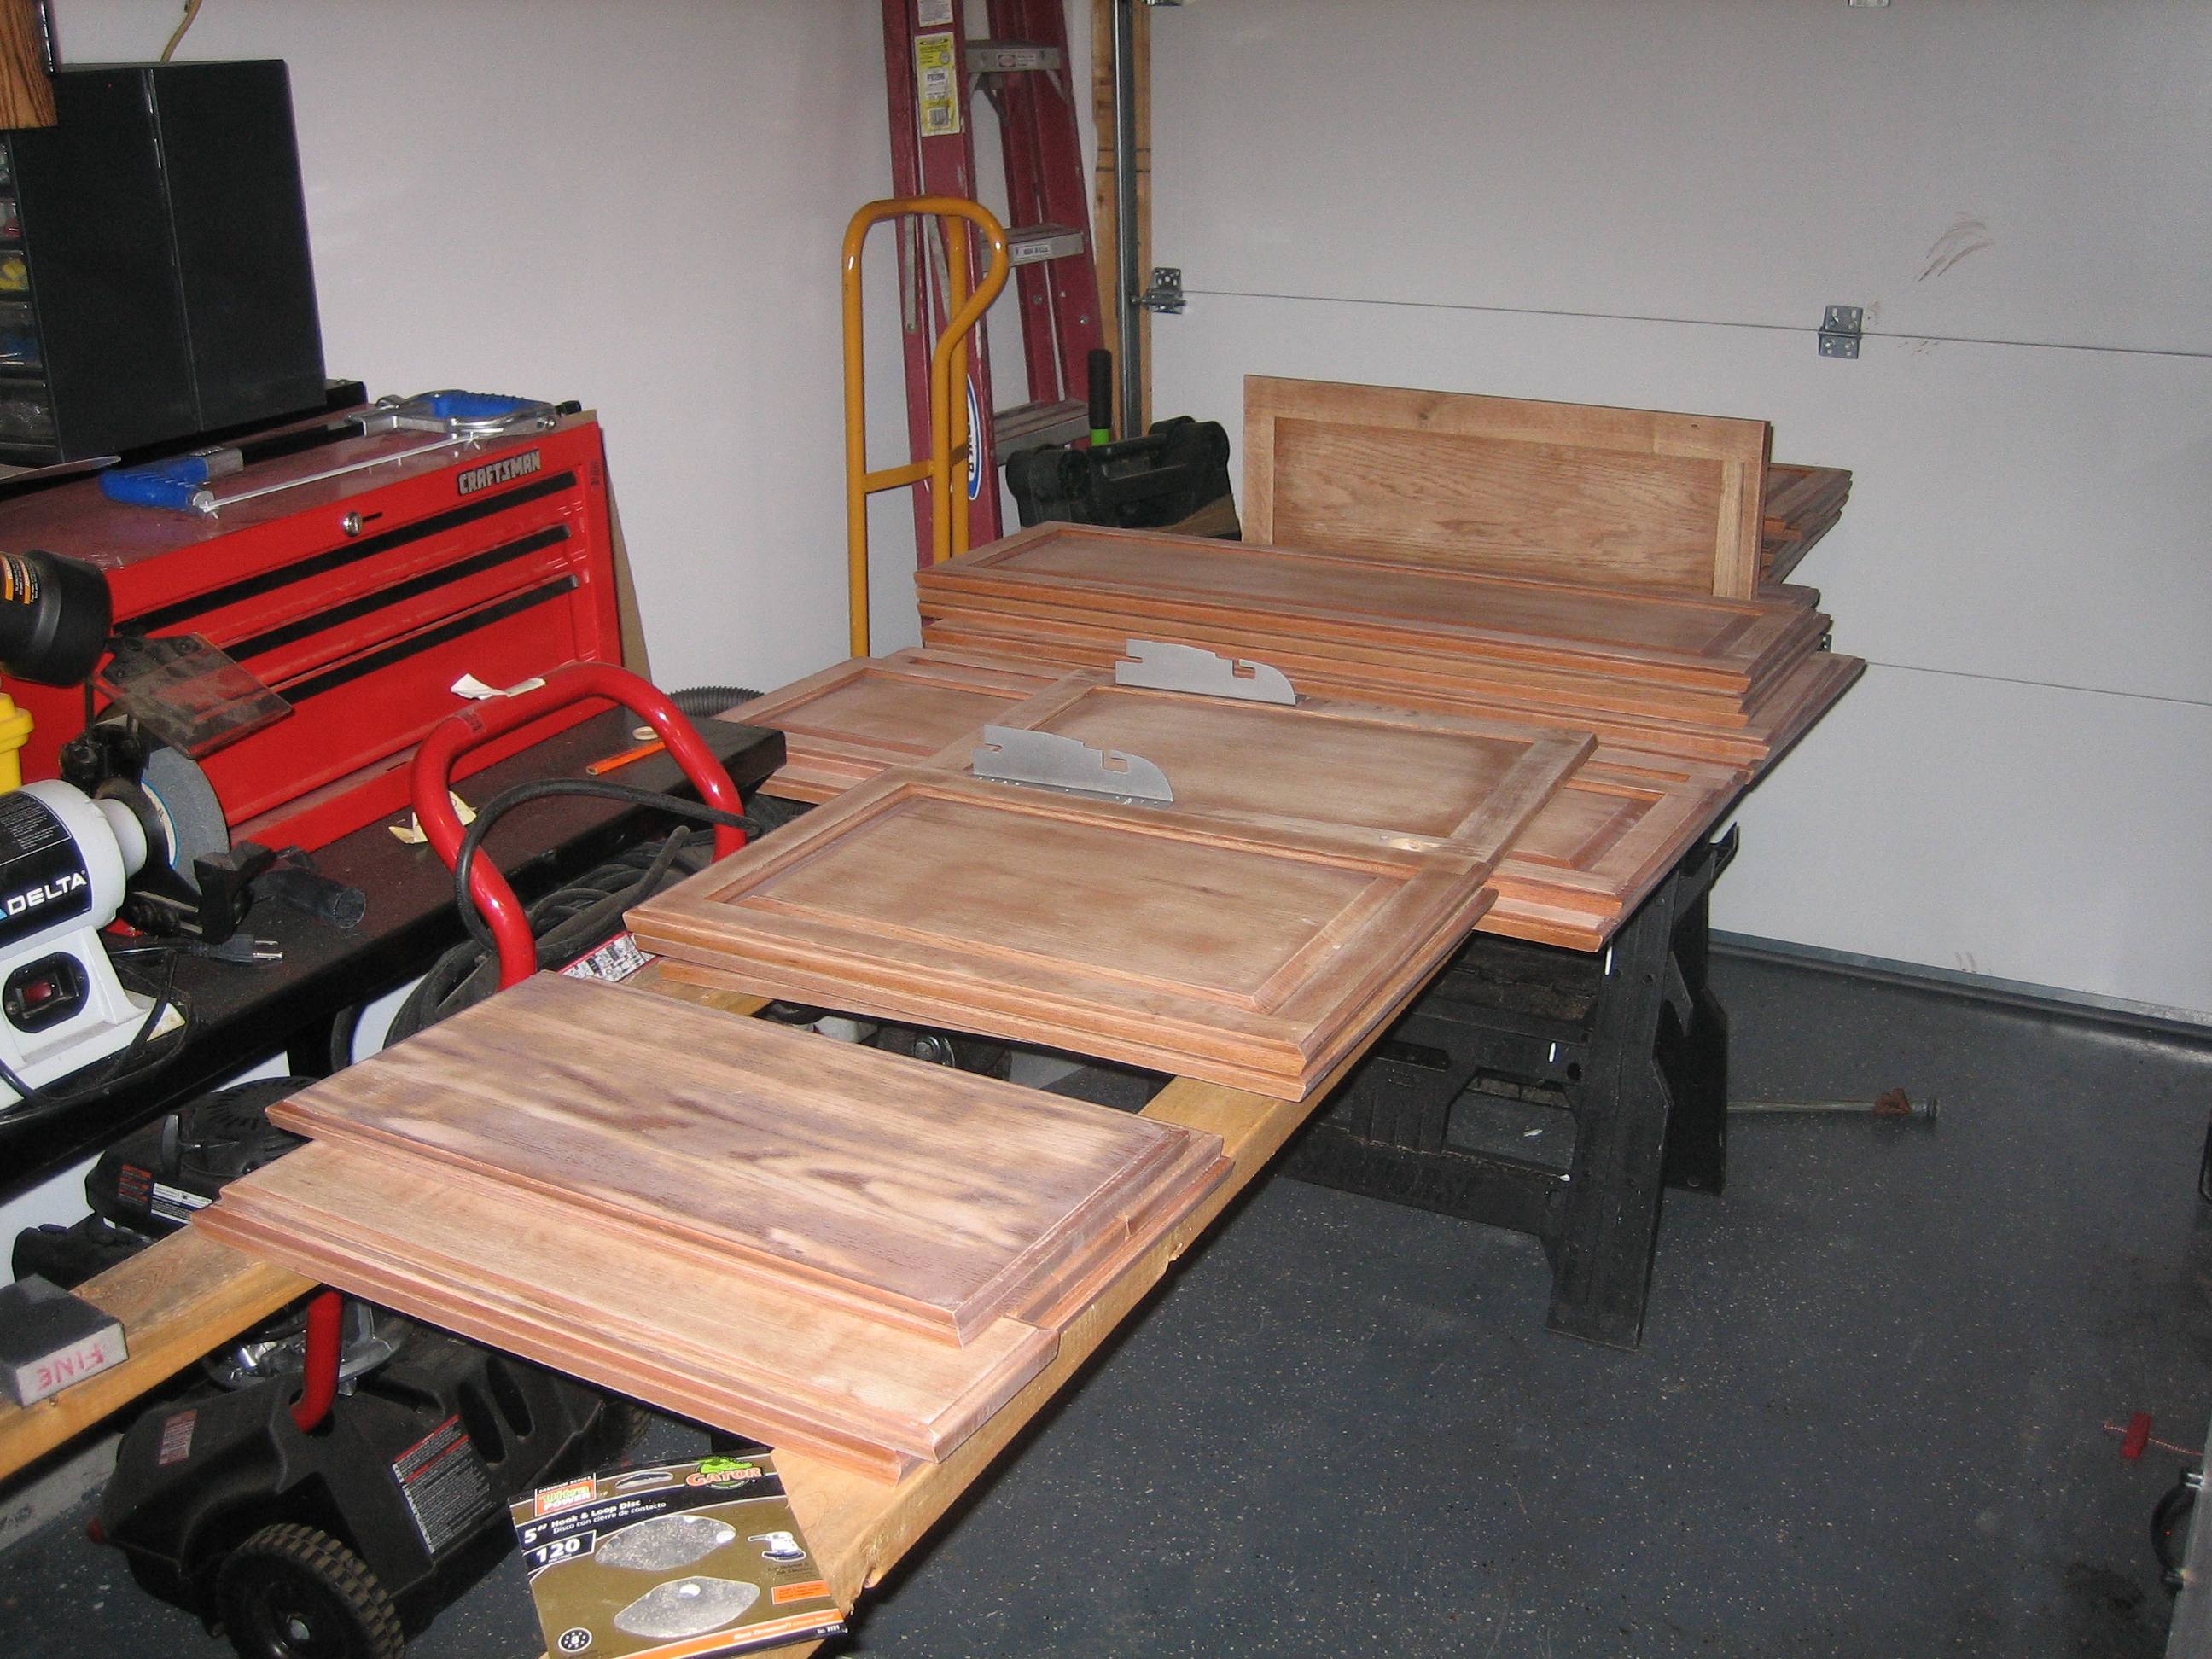
We contemplated buying or renting a spray gun for the doors and drawer fronts.  But after reading about how difficult they could be to clean and how thinning the paint correctly took some trial-and-error, we looked into having someone spray them for us professionally.  Unfortunately, all the quotes were well over $2000… more than we were willing to spend.  We had every inclination to just prime and paint them by hand but knew it would be a loooong time before we were able to complete that task… it was January in Ohio… we didn’t want to paint them indoors…plus we have two kiddos that take up most of our time…not to mention jobs.  Then we found DJ.  DJ was hard up for some work, had a decent portfolio and wanted $280 total to caulk, prime and paint all the doors and drawer fronts.  Yippee!  And he did it in 5 days.  (DJ will definitely be considered for more time-consuming painting projects in our home!)

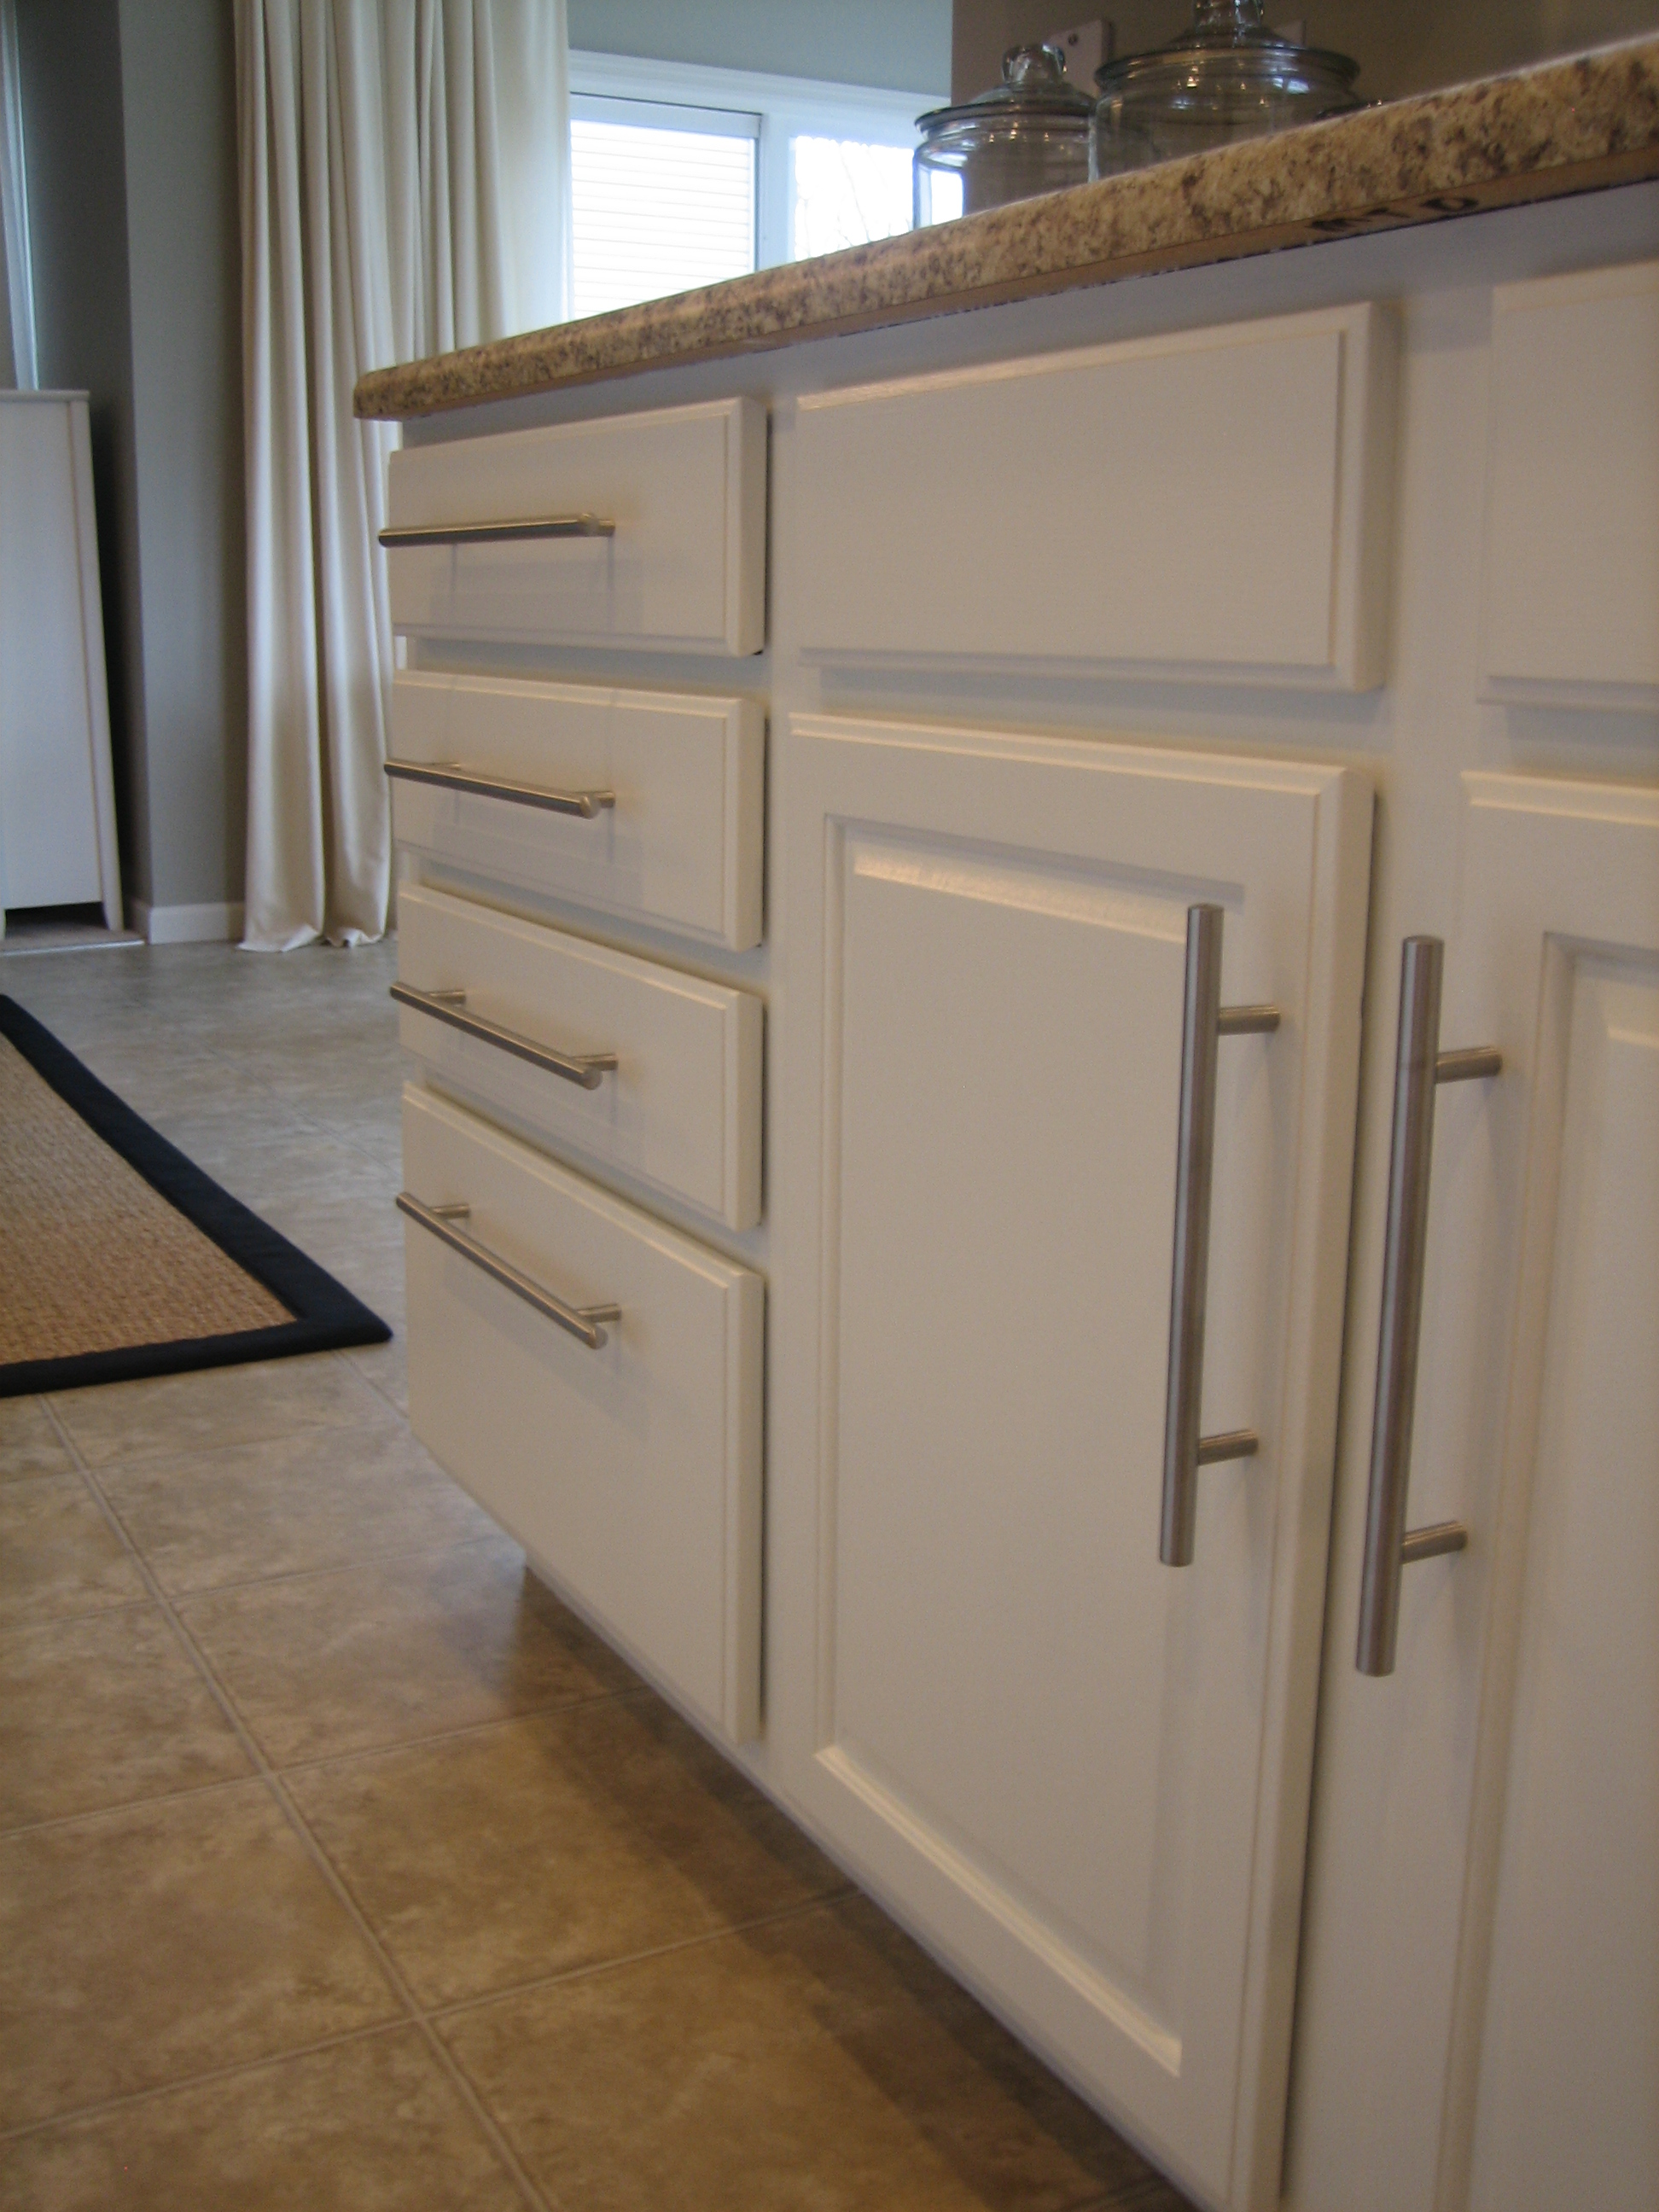
We got our doors and drawers back from DJ, then looked to IKEA for hardware.  We decided on the LANSA handles.  Luckily, I had $75 in gift certificates so we only spent $15 out of pocket on hardware.

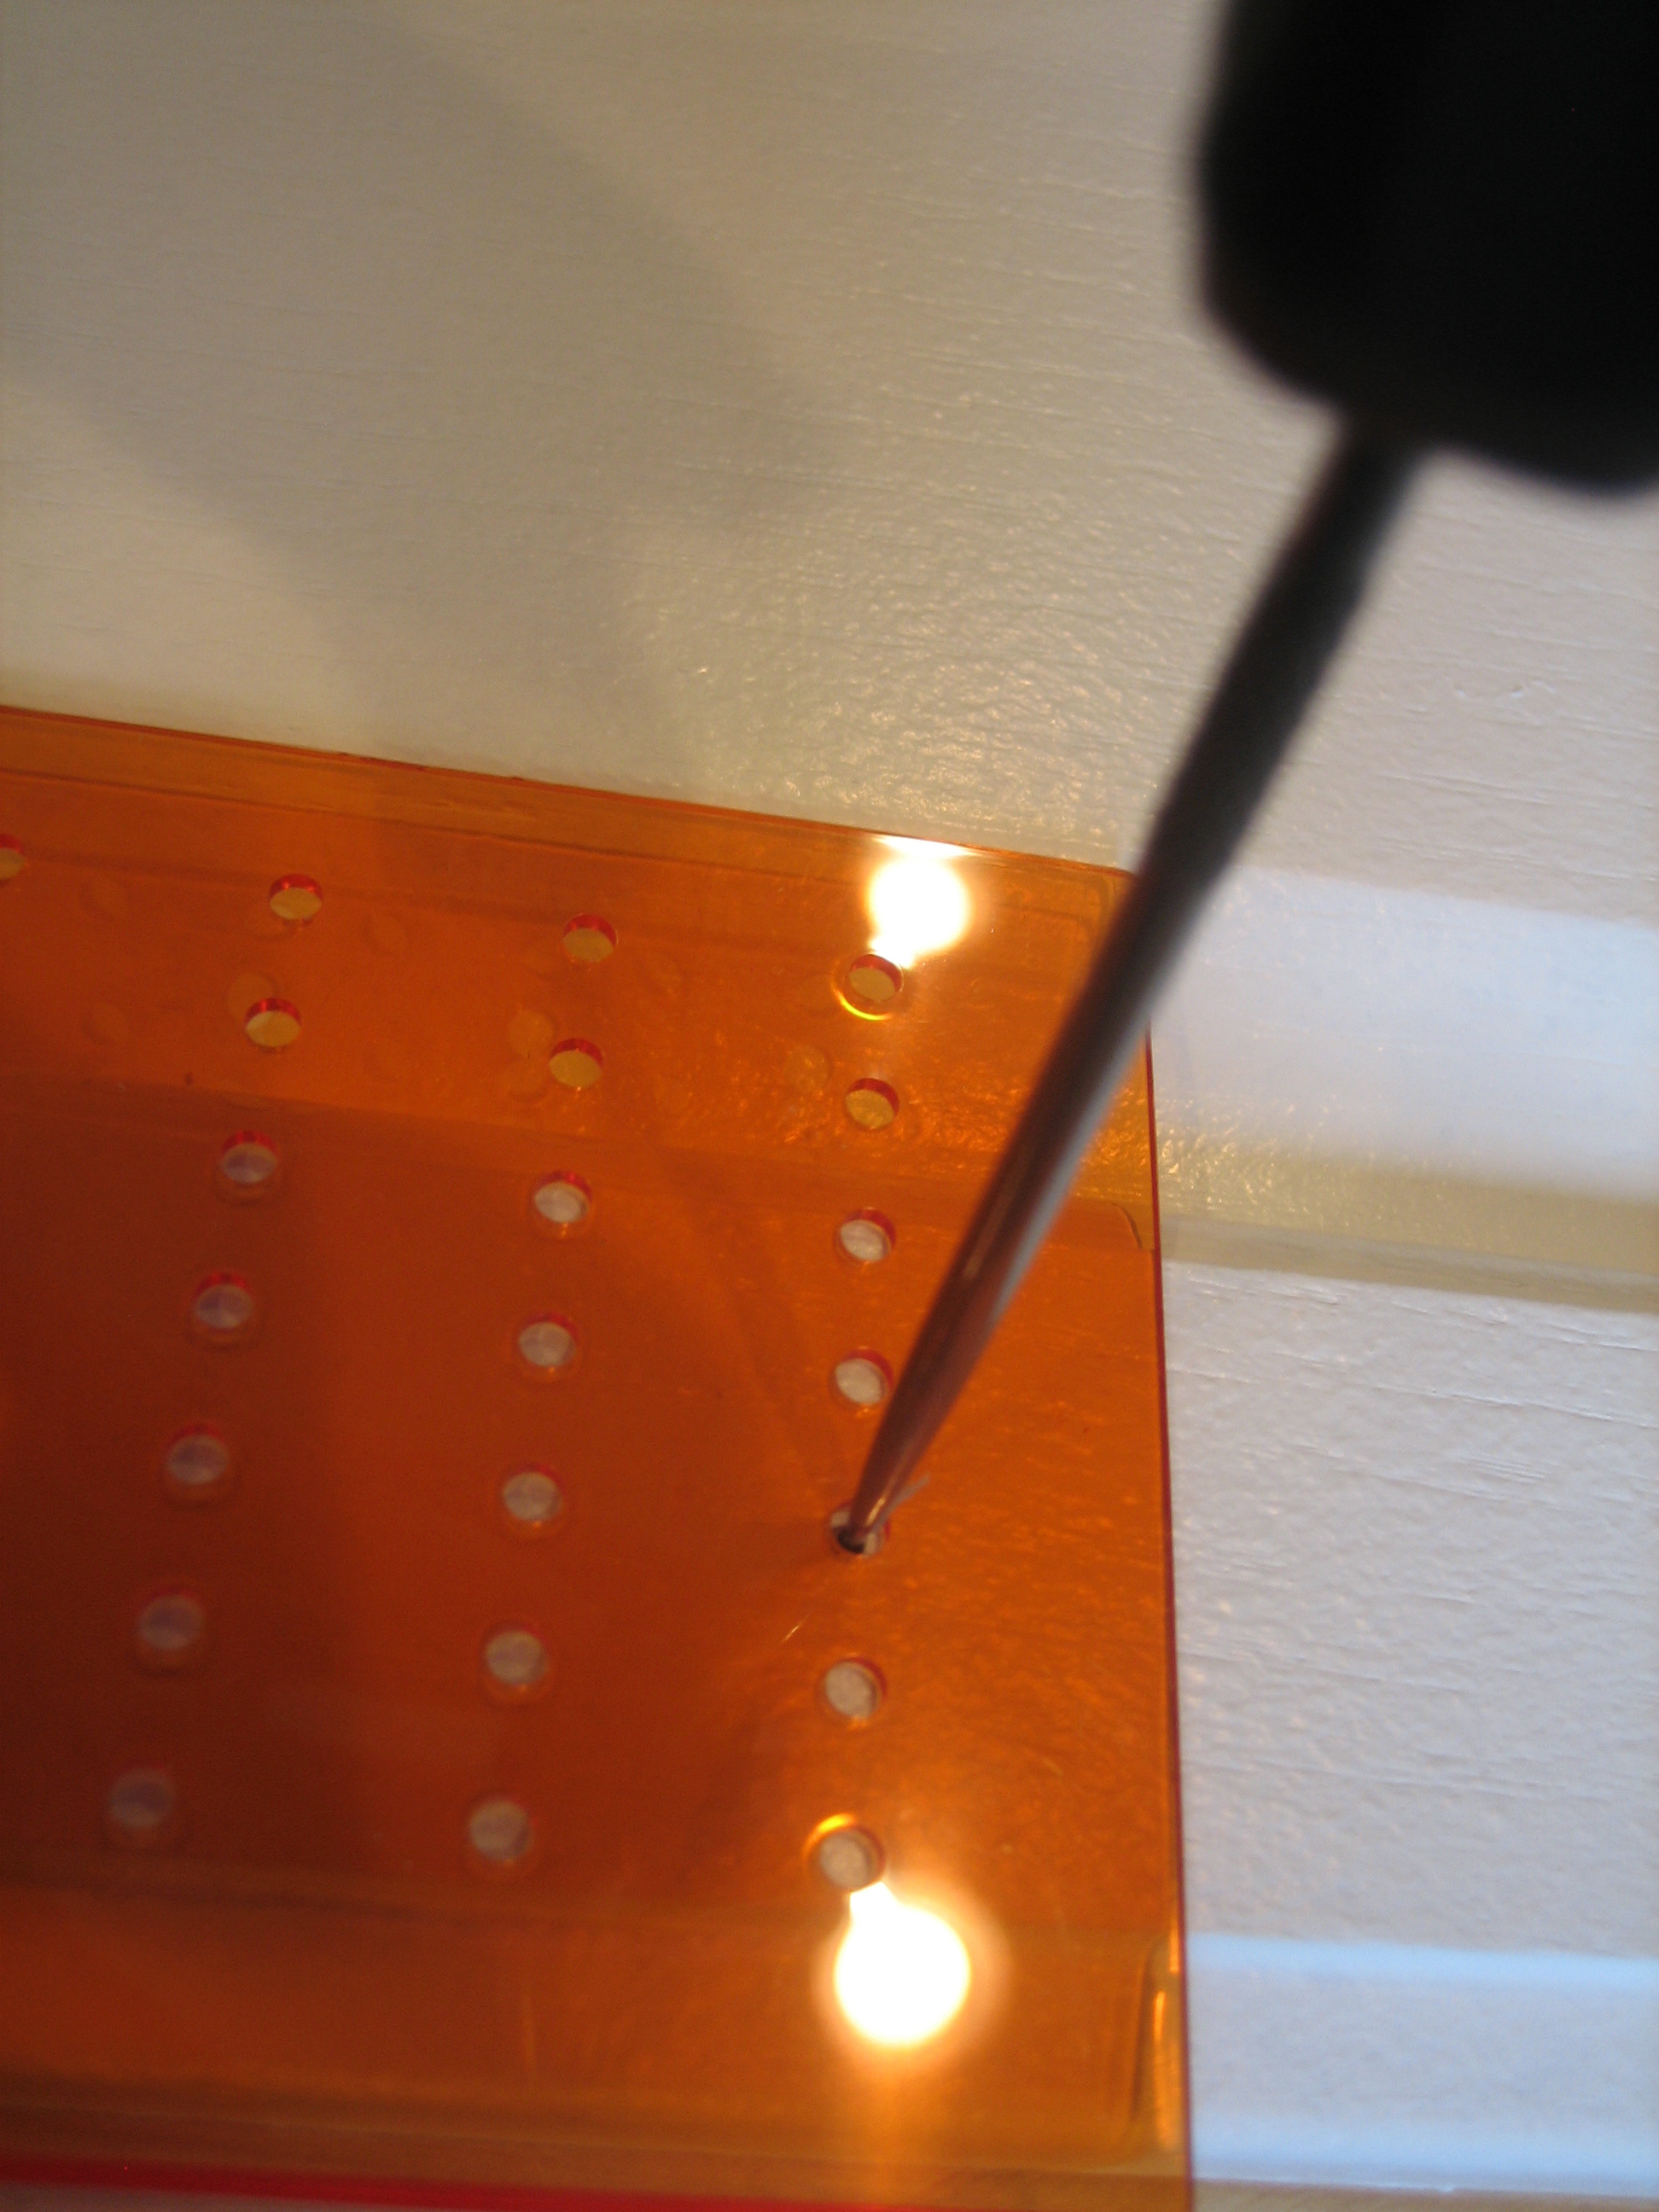
Steve also made an extra trip back to IKEA for a handy tool to help him line up drill holes for the hardware.  It put us back another $2.  Here’s the drill template in action.

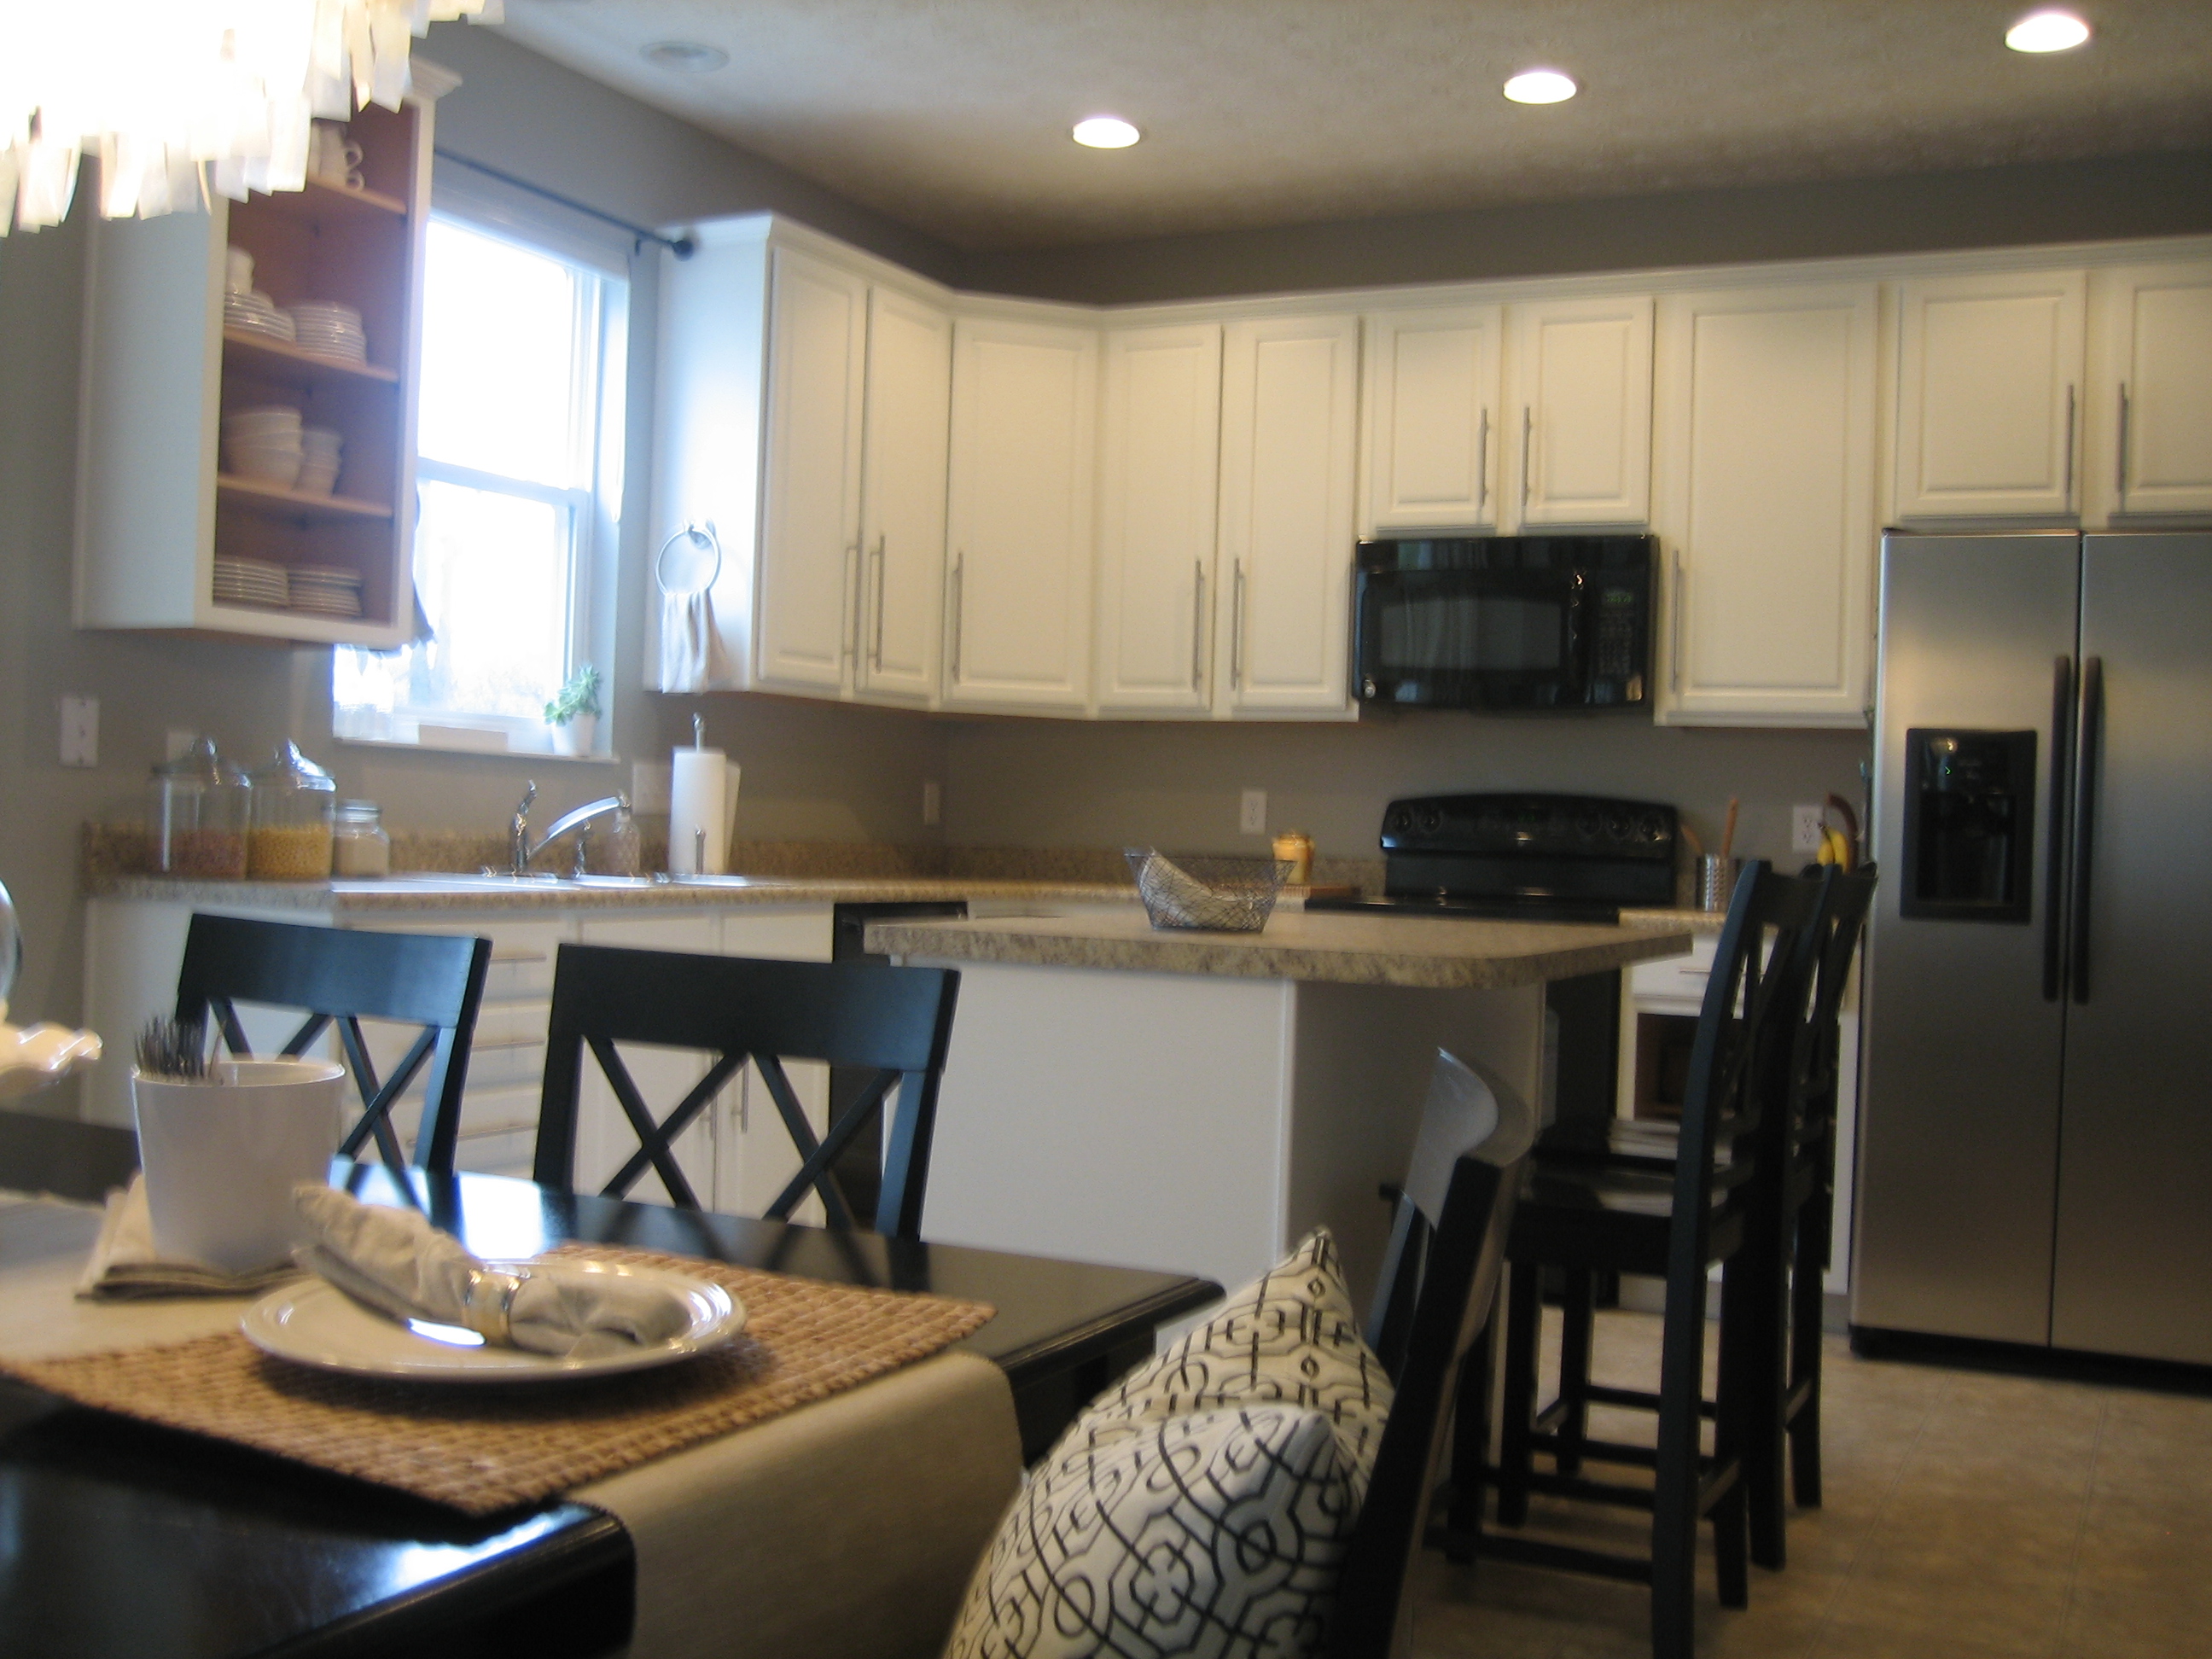
So, 2 months and $375 later, our kitchen now looks like this.

It’s not 100% finished.  I plan on adding a glass front door to the upper cabinet, left of the sink.  And Steve is trying to find an organizational rack for the pots and pans in the lower cabinet, left of the fridge.  We’ve also been putting away money every month for the last 3 months to upgrade our sink, faucet and countertops.  More to come on those changes soon…

But, for now, we are basking in the white-ish glow of our newly painted kitchen cabinets!  I might even take up cooking.

{ 9 trackbacks }

Everything but the Kitchen Sink — House*Tweaking
January 27, 2010 at 12:24 AM
Framed With Love — House*Tweaking
February 14, 2010 at 3:50 PM
Countertop Counterparts — House*Tweaking
March 2, 2010 at 1:08 AM
Chalkboard Paint DIY — House*Tweaking
March 11, 2010 at 1:15 AM
Kitchen Cabinet Organization — House*Tweaking
May 2, 2010 at 10:13 PM
See Through Me: DIY Glass Front Cabinet — House*Tweaking
May 7, 2010 at 10:32 PM
They’re Here! — House*Tweaking
June 4, 2010 at 2:47 PM
Kitchen Progress Update — House*Tweaking
August 12, 2010 at 5:09 PM
Feature Friday: My Kitchen — House*Tweaking
September 3, 2010 at 3:34 PM

{ 72 comments… read them below or add one }

1 Chris Roscoe January 24, 2010 at 10:40 PM

Those look great. We have similar cabinets and I am thinking about doing the same thing but I was curious if you can see the grain through the paint or does the paint “hide” the grain? I’m kind of like your dad and grandpa and don’t necessarily want to paint over oak but I don’t like the current look and just wanted to get some of your thoughts. Thanks.

2 Handy Hubby January 25, 2010 at 8:09 AM

Just a few points for clarification. On the frames we used a TSP cleaner and a liquid deglosser (no sanding as to keep the dust down in the house). We did a VERY light scuff sand to the sides of the frames that were laminated (thin pieces of fiberboard w/ a picture of wood on them) so the primer would have something to stick to. As for the doors, we sanded them down to the wood with an orbital sander and sand sponge.

On the painting, DJ used a technique which involved brushing the inlays and then rolling the flat surfaces with a smooth-finish foam roller, and he did a fantastic job!

As for the cabinet drill template, it’s called FIXA and is located right by the hardware at IKEA. It was the only one I could find that would work with such long cabinet handles. Not bad for $2!

Lastly, my wife rocks!! And I hope she takes up cooking!!

3 housetweaking January 25, 2010 at 10:48 PM

Handy Hubby – Thanks for all the detail clarifications, Steve… quite the engineer.

Chris Roscoe – If you look at the cabinets just the right way, like if you are directly beneath them and look up, the overhead recessed lighting shines down and you can see the grain. You can’t see the grain just by looking at the cabinets straight on, whether the lights are on/off. You’ve got to be really close. And it’s only really noticeable on the doors, not the frames or drawers. I think it also helps that we went with a semi-gloss finish and not a gloss finish paint.

This was a concern for us too before we painted. We looked into using some sort of roll-on filler to ‘fill in’ the grain but decided against it just bc we weren’t really that turned off by the possibility of grain showing. However, if you ARE wincing at the possibility of grain showing through, maybe you’d want to go with the filler. I can’t say I wasn’t a little nervous when we first started priming over the oak but now that we’re done, I wish we would have done it sooner. I am 100% satisfied with the results we got for the amount of $$ we put into it!

4 Handy Hubby January 26, 2010 at 8:26 AM

Chris – when we were thinking about using a filler to hide the grain it was a product called Brushing Putty from Fine Paints of Europe. It’s quite a bit more work, but some people have used it with great results.
http://www.finepaintsofeurope.com/brushing_putty.aspx

5 DJ Justice January 26, 2010 at 9:52 AM

Just wanted to drop by and thank you again for using me on this little painting project. Your job came in handy during what is typically a slow time of year, post holidays and all, although business has picked up a good bit since then.

And for anyone considering doing your own cabinets, keep in mind that although these do-it-yourselfers took a good bit of this project on themselves (which saved them a fair amount of money), you can always hire someone such as myself to take care of everything from A-Z.

Thanks again, Dana and Steve, for using me on this painting project that obviously improved your home a great deal. It was truly a pleasure. Of course all referrals are certainly appreciated, and anyone interested in having me help them out with their next project can reach me directly at 937 559 8167 or justice.dj@gmail.com.

Enjoy! -DJ

6 Chris Roscoe February 2, 2010 at 10:54 PM

Handy Hubby and Housetweaking Hottie –

Sorry Steve, I needed a noun that began with ‘H’. It was just the first thing to pop in my head.

Anyways, thanks for the additional information. I trust your opinion on the paint job without the filler although thanks for providing the link to the information, I’m not sure I want to take the chance with that. I may buy the smaller can and try it on a piece of one of the cabinets. I am going to remove the panel out of 2 of the doors and put glass in them. I might do that first and try the grain filler in the panels that I remove. I’m thinking that regardless of whether the grain is there, I will like seeing a little bit of grain in the wood a lot more than I will like looking at the ugly golden oak cabinets. We’ll see how the test pieces go. I’ll post some reviews of the test pieces after I finish them.

Good luck with the rest of the kitchen remodel. Looking forward to seeing the pictures. Are you guys looking at granite slabs? There is a company called Granite Transformations that uses thin slabs of granite and creates a layer of granite over your existing countertop. My explanation is not doing it justice. You can tell the difference but for the price difference, I think it may be worth it. We are going to look into it some more when we look at doing our countertops.

Thanks again! I may give DJ a call if I decide not to do it myself but I’ll probably take it on pretty soon.

-Roscoe

7 Handy Hubby February 4, 2010 at 4:17 PM

Roscoe!
I’m in the middle of replacing a panel on one of the doors with glass right now. I’ll take some pics and we can post how that project goes. If you beat us to it, let us know how it turned out.

As for the countertops, we’re looking mainly at granite. I’ve heard of Granite Transformations but didn’t really know what they did. Sounds like a decent less expensive option. We’ll definately check it out.

8 Erica March 11, 2010 at 4:33 PM

Your cabinets are beautiful! Such an inspiration…I’m going to paint ours aas soon as the weather warms up a bit so we can sand and paint outside. What color are your kitchen walls? They’re beautiful, esp with the white cabinets, they really make the color pop.

9 housetweaking March 11, 2010 at 9:59 PM

Erica – The walls are Valspar (Lowe’s) Bonsai color swatch but we had it mixed at Sherwin Williams in their NO VOC eggshell finish. And even though you didn’t ask… our cabinets are Sherwin Williams Greek Villa. We didn’t realize how many whites were out there to choose from until we started looking! Happy painting! Take before/after pics if you remember and send ‘em my way. I love a good before and after.

10 Sherry @ Young House Love March 24, 2010 at 9:43 AM

It looks amazing! Thanks for sharing the link Dana. You guys (of course) did a fabulous job. And the budget is amazing of course.

xo,
s (& j)

11 Steph Stimson March 24, 2010 at 2:05 PM

Great job painting your cabinets! We painted our old 70′s cheap wood cabinets 3 years ago a sage green (walls are butter cream…all latex) and what a difference it made…even made the old 30 year old gray speckled laminate countertop look good! We replaced the hinges & pulls/handles as well to silver and laid laminate knotty pine on the floor (had commercial carpeting glued down…ewwww). We put 2 coats of poly over our paint & they have held up extremely well (I do touch them up occasionally where the fingers are always rubbing at certain spots by pulls)…did you think of putting poly on yours as well or is the acrylic paint tough enough to withstand every day abuse? Thanks!

12 housetweaking March 25, 2010 at 1:32 PM

Sherry – Um, I am totally giddy that you read this AND made a comment! The painting of the kitchen cabinets never would have happened without your inspiration!

Steph – We have two young boys (both under 5yrs) that test our kitchen paint job every day. Happy to say that it has held up well. We did not use polyurethane but the white latex paint we used is enamel, so it has a much more durable surface than plain latex paint. It requires a longer curing (drying) time after painting, but we knew we’d need it. I will probably take one day each year to touch-up scuffs but I’m okay with that. These cabinets are gonna be around for a while! The only thing we would change was painting them earlier!!!!

13 Heathyr March 30, 2010 at 10:43 PM

Thanks so much Dana and Steve, this is super inspirational. We are moving into a house at the end of April and the entire house is oak… oak kitchen cabinets, oak bathroom cabinets, oak trim, hollow oak doors, oak baseboard and oak crown molding- YUCK! Not to mention a two-story entry way… all OAK… oh, and also oak-colored hardwood.

When we made the offer on the house my intention was to paint all that oak white but everyone I have talked to about looks at me like I am crazy (except my sweet husband who stands by me and says that all the oak is ugly). I am nervous to take on the project but our first fix would be painting the kitchen cabinets white – I have to say, the more and more people that are cropping up that have done this gives me ease. My main worry is the oak grain showing through, how many times did you sand? Just the once at the beginning? I have read a few instructions on the internet that have recommended once and then between priming and painting and that seems like so much work. I just don’t want the grain to be noticeable (but if it ended up like yours when you can only see it up close and in the light I would be more than satisfied).

How many coats of primer and then paint did DJ do? Any info is helpful, and again thanks so much for sharing – your kitchen looks 100x better! I can’t believe that dads and grandpas are so puzzled by us people that just want a fresh and airy kitchen! I mean look at that difference!

14 housetweaking March 31, 2010 at 10:30 PM

Heathyr – Even though we were both totally on board for painting our oak, I can’t say I wasn’t a teeny-weeny bit shocked that we were actually going to do it. That first stroke of primer was like “OK, there’s no turning back now!” But, honestly, even after only being primed, those cabinets were looking a million times better!

As for our specific technique, we cleaned, deglossed and sanded everything then dusted off again. We used one coat of OIL-BASED primer tinted to our topcoat color (Sherwin Williams Greek Villa). We did LIGHTLY SAND between priming and our first coat of paint. We used a LATEX ENAMEL in a semi-gloss finish for a durable topcoat. Two coats of latex enamel were required with SANDING BETWEEN EACH COAT and light dusting with a damp towel. This may sound like a lot of sanding, but really it’s not that bad…it wasn’t like we made sure each and every square inch was perfectly sanded…we just lightly rubbed our sanding blocks across the surface in a circular motion (like shining windows). We were more concerned with paint strokes showing up but that did not happen.

As far as the grain is concerned, I think going with a SEMI-GLOSS LATEX ENAMEL topcoat is the way to avoid this best. Semi-gloss is easy to clean yet not so shiny that it shows the grain – I wouldn’t recommend gloss finishes if you’re worried about the grain showing. Again, our grain is faintly noticeable: only up close with overhead lights shining down on them and your head tilted at just the right angle. They really have a soft look to them not grainy at all.

Hope all the info helps! I’d be glad to answer any other questions that may arise. Good luck and happy painting. You will be so glad you paint that oak! And don’t think too much about what others say – if you and your husband agree that the oak orange has to go than so be it. You’re the ones that have to live there and it’s not as if you’re saying everyone should paint their oak…it’s just your preference. Believe me, we got a lot of ‘looks’ too!

15 busy holandia April 11, 2010 at 4:48 PM

Thanks for share, please keep us posting about this info. I’d like to read it more.

16 housetweaking April 12, 2010 at 8:58 PM

Holandia – We are upgrading our countertops in the near, NEAR future so stay tuned for that! I’ll be sure to post. I also have plans for changing the look of our black appliances without actually ‘upgrading’ them…

17 Nancy July 12, 2010 at 9:43 AM

What an awesome change! Your kitchen is beautiful. I’d love to find someone like DJ to help paint our kitchen in Baltimore! How did you find him- friends, craigslist? I am always a little leery of craigslist.
thanks!

18 Carrie December 13, 2010 at 4:45 PM

Your kitchen makeover helped me convince my husband to let me paint our kitchen cabinets white too. Probably a silly question, but did you paint the underneath portion of the upper cabinets. I know I would paint this part of the shorter cabinets that you can clearly see, but I’m unsure of all the other cabinets. What about the back of the cabinet doors? Should these be painted? Thanks!

19 housetweaking December 13, 2010 at 10:25 PM

Carrie – We did NOT paint the underneath portion of the upper cabinets. We considered it but decided not to just because you don’t really see that part of them in our home. We DID take the cabinet doors completely off and paint both the fronts AND backs of them. However, we did NOT paint the inside of the cabinets…except for the one cabinet that Handy Hubby turned into a glass-front cabinet. {We painted the inside of it gray.} I hope that’s what you needed to know! I don’t think there is really a right/wrong way to do it…it’s totally a personal choice. Yay for painting cabinets!!! Good luck.

20 dennis teschendorf January 20, 2011 at 12:18 AM

We currently have white oak cabinets that are 20+ years old and showing wear and tear. I am leery of trying to repaint the doors because I have run into the following problems. Plan A) I enjoy the oak grain showing and I purchased an oak door replacement (for the worst door) and painted it with water based white paint. The results were the paint dried too fast and the paint strokes showed. My dilemma is I have not had great success in the past with the water base paints no matter where I have used them within my homes interior. The paints dried too fast with paint strokes showing. I want a smooth finish. I was not satisfied so I moved on to Plan B. I retrieved the worst door and I used an oil base paint for select areas of exterior touch up and painted the inside of the door which unfortunately turned yellow. The paint did not dry too fast and the finish was smooth. Exactly what I desired. What are your recommendations for a nicer outcome if I use water base paints? Are there techniques I can use to eliminate these problems and also should a clear coat be used? Any advice would be appreciated as I do not wish to replace my cabinets in these hard economic times. P.S. Benjamin Moore paints are truly a nightmare for me, I have had better success with Sherwin William paints.

21 housetweaking January 20, 2011 at 10:38 AM

Dennis – We used an oil-based primer {after finely sanding} and latex paint for our kitchen cabinets. We used small foam rollers on the larger surfaces and a small 2″ brush to cut in. No poly…just a semi-gloss finish with the latex paint. All primer and paint was from Sherwin Williams. We had no problems with brush strokes or yellowing.

22 malissa January 23, 2011 at 3:08 PM

what did DJ caulk? i always see that in directions but never understand exactly what they are caulking…your kitchen looks awesome btw:)

23 housetweaking January 24, 2011 at 10:16 PM

Malissa – DJ caulked around some of the raised panels {the part of the door front that looks like it has a beveled frame around it} on the cabinet doors, so there wouldn’t be any gaps/cracks showing where paint got in and could run out. We also caulked a few places on the cabinet frames {the parts still stuck to the wall when the doors were off} where separate cabinets met. Caulking all the nooks and crannies gives the finished product a seamless, polished look.

24 Linda February 22, 2011 at 5:59 PM

Hi! I’m a little late on commenting, but doing some initial research on painting our cabinets white as well. We have a small kitchen in our townhome and think the white will brighten up our little cave of kitchen. I was planning to go to Sherwin Willaims for supplies (my work has a discount there). I love the color that you guys went with. Do you by any chance know the name of the paints you used?

25 housetweaking February 22, 2011 at 10:23 PM
26 Jennet March 1, 2011 at 12:06 AM

Dana,
Help! Husband and I are about to redo our kitchen cabinets so I’ve looked at a million tutorials on painting. I’ve got a little one so durability is definitely important. Everything I’ve read says not to mix oil primer with latex paint, so I just wanted to touch base with you and see why you chose that, how is it working for you, any reason you guys went with what you did? I know you said durability as far as the latex enamel, but I was just maybe hoping you could elaborate on the oil primer use?

27 housetweaking March 1, 2011 at 8:09 AM

Jennet – We did use oil-based primer. It has more of a smell when applying it, but it is much better at providing a base for latex enamel paint. We did a LOT of research about this same issue…latex over oil???…but in the end we found out from reputable sites (YHL, This Old House) and salespersons (Sherwin Williams) that this was the best way to get a long-lasting, durable, wipeable surface on our cabinets. You can use latex enamel paint over an oil-based primer. Just make sure to let the primer cure well (we added on several days to the drying time) before applying the latex enamel. We LOVE the results. Don’t know why we didn’t do it sooner.

28 Andrea March 21, 2011 at 2:21 PM

Beautiful. I am painting two small 13X30 oak cabinets to install UNDER the counter in the kitchen for more storage. For as long as we have lived here, no one has ever used the bar stools and sat there. Just wasted space. One cabinet to each side, open shelving in the middle and just to make it special, new granite countertops to replace the formica and a new one bowl sink and a new faucet with the enclosed spray. New cabinet knobs were found on ebay for a dollar each and free shipping. Can’t beat that.
Your kitchen is gorgeous. You did a great job! Be proud!!!

29 housetweaking March 21, 2011 at 11:18 PM

Andrea – Good luck on your kitchen redesign and send some pics my way after if you’d like!

30 Ann March 23, 2011 at 11:31 AM

Hey! Your kitchen turned out AMAZING! My hubby and I just bought a new house and we are hoping to paint the cabinets white and hopefully they turn out half as gorgeous as yours did! I have one question though, did you paint the insides of your cabinets too or just the exterior? Thanks!

31 housetweaking March 23, 2011 at 3:22 PM

Ann – We painted the backs of all the doors but did not paint the insides of the cabinets {except for the one glass-front}. We’re the only ones who see them, so we couldn’t justify all the extra work. Or maybe we didn’t want to justify the extra work ;)

32 Nicole May 4, 2011 at 12:35 PM

Looks great! We are hoping to start our project soon. It’s amazing how the quotes range from $750 to $2800! Now I just have to decide the color white and the color of hardware. We have exposed hinges so I am a little concerned with dark hardware. Would love anyone’s insight.

What color white paint did you use?

33 housetweaking May 4, 2011 at 2:17 PM

Nicole – We used Sherwin Williams Greek Villa. It’s a nice clean white but not too stark or sterile.

34 Rebecca May 19, 2011 at 2:02 PM

Hi Dana,
Your cabinets turned out gorgeous! I found your blog while searching for tips on painting oak cabinets white – thanks for being so descriptive about your process. I’m trying to get up the courage to do this in our house, but everyone I bring it up to thinks I’m crazy! (Why do people think oak is so great?!) Our house is only 5 yrs old, but the previous owners must have been living in the 80s because they look so DATED! And they didn’t stop at the kitchen cabinets – they chose the same yellowish orange oak for all the trim, stair rails, closet/room doors, bathroom vanities, etc – it is literally everywhere!
Just a couple questions for you – when you say you deglossed and sanded – did you use a deglossing product and then sand, or did you just degloss them using a sanding block? Also, I noticed the trim in your house is white – did you paint the trim too or was that already white? Thanks! ~Rebecca

35 housetweaking May 19, 2011 at 5:57 PM

Rebecca – We used TSP deglosser to degloss the cabinets, then sanded them. It did have a smell to it, so just be aware of that and open windows/run fans. The trim in our home was already white when we bought it. But our kitchen cabinets, railing, and vanities were/are oak. I painted one of the bathroom vanities too and love it. Good luck!

36 Ki June 2, 2011 at 4:53 PM

“We had every inclination to just prime and paint them by hand but knew it would be a loooong time before we were able to complete that task… it was January in Ohio… we didn’t want to paint them indoors…plus we have two kiddos that take up most of our time…not to mention jobs. Then we found DJ. DJ was hard up for some work, had a decent portfolio and wanted $280 total to caulk, prime and paint all the doors and drawer fronts. Yippee! And he did it in 5 days. (DJ will definitely be considered for more time-consuming painting projects in our home!)”

Hello!

New to your website. my hubby and I dont have a lot of money but are talking about painting our kitchen cabinets the same as you did. Ours are real oak, and grainey, not very good looking =) I was wondering If I did everything like you did, then sanded the doors too, where can I find a guy like DJ in california! lol I am painting my doors in my house white too, and its very hard not to get the paint brush to leave streak marks, and Im worried if I take on the kitchen will I leave streak marks, and I feel like they will turn out ugly then I will have to pay out of pocket to have them professionally done lol! Did DJ hand paint or use a sprayer? and was DJ a handyman? My hubby and I can do anything and everything, but when it comes to painting cabinets, and doors we are not so good at that!

and what does chaulk mean? =)

Thank you in advance!

37 housetweaking June 2, 2011 at 10:03 PM

Ki – DJ used a small foam roller and a small brush to complete the job by hand {as did we for the cabinet frames}. We found him on Craigslist and he was able to produce references and pictures of previous paint jobs. It turned out great!

38 angie June 10, 2011 at 1:42 PM

What were your drying times for the primer (2-3 days?) and for each coat of paint. We are in the process of priming right now and when all is finished we need to finish a wall tear-down so we are wondering how many days until we can resume that project to keep from having dust on our new cabinets (not to mention, cook a real meal). Thanks.

39 housetweaking June 10, 2011 at 10:49 PM

Angie – It took us the course of a few weeks to get the cabinets completely primed and painted. That’s just because we did it between working, kids napping/sleeping and other everyday life stuff. We had planned on doubling all the recommended dry times to get a solid paint job but it ended up being even longer than that! I’d suggest going longer for your drying times. I know the waiting and inconvenience is hard but it’s well worth the wait. Our painted cabinets have held up so well to our two kids and messy food preparation.

40 Alysia D. July 7, 2011 at 10:09 AM

Hi! I am in the process of painting my oak cabinets right now – started last weekend over the long 4th of July holiday. The sanding was a pain but I am sure the end result will totally be worth the work and mess. I have referenced your info a few times just to look at the pics etc. (looks great!). I have a question please – I have already applied two coats of primer (oil based), and sanded in between each. I am now ready to paint (latex paint – Valspar – “Betsy’s Linen”). Do I need to sand in between each coat of paint also? I will be brushing the small detail areas and rolling all flat surfaces. What do you think? Necessary to sand in between the paint coats also?

41 housetweaking July 9, 2011 at 7:14 AM

Alysia – We very lightly sanded between coats of paint…although by the third coat, I think we skipped it. The key is to very lightly sand it..just scuff it up a little…don’t press so hard that you remove all that hard work! Good luck!

42 Alysia D. July 9, 2011 at 12:51 PM

Thanks for the tip! I am in priming and sanding purgatory on the doors now (the cabinet boxes have their first coat of color and I am getting excited)!

43 Mollie July 14, 2011 at 10:44 PM

Hi, thanks for all the guidance! I am just about to start on my ugly oak cabinets too and am trying to read as much as I can about others’ experiences before I start. I realize you did this project over a year ago, but do you remember how you/your painter laid out the doors and drawer fronts to paint and dry? Is there a good way to make sure all surfaces end up smooth? I’ve seen people somehow hang their doors and drawers to dry, but I’m not sure how to do that.

Also, I really want to get started but I am driving myself crazy over what color white to use. We have a light beigy-grey on the walls, and cherry-colored wood laminate floors. I painted the baseboards a couple years ago with Behr Ultra White (because there were too many white options and I was fed up so I went with their base) and my intention is to paint all of the door frames and doors as well (they’re very off-white compared to the Ultra White). Do I need to match my cabinets to the trim? I didn’t even think about it at first, but now I’m afraid it will look weird if it doesn’t match. I like the Ultra White, but on my baseboards it’s in small doses. I’m afraid it will look too stark if I use it on all the cabinets. I guess what it boils down to is, is it okay for the baseboards and cabinets to be different shades of white? Thanks for your help!

44 housetweaking July 15, 2011 at 2:59 PM

Mollie – The painter that we hired to paint the drawers and doors had space in his own home to lay them out…he did not hang them. Handy Hubby prepped all the doors/drawers himself at our home in the garage, in the winter, and used saw horse tables. He just laid plywood remnants across the 4 saw horses he owns to make the ‘tables.’ As for what color to paint your cabinets, we did NOT match our cabinets to our already white trim/baseboards. We went with Sherwin-Williams Greek Villa which is a little warmer not-so-bright-white-in-your-face white that still comes across as white. So, yes, in my opinion it is quite alright for baseboards and cabinets to be different shades of white!

45 cindy August 3, 2011 at 10:08 PM

Hi, I also bought Sherwin-Williams oil based primer to start. I asked the salesperson if I should sand my oak cabinets beforehand and she said the primer will do the job. I also asked about sanding between painting and she thought I was crazy. I want to get this right. Do you think it was necessary to sand down your cabinets before starting. I was thinking about cleaning with a TSP substitute and then lightly sanding and then priming. I also got their newish Waterbased Acrylic-Alkyd to get durability while using latex. I hope it looks good. I bought a bunch of stuff since they had a 40% crazy sale but have never used SW before! I’m a bit overwhelmed at the thought of painting the inner door and then outside and frame!

46 housetweaking August 4, 2011 at 7:31 AM

Cindy – We cleaned with TSP, lightly sanded then primed before painting. We just wanted to be sure we had a surface that was ready {i.e. clean and not glossy} for accepting paint. We VERY lightly sanded between coats then wiped clean before applying the next coat. I don’t know that all of that is absolutely necessary but our cabinet paint job has held up extremely well.

47 ann August 13, 2011 at 11:34 AM

what length were are Lansa Handles? Thanks!

48 housetweaking August 15, 2011 at 5:15 PM
49 layla August 26, 2011 at 8:47 PM

Your kitchen looks so nice! What color Sherwin Williams paint did you use on them. I am looking for a white that is soft and not blinding.

50 housetweaking August 27, 2011 at 3:04 PM

Layla – It’s Sherwin-Williams Greek Villa. A great clean white without being too sterile.

Leave a Comment

Spam Protection by WP-SpamFree

Previous post:

Next post: