...because home doesn't happen overnight.
If you’ve been following my blog, you may remember this post where I described my frustration in getting my kids to hang up their hand towel in the powder room.

I thought I had found the perfect solution in a $3 adhesive hook that I got at Lowe’s.

To my dismay, the result wasn’t perfect.

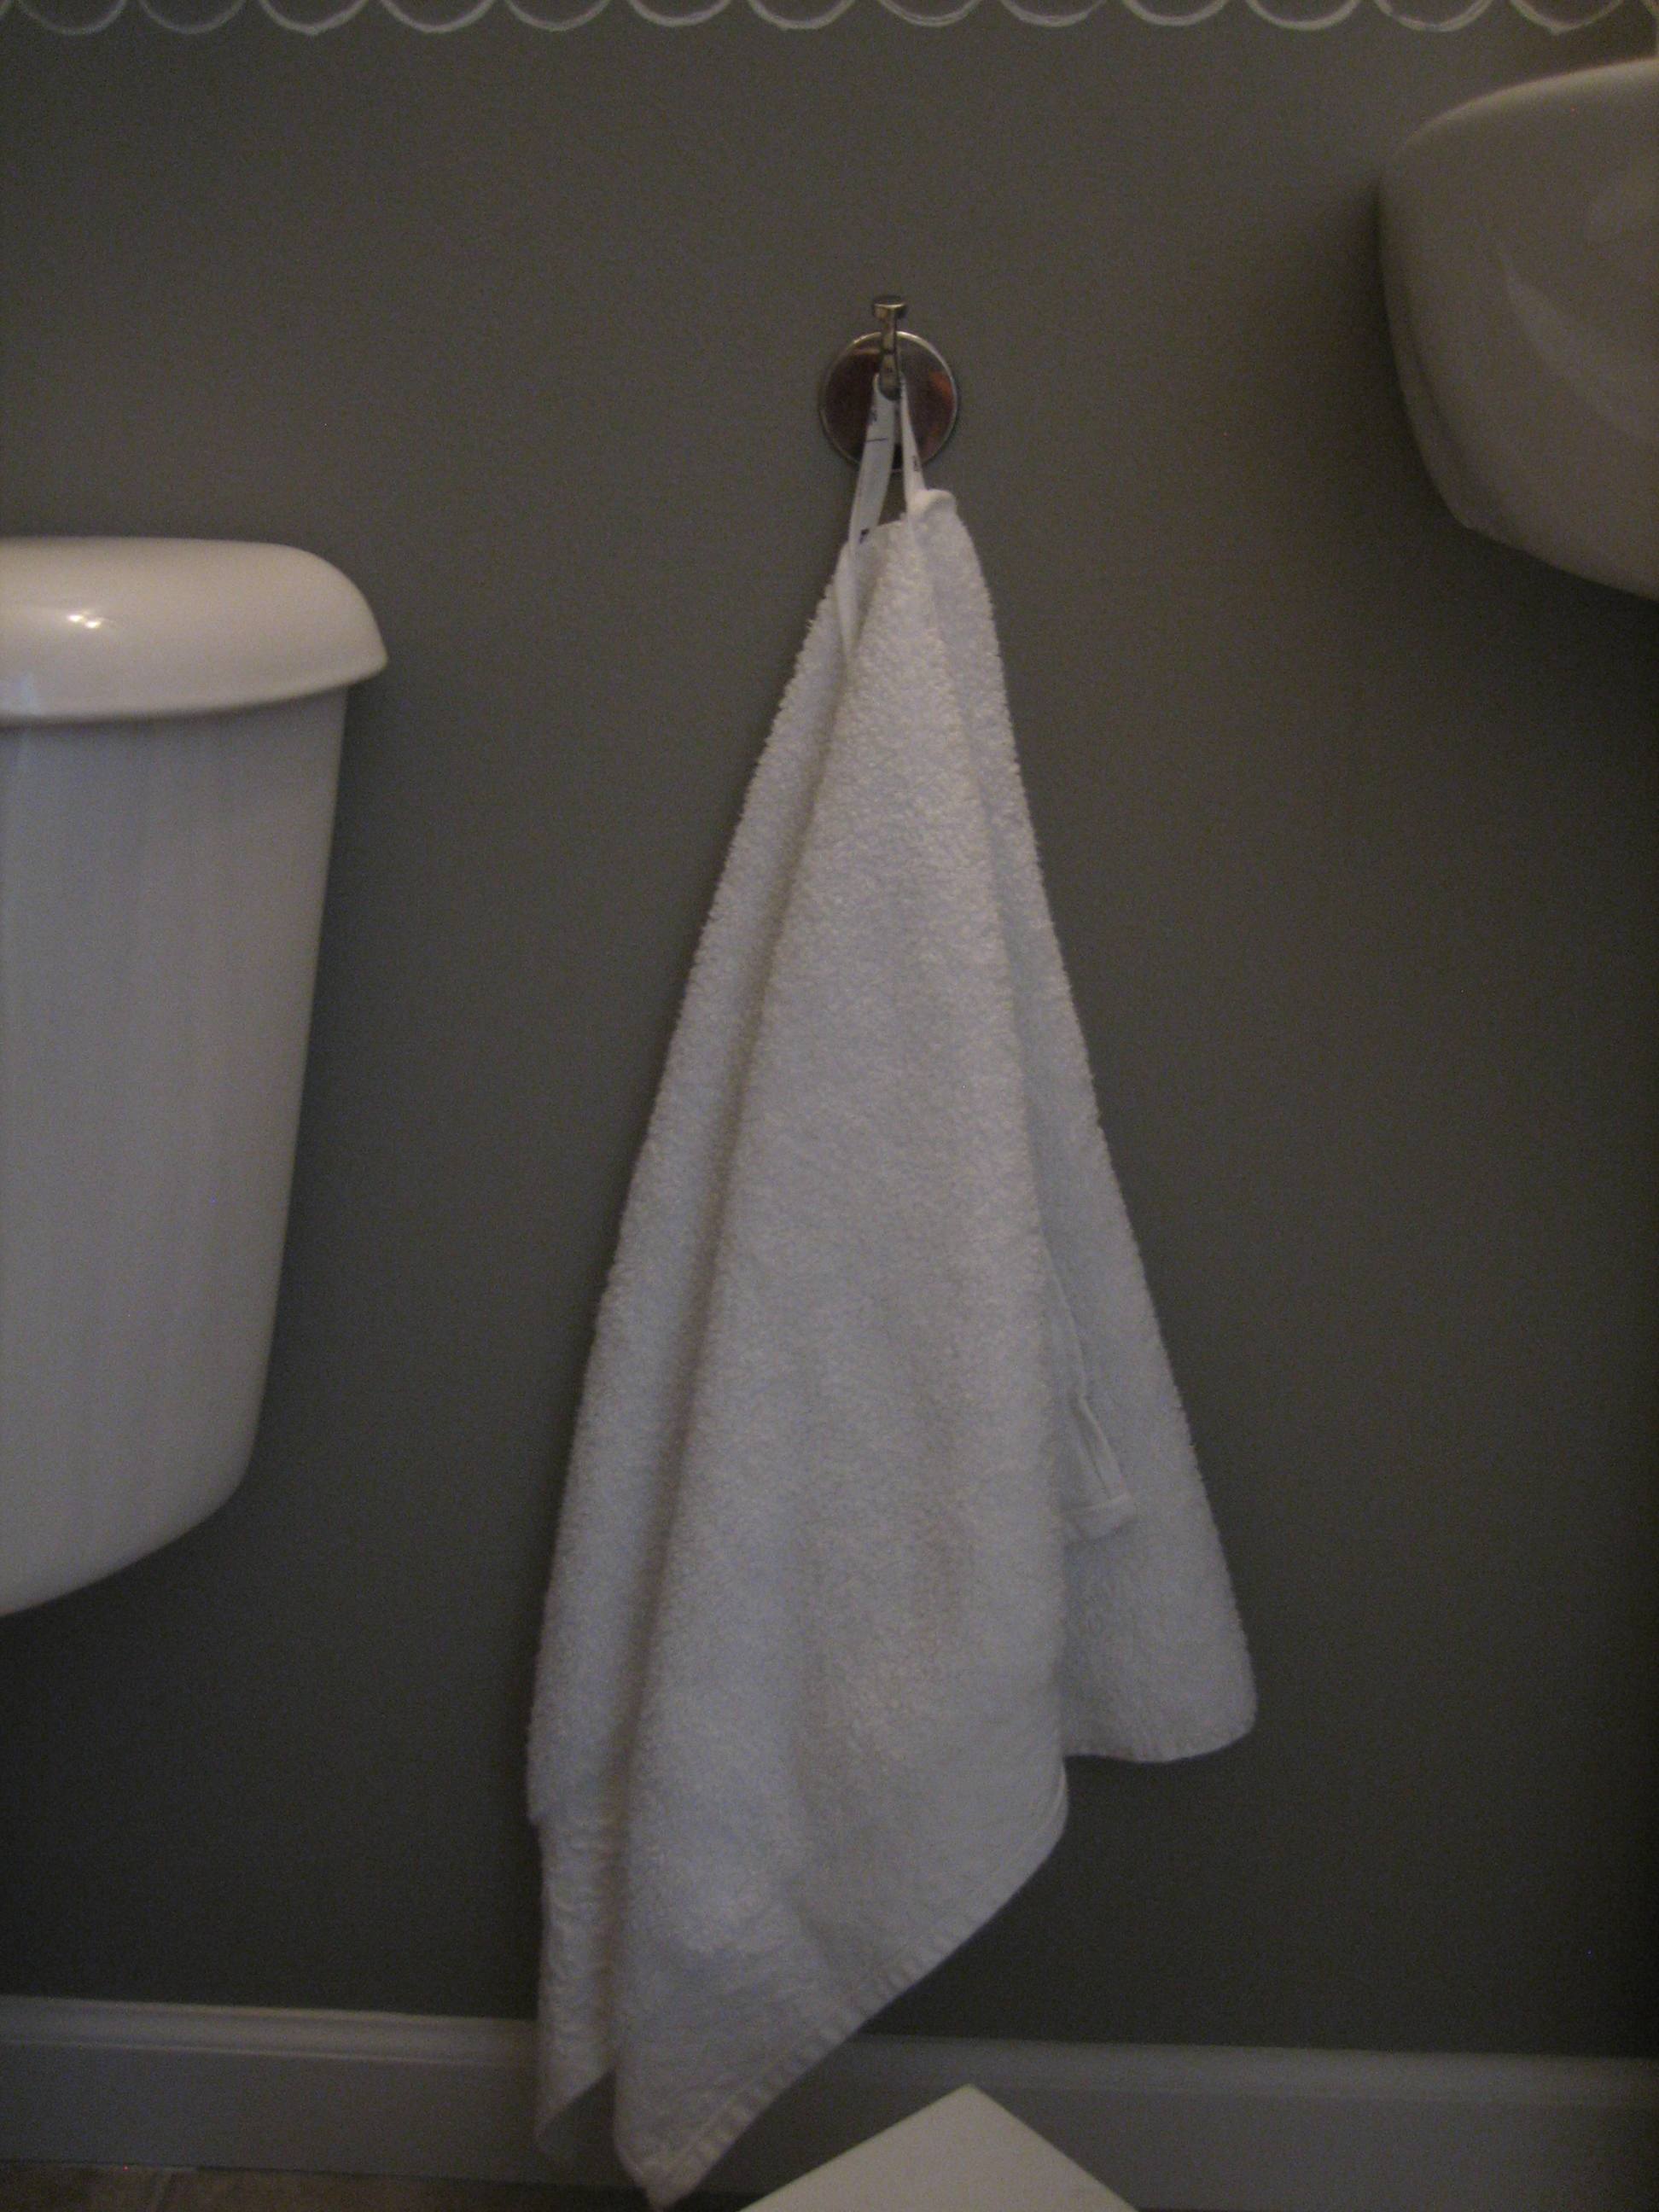
Layne complained that it was difficult for him to get the towel to hang on the hook. Sometimes he would attempt to hang it up but it would fall down shortly after. In desperation, I turned to IKEA. Which is where I usually turn when I’m feeling desperate.

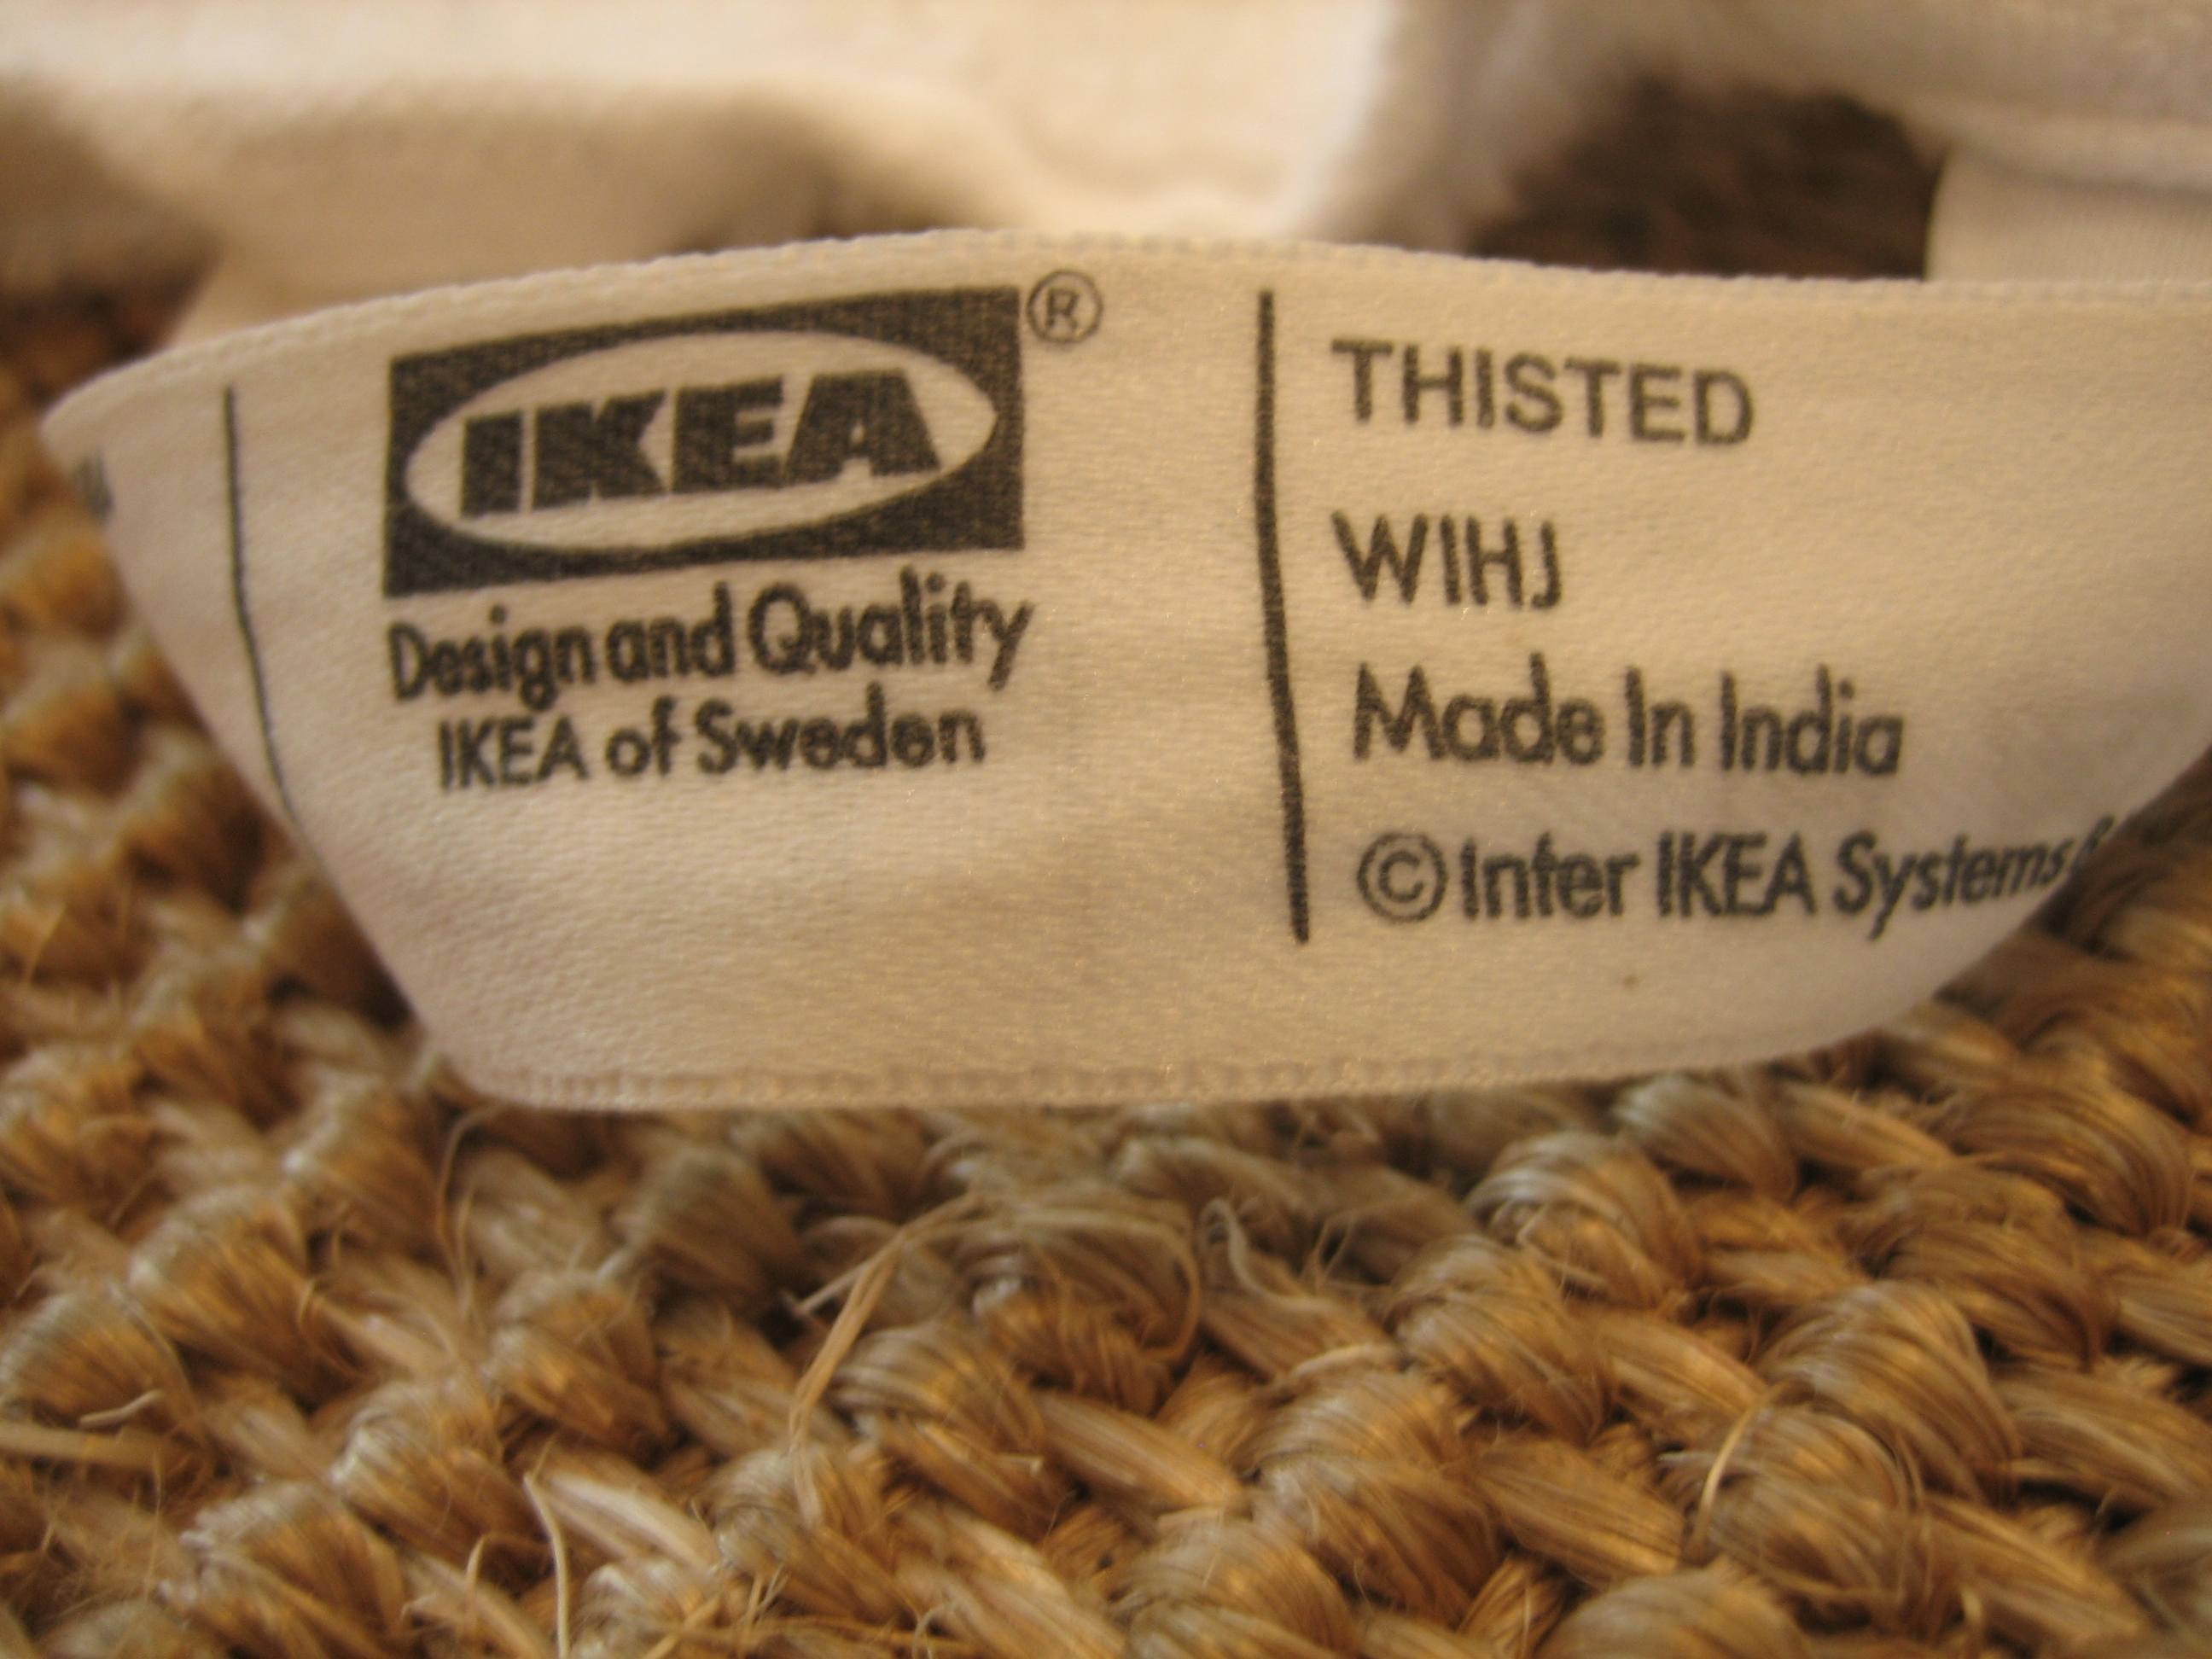
You see, IKEA has hand towels with tags that double as loops for hanging.

The IKEA THISTED hand towel (at $6.99 a pop) makes it a cinch for my lil’ guys to hang ‘em up.

It’s not a fluke. They’ve been doing it for over a month now! (I might be a little more excited than I should be.) And the quality of these towels is icing on the cake. They are oversized, beefy and absorbent…all things a towel should be. So glad I purchased 2 – one is in use and the other is ready and waiting for the first to get dirty.

If you’ve got kids that can’t reach your towel rings (or even stubborn husbands that are oblivious to the act of towel hanging)…then you’ve got soggy towels. If you’ve got soggy towels, slap on an adhesive hook at kid (or hubby) level, grab a few IKEA THISTED hand towels and watch the hanging begin.

I love a killer deal. Gently used clothing from the Salvation Army? Yes, please. Secondhand toys from neighborhood garage sales? Yes, please. Furniture left on the side of the road in need of a little TLC? Yes, please. Pretty much nothing is below me when it comes to finding a great price. I’m not afraid of dingy little outlet stores with questionable bathrooms and leaky roofs. (I just make sure to empty the tank before I get there!) Every few months or so, I’ll peruse nearby Goodwill stores just to see what they have. Most times I leave empty-handed but on a recent trip I came out with some housewares. Score!

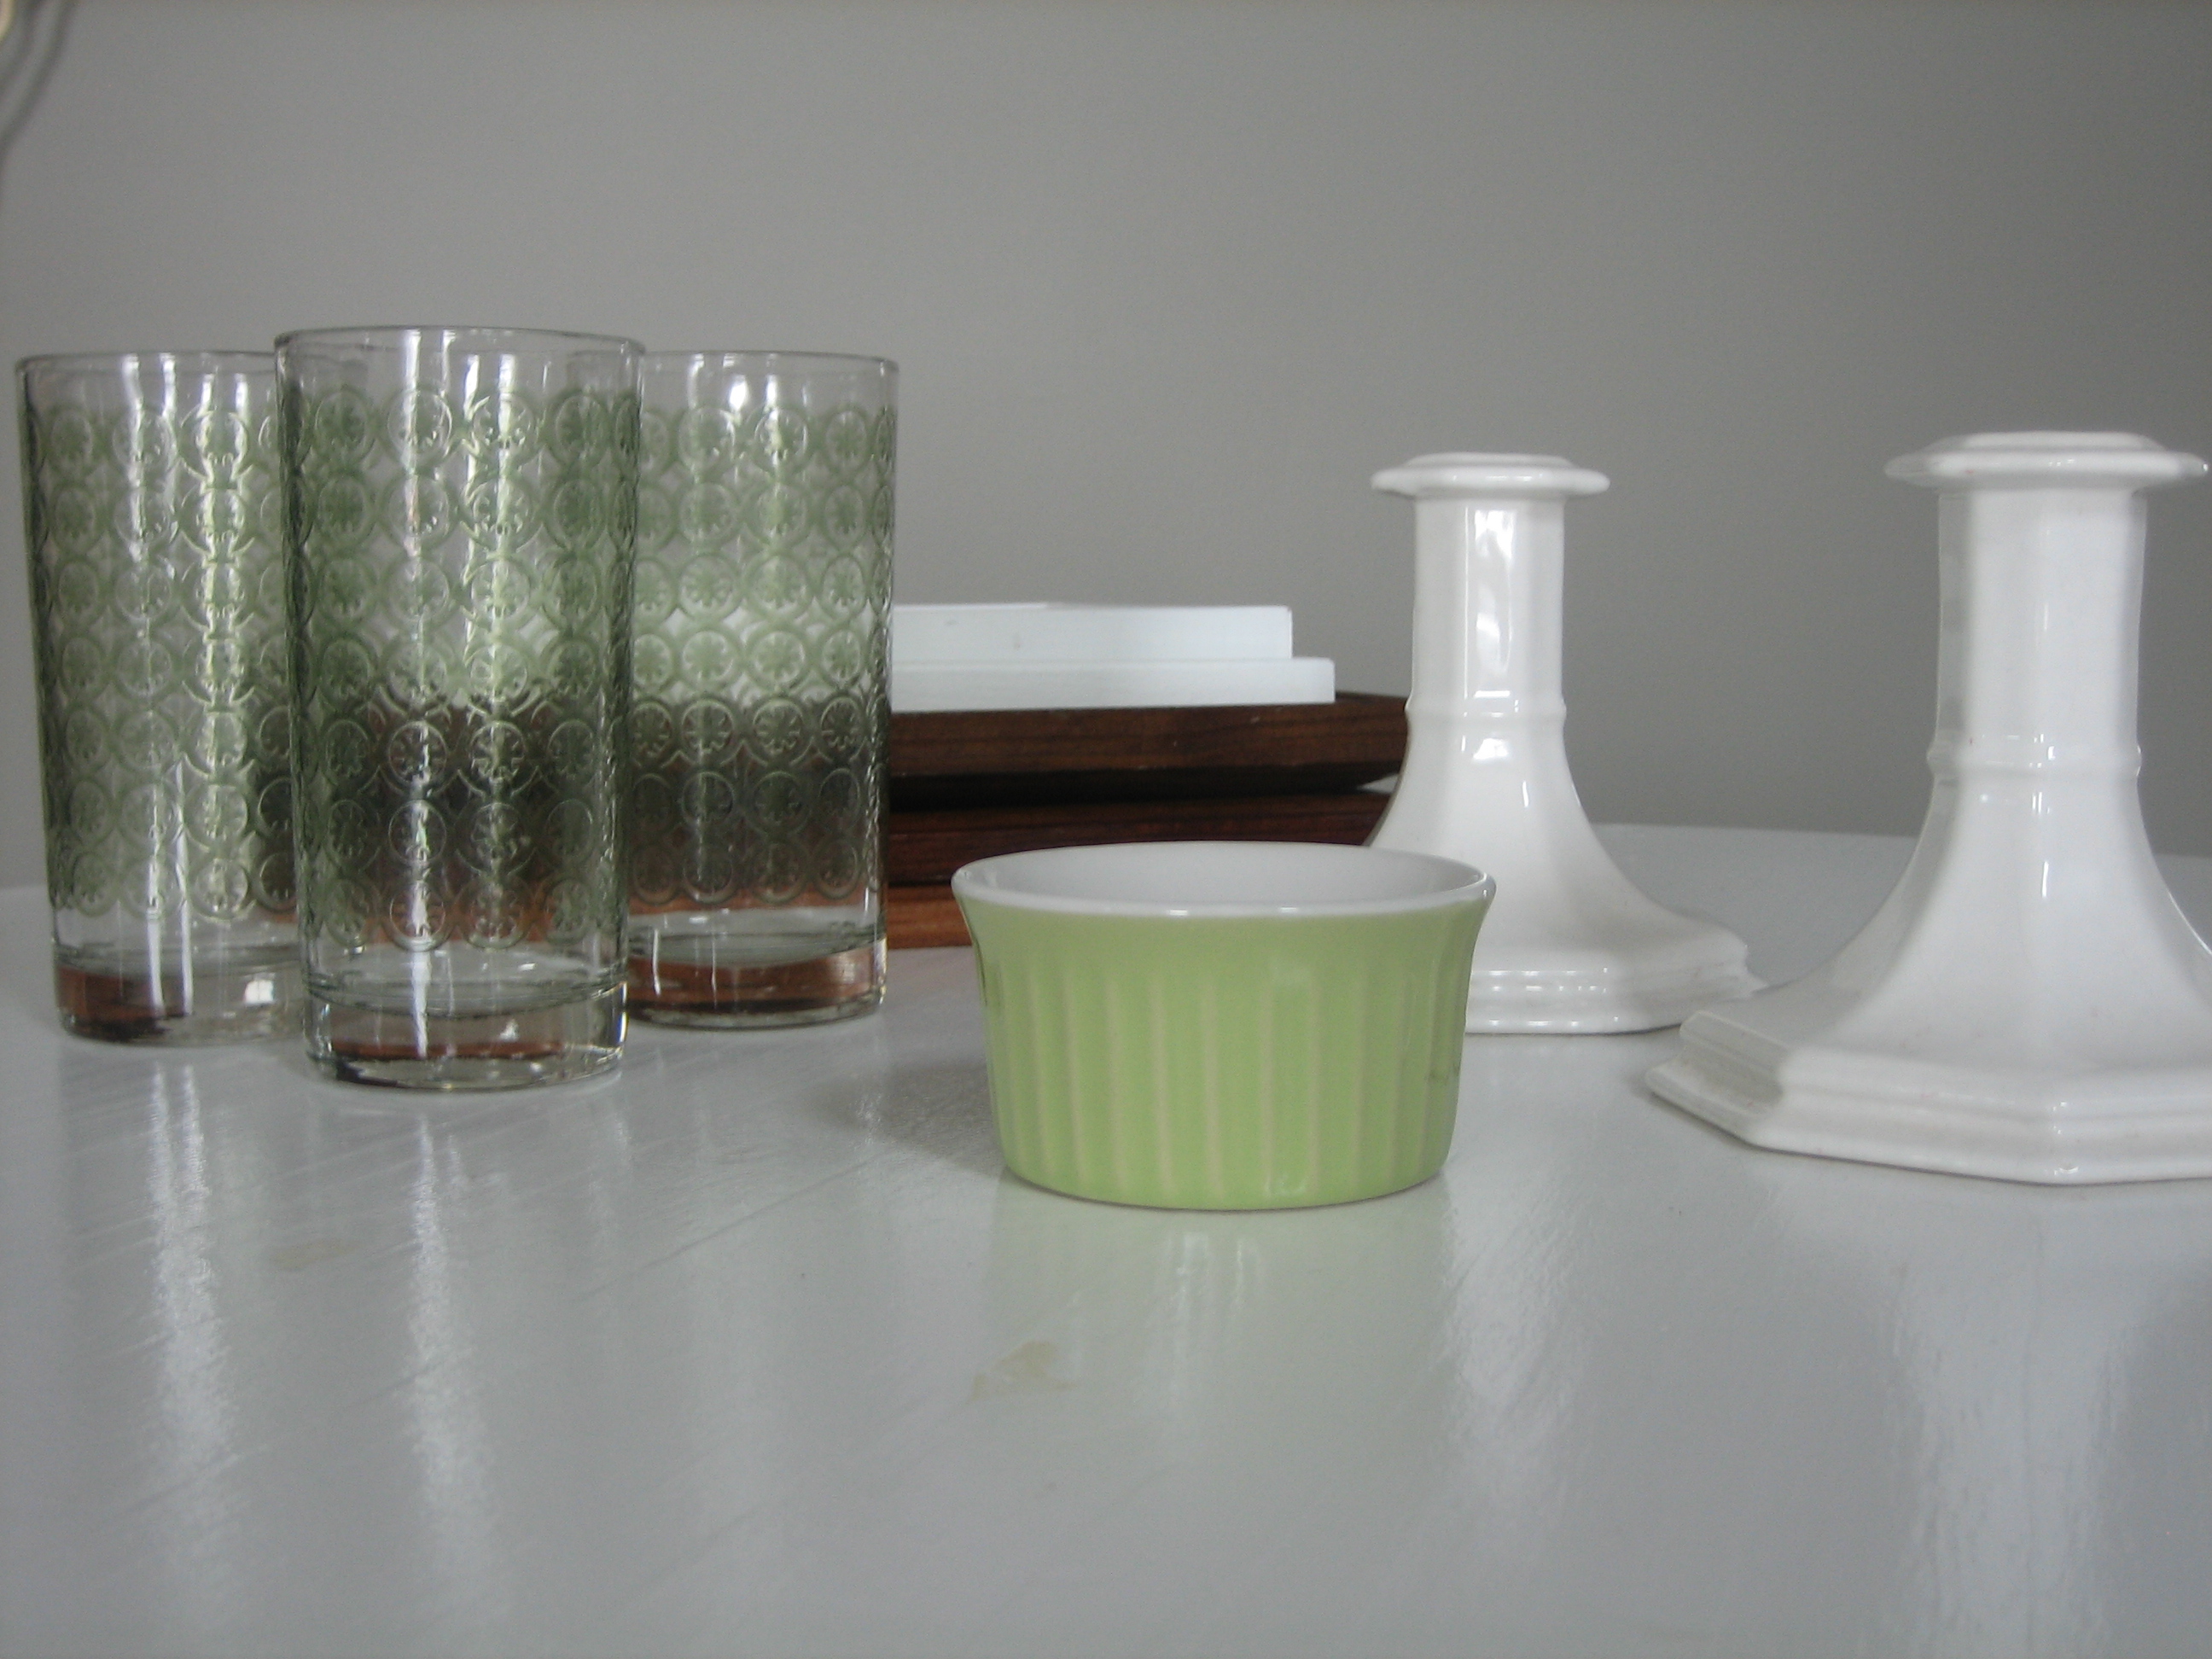
I walked out of Goodwill with 5 picture frames, 3 drinking glasses, 1 ceramic dish and 2 matching candleholders (and a partridge in a pear tree)…for a total of $19. Yippee! You woulda thought I’d won the lottery by the look on my face.

The 5 picture frames are real solid wood. They aren’t much to look at now but they’ll come in handy for the future family photo wall. Stay tuned for that…

This set of drinking glasses made me squeal. They’re a good size (not too small, not too large) and have some weight to them. I can see my boys and me sipping ice cold lemonade out of these in the summer. Summer does still exist, doesn’t it?

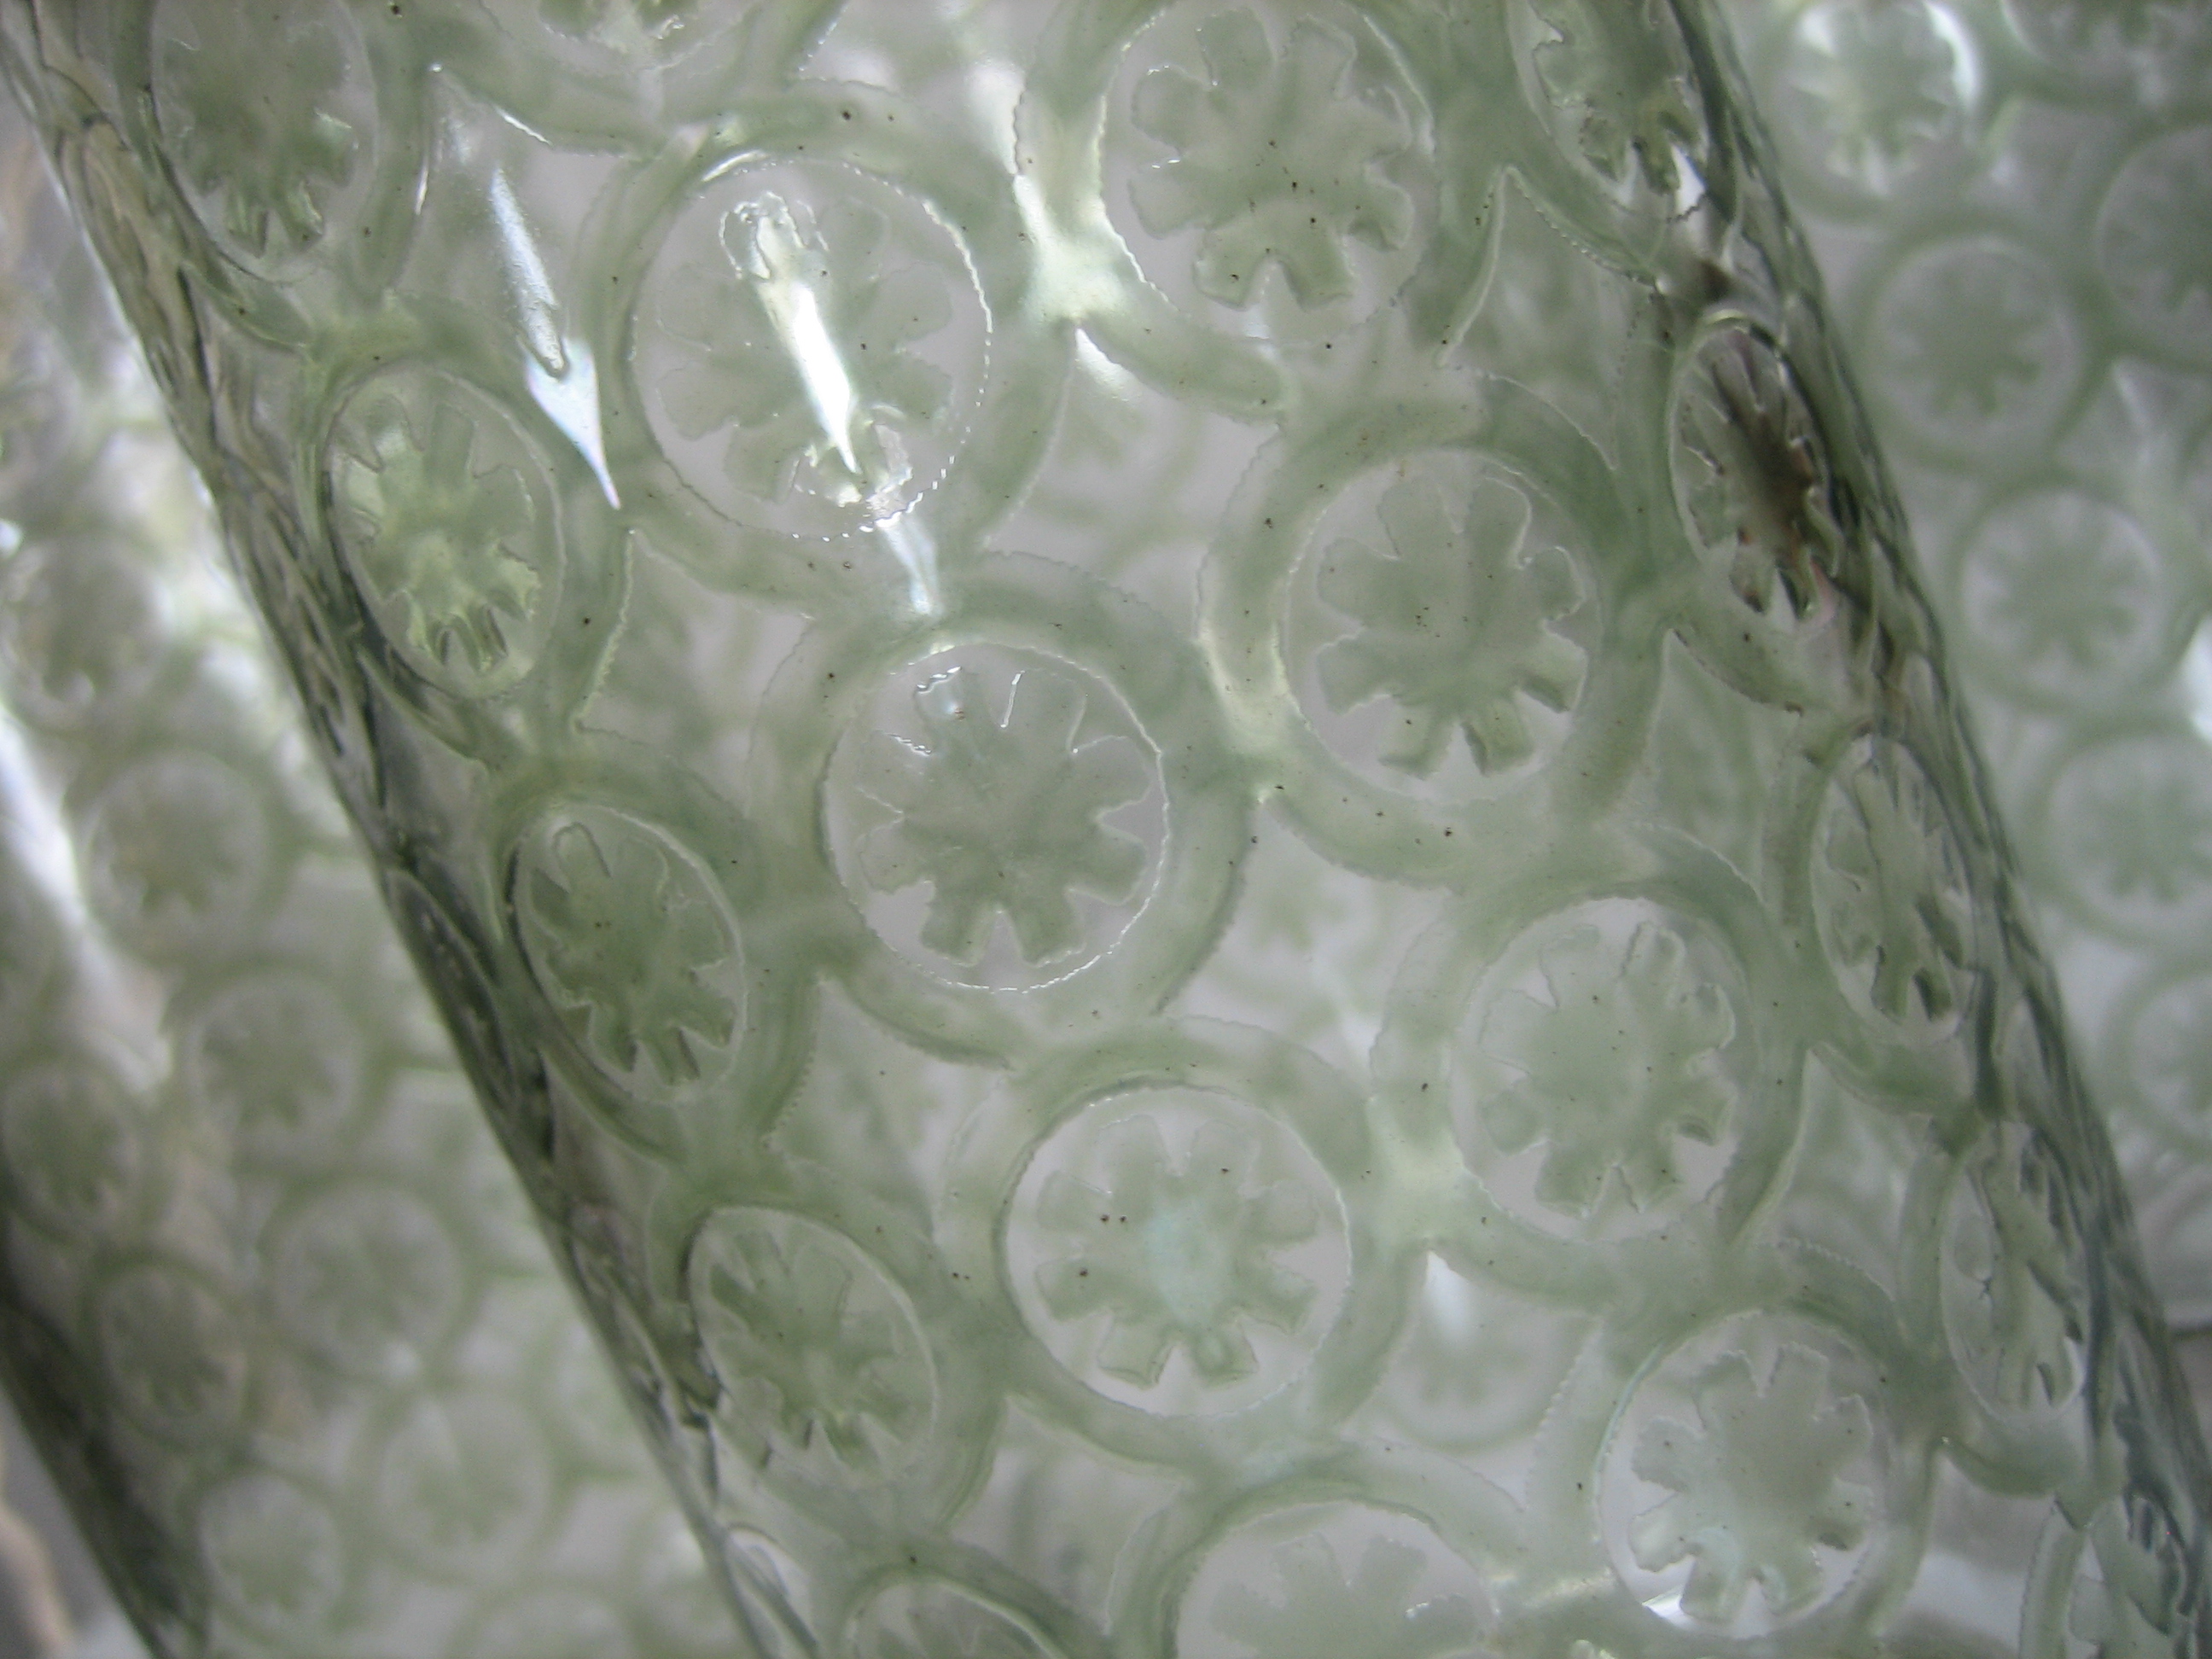
My favorite part is the raised green sunbursts. Aren’t they sweet? They provide great texture and subtle color at the same time.

I couldn’t pass up this small green dish. I have 2 white ones already. They’re perfect for dipping sauces, kids’ snacks or food prep. I kind of feel like Rachael Ray when I chop and measure out all my ingredients in these little guys before dumping them into whatever dish I’m making.

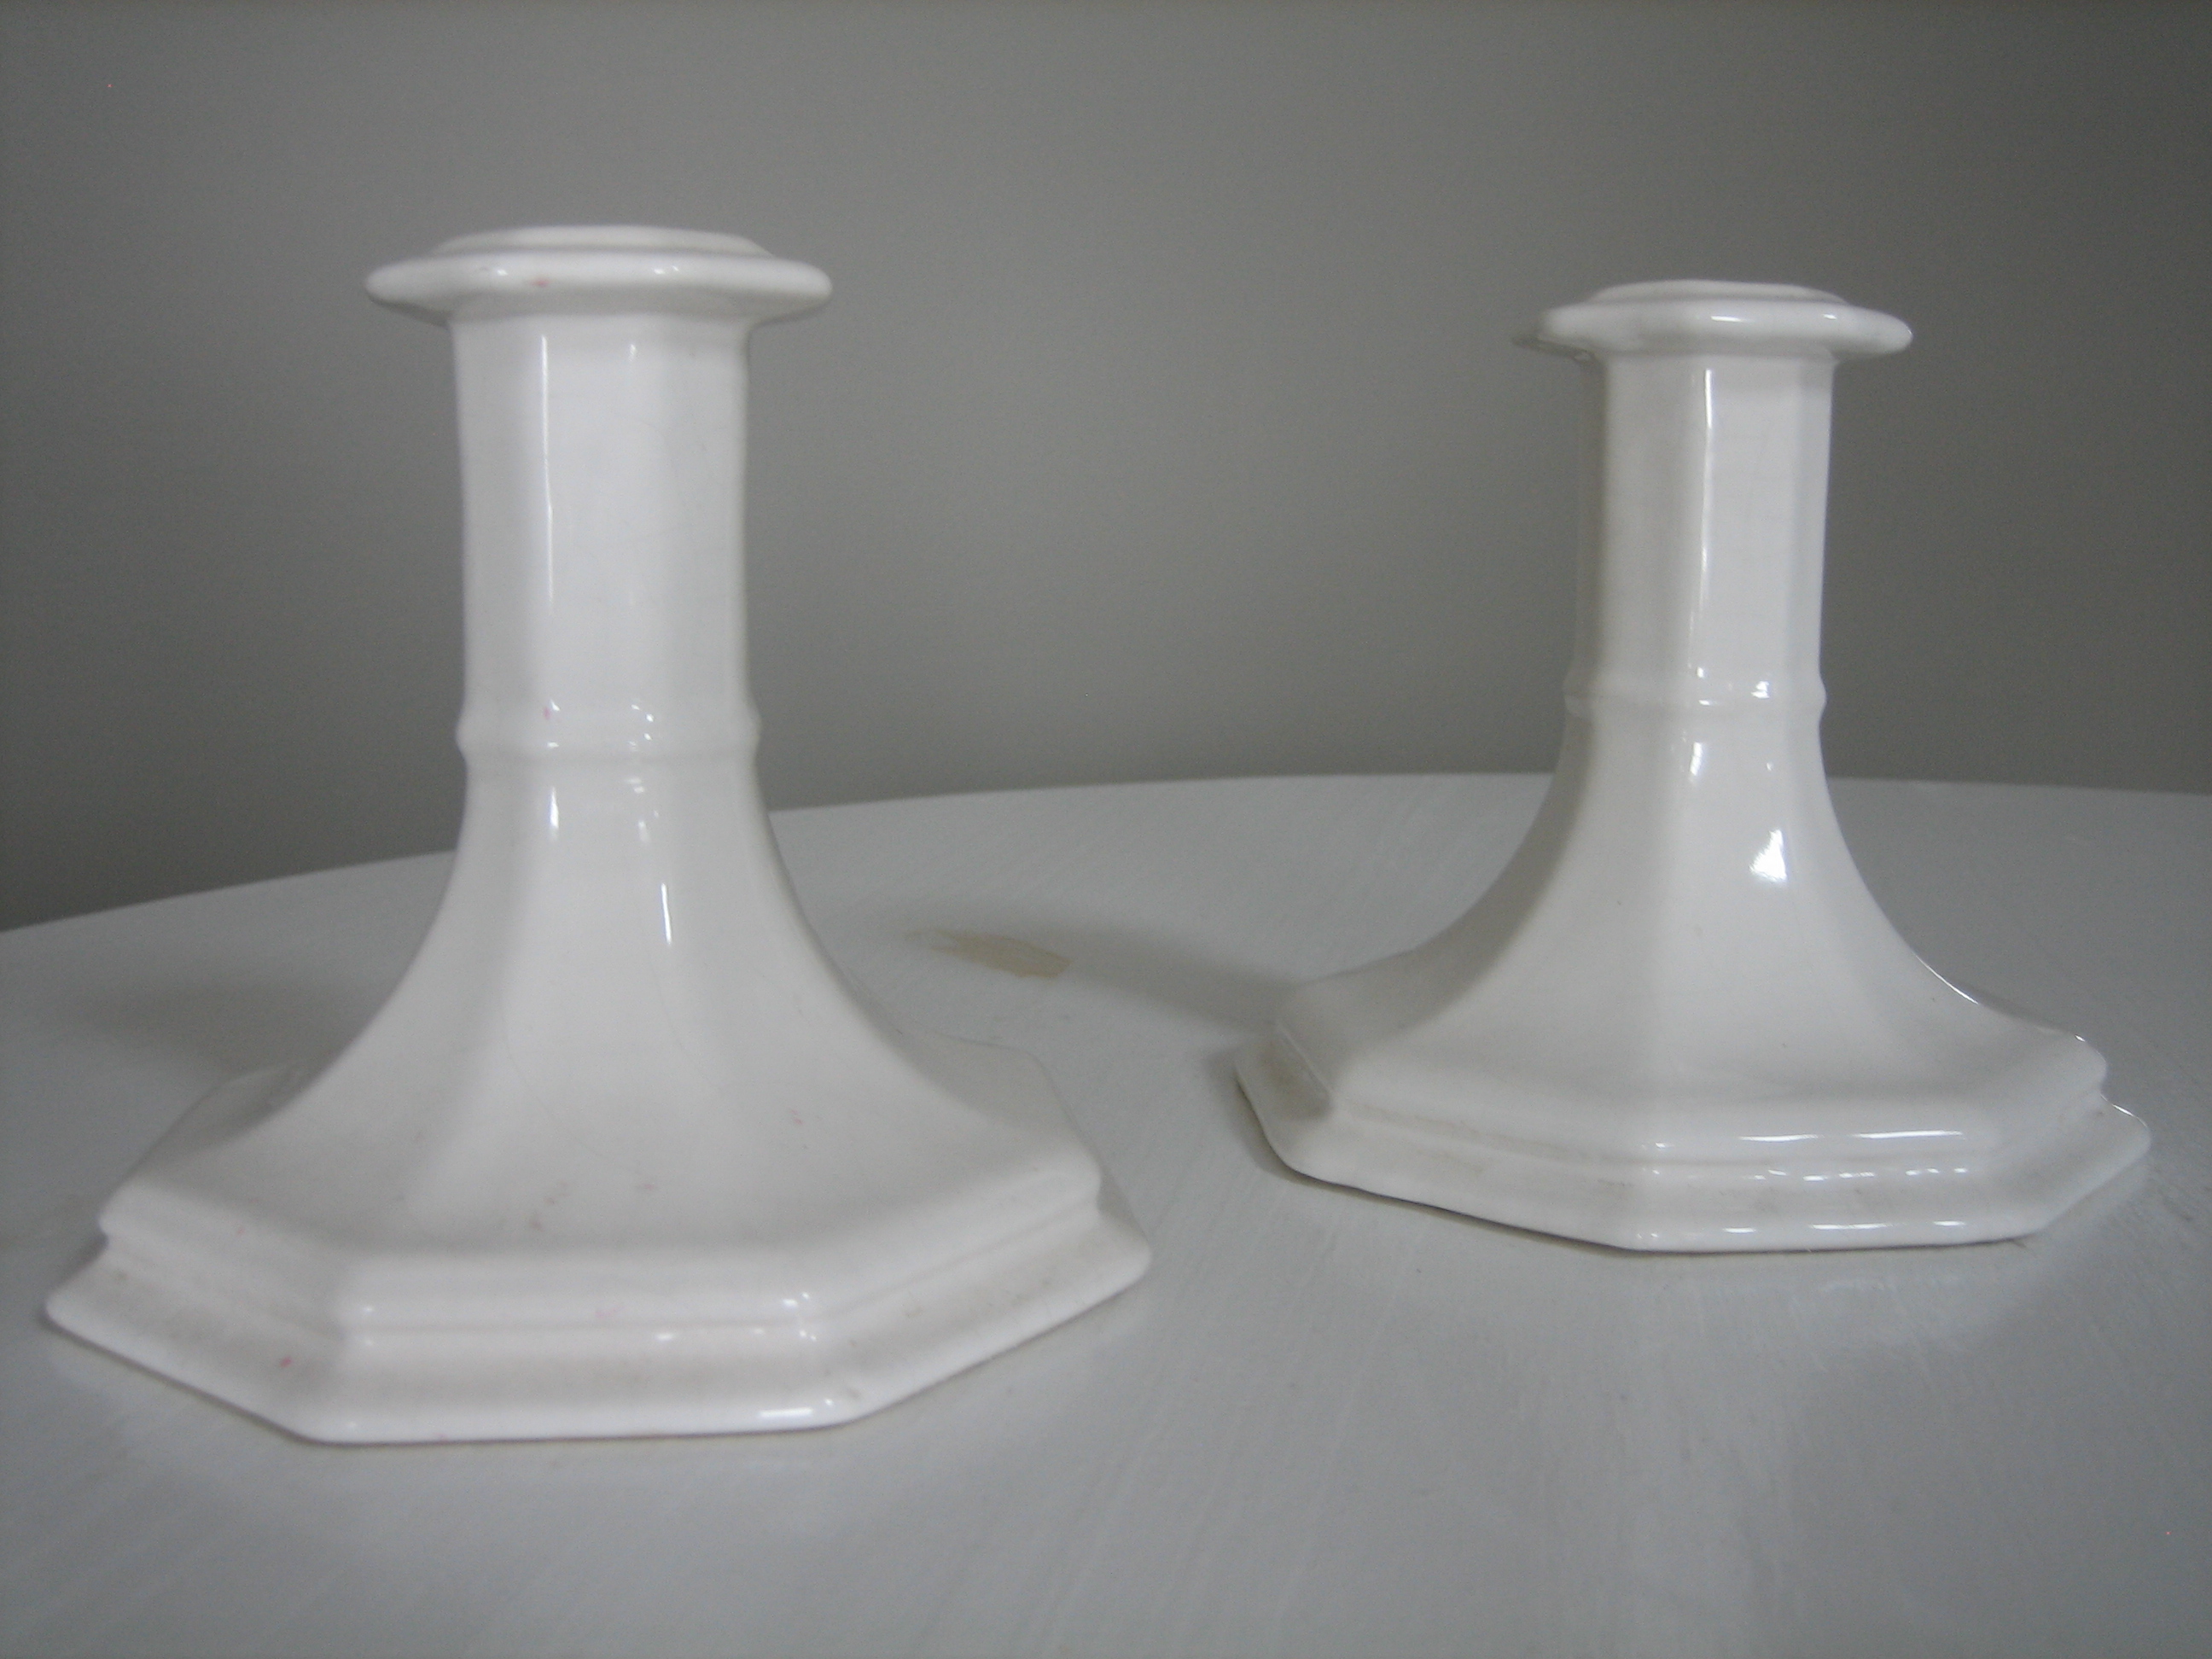
And last but not least, I found a pair of matching candlesticks. Yep, a PAIR. It’s truly a miracle when you find a pair of matching anything at Goodwill. I actually saw one first and marveled over its shiny whiteness but was disappointed when I couldn’t think of anything to do with one lone candleholder. But, lo and behold, I turned down the next aisle and spotted its twin! It was nothing short of divine intervention.
So, there you have it…the fruits of my Goodwill shopping spree. And it cost me less than $20. Goodwill and other resale/secondhand stores are great places to score on affordable glassware: dishes, vases and decorative accents. You may have to search through junk to find worthy pieces but the hunt is quite fun!

That title has more to do with how I’m feeling today than the content of this post. (I’m running a little ragged.) Still, the phrase “I think I can, I think I can” conjures up visions of The Little Engine That Could. And The Little Engine That Could was a train. And kids like trains. And I have kids. And my kids need a train table for the trains they like. There. You got it. This post is about a train table. Whew. I’m spent.

Okay, moving on. Right before we moved to Ohio, we were offered a used train table by our dear friends (that we miss!), the Streitmatters. We paid $15 for it. Layne was in heaven and we were grateful for scooping up such a great deal. It was very similar to the train table pictured below except that it was white instead of wood tone and included 4 plastic bins for storage underneath. Also, the landscaping on the top wasn’t as realistic as the one shown below. Besides the white frame, everything else was primary colored…red, green, blue, yellow. (Wait, aren’t there only 3 primary colors?! I told you I was spent.)

Sadly, I don’t have a true ‘before’ picture of our train table. (That was waaaay before I even knew what a blog was.) But, hopefully, you have a good idea of what it looked like. Pretty kid-ish. I’m not knockin’ the train table. I just knew I could make it fit into our decor a little better because, remember, I like to tweak. So, I got to thinking that I could probably paint over all the stuff I didn’t like and my kids would still play on it. I hunted down this image of a painted train table online for inspiration.

Taking cues from the inspiration table, I decided to go with an aqua-celery-khaki-taupe color scheme. I had sample-sized paint cans (the sample sizes are great for little projects like these) from Lowe’s mixed accordingly and bought khaki-colored spray paint. First, I primed the tabletop. After the primer was dry, I sketched out a rough drawing of my new landscape right on the primer with a pencil. I labeled each area with either an “a” for aqua, “g” for light green, “G” for dark green, “k” for khaki and “t” for taupe to determine my color layout. It was my take on paint-by-numbers. It let me keep track of where each color should go. Then I simply hand painted each area with its corresponding paint color. In order for it to withstand the beatings of my 2 lil’ boys, I finished it off with 2 hefty coats of polyurethane. I used the khaki spray paint to update the plastic storage bins under the table. *When spray painting plastic, you must make sure to use spray paint that specifically adheres to plastic.* Here’s the more serene train table hanging out in our guest/play/craft room (i.e. the ‘everything’ room).


As non-kidlike as it looks, I assure you that my boys play on it just as much as before it was painted. In fact, I even added a dock for them to have somewhere to play with their boats. Guests can stay in the room without feeling like they’re spending the night at Toys ‘R Us. It’s a win-win situation.

After I gifted these heartfelt frames to Handy Hubby on Valentine’s Day, he immediately posed the obvious question, “Where are we gonna hang them?”

Good question, Handy Hubby. We don’t exactly have a place that we show off our family snapshots except in photo albums. Nothing right there out-in-the-open. Possibly because we are both clutter freaks and the idea of propping up little frames on every horizontal surface makes us quiver. However, I have been wanting to work on a family photo wall for a while…now I have an excuse to do so. See how this works, ladies?! Just get your man interested in a few momentos and then you have full reign of an entire wall! No, really, that wasn’t my plan at all when I assembled and gifted those family heirlooms to Handy Hubby. We had both been wanting to display family pictures but hadn’t talked about or acted on it yet. The V-Day gift sparked a fire. Since then we have designated this narrow, tall, obsolete wall as our future family wall.

This wall resides in our main open living area between the family room and dining area. It’s only purpose (besides structural) is to house our thermostat, a switchplate and an outlet. This wall is the perfect candidate for the family photo wall because 1) it’s not a focal point 2) the pictures may actually help disguise the electrical uglies 3) there’d be plenty of room to linger and take in all the pics 4) there’s not much else you could do with it. The door to the right leads to the unfinished basement and opens up onto the narrow wallspace. So, we couldn’t put anything on the floor…only on the wall. A family picture wall is the perfect concept!
Here are some inspiration photo walls that have lured me in…

I love that the frame materials used in this one are different but they still ‘go’ together.

This entire room is outfitted in pictures but it still looks clean and notice the subtle pops of yellow and blue.

This landing could be an art gallery! I like the way the arrangement follows the lines of the wall and stair railing.

All the different sized rectangular frames form one big rectangle on the wall.

In an otherwise empty space, these photos take center stage.

This Mom made art in a narrow stairwell! Lovin’ the painted wall with words as a backdrop.

The black and white photos pop out from this pea green wall.

I like the idea of mixing kids’ artwork with photos for a playful arrangement.

I’m totally diggin’ the white frames against the gray wall. (Not to mention the old floors. Sigh.)
There you have it. My next, newest project in the works. A family photo wall. I’m pretty sure going through all of our old photos isn’t going to help the “having-a-third-kid-would-be-crazy” point that Handy Hubby and I try to remind ourselves of each day when we stumble upon the thought of having #3. Maybe if I fill the wall full enough we won’t have room for more photos and that would be reason enough not to have a third, right?!

Just a friendly reminder that you can enter to win the HGTV Dream Home 2010 up until 5:00PM today. Although I’m not sure if that’s Eastern time or what? I know it’s a looooong shot, but I’m entering anyway. Keeping my fingers crossed…

No, that’s not my hand. And, yes, that hand has some extra digits.

Last week my older son, Layne, turned 5. (This is me taking a deep breath.) Am I really old enough to have a 5-year-old?! Um, yes, I am. Get it together, Dana. At any rate, it didn’t take long for Layne to decide that he wanted a ‘solar system party’. Ever since we got him a book about outer space for Christmas, he’s been rattling off random solar system facts left and right. The kid doesn’t forget anything. So began my quest for space party decor.
I knew I wanted things that we could reuse either in the kids’ bedrooms or for other parties in the future. I knew I wanted the sunroom to serve as Mission Control (i.e. party central). I searched the web for some inspiration and quickly found this inflatable solar system. At $34, it wasn’t exactly cheap but I figured we could recycle it as pool toys, kids’ bedroom decor or even a future school science project. I was sold…and so was it.

Next, I browsed some web images of real birthday parties and was delighted to find another reusable decoration. Fabric garlands are all the rage for their ‘green-ness’ and ease to assemble. And they look adorable! Here’s the one that inspired me…

I knew the pink wasn’t going to fly with a 5-year-old boy. I started thinking blues, greens and yellows…the colors of earth from afar. After I had a color scheme in mind, I went to JoAnn Fabrics and bought a bunch of scrap fabric and 10 yards of heavy-duty cotton ribbon. Then I used a rotary cutting tool and self-healing cutting board to cut triangles out of the fabric. I made sure that each triangle had a match so the garland would be two-sided.


Then I simply paired up two triangles of the same fabric and sewed them onto my white ribbon. I contemplated using fusible interfacing between the two triangles to beef them up but that stuff is expensive!! I also decided not to finish the edges of the triangles because 1) I was running low on thread and 2) I liked the idea of it looking a little ratty, imperfect.

I had some scraps left from cutting the triangles and tied them to a strand of twine.


At this point, Handy Hubby must have liked what he saw and kindly offered to help out with the party planning. I gave him the task of whipping up a homemade Mission Control station that the kids could play with. I suggested he cover cardboard boxes (we had plenty in our basement) with foil to make it look space-agey. Well, he went above and beyond the call of duty!

Mission Control turned out so great that even I wanted to play with it! Handy Hubby used lids and an empty yogurt container for the buttons and dials.

The mouse is a deck of cards covered in foil and attached with a string.

There’s a video screen of the ‘launch pad’…

…and a speaker to communicate with the astronauts.

Awesome, right?! Isn’t Layne so lucky to have such a cool Dada? After all the decor details were in place, I moved on to the birthday cake. Warning: amateur baking and cake decorating ahead. I had the grand idea of making a rocket cake complete with boosters. I cut a rocket shape out of a store bought box mix carrot cake. (While cutting, I had horrid visions of what shape might come out if I wasn’t careful…but I tried really hard to keep it G-rated.)

Then I added Ho-Ho boosters, cream cheese icing and “NASA” in black icing. I am nooooo baker or professional cake decorator. My icing is far from smooth and I discovered it’s difficult to write with icing. I used the negative space cake (the parts I cut away to get the rocket shape) to make a little square cake atop a cakestand. Star sprinkles finished it all off nicely were a diversion from all the imperfections. Success = Layne knew it was a rocket.

In the end, the party was a blast! (pun intended)


It took some work, yeah, but it was fun. And I’m super-duper happy that we can reuse/recycle everything…well, the cake is gone. It tasted better than it looked.

It’s 20 degrees outside and I’ve lost count of how many inches of snow are on the ground. Cold weather, snow and dismal skies conjure up pictures of warm, inviting fireplaces in my mind. Below are a few fireplaces that I could cozy up to real nice like. (All courtesy of Decor Pad.)

The tiled surround and ornate framed TV looks polished but not overdone.

The color scheme of this fireplace and mantlescape would fit right into my home. I’ll take one!

The natural stone of this fireplace adds some much needed texture in an otherwise flat room.

I think Handy Hubby would like this one…modern and sleek.

This mantle extends under two craftsman windows for a built-in effect.

I would live outside for this outdoor fireplace.

The neutrals in the fireplace allow small pops of blue, green, orange and yellow to stand out.

And nothing says cozy like a big, fluffy rug to lie on in front of the fireplace.
So, if you’re snowed in like me, take it as an opportunity to snuggle up with your favorite loved one, book, four-legged friend or hot beverage in front of a roaring fire. This is where you’ll find me tonight…


If you followed my Laundry Room Makeover last week, you may be wondering how I made the knot detail on the curtains that hide the mechanical eyesores (i.e. water shut-off valves and electrical cords).

Contrary to popular belief, I did not sew them onto the linen fabric. I actually hand-painted them using a stencil. And I tried the technique on a plain pillow cover first, before using it on the laundry room curtains. Luckily for you, I documented it all in photos so you can try it too! But before we delve into that…a tangent…because I’m feeling a little scatter-brained today.
I got this stunning stencil as a Christmas gift (you may remember my other Christmas gift from this project) from Handy Hubby. The Knot stencil is made of pliable yet durable plastic that is intended for multiple uses. And, yup, it’s easy to clean!

It’s from Sunny’s Goodtime Paints which offers more than just stencils. They offer paints, glazes, paint books and tips for unique painting techniques. Paint is a great, inexpensive way to dramatically change a room and Sunny’s ideas can get the creative juices flowing. Check ‘em out!

And now back to your regularly scheduled programming… (yeah, this is how my brain works)
Here are the supplies you will need to paint fabric:
*fabric - washed, dried and ironed
*cardboard - large enough to lie beneath the area of fabric you’ll be painting…I used a scrap piece of cork
*fabric paint – got mine at JoAnn Fabrics
*paper plate
*foam paint brush – from any home improvement store
*stencil

First, you need to wash and dry the fabric you’re wanting to paint. This may be the most important step. If you skip the prewash, the painted fabric can shrink causing your painted detail to crack and flake. Do not skip this step! Then, for ease, iron the fabric. (I know, I hate ironing too! But if I can do it, so can you.) Then place your cardboard underneath your fabric to catch any paint that may bleed through. Again, I used a scrap piece of cork instead of cardboard.

Tape your stencil into place to keep it centered.

Squirt some fabric paint onto your paper plate. Use your foam brush (I improvised with an on-hand foam roller as I was snowed in with two lil’ kids and no way to get a proper brush) to dab into your fabric paint. Get rid of excess paint by dabbing around the paper plate a few times.

Press the fabric paint onto your fabric, making sure to use an up-and-down motion to avoid getting paint under the stencil.

Do one layer of paint for an old, worn look or two coats for a more clean, crisp feel. (For my pillow cover I did two coats; for my laundry curtains I did one coat.) When you’re done, it should look something like this.

Carefully remove the stencil from your fabric. Follow your fabric paint’s instructions for drying times. I let mine dry for 4 hours. The label should also list a minimum setting time…the time required to pass before you can wash the fabric. Mine was 72 hours; however, in a miraculous turn of events (i.e. my kids haven’t dropped snacks on it) I haven’t needed to wash it yet. Here’s my happy little pillow cover…

Isn’t it so cute and sweet?

A close up of the stenciling detail…

Here it is hangin’ with da boyz…

Super easy. And quick. I stenciled the pillow cover and 2 laundry curtains in 30 minutes. Total. It doesn’t get any better than that! I’m already dreaming up a big scale stenciling project now that I’ve completed some mini ones…hmmmm, what could it be?


Handy Hubby and I usually don’t celebrate the ‘Hallmark’ holidays. I know, I know, bah humbug. But, really, he does so much for me on a daily basis (have you seen this or this) that I don’t need a specific day designated to making me feel special. However, this Valentine’s Day I did see it as a chance to thank him for supporting my most recent endeavor…this blog! (He bought and registered my domain name as a birthday gift for me after I told him about my idea for House*Tweaking.) Still, you know me, I didn’t want to spend a bunch of money but I did want it to mean something.
Enter these patches:

They were given to Handy Hubby by his parents as a way to remember his deceased Papa. His Papa had owned a gas station at one point during his life and wore these patches on his uniform coveralls while working there. Handy Hubby has tried several times to find just the right baseball cap to embroider them to – with no luck. So, they have been sitting in a bowl on our dresser for years now.
I decided to showcase two of them in style and leave one alone in case that perfect hat comes along. I got two IKEA ribba frames (well, in fact, Handy Hubby picked them up for me not knowing what they were for…probably just figured they were another House*Tweaking project)…

…then I cut two pieces of linen fabric to serve as the background.

I simply tacked each patch to its respective backdrop with a few stitches of thread then framed ‘em up.


Isn’t mixing old (patch) with new (IKEA frame) a great way to decorate? I love the contrast of the clean white frames around the tattered worn patches. And I hope Handy Hubby loves it, too. Happy Valentine’s Day!


Aaahhhh. It’s finally Friday, and I’m sharing pictures of the finished laundry room! Here was the boring builder utility room just a few short weeks ago…

It wasn’t awful but it was blah. After some painting, re-organizing and accessorizing, this room has a little personality. Check it out.

I’ll take you on a tour of my small but happy laundry room. Let’s start at the door and work our way around in a clockwise fashion. Just inside to the left is where my Etsy-fied ironing board found its new home.

I nearly fainted over this handmade cover. Sorry, Handy Hubby, I still probably won’t take up ironing.

I hung the Goodwill mirrors that I spray-painted to the left of the washer in an asymetrical arrangement. In my book, mirrors are a must-have for every room…even a laundry room. I must say I never realized how ‘domestic’ I look while doing laundry – until now. Ugh.

Look down and there’s the IKEA stool that I stained and polyurethaned. (If it had been a snake, it woulda bit ya!)

Not only does the stain look great, but that stool has purpose! Keeping the washer door open to prevent mold growth and giving me a lift to reach overhead storage. (The rugs in the laundry room are also from IKEA but since I had them before the makeover, they aren’t getting much airtime here.)

On to the space above the washer and dryer…

I made and hung two curtains from a tension rod to hide all the water hoses and electrical cords. For interest, I added geometric borders and a stenciled ‘knot’ onto each. (More on stenciling the fabric next week!) Yup, that was my big surprise for ya – the handpainted knot. Or had you already figured that out? Originally, I hung the curtains with just the contrasting borders but quickly realized that was too much bland, brown linen. These geometric knots were the perfect inexpensive solution! They are the focal point in the room.

Doesn’t the new hardware give the cabinets a polished look?

To the right of the dryer is Layne’s artwork. I like that it pulls from the yellow in the ironing board cover without exactly matching hue for hue. And it makes me smile.

Discreetly hidden behind the door is my secret bra-drying hook rack. No more lil’ boys running around the house with my wet bras on! (Okay, it is funny.)

That brings us so quickly back to the door again.

I’m lovin’ the way the wicker laundry baskets play off the baskets above the cabinets. All rooms need some texture.

And that, my friends, is how I tweak a laundry room…for about $125. Enough eye-googling, there’s laundry to be washed!

kid-friendly