...because home doesn't happen overnight.

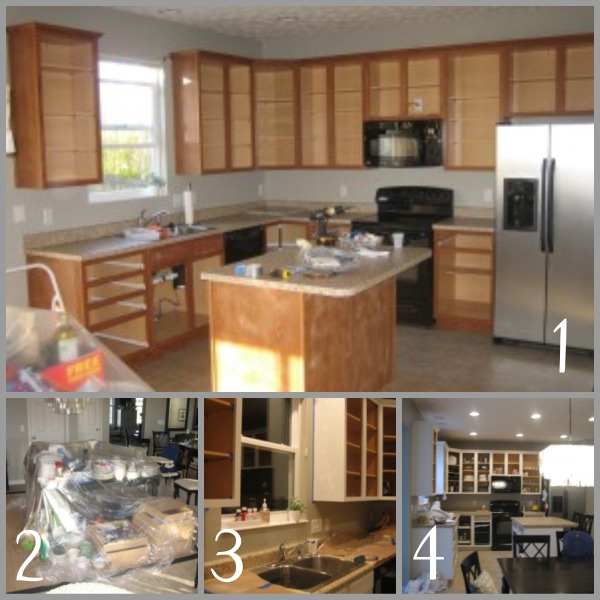
This is what our kitchen looked like last December…

1 – We emptied out the builder oak cabinets in preparation for sanding, priming and painting.  We removed the cabinet doors and drawers also.

2 – We piled the contents of our cabinets onto and under our dining table and covered it all with a plastic drop cloth.  This made it difficult for us to find what utensils we needed and easier for the kids to find what utensils they wanted to play with.

3 – After a light sanding to scuff up the surface, we taped off the cabinet frames and set to work priming while the kiddos snoozed away.

4 – Several coats of primer and paint later, we placed everything back in the cabinets.  It was another month before the cabinet doors and drawers were finished.

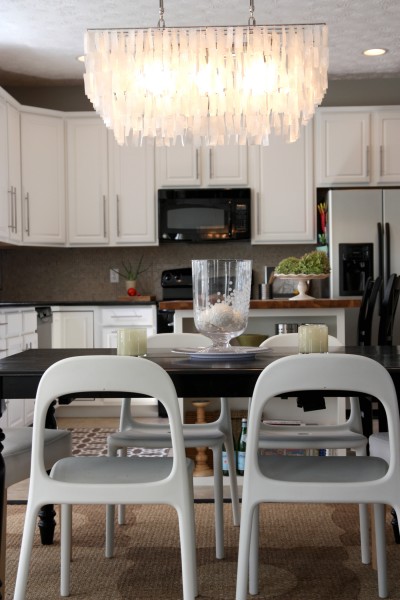
Looking back, I don’t remember the mess or the work much.  What I do remember are those orange-y oak cabinets that I was determined to paint white the day I saw them.  It took us 2 years to get around to doing it.  It’s definitely one of those things we look at and think, “Why didn’t we do this sooner?!”  Eventually, we added new hardware, DIY’d a glass-front cabinet, switched out the laminate countertops for granite, updated our sink and faucet, tiled the backsplash and customized the existing island.  For the full tour as-is, click here.  We’ve yet to find a suitable window treatment, hang industrial pendant lights above the island and install new flooring.

I wanted to share this with you to show you things don’t happen overnight here.  My kitchen has not always looked the way it does now.  Kids, real jobs, time and money constraints, and just plain energy levels usually dictate our project timelines.  And that’s fine.  We don’t have any big deadlines to meet.  So, if you’re thinking of taking on a similar DIY home improvement project, don’t be discouraged.  You may have to live with chaos, clutter and dust for a while but that’s what makes the end result that much sweeter.

Happy home improving!

images:  all Dana Miller for House*Tweaking

14 Comments

16.December.2010

Thanks for sharing this, I love your kitchen! We just finished painting our cabinets as well, which took nearly a month of evenings and nap times…I am so glad it is finished :)

I still can’t believe what a fab job you guys did with your kitchen. And I love the reminder that DIY doesn’t happen over night!

16.December.2010

Jen – Oh yeah, we know all about working during evenings and naptimes… Congrats on your freshly painted cabinets!

16.December.2010

I love the look of painted cabinets. They should make that orange-y oak colour illegal.

when the kiddos were little, naptimes and bedtimes were the only time to get things done…now that they’re older, we rope them in to help! I try to balance out things by alternating bigger DIY projects (installing flooring/tiling) with smaller decorating projects (new curtains/changing furniture arrangements)…that way, we don’t get burned out and our house isn’t always a construction zone (plus, we can save up for the larger projects, but still feel like we’re getting things done in the mean time).

16.December.2010

My oaky cabinets are being painted this week. We have lived with the oak for 6 years because I was afraid to paint them but when the opportunity presented itself for our neighbor (who paints for a living) to paint them I jumped at the chance. My kitchen is in complete chaos at the moment, but I’m sure it will be worth it in the end. Did you paint the insides and the backs of your cabinet doors?

16.December.2010

Ches – We painted the backs of the cabinet doors but NOT the insides of the cabinets. We contemplated about painting the insides but decided against it. We didn’t really care if the wood tone peeked out for a second whenever a door is opened.

21.December.2010

i love your bright white kitchen! thanks for sharing that this wasn’t an instant renovation! things take time and thats okay… thats what i keep telling myself!

we bought our home a couple years ago and replaced the cabinets right away with a tax credit (ikea was cheaper than replacing doors and painting- and we wanted 42″ uppers as our kitchen is small and we need all the storage space we can get). then we went a month without countertops waiting for those to come in. now a year and a half later we finally finished the backsplash and only because i found an insanely cheap glass subway tile special buy @ home depot. we still havent touched the outdated lighting, windows, and are in need of rugs and some accessories… but we’ll get to it some day!

21.December.2010

Erin – The tall IKEA cabinets sound lovely! What a great way to add extra storage to a smaller space.

02.January.2011

Wonderful job redoing the kitchen! We’re in the planning stages of a renovation; I’m wondering if you could tell me how much space you have between your island and table since we’ll have the same layout. Thank you!

05.January.2011

Colleen – There is ~37 inches between the edge of our dining table and the kitchen island. When our dining table is extended {it has a self-contained leaf} to seat 8, it’s more like 18 inches…narrower space but definitely still passable.

07.January.2011

Your kitchen looks fantastic, love it. I’ve been wanting to update our kitchen for awhile now and haven’t been able to get to it (because of those pesky time and money things you mention). It’s so true that when the project is over though, it’s hard to remember the mess you had to create to get to the finished result!

08.January.2011

looks great!! we are in the planning stages of painting our cabinets as well and with you as inspiration we may go ahead and “fix” our island as well!!

Can you source the rug under your kitchen table? I have been looking at natural fiber rugs and don’t know which one to go with, so I am always looking for a recommendation. Also, where did you get your very cool chairs? I am new to your blog and you may have anwsered all this already (sorry!)

Love it all!!

08.January.2011

Christine – The dining rug is from Natural Area Rugs.com…they have great prices and quality. I did stencil a design onto the rug myself. See it here. The chairs are all from IKEA.

18.February.2011

Wonderful job! I’ve been wanting to paint our cabinets, but have been so nervous about it! Yours turned out beautifully.

Also, that light fixture above your table rocks out!!!