...because home doesn't happen overnight.
09.04.13 / DIY Hinged Drawer

cl dresser 1

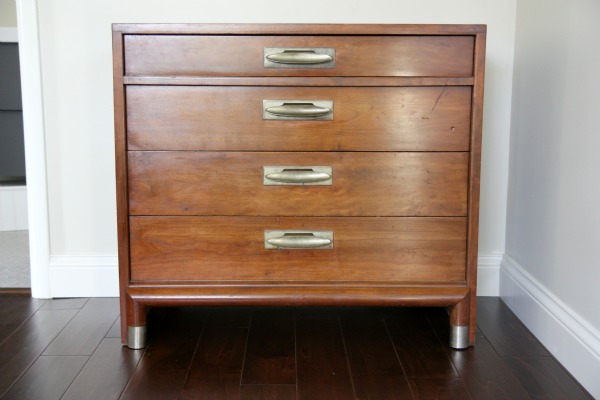
Remember the dresser I found on craigslist a while back? It’s been chillin’ in a corner of our bedroom while we brainstorm what to do with it. All of mine and HH’s clothes are stored in the bedroom closet so there’s no need to fill the dresser with clothing.

Over the past several months, HH has hinted at creating a space to take conference calls for work. HH’s job requires him to talk with coworkers in different time zones – both in the states and internationally – so he frequently conducts conference calls from home in the evenings when all parties are awake. He started out taking calls at the kitchen desk but it isn’t easy to keep three kids quiet in a such a communal area. HH retreated to the lower bunk of the boys’ room but that forced the boys out of their room during such conference calls. Finally, HH found peace in our bedroom but sitting on the bed with his laptop for extended periods of time wasn’t exactly comfortable. That’s when we decided to turn the dresser into a makeshift workspace and hinge the top dresser drawer using a piano hinge and double roller catches.

hinge drawer

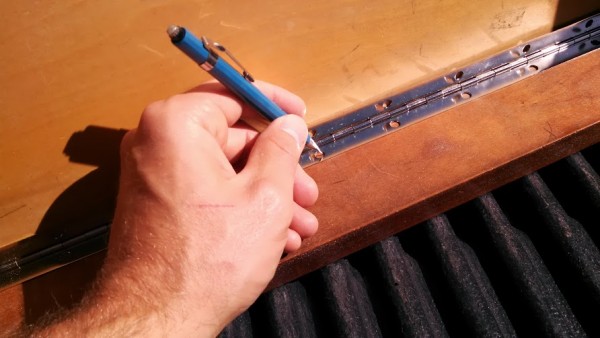
HH took the top drawer it outside, removed the hardware, placed the piano hinge {you can find ’em at home improvement stores} and marked the screw holes on the back side of the drawer front & on the bottom of the drawer.

IMG_20130804_102432_270

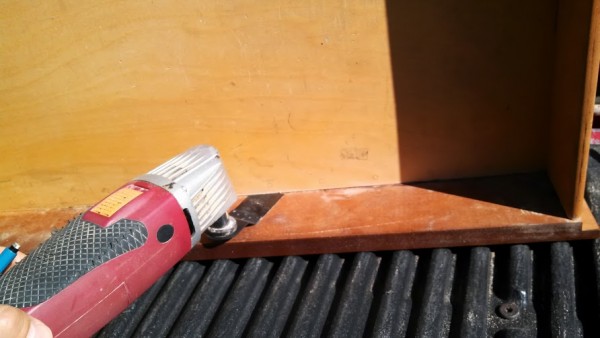
He used an oscillating multifunction power tool to cut the front of the drawer off. It was one of those DIY moments that had us thinking, “Damn, we hope this works because WE JUST CUT THE DRAWER FRONT OFF OF A PERFECTLY GOOD DRESSER.” No pressure.

IMG_20130804_104040_515

Here, the drawer front is off and the drawer is turned upside down. HH cut the center and side drawer guides to allow for proper placement of the hinge.

IMG_20130804_104033_833

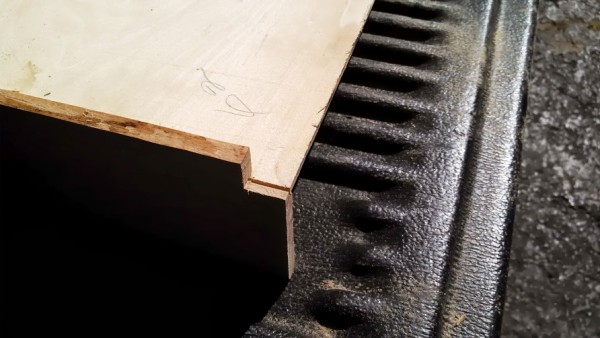
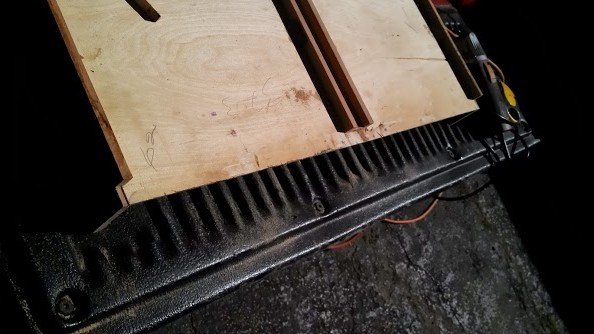
The notched space ensures that the drawer front has enough room to fold down once hinged.

hinge drawer

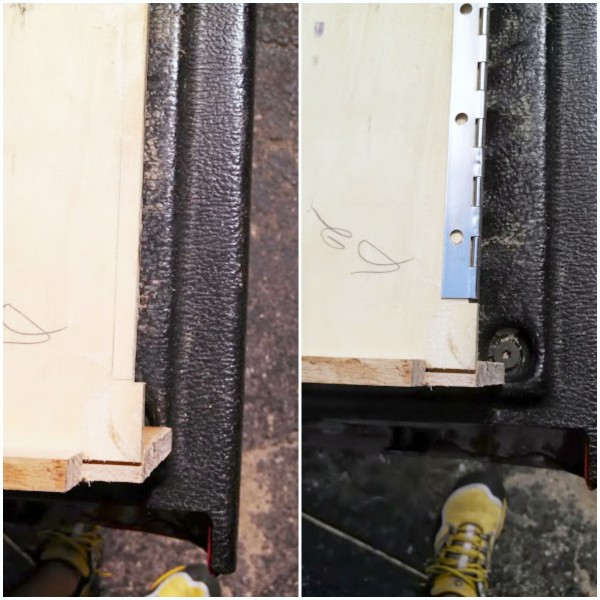
To keep the hinged drawer front flush like it was originally, HH cut in along the length of the drawer bottom so the piano hinge would be even with the drawer. {This is where the pre-marked screw holes on the inside bottom of the drawer come in handy.}

IMG_20130804_131444_407

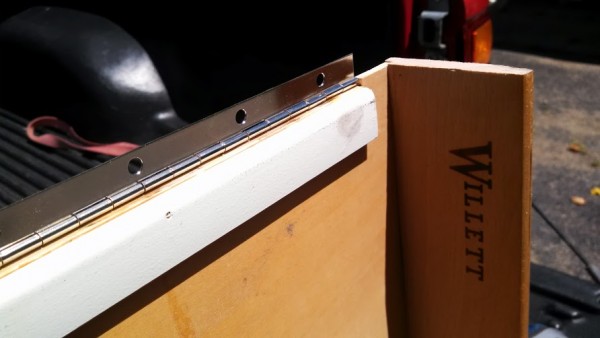
HH added a piece of leftover trim {shown in white above} to the thin bottom of the drawer so the screws would have something more substantial to tie into. Then he simply screwed the drawer front onto the opposite side of the hinge using the pre-marked screw holes as guides. The drawer front was thick enough for the screws to screw into – no additional trim was necessary.

hinge drawer 1

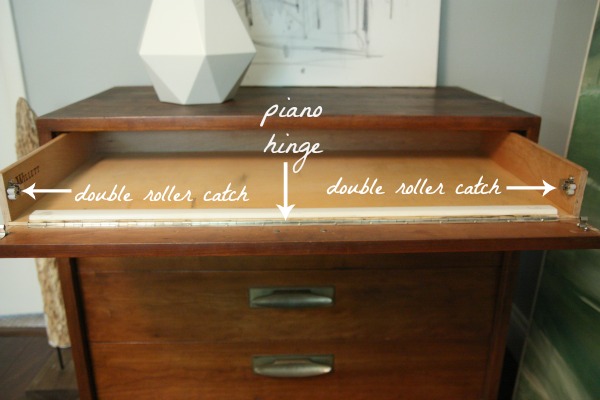
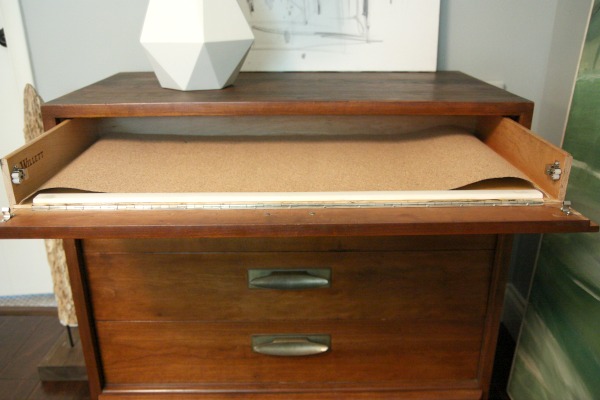
To hold the drawer front in place when the drawer is closed, HH added a double roller catch to each side of the drawer on the inside. And, voilà!, now this dresser does double duty. The drawer front can be folded down to allow access to a hidden work surface.

Of course, I couldn’t leave it alone.

cork drawer

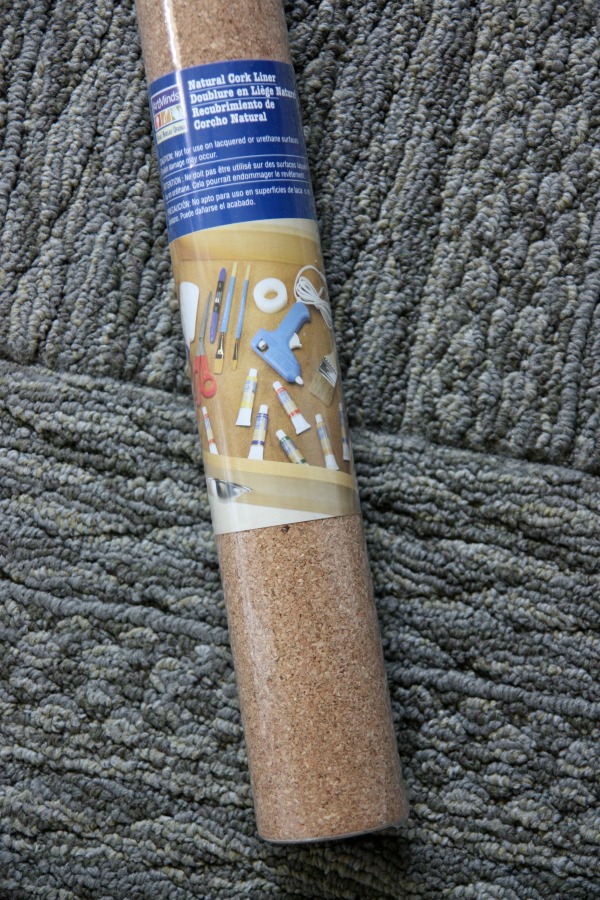
I found a roll of self-adhering cork liner at Michael’s and bought it with a 40% off coupon for $6.

cork drawer 2

I cut it to size to fit the bottom of the drawer and around the white trim piece. Then I simply removed the backing and smoothed the cork liner into place.

cork drawer 3

HH says it is perfect for him. He puts his work laptop on top of the dresser and keeps a wireless keyboard and mouse in the drawer. The squishy cork negates any need for a separate mouse pad and prevents the keyboard from sliding around. I went to Target and bought a few office accessories for the drawer and I’m dying to paint that white trim piece. I’ll post true afters later this week!

Have you ever tweaked a perfectly good piece of furniture to meet your needs? I know some people out there are cringing at the thought of cutting into a vintage dresser but, I’m telling you, this dresser has seen more use in the last two weeks than it has since the day we bought it. It works so much better for us this way. And the rest of the drawers are still empty!

Eeeeeeek! Things were so crazy last week preparing and traveling for my sister’s wedding. I forgot to announce the winner of the elephant bookend. So sorry. Check out the winner here!

images: Dana Miller for House*Tweaking

21 Comments

04.September.2013

I like it! I think the most I’ve done aside from paint, etc is I cut a hole in the back of an old night stand so I could run a power code to the drawer. Then I put a charging station inside and it’s where the kids put their iPods, etc to keep them charged and from getting lost.

04.September.2013

Looks great! I need something like this for our bedroom. I don’t want to waste the space for a full desk we only occasionally need, but want to place to do work when I need it. Can’t wait to see the finished product!

So creative. I love that you were able to make it more functional for you guys and still look good!

04.September.2013

Very cool… very cool.
I love the juxtaposition of beauty and functionality!

04.September.2013

Holy cow! I just had to print out a pic & save it for later.
This would be a wonderful way to pull double duty (with a middle dresser drawer) in any small space!!

04.September.2013

Good thinking and nicely done! I love making old furniture functional for modern technology. I have a massive deco era armoire that we turned into an entertainment center/toy storage a few years ago. My husband added a couple of shelves inside – we used the bottom 2 for toy bins and the top shelf for our TV and DVD player. The hat shelf inside (yes it has a hat shelf!) held our DVDs. It was so great to have our TV completely out of sight when we wanted it to be. And the toy bins kept the living room from feeling like a daycare. A total win-win!

04.September.2013

Dana what a great idea! I’m not as handy as HH and I would be a bit afraid DIY’ing a perfect piece of furniture but this seems like a great idea. I have a piece of furniture in the living room that I’d like to turn into a little bar area. thanks for the idea!

04.September.2013

Very smart! You’ve retained the integrity of the piece, while making it more useable.
Several years ago, I built (from a kit) a computer armoire, when we still had a desktop computer. The thing was huge! It was 24″ deep, to hold the monitor, tower and a printer. When our daughter started college and needed access to the printer at all hours of the night, I decided it was time to get it out of the bedroom. I took it apart and cut down the depth to 18″ and put it on some short turned legs. It’s in the LR now and looks better than ever. And since we no longer have the desktop computer, the remaining space is great for storage.

04.September.2013

Such a good idea!

04.September.2013

I was so happy to see House*Tweaking in my feed! I’m glad that you took some time off to be with your family, but I’ve missed your lovely blog. ^_^

04.September.2013

How clever! Great idea. I’d love to see the afters.

04.September.2013

Your vintage armoire turned entertainment center sounds lovely!

04.September.2013

Way to work with whatcha got!

04.September.2013

Nice dresesk! Is that by chance a salt light beside it? I’ve been doing some research and hearing great things about them. Is it new? Or have you used it for awhile? I really want to get one but haven’t quite found one that I love how it looks…

04.September.2013

I like when one object combines several different options. I call it «double use». It is a great way to save some space in the room and it is really great that you can make something by yourself because this object becomes really special.

Oh wow, that is genius!! It’s a beautiful piece, and now so versatile.

04.September.2013

YES! I have done this with a dresser that was missing a drawer. I used the top space to house my DVD player, Wii, router and modem. Two other drawers are for DVD storage and the last drawer holds hand weights. You can see here – http://takelifewithagrainofchocolate.wordpress.com/2012/09/07/subway-sign/

28.October.2013

Lovely tutorial! I think I can do it all by myself!

[…] What happens when you slice the drawer-face off a vintage dresser, add hinges, and re-attach? You get an instant repurposed desk! That’s what Dana of House Tweaking discovered and shared with this brilliant DIY project. […]

05.May.2015

I was looking for an article or video that would help me do this kind of thing for myself; I was actually very depressed initially because I couldn’t find anything to my satisfaction. Finally, I stumbled upon this site, although unfortunately after I’d already cut the front of the drawer; it was just what I needed. Thanks to this wonderful DIY, step-by-step guide (with pictures, which made it even better), I was able to modify my own desk in a similar manner! I had plenty of issues along the way, such as being unable to find a piano hinge of the proper length (bought one too short, then one too long. I ended up cutting the one that was too long), and plenty of others…not to mention that the power tools made an insane amount of noise that made my kids give me the stink-eye for almost all of the project, but at last I got it done. Now I have a perfectly functional “drawbridge-style” as my daughter likes to call it, drawer that is just right for me.

Thank you so much for making this guide!

28.January.2018

I just bought a vintage dresser/changing table and will use be using your instructions for the top drawer. Can’t wait to see how mine turns out!