
I had to rework the closet in Mabrey’s room when I replaced her crib/toddler bed with a twin trundle. Bringing in a larger bed necessitated moving most of the playthings to the closet to free up floor space. You can see how the closet used to look when the room served as a nursery right here. A freestanding shelving unit (it lived in our previous home’s craft closet) was a temporary fix that worked well for the first few years to corral diapering essentials and a quickly evolving wardrobe. (Little ones outgrow clothing so quickly!) However, it wasn’t the most functional solution for a preschooler.

I sold the shelving unit and put the money towards the room makeover. To accommodate larger toy items like the dollhouse, shopping cart and stroller, we added a second shelf under the existing shelf and hanging rod. I measured the height of the dollhouse and shopping cart to allow for clearance, then we added cleats to the back and sides of the closet. We cut and laid a shelf board across the cleats. All the wood was left over from the whole house renovation (a longer shelf used to hang in the boys’ closet), so the cost to add the shelf was nil. I painted the shelf and closet to match the rest of the room.
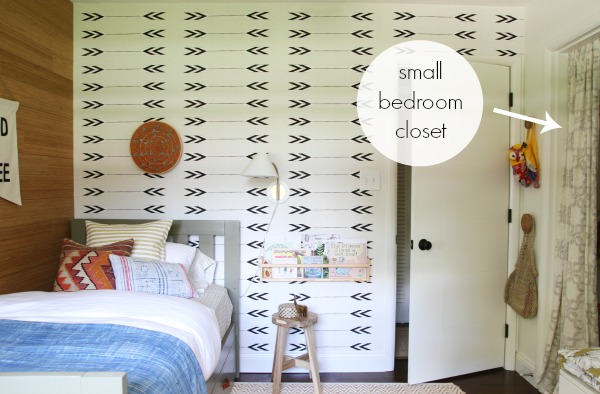
I kept the closet curtain panel. With the door to the room opening up on to the closet, it’s just a less cumbersome setup versus a legit door. Plus, I really like using curtains vs. doors on children’s closets for practical reasons: no smashed fingers, easy access for little ones, no slamming doors! The curtain matches the panels at the window and hangs from an inexpensive tension rod just behind the stop of the door frame. Years ago, I hemmed it to puddle slightly at the floor for a casual vibe. The wood dot hooks next to the closet double as curtain tie backs.
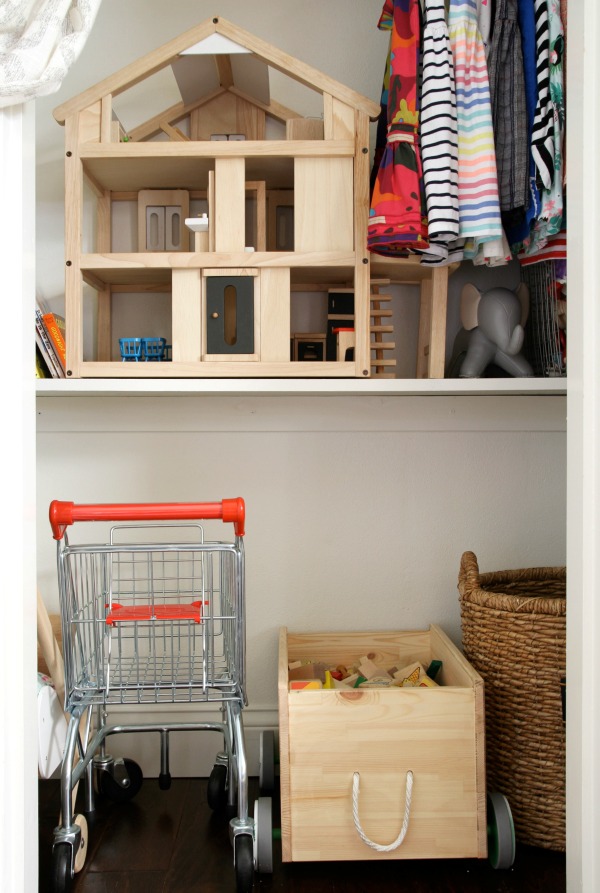
The floor of the closet serves as a mini “garage” housing wheeled items like a stroller, shopping cart and portable toy box. The shopping cart was a joint gift from family a few years back, and it’s the toy Mabrey plays with most often. The rolling toy box is new. (Yes, I spray painted the green rims white and replaced the green rope with a white one because #typeA.) I filled it with blocks and Lincoln Logs from the boys’ closet since they’ve pretty much outgrown them and Mabrey plays with them more. (BONUS: This freed up space in the boys’ closet!) It’s so great having these items out of the way but within easy reach. Mabrey can pull them out on her own to play with in her room or in the living room. A laundry basket sits to the right of the toy box.
Mabrey doesn’t play with the stroller all that much so it sits in the corner for now. She doesn’t seem to have a huge interest in baby dolls. In fact, she keeps asking me if she has to have a husband and kids when she grows up. I tell her, “Absolutely not! You can do whatever you want and have any kind of family you want.” She says she wants to work, have a house and a cat, and she wants me to visit. So sweet!
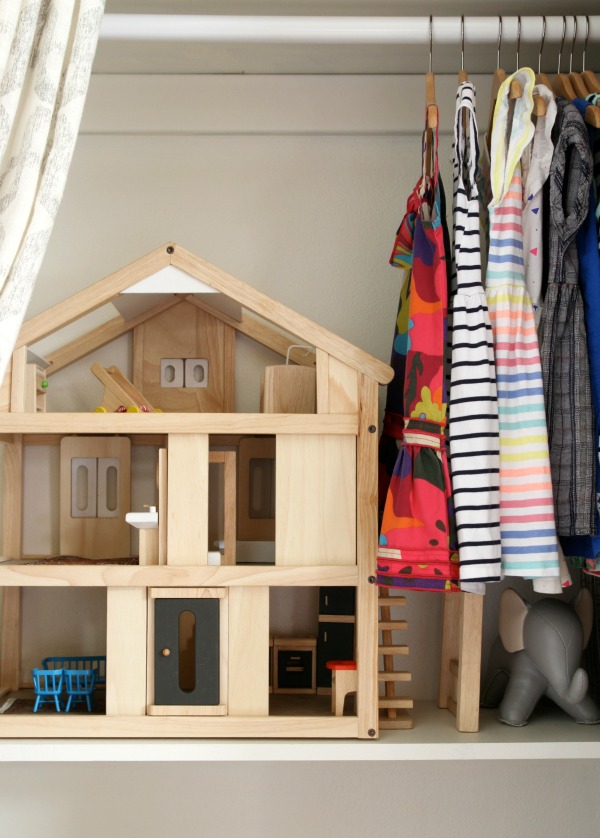
The newly added shelf holds a dollhouse which Mabrey actually enjoys playing with in the closet. (See how I tweaked it here.) It’s right at eye level, so I guess that’s why. Even so, it can be easily moved out to the coffee table in the living room for access to all sides. A small wire basket off to the right holds a set of mini wooden figurines that Mabrey plays with in the house.
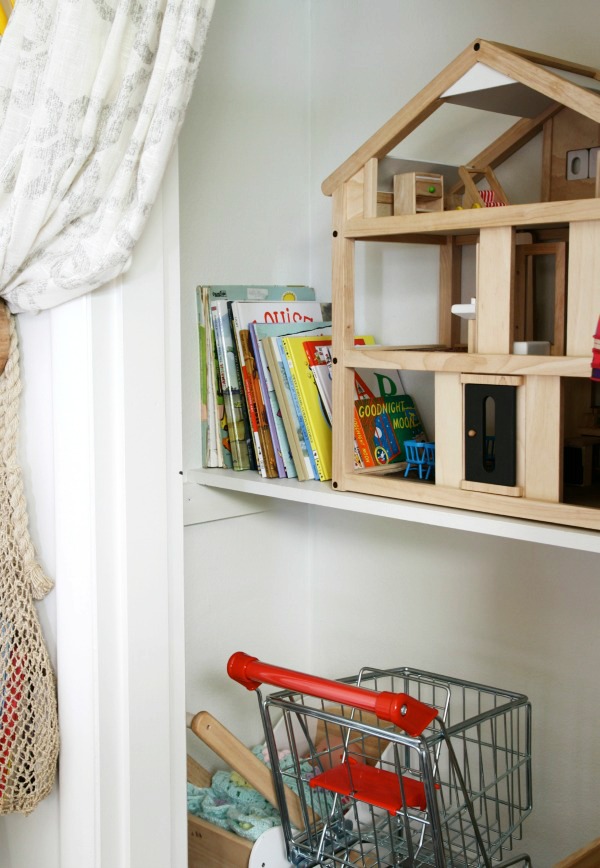
I stash books on the left and rotate them in and out of the wall-mounted bookshelf next to Mabrey’s bed, so we don’t get stuck reading the same books over and over again. It kinda works? If Mabrey had it her way, we’d read Richard Scarry’s Best Word Book Ever every night until she moved out. #somuchpointing
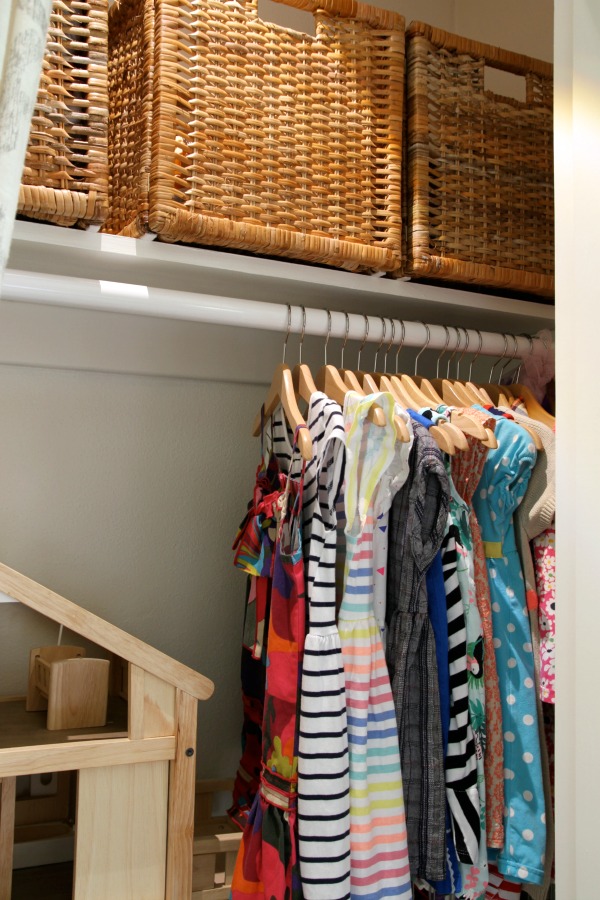
Dresses, tutus, butterfly wings and a few sweaters hang from an existing rod. I finally upgraded to wooden children’s hangers. I always thought they were too expensive for fast-growing kids, but I found these at IKEA for cheap. Woven baskets along the top shelf hold hand-me-downs that don’t quite fit yet. They’re organized by size and I rotate them in as needed.

One of my renovation regrets is not adding a hardwired light to Mabrey’s closet. (We did in the other bedroom closets.) The closet is so teeny that I thought it wouldn’t matter, but I was wrong. Hindsight is 20/20. We finally added a battery-operated, motion-sensing LED light overhead, and it’s my favorite thing about the closet now. We can actually see the closet contents in the dark, and the light turns off on its own!
I love how functional this closet is now, and I can totally see it evolving with Mabrey’s needs. Once the toys are long gone, a second hanging rod could be installed below the lower shelf for more clothing storage. Small, tidy closets for the win!
P.S. – A DIY hidden litter box.
images: Dana Miller for House*Tweaking


budget decor, DIY, kid-friendly, organization