
Last month Steve and I snuck away to Nashville for a kid-free weekend. Steve wasn’t able to leave work early on Friday, so we drove to Louisville after he got home that evening and stayed overnight. We hit up HammerHeads for dinner. The mac & cheese balls didn’t sound particularly appetizing, but they came highly recommended so we had to try them. They were AMAZING. So smoky and savory! The brisket tacos were pretty yummy as well.
The next morning we had a little time to kill before our drive on to Nashville. We came across an interesting trinket shop/bakery called Kizito. I was initially drawn to the window display chock full of African wood sculptures, but once inside we were hypnotized by the most amazing aroma of yeast, sugar and cinnamon. Turns out, the shop is owned and operated by a woman from Uganda who visits her homeland regularly and brings back African folk art to sell alongside her homemade baked goods. It makes for quite a unique inventory! Steve bought cookies (a gingersnap and coconut macaroon) and I bought an ebony figurine that now lives on the media cabinet in our living room. I can’t look at it without seeing Kizito’s warm face and smelling the faintest hint of cinnamon.

We checked in to our Nashville Airbnb later that afternoon, and immediately my dream of living tiny as empty nesters was solidified. Our cozy home for the weekend was a vintage Shasta camper in our host’s dreamy backyard. Walking through the gate from the driveway was like being transported to a secret oasis – leafy canopy, dappled sunlight, chirping birds, twinkle lights and all. #icriedalittle (I’m not much of a camper, but I love being outdoors as long I have running water and a real bed nearby.)
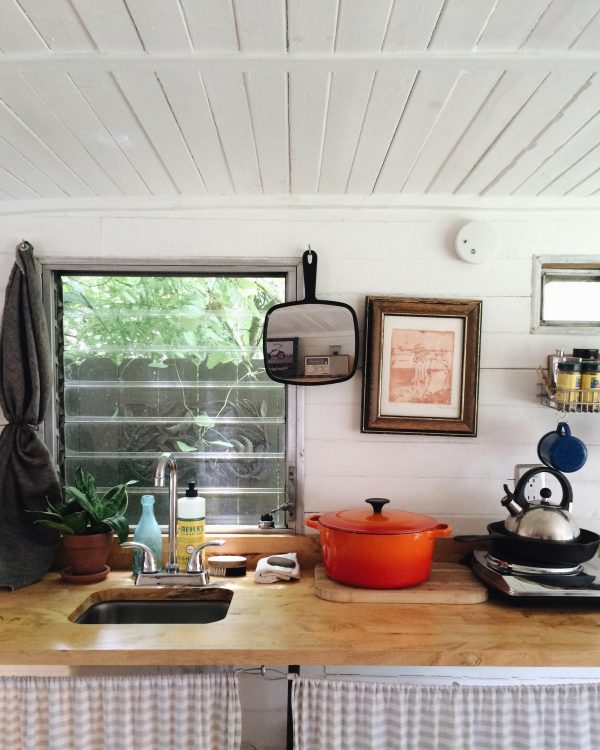

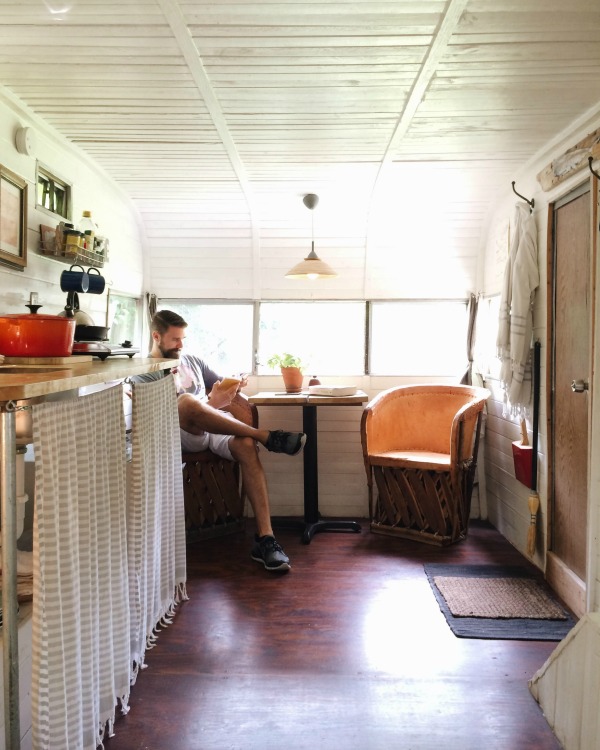
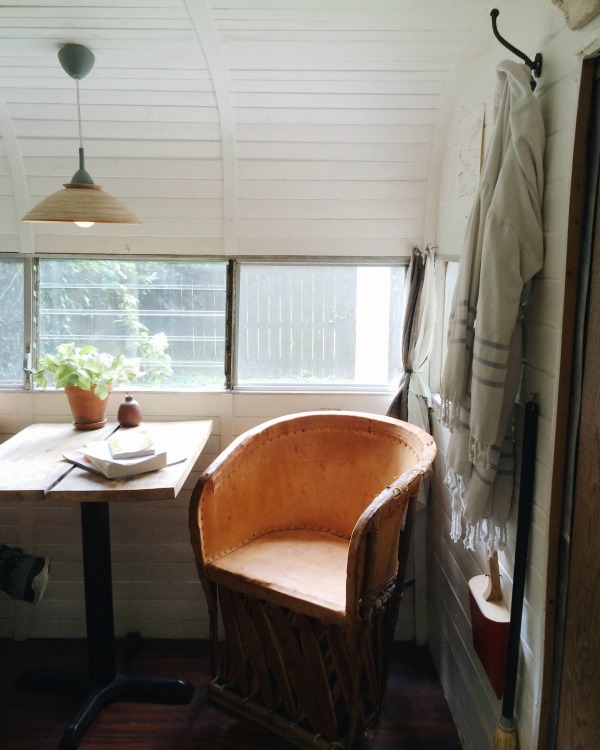
The camper featured a teeny kitchen complete with sink, running water, hot plate, mini fridge and essentials. One end of the camper was outfitted with a built-in platform bed (plus AC unit!), while the other end housed a small table and vintage leather and cane chairs.
Clever storage included baskets under the bed, DIY peshtemal towel “curtains” to hide kitchen clutter and a slew of wall hooks and shelves. The wheel wells were covered in planks and provided extra shelving and seating. I thought the simple DIY window coverings were ingenious. Essentially, they were raw cut linen panels (white facing the window, gray facing the interior) with frayed edges and grommets looped over small hooks. During the day, they could be tied back with leather lace. At night, they could be closed by moving one grommeted corner to a hook on the other side of the window. Such an easy solution for oddly sized windows!
The vibe was super cozy, rustic and casual. I loved that the decor felt homier than a traditional camper. (Obviously, this camper isn’t meant to be moved around from place to place like a traditional camper.)
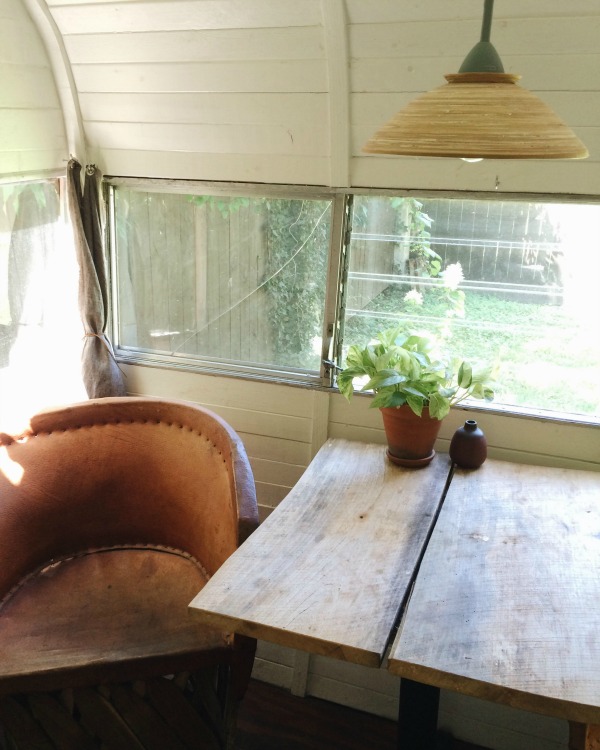
We spent a lot of time at the table reading, playing cards, drinking wine and just looking out over the backyard. (Temps were in the 90s during our stay, so we were grateful for the AC.) It was so quiet and peaceful that we had a hard time believing we were actually within city limits.
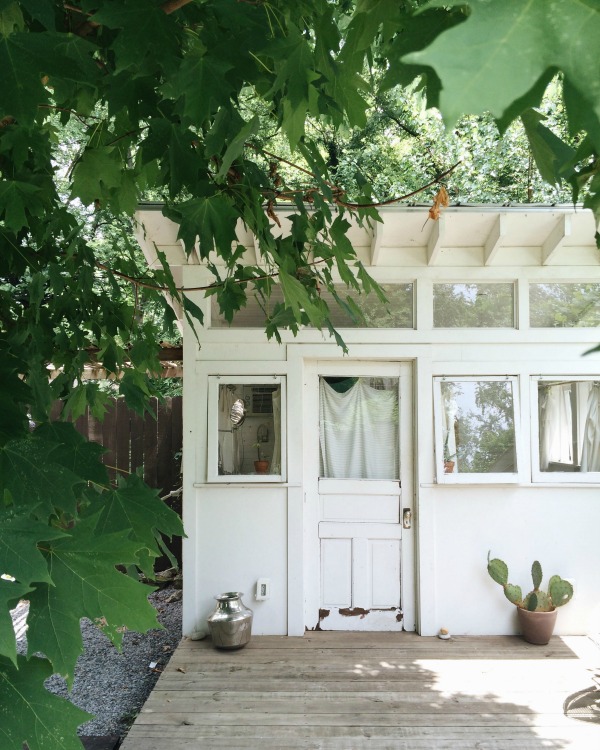
The separate bathhouse was so charming! Even with windows galore, it felt private. The lower awning windows featured the same tieback curtains as inside the camper for privacy, while the upper clerestory windows kept the small space feeling light and bright.


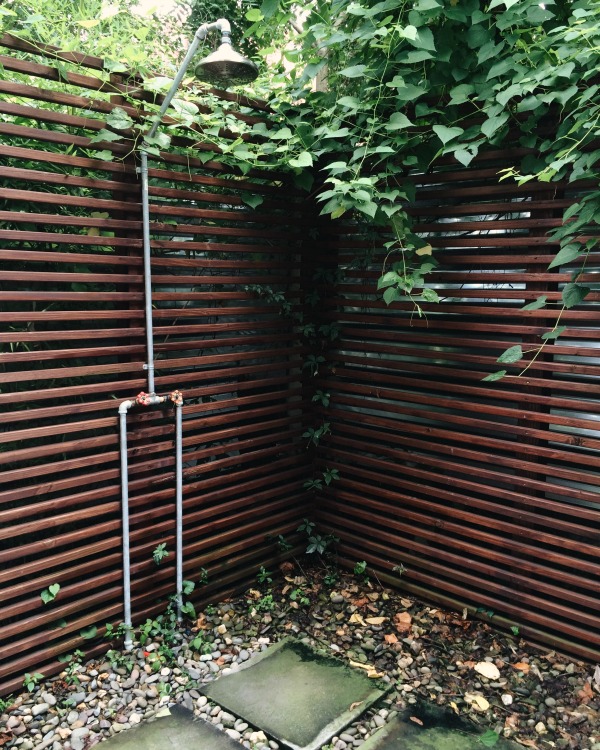
Inside was the cutest corner sink, a toilet and clawfoot tub. Just outside, in a secluded corner between the bathhouse and camper, was an outdoor shower. Panels of galvanized metal backed cedar slats surrounding the showerhead. Showering under the stars one night remains a favorite memory. An outdoor shower is now on my dream house wish list. Bonus: no cleaning required!

A hammock was on the other side of the bathhouse under a minimal pergola. I’ll never forget the first time Steve tried to mount it when he didn’t think I was watching. He approached it like an American Ninja Warrior obstacle by getting a running start then jumping on to it back first which caused the hammock to quickly flip upside down. Consequently, he landed underneath the hammock facing the ground with his knees bent, resembling a human spider. Luckily, the only thing hurt was his pride. I had just stepped out of the camper when it all went down (literally). “I saw all that,” I said. Then we laugh-cried for approximately fifteen minutes. I fall into hysterics just thinking about it now. I told him I hope it’s the last image that flashes through my mind on my death bed. I would die laughing.

I made friends with Margot, the friendly backyard mascot. She was so sweet.
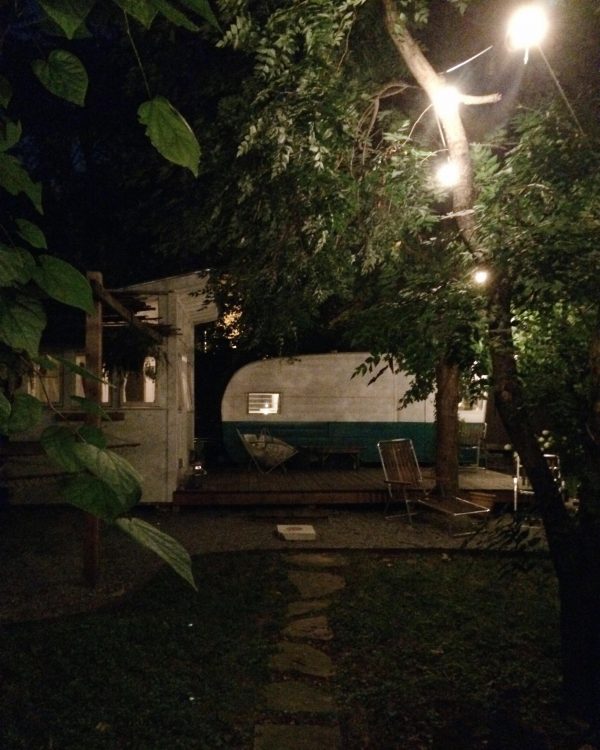

Nighttime was nothing short of magical in this little corner of the world.

With some pre-planning I was able to make a dinner reservation for two at the highly touted Rolf and Daughters. The interior felt very “industrial loft” but it was still cozy. Our waitress was really patient with us and answered all our questions about the menu which was a little difficult for us decipher on our own. We ended up having an incredible, drawn-out meal that felt all the more luxurious because there weren’t any kids to tend to. I forgot how nice it is to linger after a meal. (I’m usually in cleanup mode as soon as all forks are down at home.)
Not all of our meals were so extravagant, but here are some other food joints we thoroughly enjoyed near our Airbnb:
Calypso Cafe: an affordable lunch option within walking distance of the Airbnb. We loved the salads and martinique callaloo.
Five Points Pizza: within walking distance and well worth any wait. The garlic knots and Zeus pie were my favorites.
I Dream of Weenie: within walking distance but bring a bottle of water. Gourmet, charcoal-grilled hot dogs featuring unique toppings are served from a vintage VW bus. There’s a rotating menu and daily specials. No boring hot dogs here! FYI – I love a good hot dog. LOVE.
For breakfast, we hit up juice joints like Franklin Juice and The Urban Juicer. The morning dirt at Franklin Juice was our favorite.

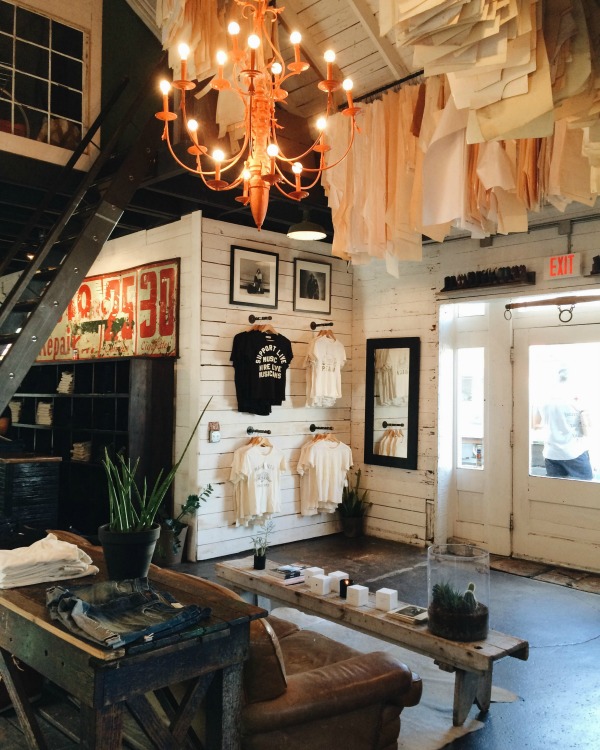
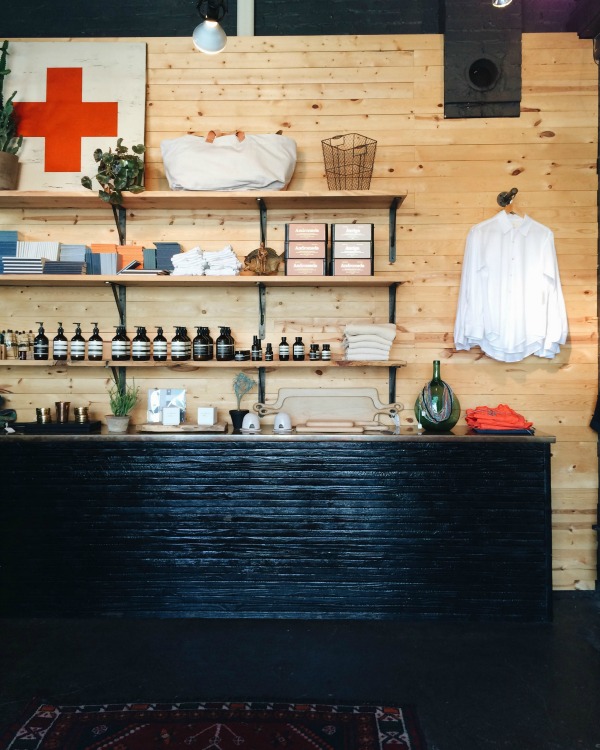
We browsed a bunch of local stores and antique shops. I could have moved right in to Imogene + Willie. It’s located in an old service station and has a cool industrial vibe that’s warmed up with wood and leather accents, planked walls and a glowing red chandelier. Did you notice the paper patterns hanging from the ceiling? From afar, they looked like a giant tissue paper garland.

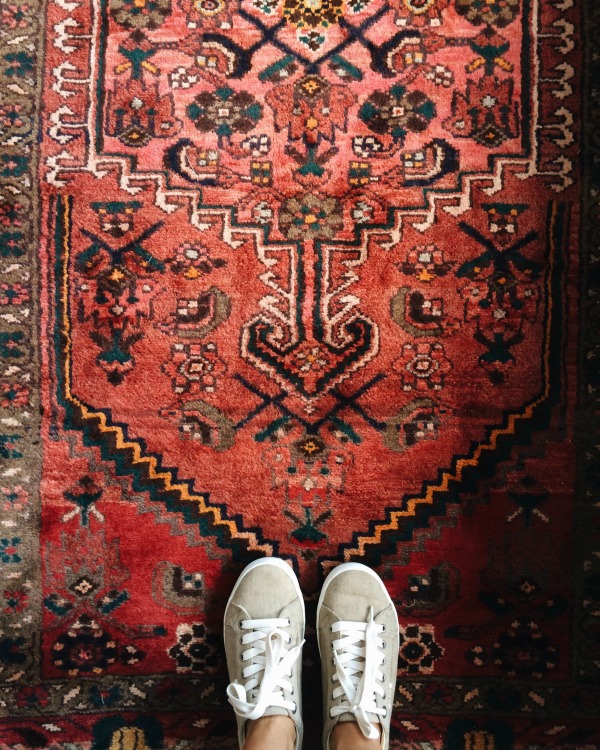
I had a daybed + rug moment at Rich Hippies. Have I mentioned I love getting interior inspiration from commercial spaces?
We picked up gifts for family from Moto Moda, Cadeau and Craft South. (Coincidentally, it was tax-free weekend in Tennessee.) Cadeau is where I first discovered my new favorite candle, Ash by Boy Smells. Don’t let the name fool you. It smells nothing like boy smells. Steve couldn’t care less about scented candles, but he loves this one. We also hit up Third Man Records downtown. Steve was really hoping to run in to Jack White, but we just missed him. He had been there two days earlier. We spent one evening walking around downtown, ducking in to different venues, sipping drinks and listening to live music, but we were happy to retreat to the quiet lil’ camper afterwards.
Not surprisingly, I had a hard time leaving. I knew returning to real life would be a slap in the face, but the little time we spent away from the kids was enough for a much needed reset. One thing I picked up from our short stay and started incorporating into life at home is setting the dial on our kitchen radio to a classical music station in the afternoons. When we arrived at the Shasta, the host had tuned a Tivoli radio to a classical music station. The volume was perfect. Not too loud, not too faint. We ended up leaving it on for most of our stay. It was so calming, and it has the same effect at home when the boys return from school. They’ve even been asking me to turn on “that music” from time to time when they need some downtime. I love bringing home little experiential golden nuggets like this as souvenirs from our travels.
Have you spent time away from your kids recently? Is it something you’re at ease doing or do you need a nudge (or shove) to get you out the door? When my kids were younger, I rarely traveled or spent time away from them. But now that they’re older, it’s a little easier and the more I do it the easier it gets.
P.S. – More thoughts on vacationing without kids.
images: Dana Miller for House*Tweaking


family life, inspiration