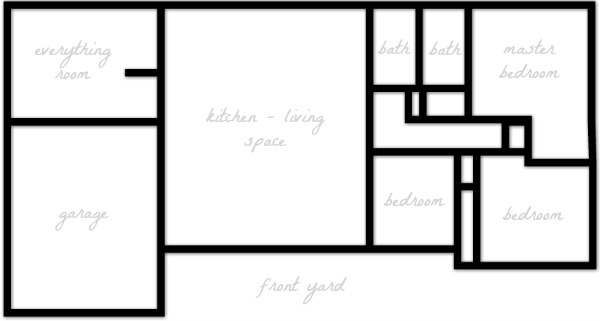
First, a general floor plan. It isn’t exact and doesn’t include doorways but, hopefully, you get the gist of things. If not, you might find this post helpful.
Part of the remodel included tearing down walls that separated the original kitchen, dining and living rooms.
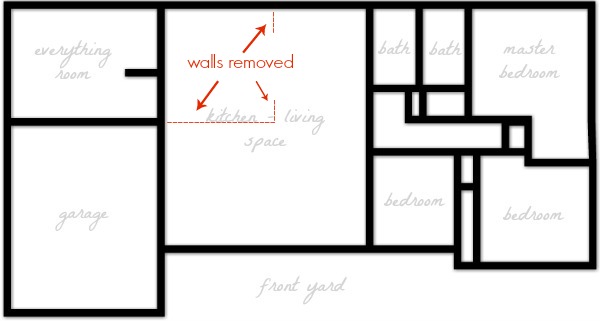
This allowed us to create an open kitchen – living space conducive to our casual lifestyle. It also made the modest house feel larger without straying from the original footprint.
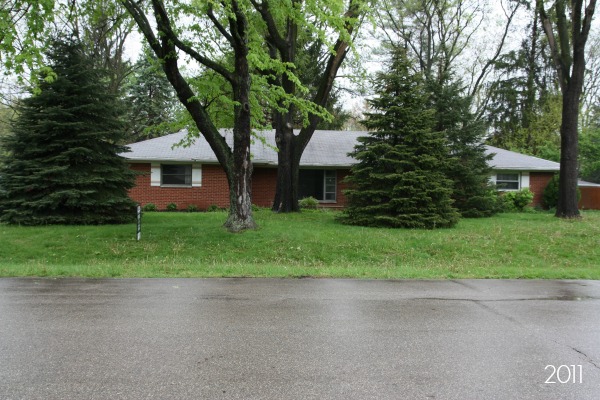
When we bought the home it was surrounded by numerous trees – some not in the best health – which prohibited the house from drying out properly and ultimately led to mildew problems and termite infestation. The exterior was in need of long overdue maintenance and repair including a new roof & gutters, new windows and general yard cleanup.
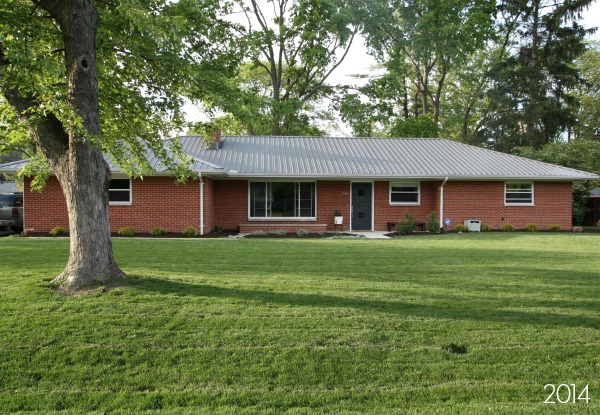
We had several trees removed and installed a metal roof along with insulated vinyl windows. The yard was excavated and we added basic hardscaping and landscaping. In an effort to preserve the home’s midcentury roots, we rehabbed the original front door.
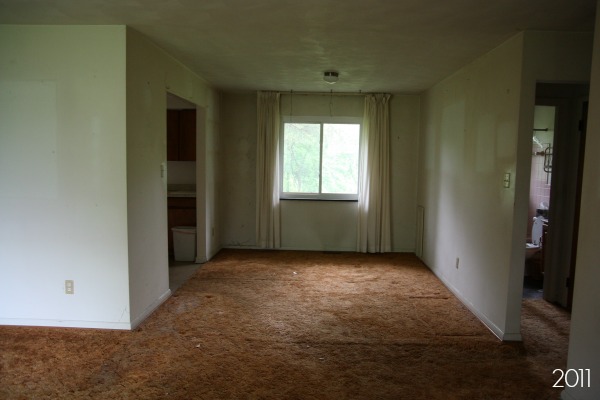
The original view from the front door looked into the dining room. Dirty and worn shag carpet was abundant. There were termite trails in the carpet pad and the baseboards were disintegrating due to termite damage.
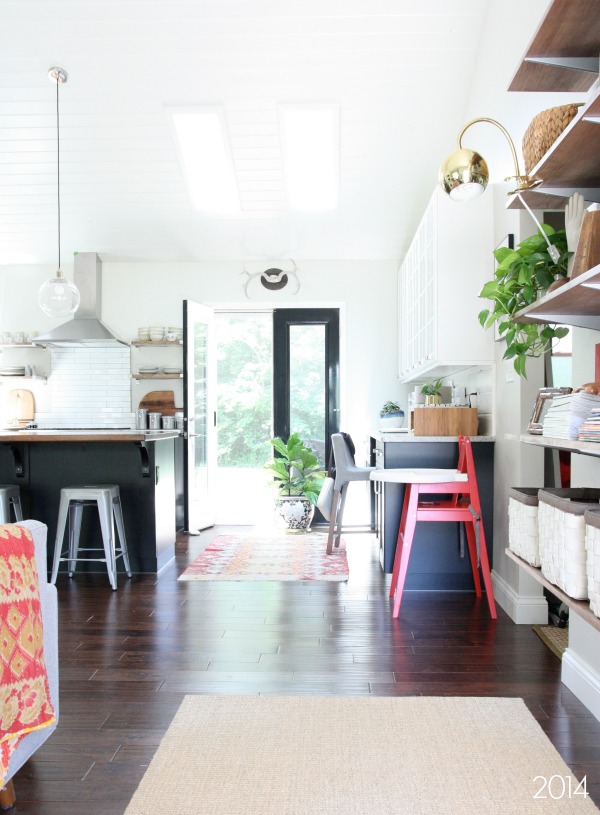
After removing walls, vaulting the ceiling and adding skylights, the space feels larger and brighter. We switched out the dining room window for a set of french doors to help connect the new kitchen to the backyard.

The original kitchen was small and closed off from the living room.
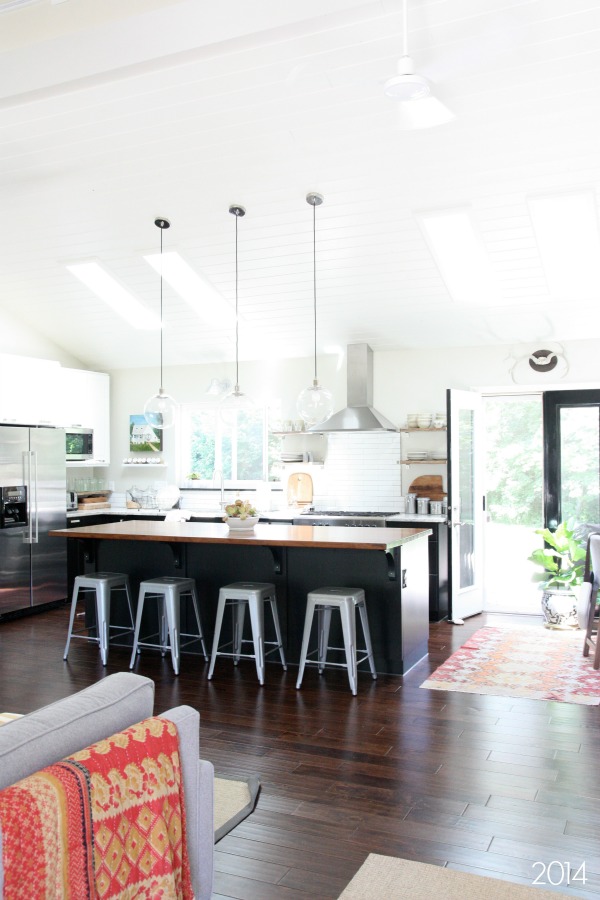
The new kitchen is open to the living room. A nine-foot-long island provides plenty of room for food prep and casual dining. It’s the hub of the house.
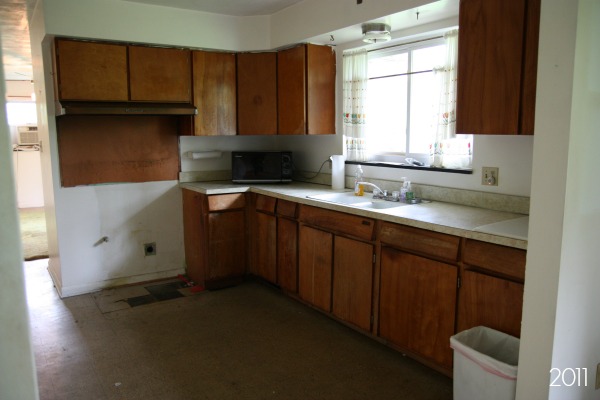
The original kitchen cabinets didn’t open / close properly and some were rotted through in places from years of neglect. The layout assigned the refrigerator to a corner all by itself and didn’t include a dishwasher.
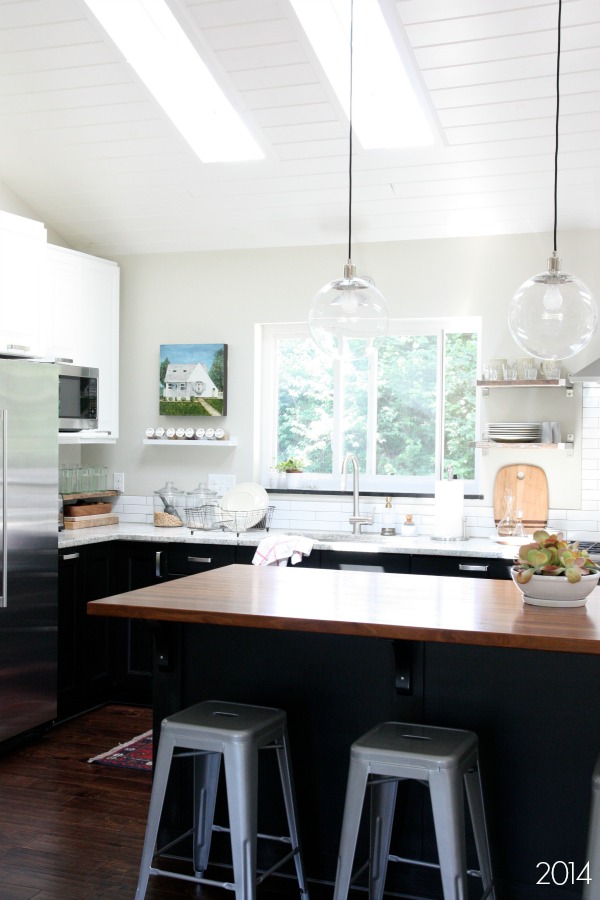
We left the kitchen sink under the window but ran new water and gas lines to relocate the refrigerator and stove and gain a dishwasher. We installed Ikea cabinetry. All appliances (save for the microwave) are Ikea as well.
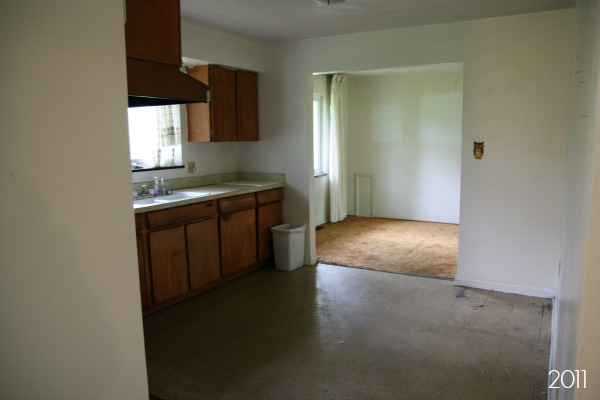
The original kitchen’s footprint was quite small.
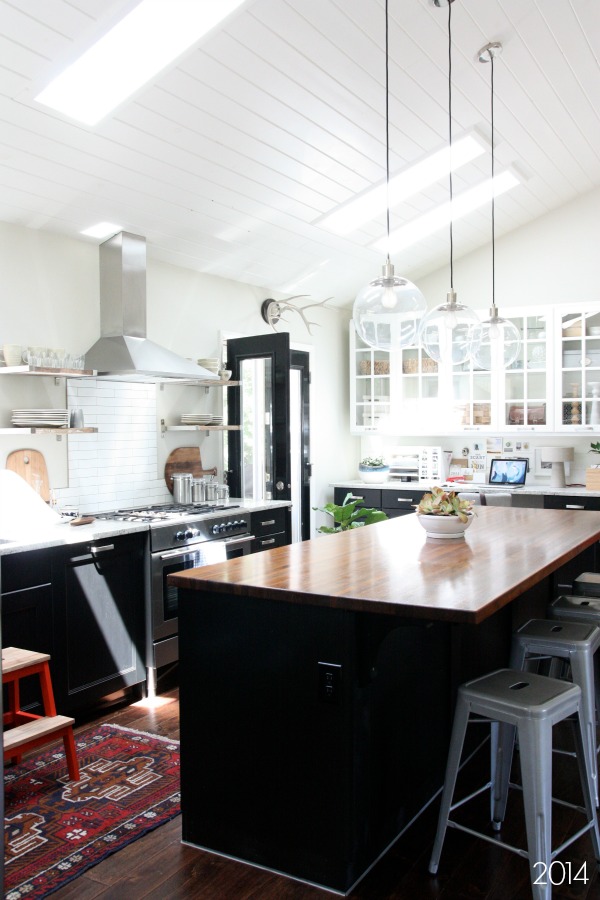
We relocated the dining room to make way for a larger kitchen. One side of the kitchen functions as a home workspace.
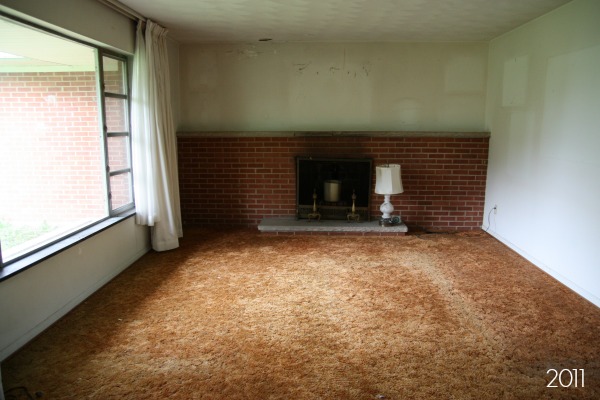
The living room – while dirty and outdated – boasted a brick fireplace and a large picture window. Chimney and roof leaks had caused damage to the ceiling and wall.
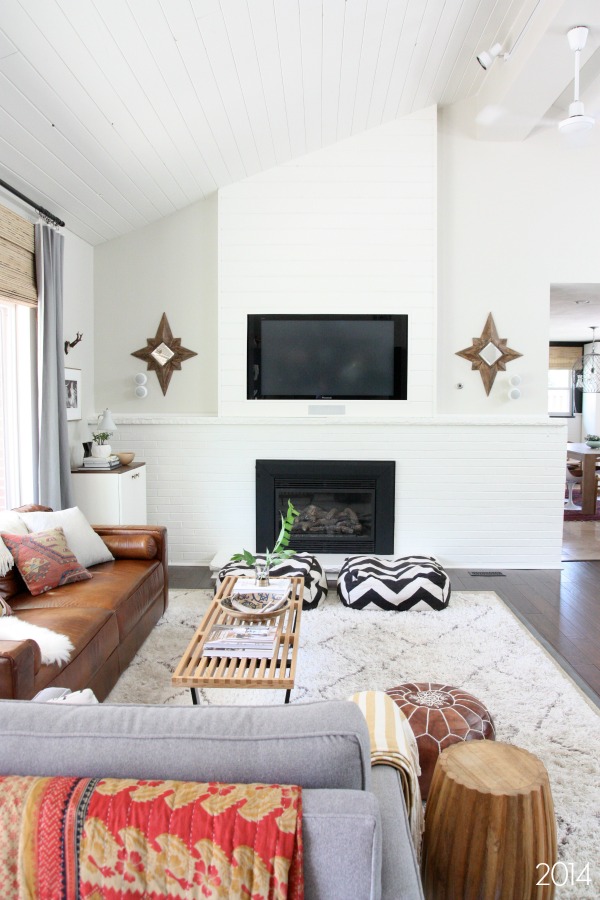
As much as we loved the idea of a wood burning fireplace it wasn’t a practical feature for our young family. A new gas line and a craigslisted gas insert allowed us to convert the fireplace to gas. We lived with the red brick surround for more than a year before deciding to take the plunge and paint it white. With limited wall space, we mounted the flatscreen TV above the fireplace and recessed it in a planked bump out.
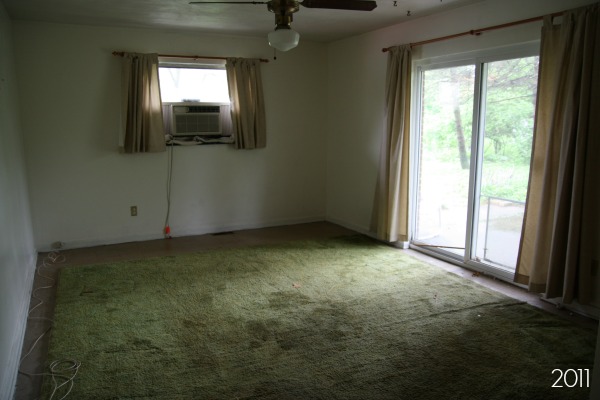
This room was used as a den originally. Sliding doors look out onto the backyard. Notice the window A/C unit. The house didn’t have central air conditioning.
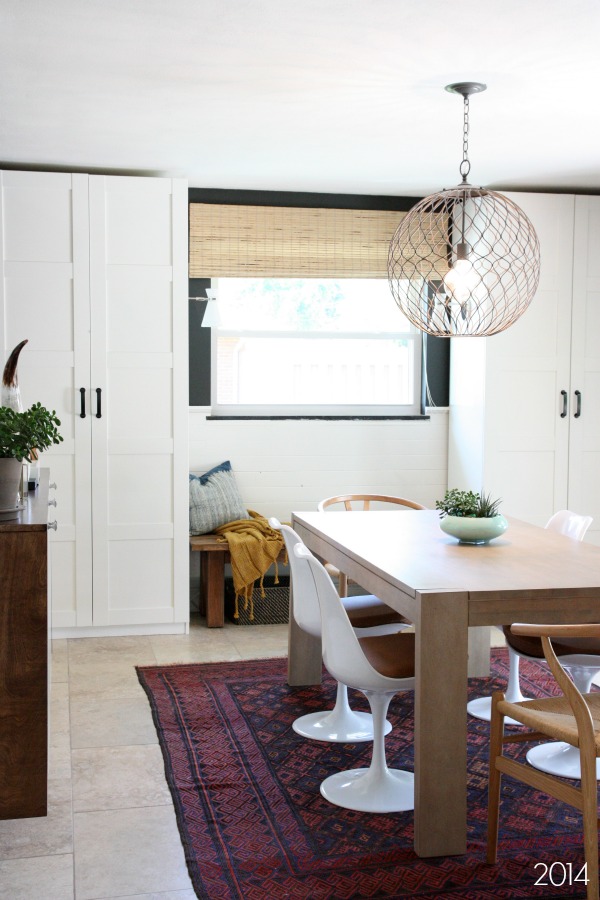
This room serves multiple purposes now. It’s our dining room, mudroom and laundry room. We installed a heat pump found on craigslist for $500, got rid of the window A/C unit and added a pair of freestanding wardrobes to stand in as closets. Hardworking tile and planked walls were specifically incorporated for their practicality.
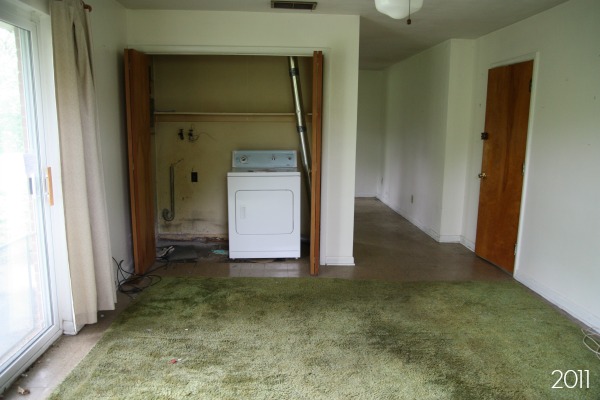
A laundry closet housed the washer and dryer behind cumbersome folding doors.

We ditched the closet and created a laundry nook with a floating countertop and upper cabinetry.
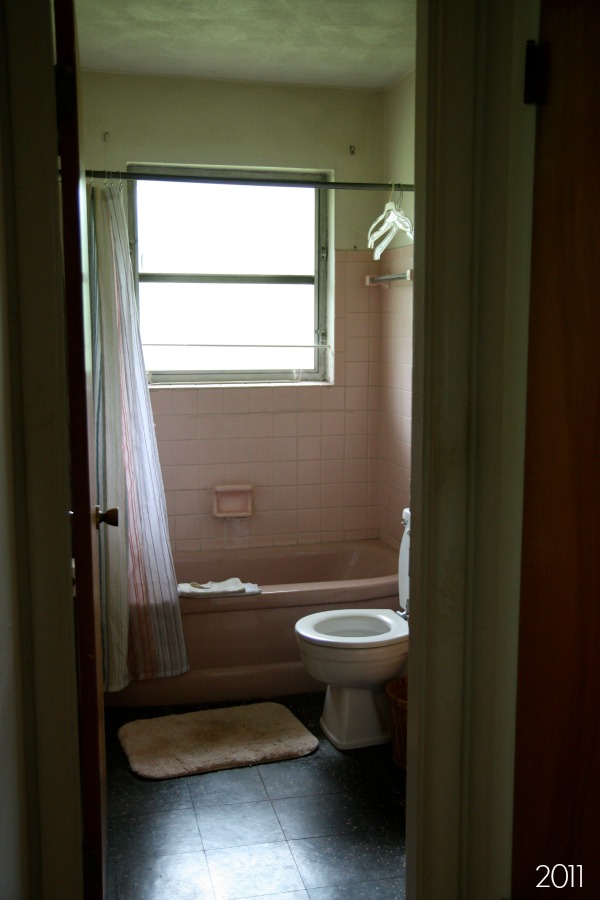
Moving onto the more private rooms in the house, here is the main bathroom. After discovering black mold within the walls, we gutted it.
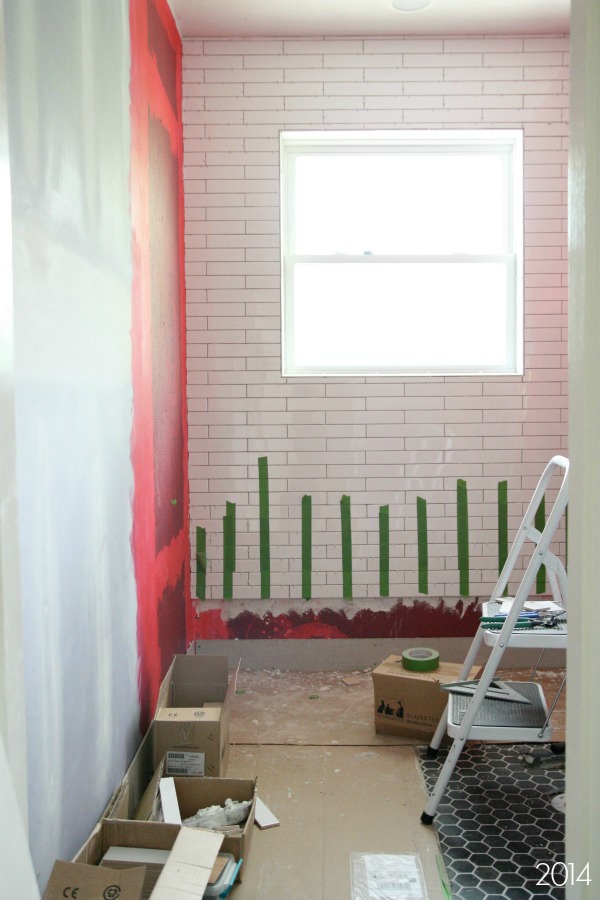
We moved into the house with this bathroom unfinished. (Luckily, the master bathroom was fully functional.) We’ve sloooooowly been working on the bathroom when time allows but have recently given it more attention. We tiled the floor and are in the midst of tiling the walls. The wait will be worth it!
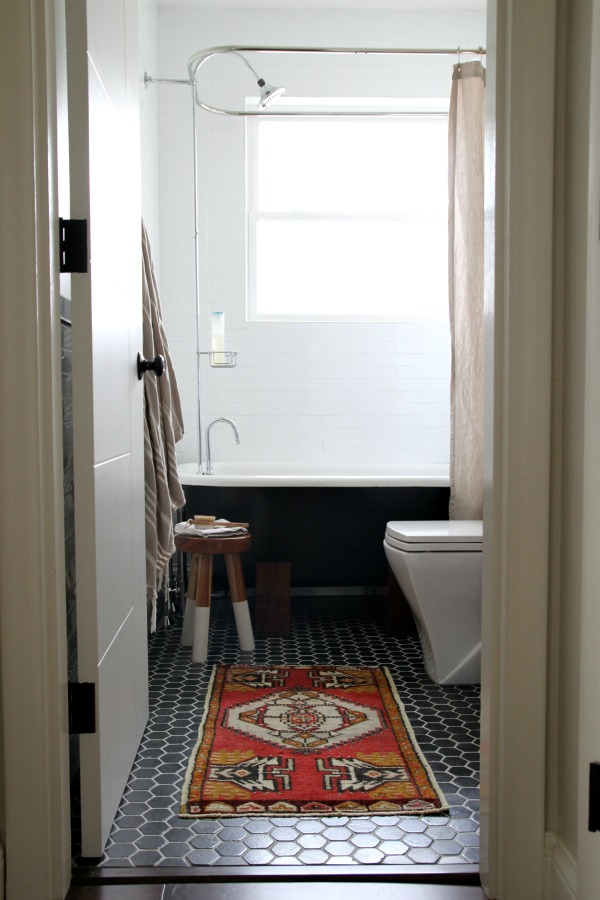
UPDATE: The main bathroom renovation is complete! See it here.
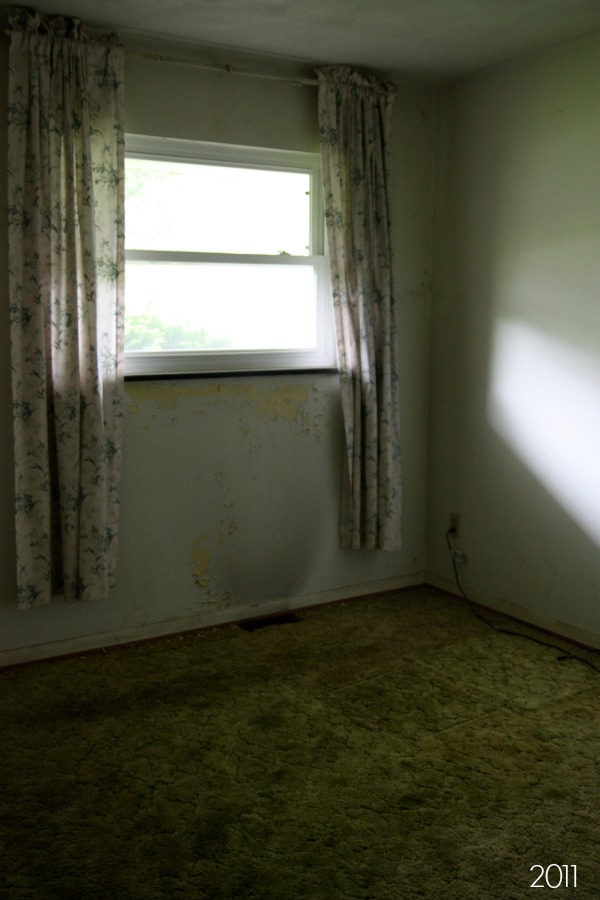
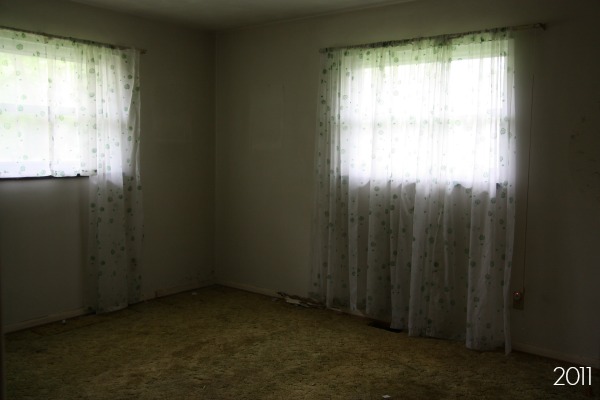
The smallest bedroom came to us with peeling paint, nonexistent baseboards and scary carpet. When we bought the house, we were a four-person family. Three bedrooms would have allowed each of our two sons to have their own bedroom. But three months after we closed on the house, we found ourselves unexpectedly expecting a third child.
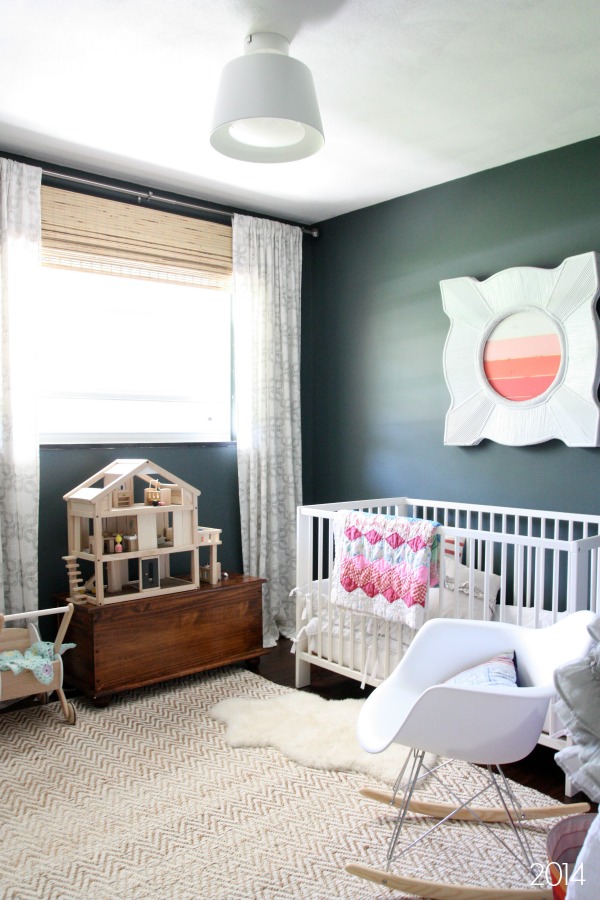
The smallest bedroom became the nursery. I installed the engineered hardwood flooring (same as in the main living space and all other bedrooms) while seven months pregnant. And, yes, I want an award for that.
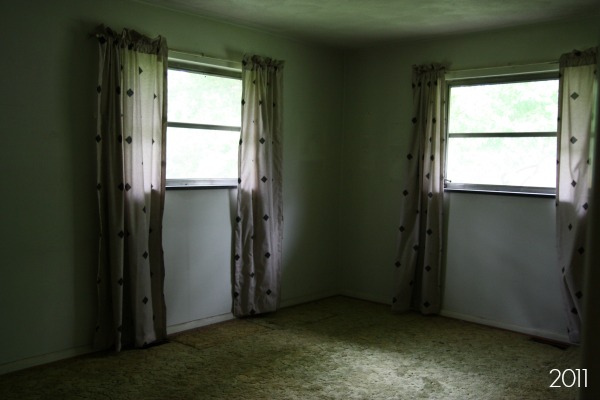
The only thing this bedroom had going for it was its size. It’s the largest of the three bedrooms.

Naturally, it became a shared bedroom for our two boys. We’re currently working on bringing better design to this room. I’ll share the results soon!
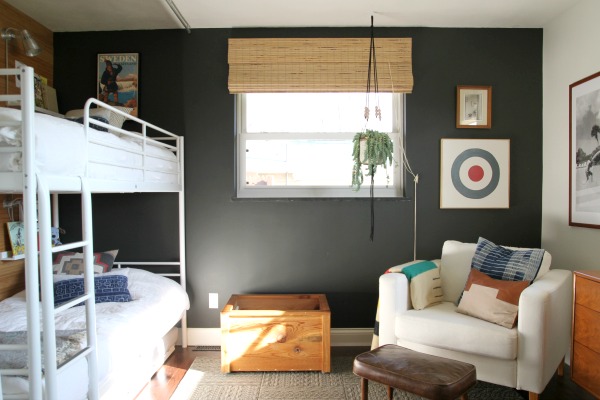
UPDATE: The boys’ shared bedroom is done! See it here.
There wasn’t anything master-ish about the master bedroom other than it sported an adjoining bathroom. More crumbling baseboards, more gross carpet…you get the idea.
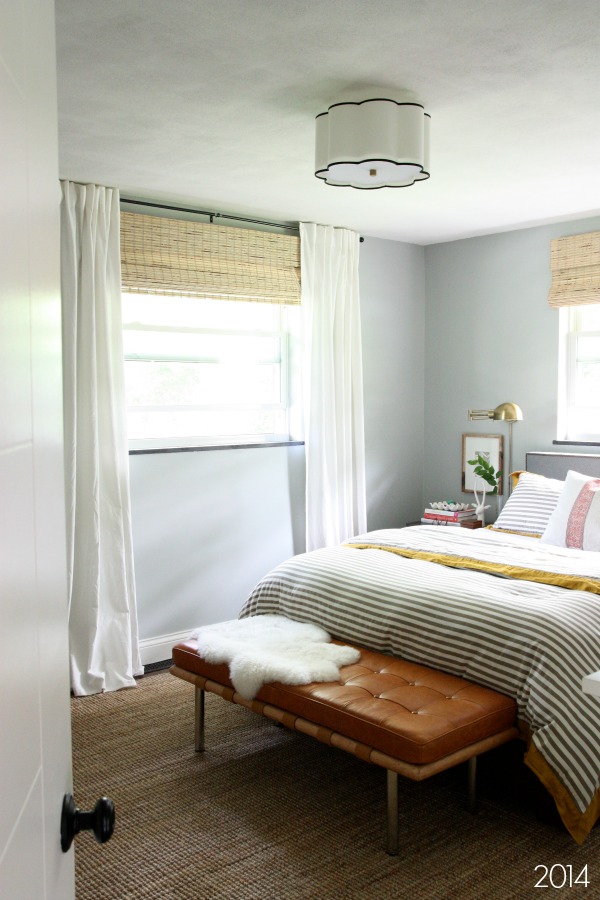
Three years later, it’s our retreat at the end of every busy day.

The original master bathroom was very PINK. The shower tiles were cracked. The floor tiles were hideous. The vanity was too small. The fluorescent lighting was unnerving.
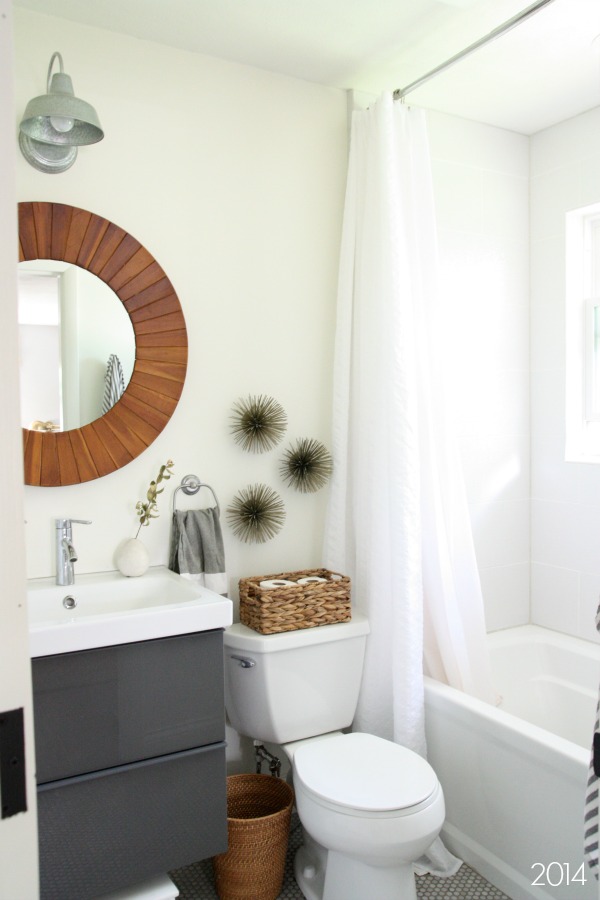
We demo’d the bathroom down to the studs. We kept the original layout but updated the fixtures and finishes.
That concludes the general house tour. Our goal was to make this modest ranch work for our family of five and lifestyle without adding square footage. I should probably mention that we upgraded the electrical, had a radon mitigation system put in, added insulation to the exterior walls and vaulted ceiling, and installed all new interior doors. We still have a few big projects in the works: finishing the main bathroom & boys’ room, installing a new driveway, hanging a new garage door, organizing the garage, improving the backyard, etc. so we aren’t done by any means. I’m including links relevant to the larger renovations we took on below. You can find source lists for each room here.
DEMOLITION
*https://www.housetweaking.com/2011/06/09/demolicious/
*https://www.housetweaking.com/2011/06/30/feeling-the-ceiling/
*https://www.housetweaking.com/2011/07/06/shes-a-brick-house/
FRAMING
*https://www.housetweaking.com/2011/07/27/framing-up-the-underdog/
VAULTED CEILING
*https://www.housetweaking.com/2011/08/04/things-are-looking-up/
*https://www.housetweaking.com/2011/08/18/the-underdog-sans-scaffolding/
*https://www.housetweaking.com/2011/11/23/tongue-and-groovy/
*https://www.housetweaking.com/2014/02/24/what-it-took-to-vault-the-ceiling/
WINDOWS & DOORS
*https://www.housetweaking.com/2011/10/11/new-windows-doors/
SKYLIGHTS
*https://www.housetweaking.com/2011/10/25/light-skies/
METAL ROOF
*https://www.housetweaking.com/2011/10/27/rockin-a-metal-roof/
FOAM INSULATION
*https://www.housetweaking.com/2011/11/01/in-case-youve-never-seen-foam-insulation/
INTERIOR DOORS
*https://www.housetweaking.com/2012/07/05/hold-the-door/
*https://www.housetweaking.com/2013/10/15/a-date-with-my-doors/
FLOORING
*https://www.housetweaking.com/2012/01/05/good-thing-my-body-is-producing-relaxin/
*https://www.housetweaking.com/2012/01/11/the-flooring/
*https://www.housetweaking.com/2012/09/26/our-wood-floors/
EXTERIOR
*https://www.housetweaking.com/2012/09/21/stranded-in-the-desert/
*https://www.housetweaking.com/2013/03/18/on-deck/
*https://www.housetweaking.com/2013/05/28/gettin-our-deck-on/
*https://www.housetweaking.com/2013/07/23/the-deck-where-we-left-off/
*https://www.housetweaking.com/2013/08/05/deck-boards-hidden-fasteners/
*https://www.housetweaking.com/2013/08/06/deck-done/
*https://www.housetweaking.com/2014/04/24/my-front-entry-part-i/
I’ll be adding individual room tours and will update this general tour with new projects as we finalize them. Thanks for looking!


