I’ve been meaning to create family photo books for a while now. I held off as long as I did because I was waiting for the perfect photo book to come along. I really didn’t want the thick albums of yesteryear with their photo pockets. I’m horrible at printing out photos. Horrible. Not to mention, traditional bulky albums take up a lot of space – space we don’t have. It saddened me to know the photos of our life were stuck in limbo on our laptop and phones. Surely there was a tangible yet beautiful way to share family photos.
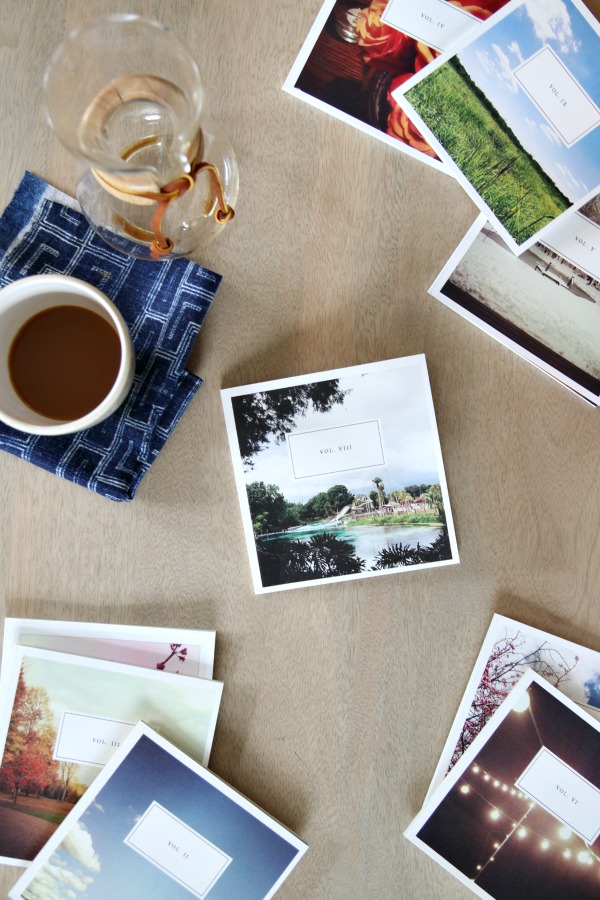
Enter Artifact Uprising. The company offers a variety of photo products you can hold in your hand: photo books (hardcover and softcover), calendars, postcards, prints, etc. It doesn’t sound all that different from any other company offering similar products but Artifact Uprising focuses on design-worthy aesthetics and eco-friendly materials. Photo book pages are made of 100% post-consumer waste recycled paper and wood items are handcrafted from local, fallen beetle pine – versus healthy trees. The commitment to quality along with the inspiring back story are what set this company apart from the rest of the pack.
“We believe that doing good is more important than doing well – and that kindness makes the world right. We believe in travel and the things you can learn from getting lost. And we believe the best lessons come from the listening. We try to laugh when light is needed and persist when the path requires it. We love wide open spaces and campfires and the kind of quiet that allows you to hear the snow crunching below your feet. We believe in those who wake up every day to choose joy. And we believe in the underdog. We believe in always remembering where you came from. We believe each of us will – in time – do something really, really nice for the world.” – Jenna Walker, CEO & co-founder of Artifact Uprising
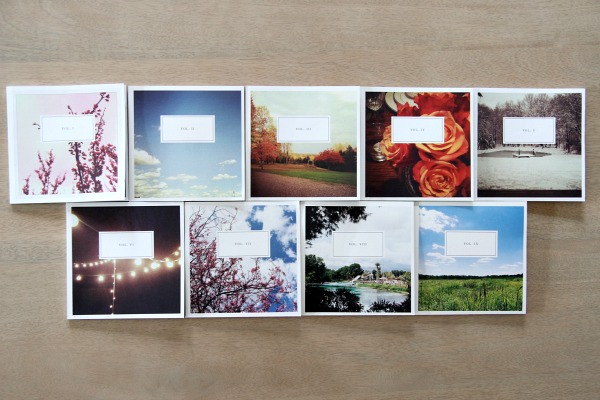
So, yeah, choosing Artifact Uprising was a no-brainer. I sat down one afternoon while the boys were at school and Mabrey was napping and created nine softcover photo books in the 5.5″ x 5.5″ size. They candidly document the last three years of our life. Most of the photos are from my instagram account but I downloaded a few from our computer as well. I didn’t include every photo from my instagram feed – only the ones that were family-oriented. I chose mostly nature-themed photos as cover photos so the books would look pretty on display. They. are. gorgeous.
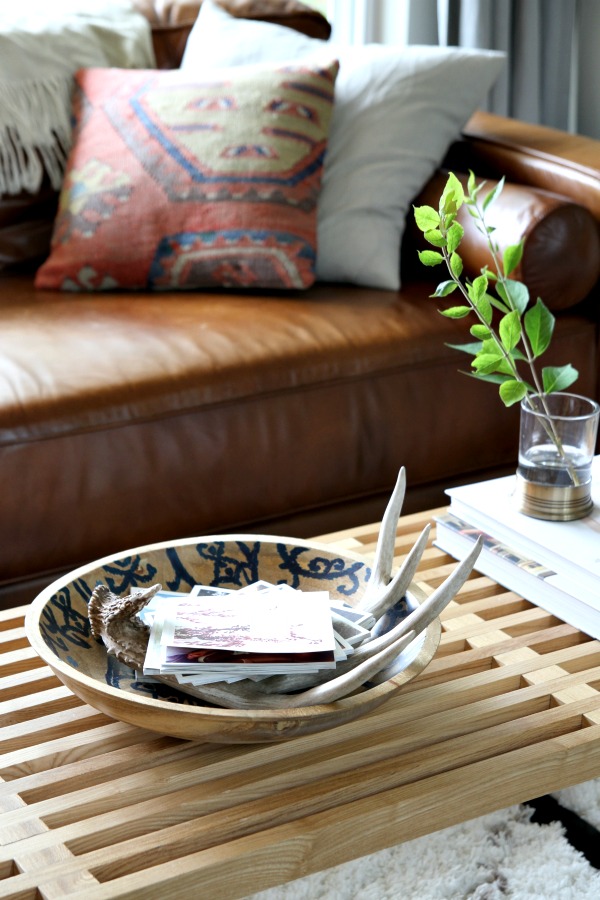
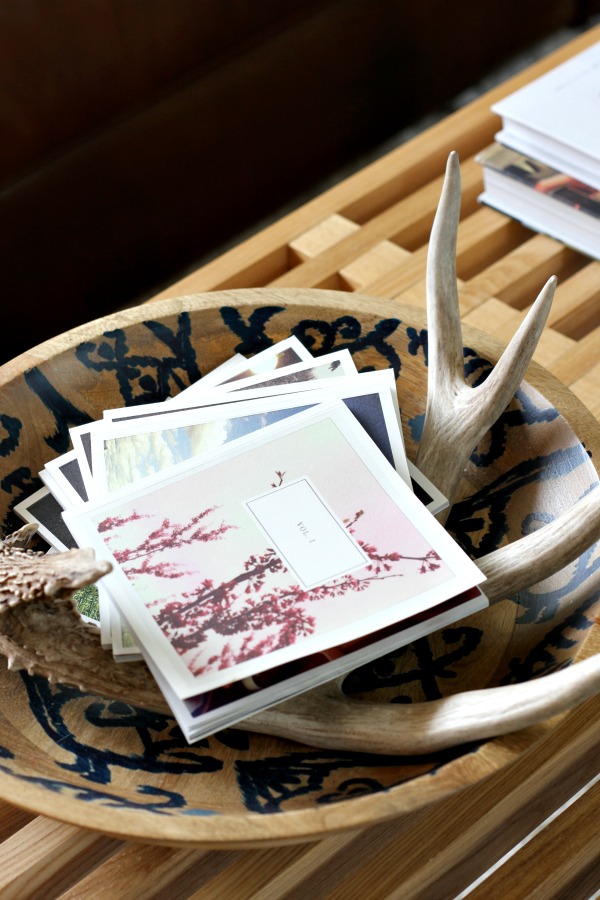
The day the books arrived I tossed them in a bowl on the coffee table and immediately the kids were flipping through them. They are the perfect size for little hands. To say we LOVE them is an understatement.

I can’t believe how one photo can spark a memory and suddenly we’re talking about “that one time…” They are such great conversation starters for kids. Mabrey especially enjoys seeing pictures of people she knows in a book. “Dat’s ME!” She thinks they’re legit books and we’re all famous ;)
One softcover book runs $16.99 and would make a special gift for a family member or friend. Mine are in chronological order but you can create “themed” books, too. A book that tells the story of a child from newborn to graduation would be great for a graduation party. A book dedicated to a family vacation could be fun. Steve and I have even talked about creating a book that documents our home’s renovation.
How do you display family photos at home? We have a gallery wall plus these new photo books and we also stream our computer photos on to the TV (via Apple TV) on the weekends when we have guests or are working on a project. The kids love seeing themselves on TV. #mininarcissists
*I love Artifact Uprising‘s mission so much that I contacted them about becoming an affiliate soon after our photo books arrived. They agreed! While I purchased the photo books shown above on my own with no special discount, I do earn commission on any orders placed via affiliate links. This post was NOT sponsored and Artifact Uprising didn’t request a post. I just love sharing good stuff. Thanks for your continued support!
images: Dana Miller for House*Tweaking
When we bought our house three years ago, the plan was to scrub the original bathrooms really well and live with them for a few years before renovating them. But in the midst of demolition, we discovered black mold behind one of the bathroom walls when we demo’d a shared kitchen wall. Upon further inspection, there were cracked shower tiles in each of the bathrooms allowing water to seep into the walls. We ended up gutting both bathrooms to remedy the mold problem. We finished the master bathroom before moving in and it’s been our only functioning bathroom for the past 2+ years. Yep, all five of us use one bathroom. And I’m still alive to tell its story.
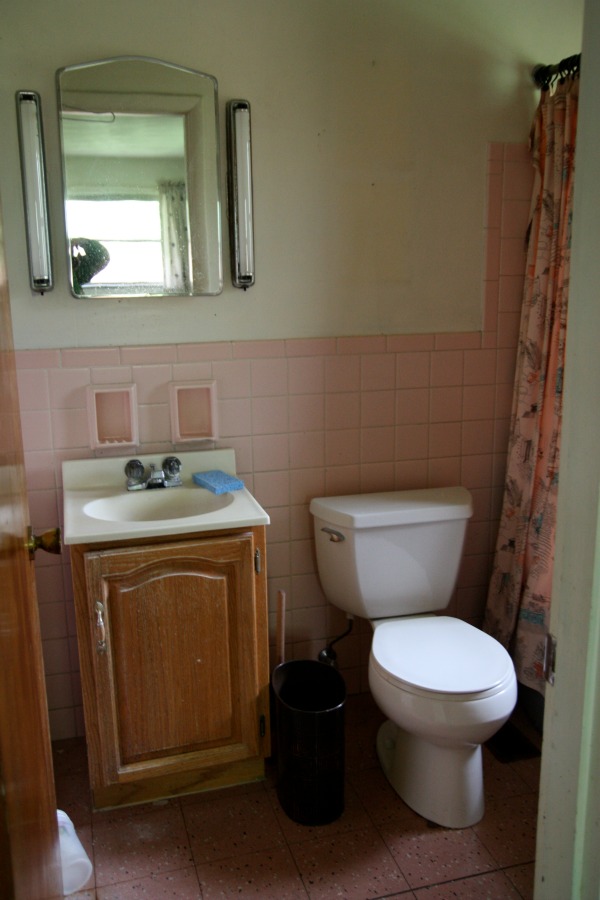
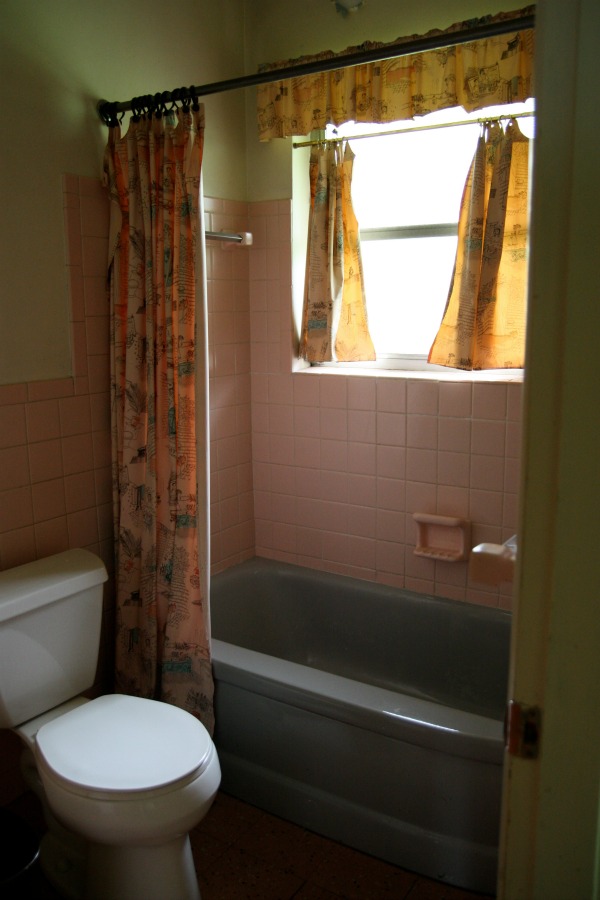
The original bathroom was pink and gray – complete with a matching vinyl shower curtain, window curtain and valance (!). The vanity was way too small. The fluorescent lighting had to go and the only ventilation was an open window. However, we didn’t mind the layout and the window in the shower provided a decent amount of natural light.
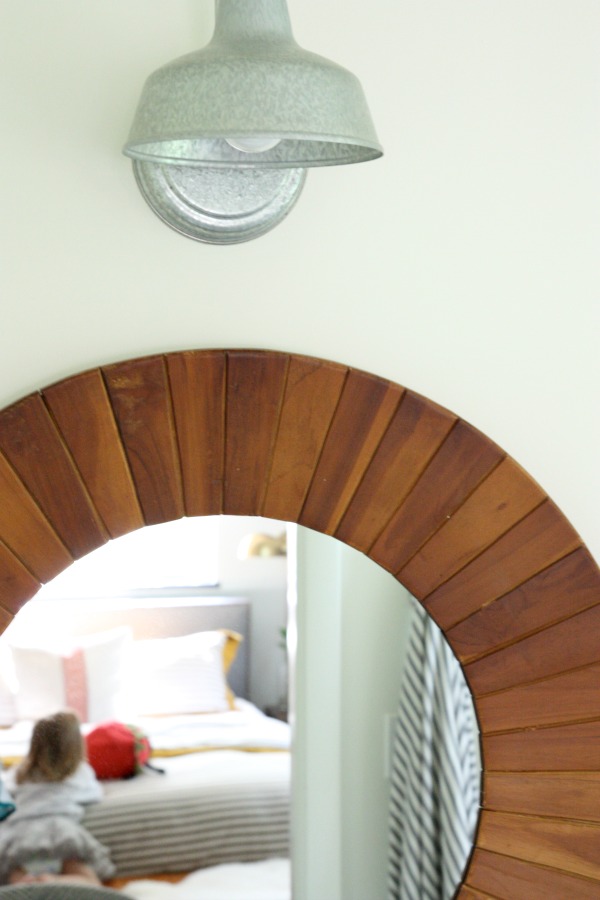
To save time and money, we kept the original layout and toilet but all the other fixtures and finishes are new. The electric was upgraded to service a sconce above the vanity, a can light above the tub and a proper ventilation fan.
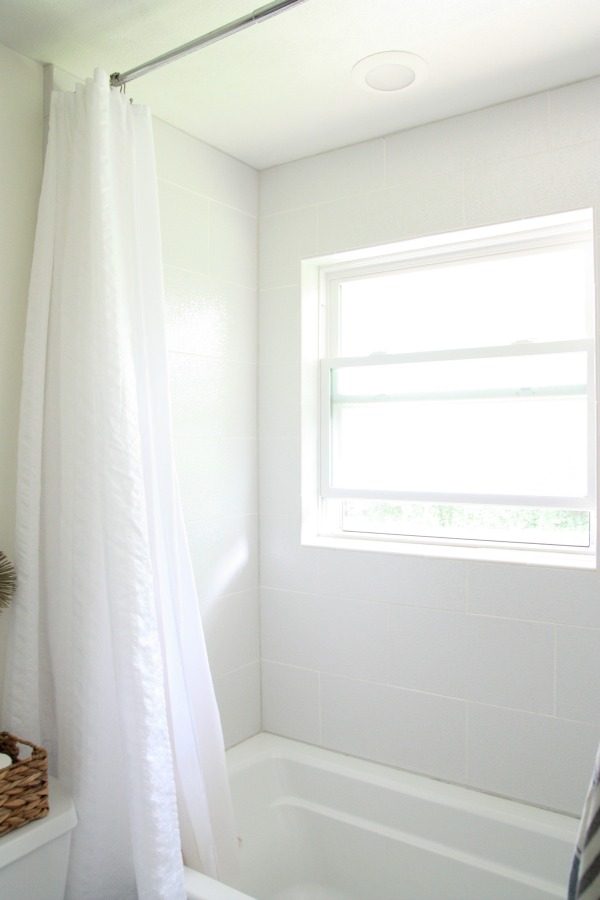
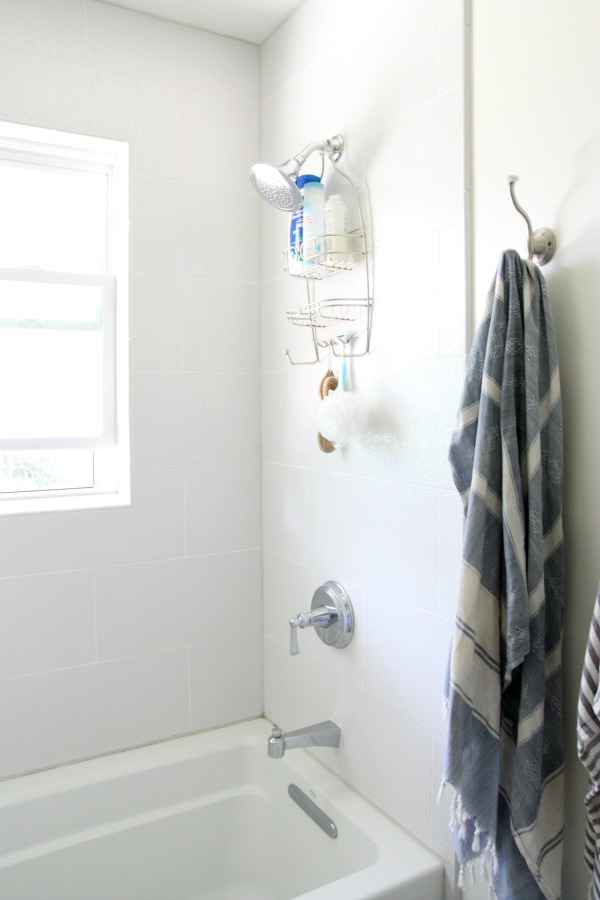
The original aluminum window was replaced with a vinyl one featuring privacy glass. The glass is smooth to the touch (and easy to clean) but textured in between the double panes for privacy. I am so, so, SO happy to have a window in the shower! It’s as close as I’ll ever get to an outdoor shower in Ohio.
The original shower tile was only installed about two-thirds of the way up the wall. We chose to take the new wall tile to the ceiling to give the appearance of taller ceilings and a bigger space. We contemplated a glass door or partition on the tub / shower but the placement of the plumbing would have made entry / exit into the shower tricky. We opted for a simple floor-to-ceiling shower curtain instead and it works great.
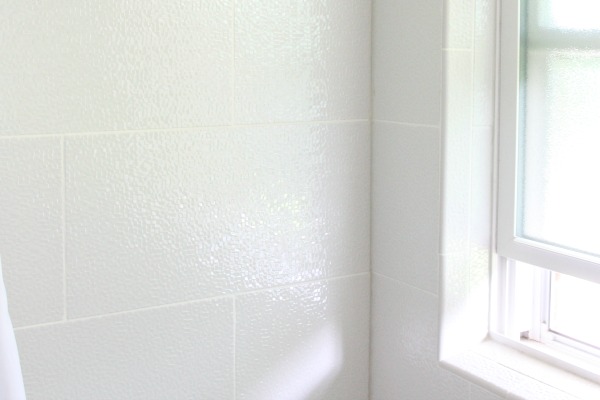
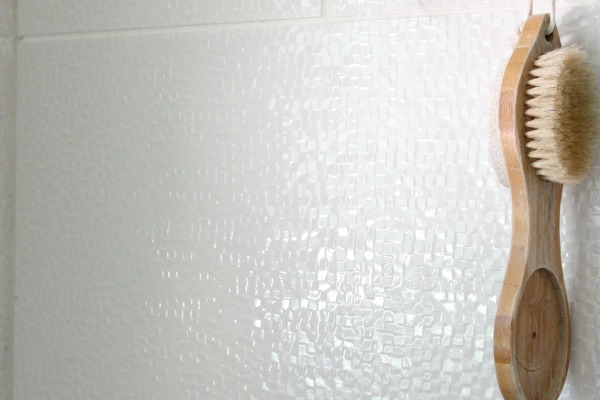
Bathrooms tend to feel very slick and sterile but I’m drawn to natural, nubby and woven textures. To achieve that tactile vibe I love, I chose tiles with interesting textures. The shower tile almost has a glittery appearance. It shimmers in the light from the window. Not to mention, the reflective surface is another way to trick the eye into seeing a brighter, larger space.
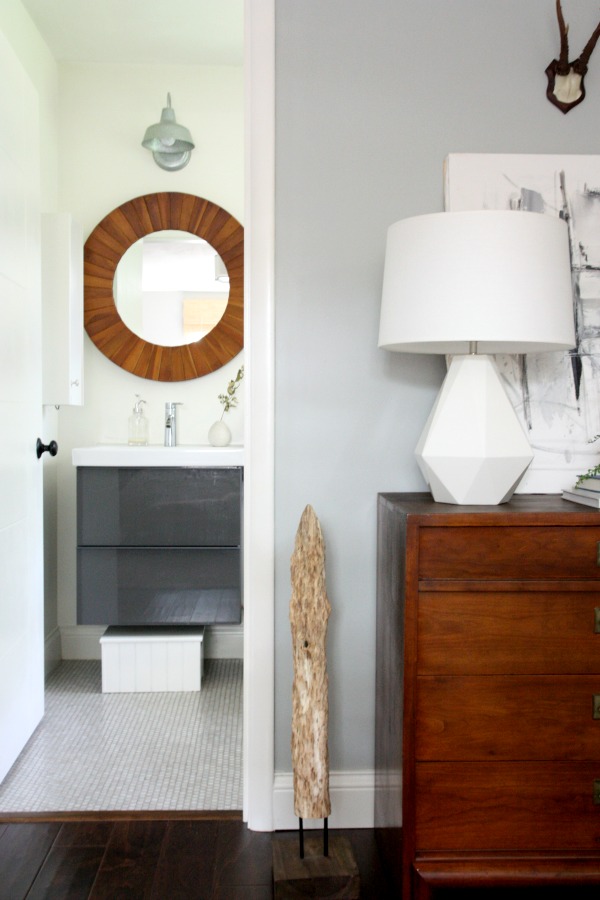
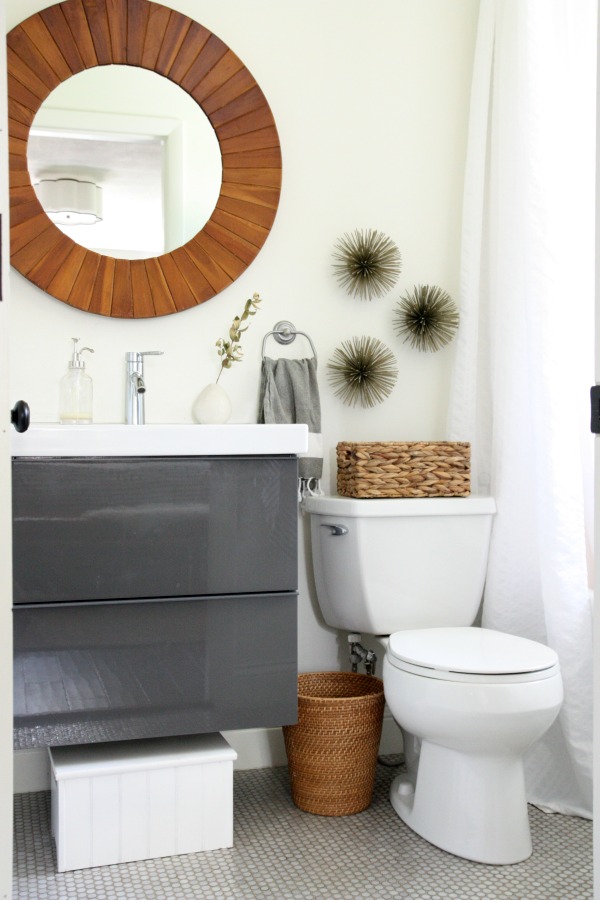
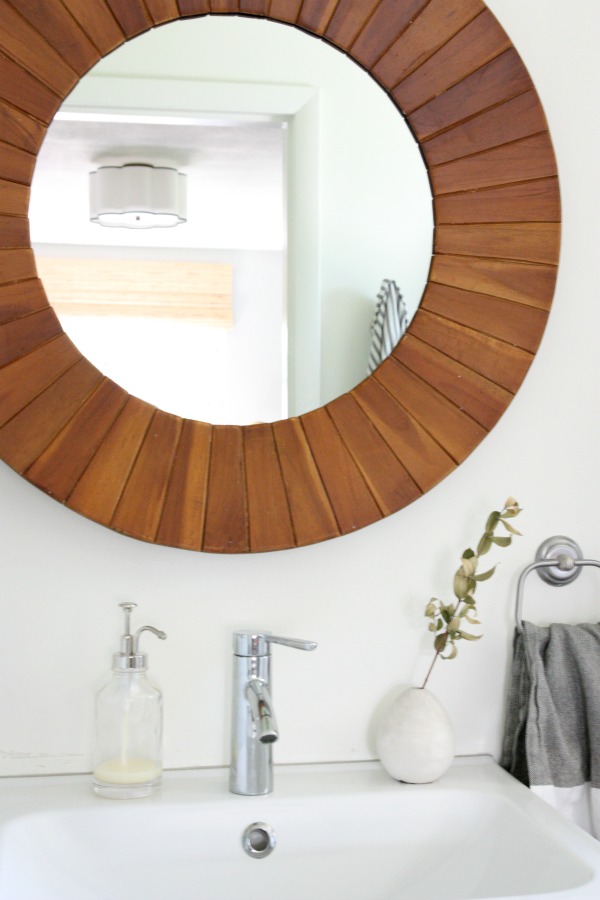
The sink area of the bathroom is visible from our bed(room) so I wanted something super simple that would tie in to the bedroom and not look too utilitarian. I had my heart set on a floating vanity but Steve requested drawers for all of his beauty supplies. (He’s kinda high maintenance.) The compromise was a floating vanity boasting two deep drawers. It was the perfect solution! We have plenty of storage and I can slip the kids’ step stool underneath the vanity. The floating design makes for quick and easy floor cleaning, too.
Eventually, we added a small wall cabinet to the left of the sink to house Steve’s electric razor, electric toothbrush and more of his manly toiletry surplus. (I told you he’s high maintenance.) I got tired of knocking over all the charging stations on the sink. We cut a hole in the side of the wall cabinet to gain access to an outlet so Steve can charge his grooming tools sight unseen and no one’s the wiser. THIS IS HOW YOU STAY MARRIED, PEOPLE. You won’t read about this in any of those self-help marriage books. Good communication? Showing appreciation? Healthy sex life? Yeah, those are all noteworthy and all but, I’m telling you, hidden charging stations are where it’s at! And they lived happily ever after…
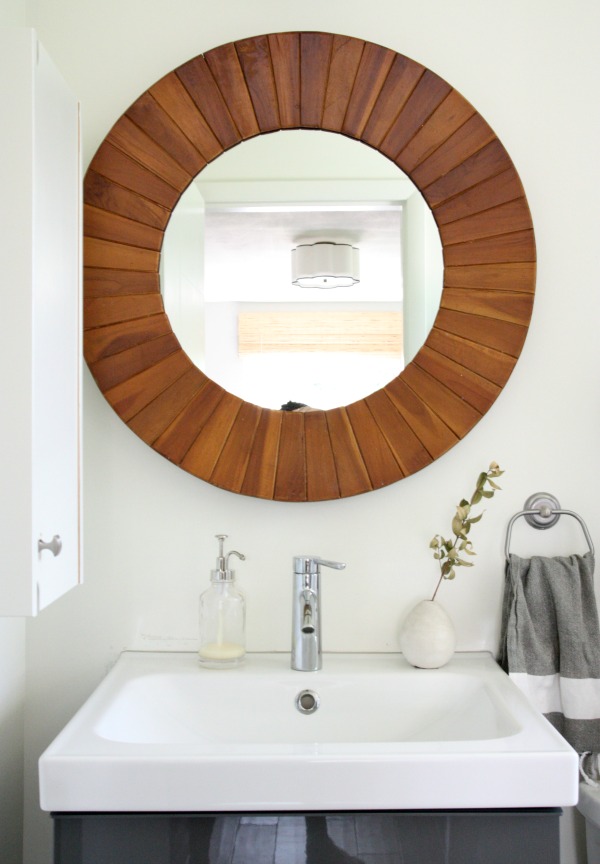
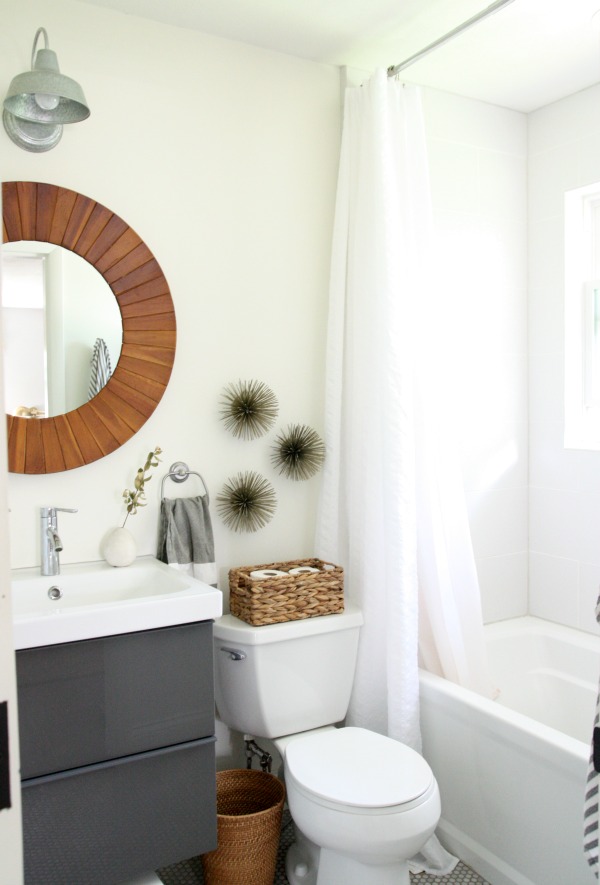
For warmth, I hung a round teak mirror above the sink. I didn’t seal it or anything and it looks as good as new. Teak has a good reputation in wet conditions so it’s kinda perfect for a bathroom.
The original floor tile tested positive for trace amounts of asbestos but there was no way we were keeping it. Now the proper way to remove asbestos tile (at least in the great state of Ohio) is to hire a certified abatement contractor for anything >50 square feet. (This one bathroom contained less than that but we were dealing with two bathrooms which put us over by ~20 square feet.) But that is expensive and Steve will try anything at least once. So he removed the asbestos tile himself using a wetting method along with full-body coverup gear and a respirator. I was pregnant at the time so the kids and I steered clear of the house during and for some time after removal. Steve did dispose of the tile in a landfill that accepts asbestos. In sharing this, I’m NOT saying you should attempt this yourself. I’m just being honest about what we did. You should probably follow your state’s regulations, m’kay? M’kay. Now that that’s settled…
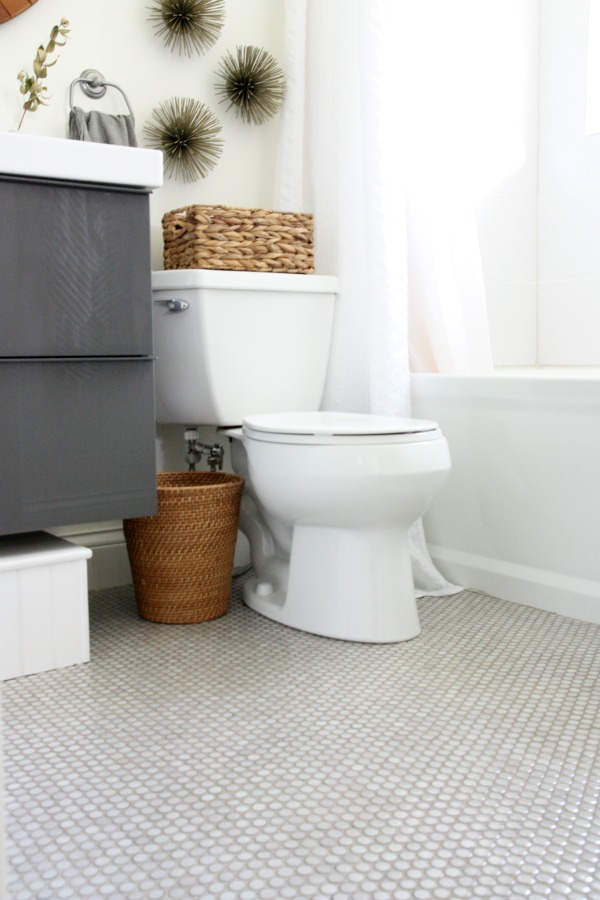
The new floor features (asbestos-free!) penny rounds and they lend yet another texture to the bathroom. It reminds me of reptilian scales and, after we first installed it, I wanted to rub myself all over it. We chose a sandy, dirt-colored grout that has held up well over the past two years. A woven trash can disguises ugly water lines. The basket on top of the toilet tank holds toilet paper. We couldn’t decide on a good place to hang a toilet paper holder (I vetoed the side of the vanity because I didn’t want to see toilet paper from the bed) so we threw a few rolls in the basket temporarily and, well, now it’s permanent.

I don’t think either of us expected to live with only one bathroom for this long. (We’re slowly plugging away in the other bathroom as I type.) But if we must share a bathroom, I’m happy it’s this one. On any given night, you can find all five of us squeezed in here getting ready for the kids’ bedtime. It works but, man, I am totally looking forward to having a second bathroom. It’s going to be a game changer. No more difficult questions about what happened to my penis!
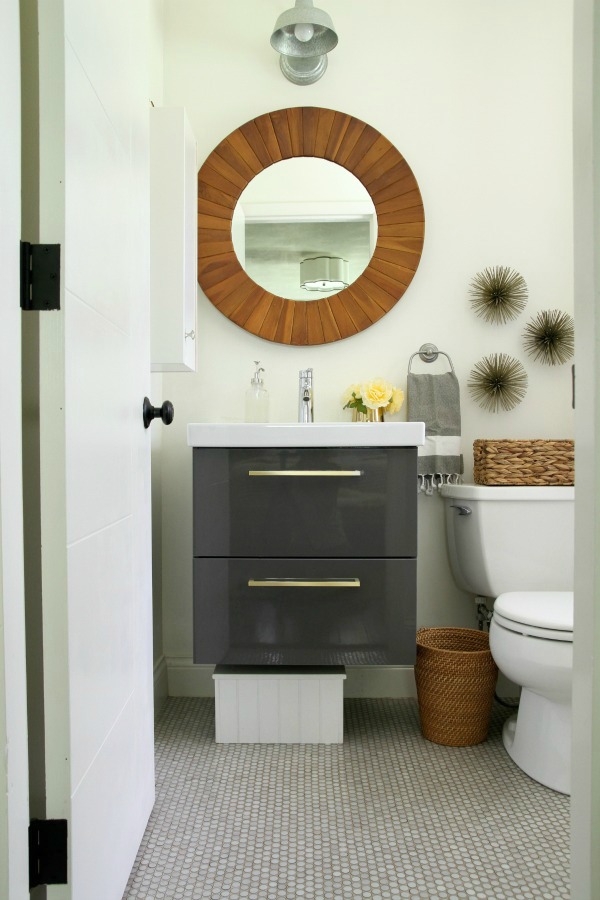
UPDATE: We added brass pulls to the IKEA vanity. See them here.
Resources of note:
wall & trim paint – Benjamin Moore white dove
floor tile – penny round moss from The Tile Shop
shower tile – capua blanco from The Tile Shop
tub, drain, shower fixtures – Kohler archer
shower curtain – 96″ seersucker curtain from Amazon, discontinued
double hook shower curtain rings – Amazon
shower curtain liner – Amazon
toilet – reused, Kohler
wall sconce – Barn Light Electric
mirror – Home Emporium
vanity – Ikea GODMORGON, high gloss gray
sink – Ikea ODENSVIK
faucet – Ikea DALSKÄR
soap dispenser – Target
wall cabinet – Ikea, painted white
towel holder & hooks – Lowe’s
trash can – Target
wall urchins – Target (I spray painted them gold because that’s what I do.)
hand towel – West Elm
peshtemal towels – etsy
Curious about the evolution of this bathroom? Here are a bunch of bathroom-related links:
RENOVATION
*https://www.housetweaking.com/2011/08/18/the-underdog-sans-scaffolding/
*https://www.housetweaking.com/2011/08/30/a-few-new-things/
*https://www.housetweaking.com/2011/09/13/behind-the-walls-i-mean-scenes/
*https://www.housetweaking.com/2011/10/11/new-windows-doors/
*https://www.housetweaking.com/2011/11/06/we-have-walls/
*https://www.housetweaking.com/2011/11/01/in-case-youve-never-seen-foam-insulation/
*https://www.housetweaking.com/2012/02/03/let-there-be-light-and-some-cabinets/
*https://www.housetweaking.com/2012/02/29/master-bathroom-tiling-progress/
*https://www.housetweaking.com/2012/03/02/windows-in-showers/
*https://www.housetweaking.com/2012/03/06/master-bathroom-progress/
*https://www.housetweaking.com/2013/05/20/fade-to-white/
FIXTURES & DECOR
*https://www.housetweaking.com/2011/09/
*https://www.housetweaking.com/2011/10/05/the-master-bath-master-plan/
*https://www.housetweaking.com/2012/01/13/a-bathroom-vanity-compromise/
*https://www.housetweaking.com/2012/02/09/recent-purchases/
*https://www.housetweaking.com/2012/02/23/gettin-teaky-with-it/
*https://www.housetweaking.com/2012/03/27/master-bathroom-reveal/
*https://www.housetweaking.com/2012/05/15/recent-purchases-2/
*https://www.housetweaking.com/2012/11/29/bathroom-vanity-sanity/
*https://www.housetweaking.com/2012/12/19/the-peshtemal-plunge/
*https://www.housetweaking.com/2013/04/30/three-sea-urchins-a-trash-can-a-tumbler-a-soap-dispenser-walk-into-a-bathroom/
*https://www.housetweaking.com/2014/06/18/easy-and-awesome-toilet-seat-upgrade/
*https://www.housetweaking.com/2014/09/15/schoolhouse-electric-supply-co-giveaway-new-bathroom-vanity-hardware/
You can now access this master bathroom tour along with a general house tour and individual room tours under the “See My House” tab in the side bar. Thanks for reading!
images: Dana Miller for House*Tweaking


budget decor, DIY, family life, inspiration, kid-friendly