I’ve been wanting to paint the original ceramic floor tile that lines our entry and a hallway (from the garage to the kitchen) for over two years. I came across this Pinterest image shortly after we moved in and learned that it was achieved by applying chalk paint and lacquer. I thought it might work for our tile and pinned it for future reference. Well, I finally made it happen!
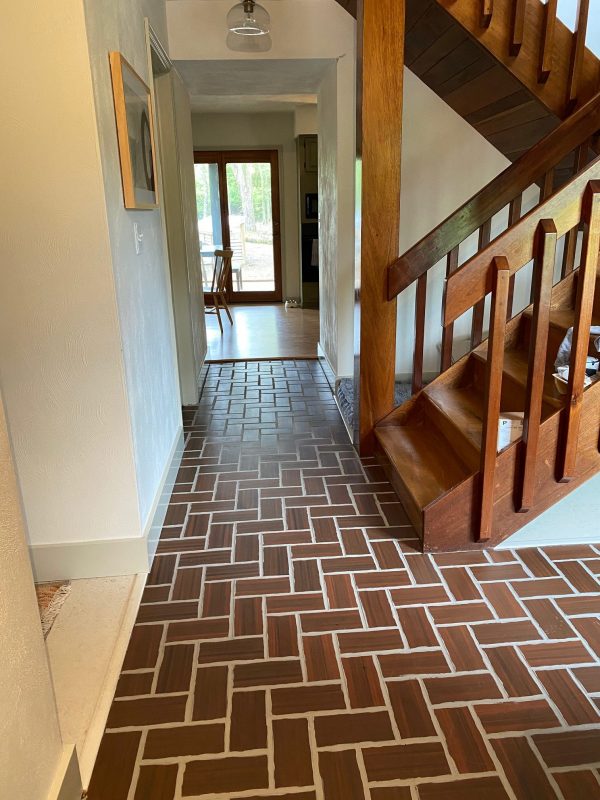
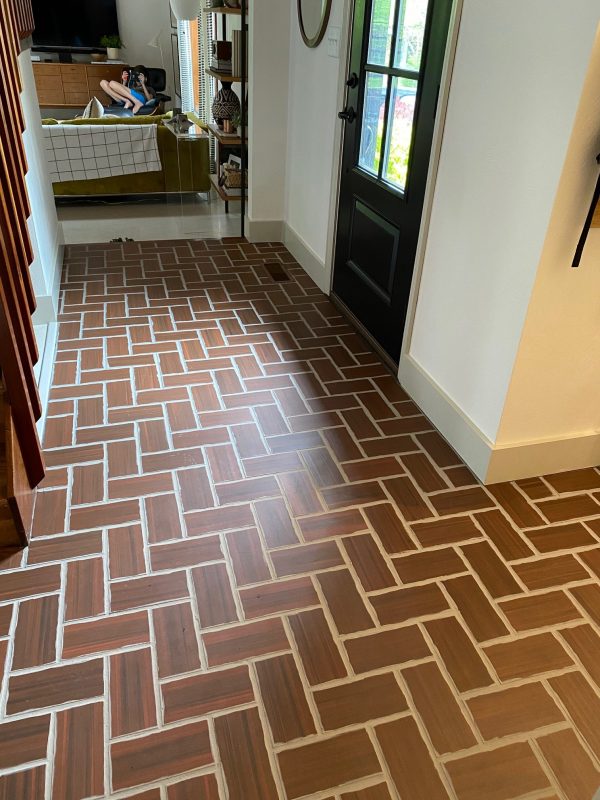
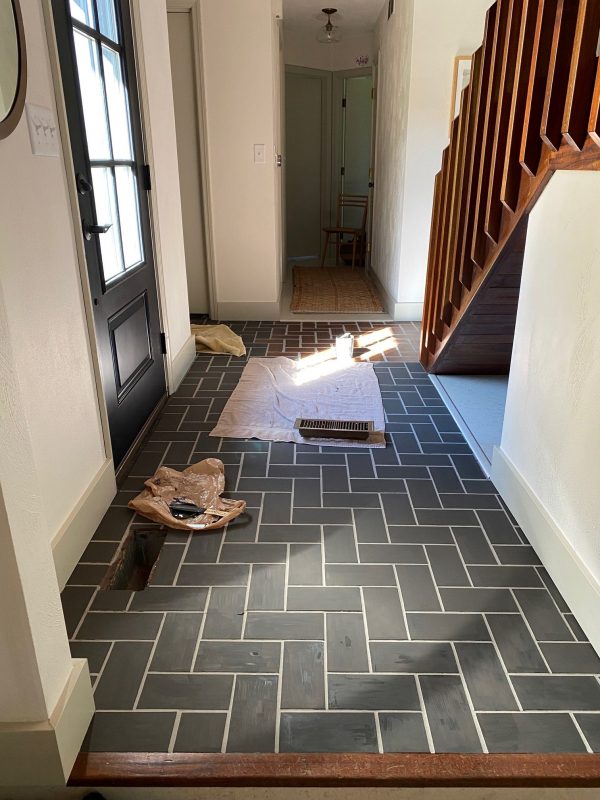
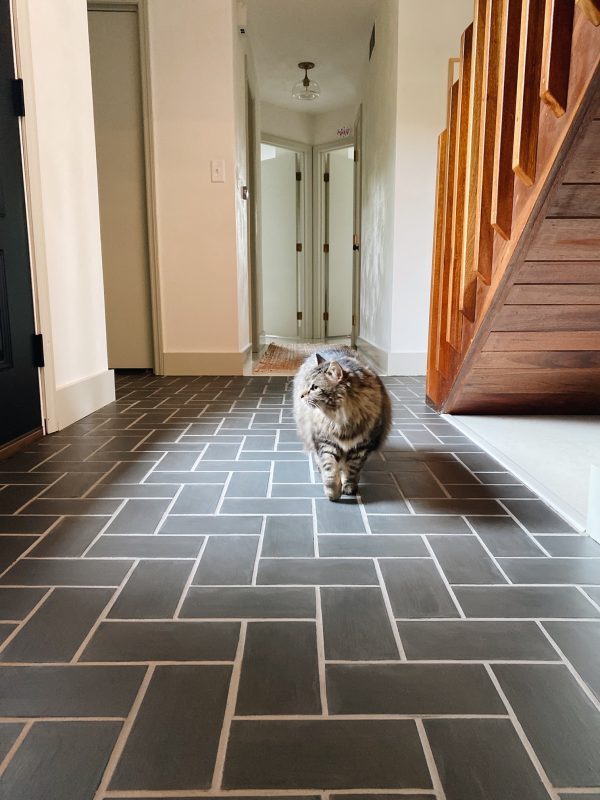
First, feast your eyes on the ’70s reddish-brown goodness I started with…
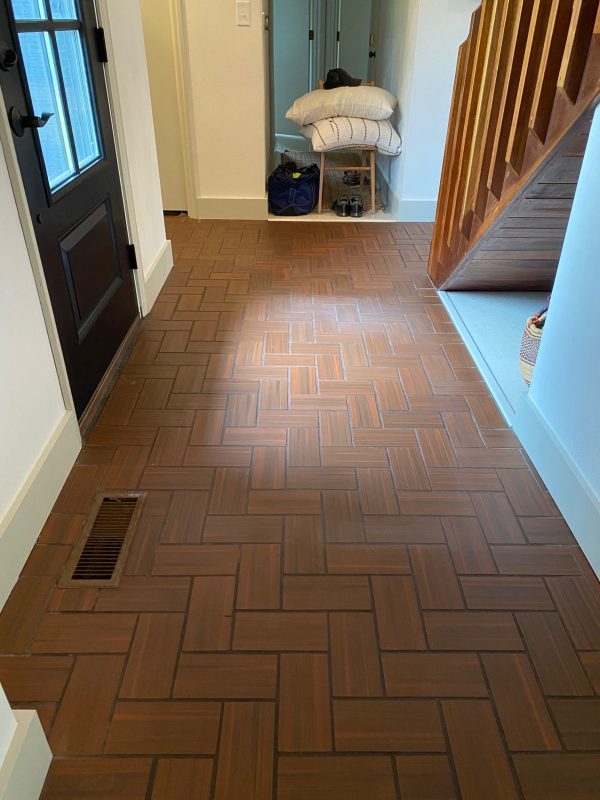
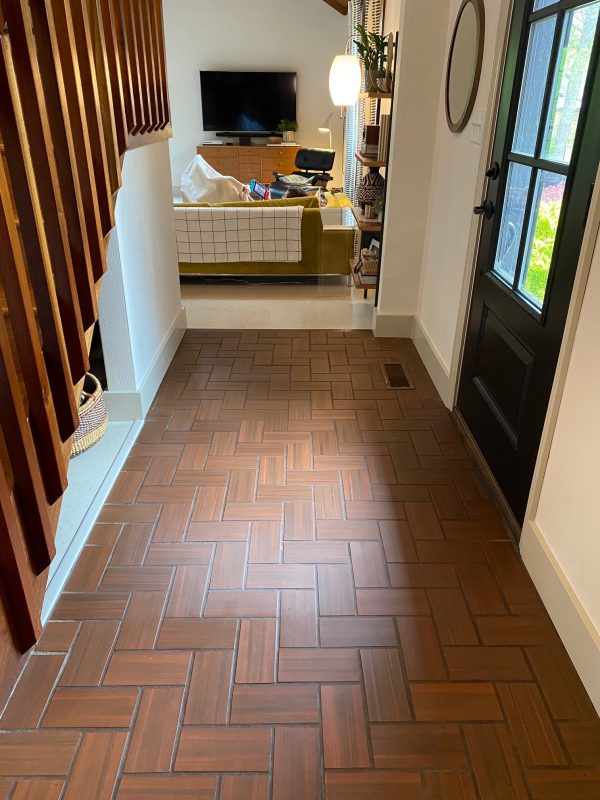
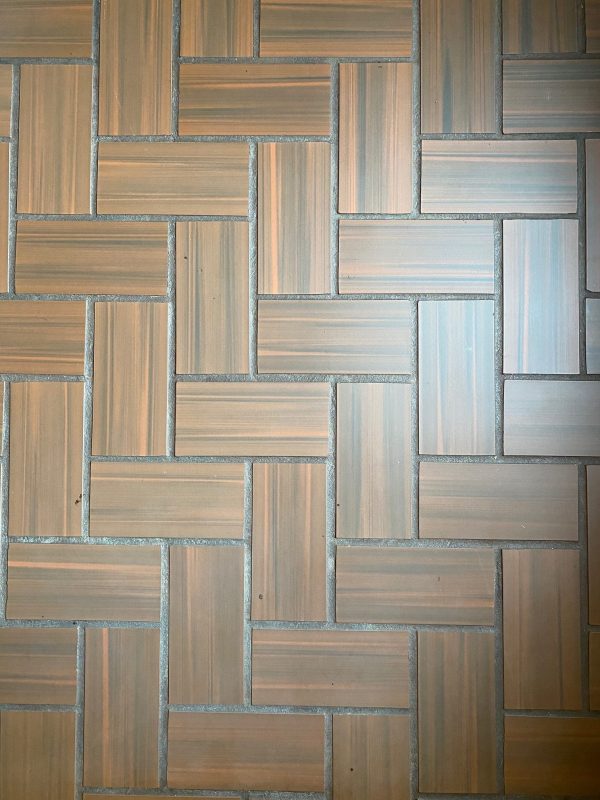
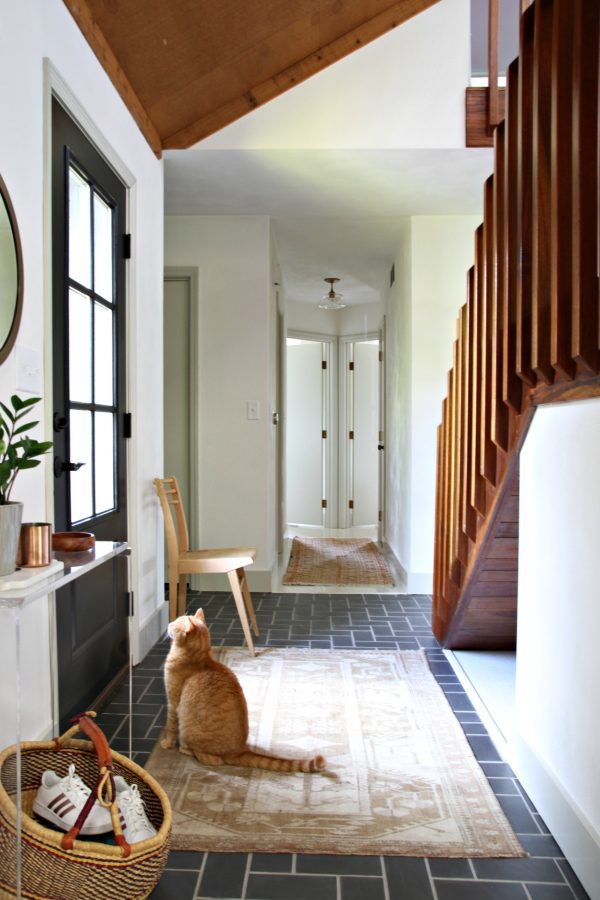
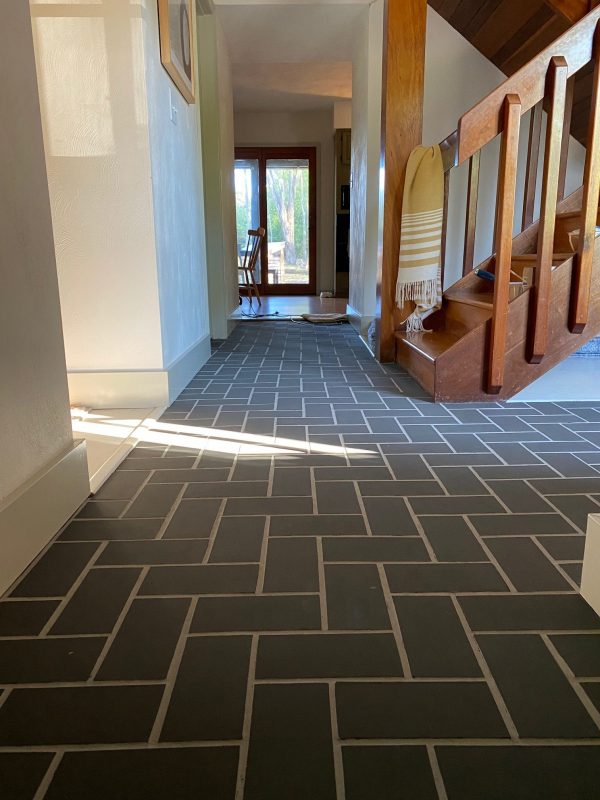
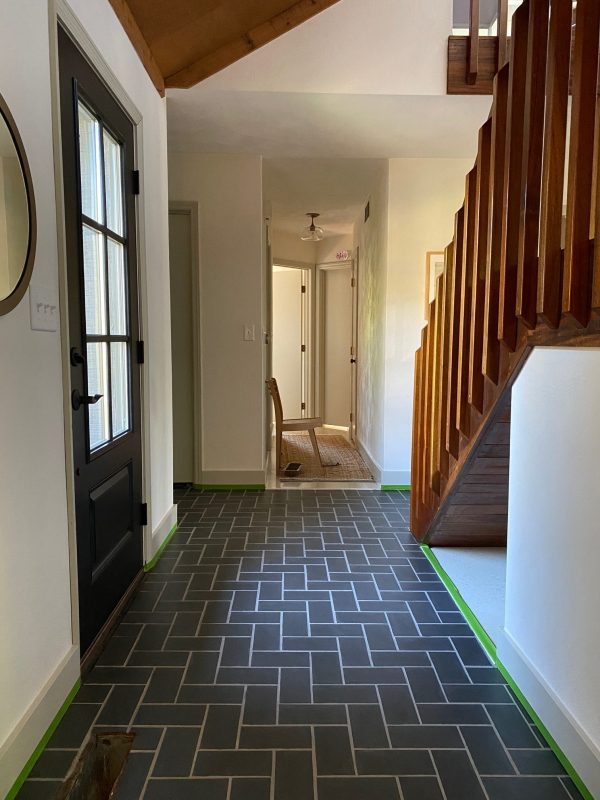
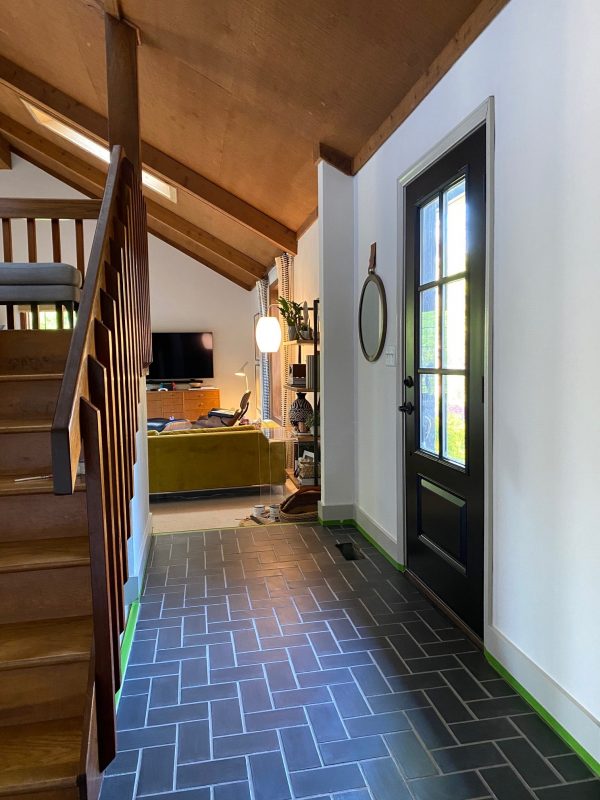
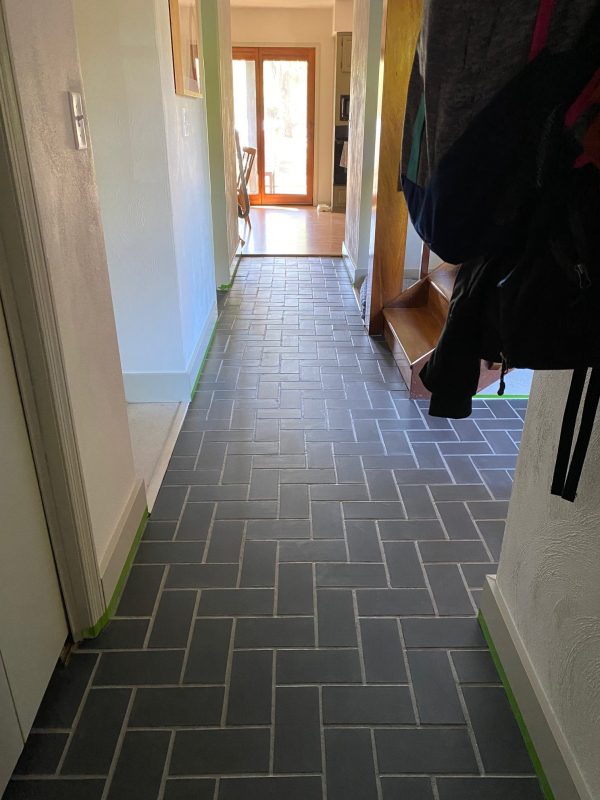
While I didn’t particularly care for the tile finish (too stripey and unnatural), I did like the placement and herringbone pattern. Hard-wearing tile makes sense in the entry and hallway, but the red-brown finish was generic and the grout lines had seen better days. I think the grout lines were originally light gray but had darkened with dirt and grime over time. (See the lighter grout lines near the staircase?) There were also small, random dark spots on the tile that WOULD NOT come off. Something tracked in from the garage or driveway?
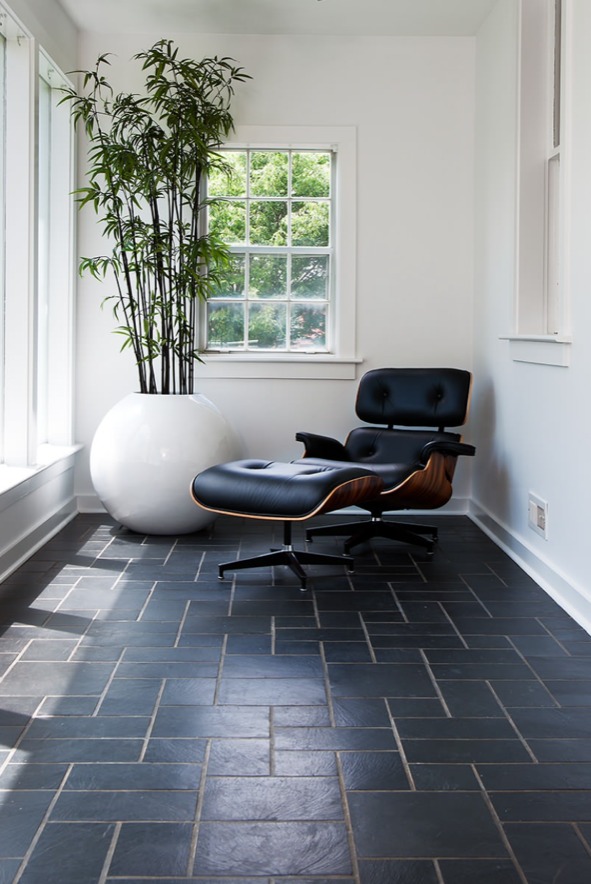
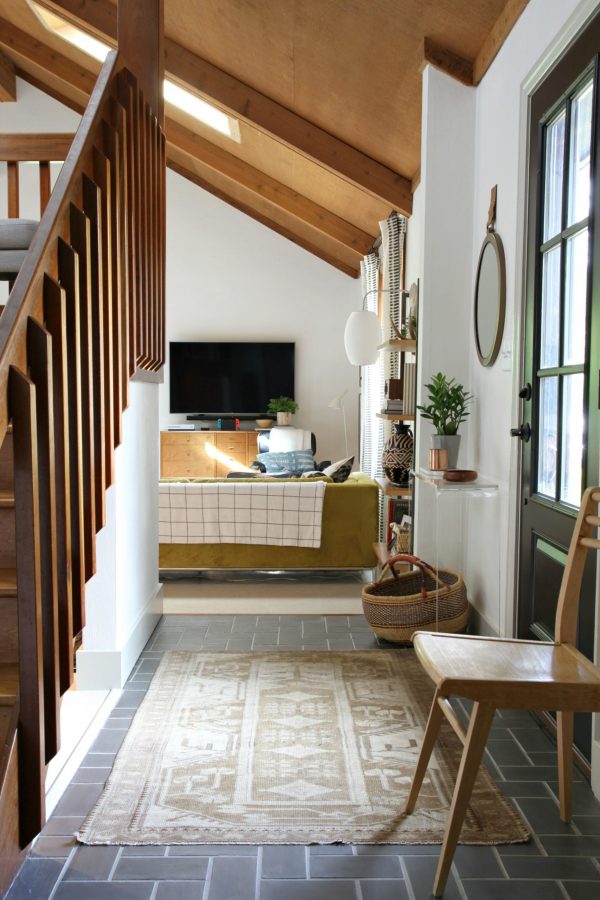
Instead of ripping it all out and installing new tile, I wanted to try painting the existing tile for several reasons: to avoid unnecessary waste, to keep costs down and to hold on to a little bit of that ’70s vibe. By painting the tile and grout, my intent was to give the tile a more natural look and emphasize the pattern. I really wanted it to feel like it could’ve been original to the house. Something like this…
After a ton of online research, I landed on this website dedicated to all things chalk paint. I found a few examples of homeowners using Annie Sloan chalk paint in graphite (on tile) + Annie Sloan chalk paint in french linen (on grout) + Annie Sloan lacquer in a matte finish (as a sealer) to achieve surprisingly realistic slate lookalike results. I’d never used chalk paint before but it sounded promising. No primer or sanding required and, when sealed properly, it’s extremely durable. When I read the fine print that literally states “wait 8-21 days before hosting a party in the room,” I knew it was the perfect quarantine project. To cover the roughly 130 sq ft of flooring with one coat of grout paint, two coats of tile paint and two coats of lacquer, I ordered 1 litre of graphite chalk paint, 120ml sample pot of french linen chalk paint and 750ml pot of chalk paint lacquer in clear matte. With shipping, the total was $106.
FYI: The paint supplies come with extremely detailed instruction sheets. You’ll want to read these before starting your project. Lots of helpful tips!
To start, I thoroughly vacuumed and cleaned the tile. The instructions suggest cleaning with Fabuloso but I didn’t have any on hand so used my go-to: distilled white vinegar + Mrs. Meyer’s basil scent multi-surface cleaner + water mixture. It worked great! Then, using a small art brush from our craft supplies, I painted the grout lines in the french linen chalk paint. I wasn’t super precise since I was going to use a darker paint on the tile. Still, it took FOREVER. Okay, maybe not forever but something like 12 hours on my hands and knees. My back hated me.
I let the grout paint cure overnight (it was dry to the touch in 1-2 hours) and, even with the cats roaming around, it was fine unprotected…probably because it’s somewhat sunken between the tiles.
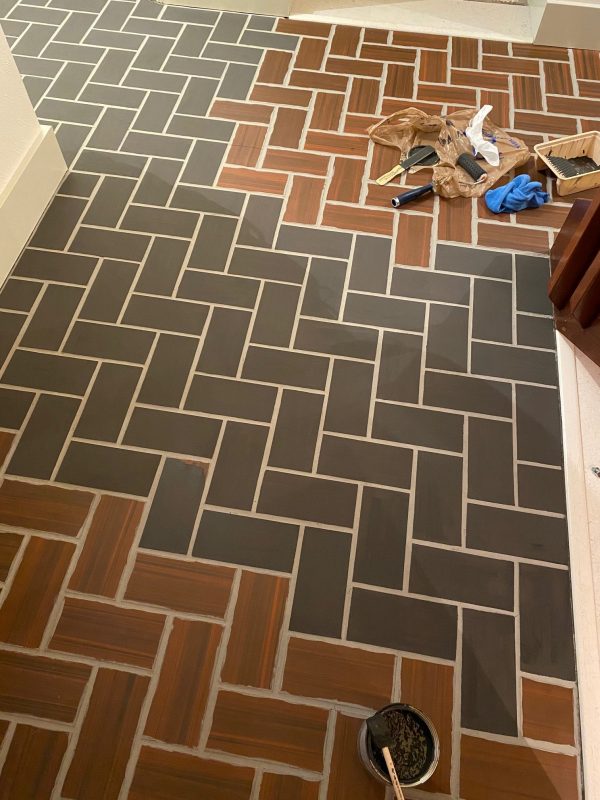
The next morning I had to re-vacuum (I kept the vacuum and SOFT BRUSH ATTACHMENT nearby throughout this entire project to catch stray hair and dust as needed without marking up the chalk paint) then started on the tile using the graphite chalk paint. I tried using a 4″ foam roller but, sadly, it was a tad too wide and hit my freshly painted grout lines :( I ended up using a 1″ foam brush on the tile because that’s what I had on hand. I think I went through a half-dozen of them before the entire project was over. It was tediously slooooooow but gave good coverage and excellent control. At one point I told Steve, “I’m just going to have to be okay with this taking a long time.” One coat on the tile took 14 hours to complete. (And it needed two coats.) Again, my back hated me. That was my weekend.
I was back to work at the pharmacy during the week so I put down old towels and flat sheets to help protect the first coat of chalk paint somewhat. (The chalk paint isn’t really protected until it’s sealed.) When I pulled back the towels and sheets the following weekend there were a few scuff marks (similar to what you would find on a chalkboard) but no chips. I was pleasantly surprised. Up until this point, I hadn’t been super vigilant about the floor. Kids and cats had been walking on it barefoot for a week with just one coat of grout and tile paint. BUT! (THIS IS IMPORTANT.) Before brushing on the second coat of tile paint, I quarantined the cats upstairs with their litter box and food/water bowls and thoroughly vacuumed with a SOFT BRUSH ATTACHMENT. I also threatened my family to not walk on my progress as I applied the second coat. BECAUSE…it doesn’t really matter what your first coat looks like, but the final product is fully dependent on what the second coat of tile paint looks like! A scuff in the second coat will stay there unless you touch it up before sealing which, trust me, you aren’t going to want to do.
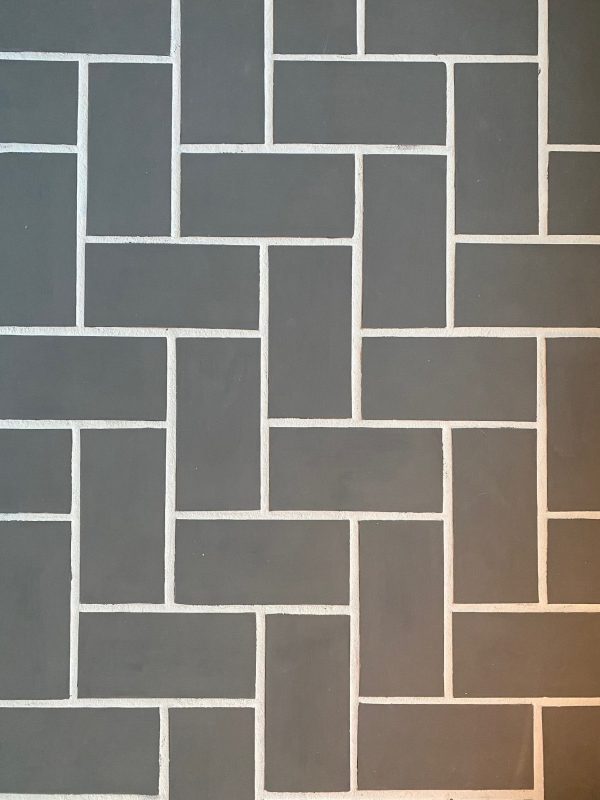
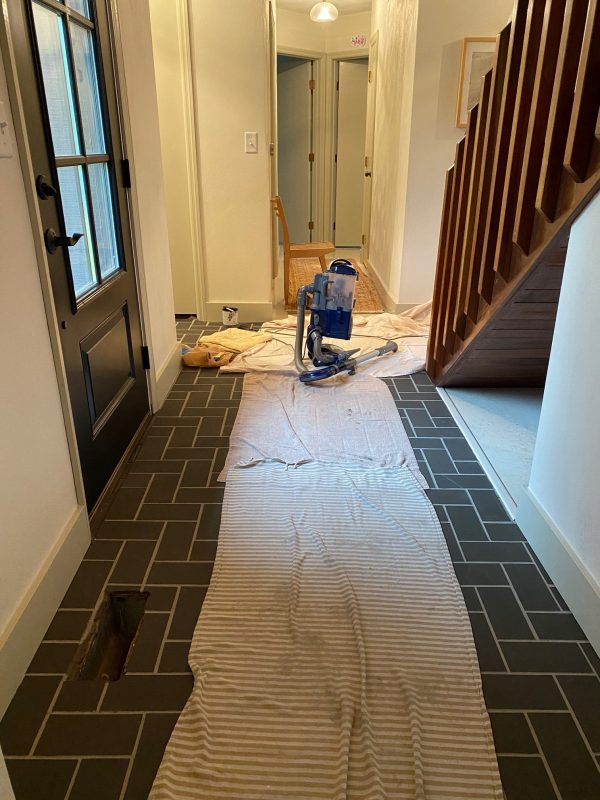
It took me another 14 hours for the second coat of tile paint and another night of curing. (The cats slept upstairs.) Looking ahead to the lacquer, I also turned the unopened pot of matte lacquer upside-down overnight. The instructions advise to do this to prevent settling of the flattening, or “matte-ifying”, agents on the bottom of the can. But! DO NOT SHAKE THE LACQUER. The pictures above show the floor with two coats of tile paint just before I started sealing it with the matte lacquer.
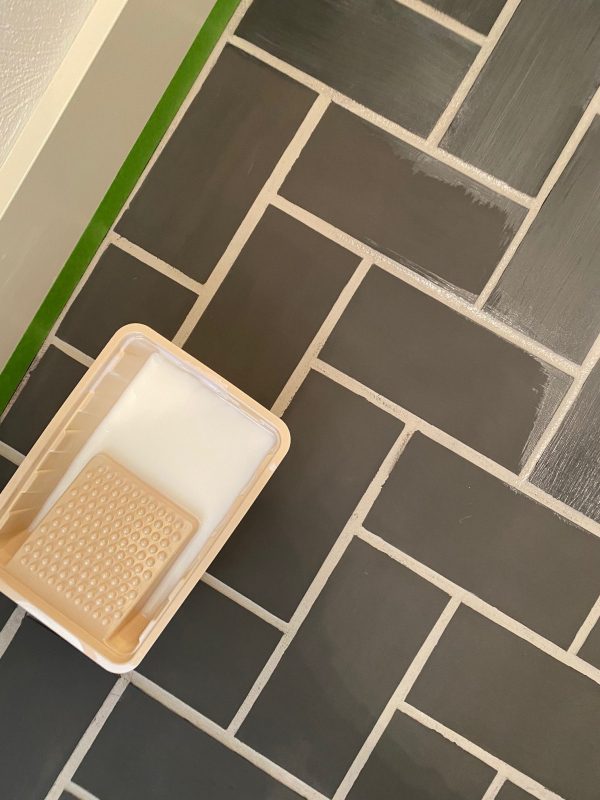
Once again, I carefully vacuumed the tile with a SOFT BRUSH ATTACHMENT. (Even rolling vacuum wheels will leave marks on the second coat!) I thoroughly yet gently stirred the lacquer for 10-15 minutes. You don’t want bubbles to form in the lacquer! For high traffic areas, two coats of lacquer are required for maximum durability. It’s recommended to slightly dilute the first coat of lacquer with 10% water. I poured ~350ml of lacquer into a small paint tray and added 35ml of tap water then stirred well. I used a 4″ multipurpose paint brush to apply the lacquer to the tile and grout lines. The directions caution against “overstroking” the lacquer so I tried to work quickly with long brush strokes, but it was a little difficult not to backstroke because I wanted to make sure I hit the grout lines completely. The lacquer went much more quickly than the chalk paint because I was brushing everything – grout and tile. It maybe took 2 hours to apply the first coat of lacquer. I let it dry for 2 hours then applied the second coat at full strength (no dilution).
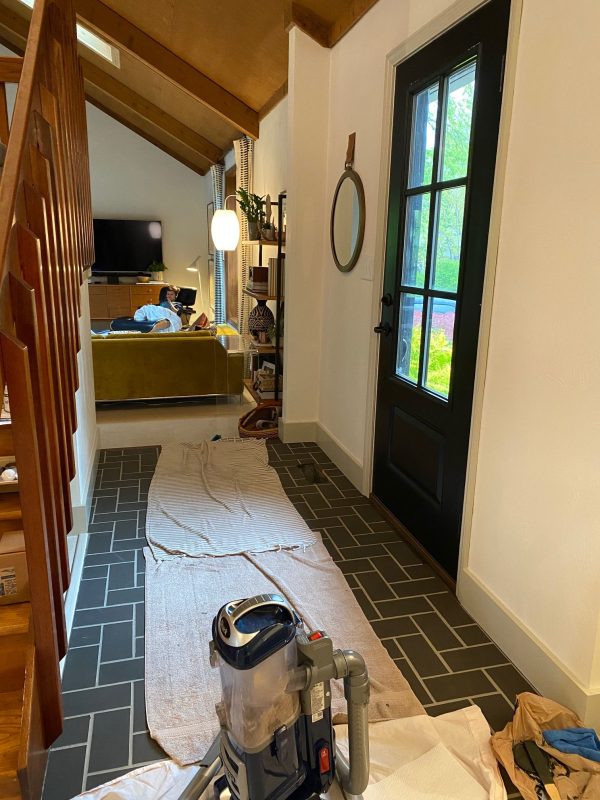
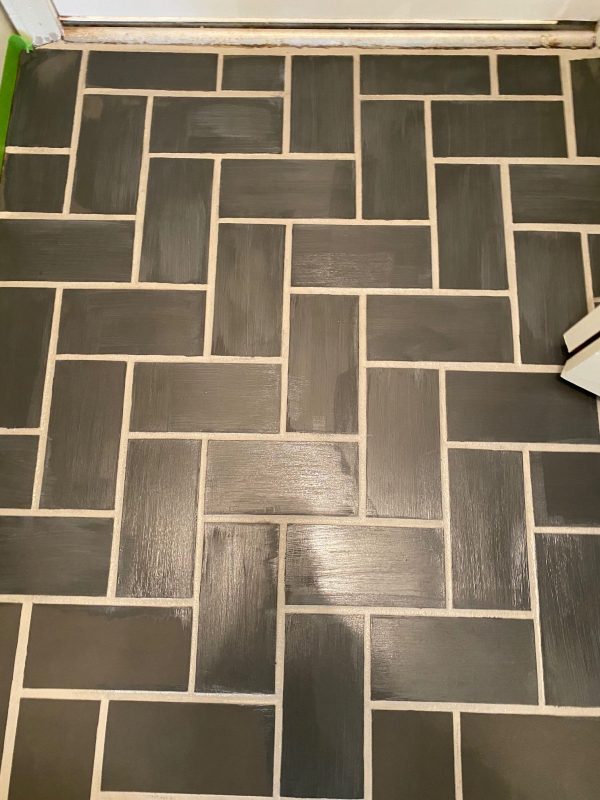
Here’s everything after the second coat of lacquer. The second coat of lacquer went on even more quickly than the first because, in effect, the tile was now sealed and not soaking up as much of the lacquer. This is where I could really tell a difference! Before any lacquer, the tile felt like a chalkboard. With the sealer, it felt really smooth like stone. I let the two coats of sealer cure overnight. (The cats slept upstairs again. I think Steve was starting to feel bad for me towards the end when he offered to tape off the baseboards right before I applied the lacquer…after I had already painted everything. Probably wasn’t necessary but was appreciated.)
Side note: The instructions advise applying a gloss (versus matte) lacquer as a first coat on a dark chalk paint color to avoid “clouding” but since I was aiming for a slate lookalike (and slate is naturally cloudy/vein-y) I went with two coats of matte lacquer and no gloss.
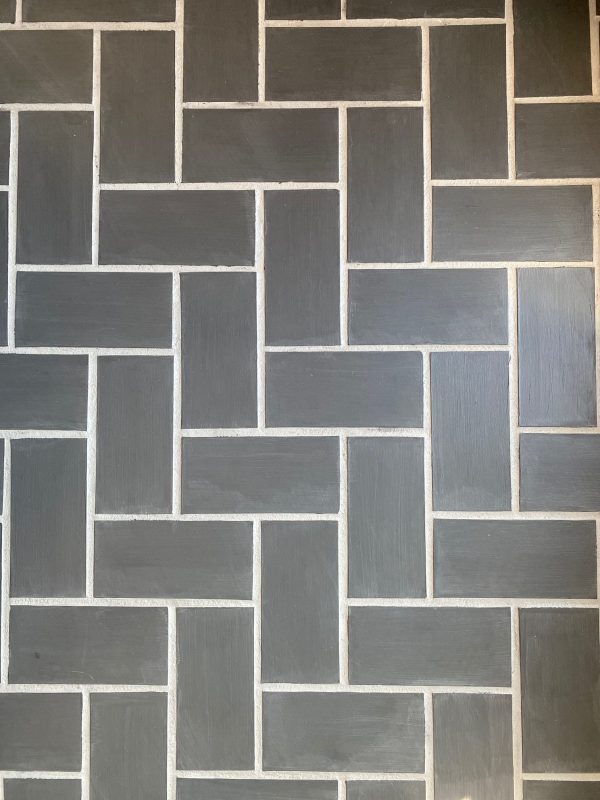
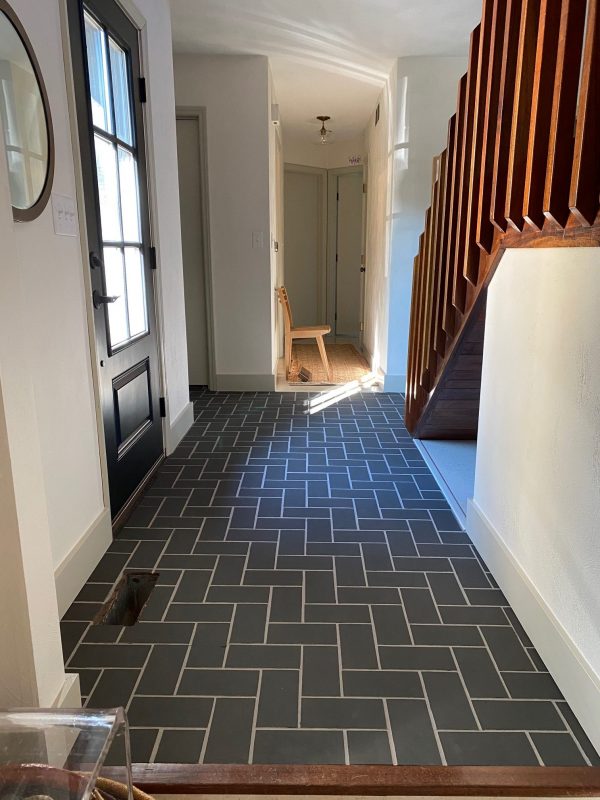
And this is how it looked the next morning! I actually love the subtle cloudiness and veining. I think it gives the tile a softer, more natural look which is exactly what I was hoping for. And the herringbone pattern is definitely more noticeable!
I let the cats come downstairs that morning but didn’t replace the rug or furnishings for another three days.
We’ve been living with the newly painted floor for a little over a week now and I’m AMAZED by how well it turned out! We walked sock-footed on it for a few days but are already back to entering/exiting through the front door with shoes on and it’s holding up superbly! Our cats are not declawed. I’ve run the vacuum over it a few times (without the floor brush rotating) and wiped up dirty footprints with a damp soft rag. I have NOT dragged any heavy furniture across it. I haven’t noticed any new marks/scratches other than what was already there before the tile was sealed. The hazy finish is quite forgiving. I expect it to hold up in the long run, especially since it isn’t even fully cured until 14-21 days after application. In fact, the matte lacquer is approved for outdoor use too! It provides UV protection so our floor shouldn’t fade over time from sunlight pouring in through the front door. Another thing I want to mention is that I’ve noticed NO ODOR from the chalk paint or lacquer – now or while painting. NONE. Extremely low VOC for the win!
Was it worth it? Yes! I would absolutely do it again…just not in the next month or so, ha!
If you’re considering this project in your own home, I have a few takeways:
*READ THE INSTRUCTIONS. This wasn’t a difficult project – just tedious. There are no shortcuts. If you follow the directions, you can’t go wrong.
*It would be much less time-consuming in a smaller area.
*Set daily progress goals. With all the steps and curing time needed, this can’t be done in an afternoon. (I may have used PTO – paid time off – at my real job to work on the floor one day.)
*Turn off central heating/air to reduce the amount of dust/hair floating around.
*If your space is a frequently-used area, make arrangements for a temporary detour. Be prepared for extreme ninja moves!
*Fold up a towel under your knees/bum while you’re working. Tile is hard!
*Keep pet paws off from second coat of paint to final coat of lacquer.
*Take short but frequent breaks.
*IT’S WORTH IT.


budget decor, DIY, renovation