...because home doesn't happen overnight.

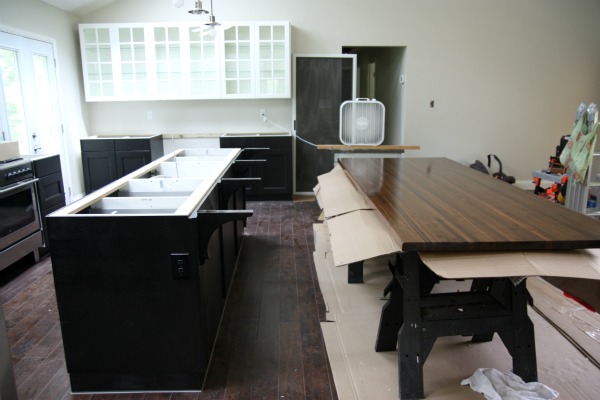
While the butcher block was drying in between coats of Waterlox, HH set to work prepping the island for countertop installation.

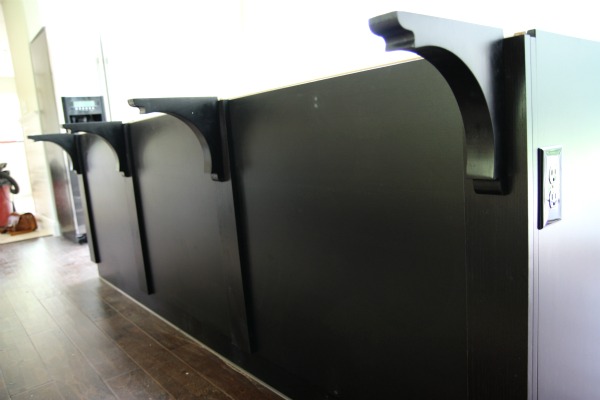
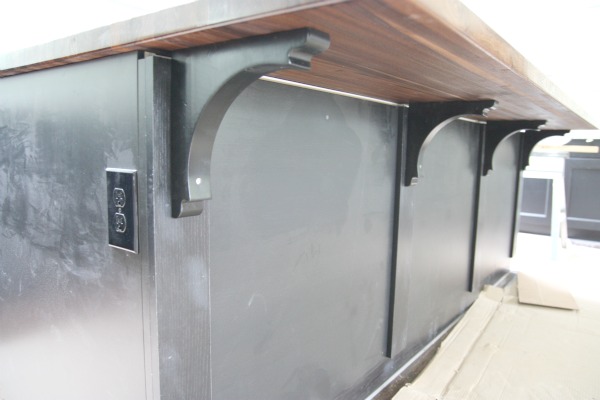
With a ~15″ overhang for seating, the wood top required added support in the form of corbels and L-brackets. Our butcher block manufacturer recommended extra support for an overhang greater than 8″. Erring on the side of caution, we figured we’d need a corbel that would extend at least 8″ along the bottom side of the walnut top. {15″ overhang – 8″ corbel = 7″ of unsupported butcher block which is less than the 8″ recommended by the manufacturer. Sorry for all the math, but it’s a really important detail.}

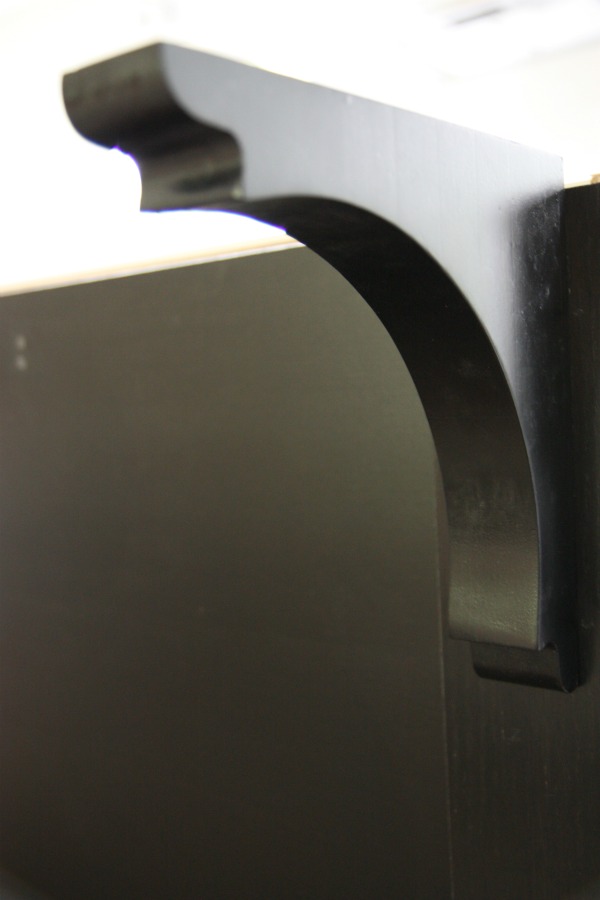
We searched high and low for corbels that were at least 8″ long but simple in design. After several failed searches, I suddenly remembered Young House Love using some chunky, simple corbels to support open shelving in their kitchen remodel. I quickly looked up their measurements and, wouldn’t ya know it?!, at > 9″ long they’d work! I also liked that they were curved – instead of triangular – to allow for leg room when seated at the island.

We bought four of the arched wood corbels at $10 a piece. Before screwing them into place, HH painted them black to match the island. Can you believe that regular old spray paint was pretty much an exact match? Love it when DIY is that easy.

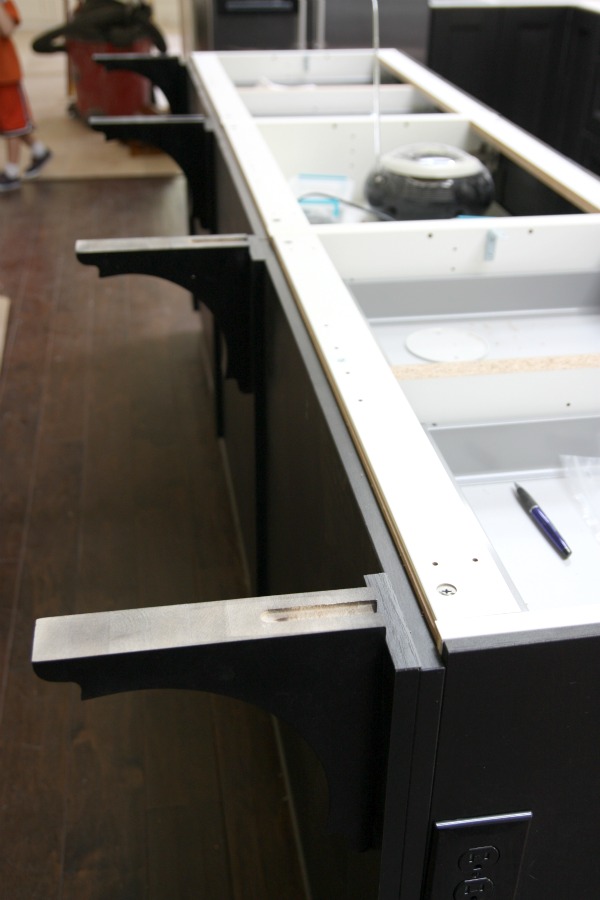
We needed four of the corbels to place them ~24″ apart {based on manufacturer’s recommendations} on the back of the 9′ island. The island is made up of three 36″ wide IKEA base cabinets. HH screwed strips of matching black plinth {also from IKEA} over the two seams where the cabinets met each other and also on each end of the island…for a total of four strips that HH could screw the corbels into. That meant our corbels would be spaced ~27″ apart which we felt was close enough to the manufacturer’s loose suggestion of ~24″ apart.

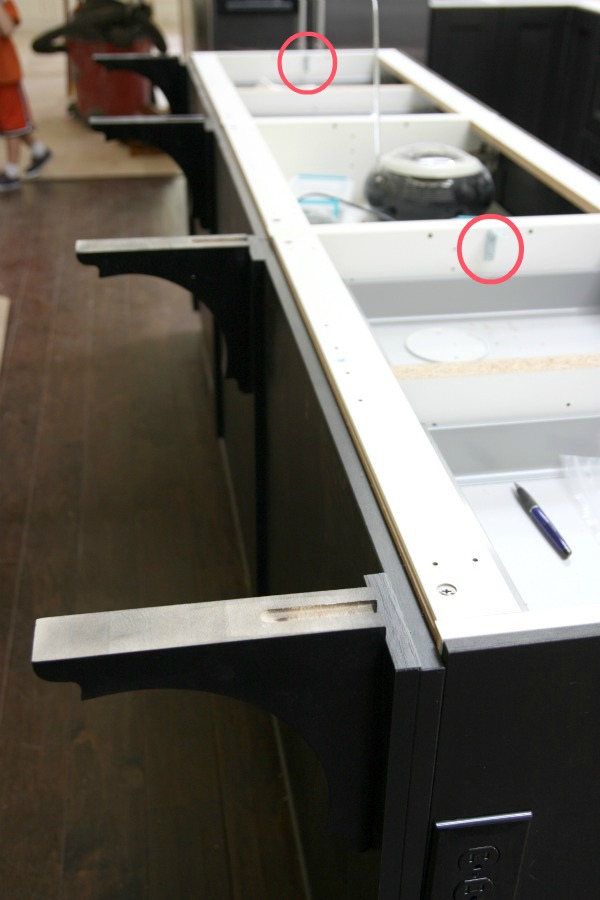
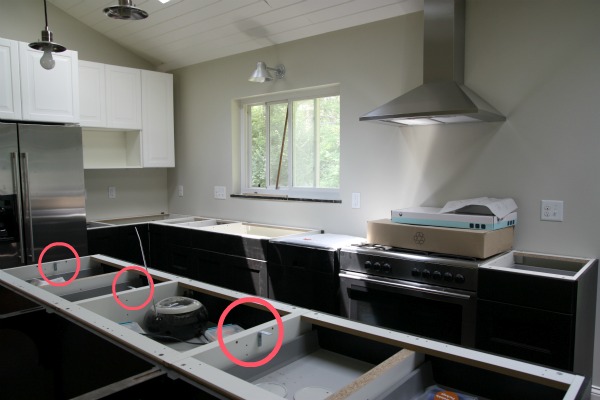
To hold the butcher block to the island properly, the walnut was to be screwed in at all four corners of the island and every 18″-24″ along the edges. HH decided to add a few L-brackets within the island too, for even more support.

I’ve circled the L-brackets in the images below. I would have taken better shots but I wasn’t aware of the L-brackets until after the butcher block was on. One of the drawbacks of caring for kids and a newborn while trying to document a renovation…I’m a little out of the loop!

With the island prepped for installation, HH had a strong neighbor help him lift the walnut countertop onto the island. Did I mention the butcher block weighs nearly 280lbs?!

With the wood top resting on the island, HH pre-drilled all screw holes to prevent splitting. HH had his neighborly helper push down on the slab while he screwed it into place. Per manufacturer directions, each screw projects ¾” into the butcher block. Hint: HH used painter’s tape placed ¾” up on his drill bit to get the correct depth every time.

The screw holes on the corbels still need puttied {did you know they make black wood putty? again, I’m out of the loop.} to hide them. And the entire kitchen is one huge renovation dust mess which we’re cleaning up this weekend before the big move. BUT the installed walnut island top looks amazing guys!

I can’t wait to show you dirty afters…tomorrow! Hehe. The only reason being that I didn’t capture any shots of the installed island top before the perimeter granite countertops were installed. It all happened so quickly! HH finished installing the island butcher block late Monday night {five days after it arrived which was within the seven day time span recommended – whew!} and the granite was installed Tuesday morning. Needless to say, HH is exhausted. He finished and installed that butcher block – among other smaller projects – in five days while working his regular 10-12 hour/day day job.

We’re both looking forward to taking a few days ‘off’ after we move in since there’s nothing pressing {like our apartment’s lease being up!} right away. I mean, there’s still gonna be tons to do but all in good time.

FYI – We were awarded a 10% discount for documenting the finishing and installation of our walnut butcher block on House*Tweaking. Regardless, we would have chosen to work with Hardwood Lumber Company and purchase the same walnut butcher block after researching our options and receiving several quotes from other businesses.

images: Dana Miller for House*Tweaking

34 Comments

24.May.2012

It looks beautiful, can’t wait to see the after pictures. Hope the move goes smoothly!

OMG! I love it. Hubby and I are planning to install a similar countertop on our existing island.

It’s all looking so great! Like many others, I’m sure, I can’t wait to see the afters! Even dirty, it looks lovely!!

24.May.2012

Thanks so much for documenting everything regarding the butcher block! I’m hoping to do a butcher block island in our kitchen soon and this is all so helpful!

So pretty! It’s all coming together so well! Can’t wait to see the other counters!

24.May.2012

I love the two colors of cabinets, the white and the dark and the walnut mixed in looks amazing. I can’t wait to see it finished! Beautiful!

24.May.2012

Like it !! Lots !! I too love the mix and match with the different cabinets, the wood and soon the granite. I did myself a butcher block for my bathroom (http://lecloslafayette.over-blog.com/article-tablette-sans-chocolat-99763361.html … there’s a lot of french words in that post but the pictures speak pretty much for themselves) … take care !

oooh pretty – can you share more details regarding how the brackets were attached to the island? I can see one bolt/screw in the pics above. Was this the only attachement point? Much thanks!!

24.May.2012

It looks amazing. We used the same corbels in our new kitchen…love ’em!

24.May.2012

Looks beautiful! Can’t wait to see how everything turns out. We just installed a DIY butcher block with Ikea cabinets as well (http://www.cape27blog.com/2012/05/kitchen-progress/). It’s so rewarding when all that hard work comes together :) Congrats on the big move coming up!

24.May.2012

Everything looks so great! I seem to remember from YHL that those corbels had screw holes/slots on the back to hang on a screw like a picture on the wall. Did you have to drill the hole in the bottom and hole/groove in the top for screws to attached to the island? I want to put some in my kitchen for 1 open shelf that will be pretty long and I don’t think hanging them on a screw would be enough support.

24.May.2012

Hooray for back-to-back posts! And gorgeous butcher block! My own renovation is underway – although my hubby is decidedly not handy, so we’ve outsourced the work – and I have to say THANK YOU for your blog. After obsessing over colors for days, I went back to your color selection post and decided on tapestry beige for our main living space. It’s now the perfect neutral palette to build on!

24.May.2012

Wow, it’s really all coming together. Good luck with the move. We moved with a small baby and older child in tow – my advice? Just pack a bag with enough to get you through a couple of days (nappies/changes of clothes/ food) and live out of that if you need to. It takes the pressure off having to get everything unpacked and in place straight away. And you can keep baby’s routine as close to normal as possible. Another tip I read somewhere which seems to have worked for us when we move or go on holidays, is to take baby’s used (but not dirty!) bedding so that the smell is familiar in the new place. Will be thinking of you!

24.May.2012

i absolutely love how your kitchen (lets face it, whole house) is coming along. i cannot wait to see more. thanks for posting :)

24.May.2012

Thanks for the moving tips, Anne! The majority of the time Mabrey sleeps in her bouncy seat so I think we’ll use that for a few days until we can unpack, paint?! and assemble her crib – which has been in storage while we lived in the apartment.

24.May.2012

I love the Tapestry Beige more and more every day! Glad it inspired you.

24.May.2012

Yes! HH first installed the corbels like YHL by using the predrilled {by manufacturer} holes on the backs. He said they were pretty sturdy that way but to support our crazy heavy walnut slab he ALSO predrilled two more holes – one near the bottom to screw into the base cabinets & one up top to screw into the butcher block – for added support.

I think you could use HH’s method to get adequate support for your long open shelf…and peace of mind ;)

24.May.2012

Your kitchen renovation looks fabulous!! And those ‘progress’ shots? C’mon, those are better than most people’s ‘afters’! Great job, you guys.

24.May.2012

Of course! HH first attached the brackets like YHL by hanging them from the predrilled {by manufacturer} holes on the back. He said it felt pretty sturdy that way but for peace of mind he also predrilled two more holes for two more screws. One on the bottom {which you see in the pics} to screw into the base cabinets and one on the top {not visible} to screw into the walnut slab. Make sense? Good question!

24.May.2012

Oh, wow! You actually made the butcher block yourself. Kudos, girl.

24.May.2012

Absolutely gorgeous! You must be beyond excited!

25.May.2012

Thanks :) it was fun and actually saved us €€€ !

25.May.2012

Oups ! I answered the wrong comment ! It did save us lots of €€€ but it was fun to imagine then build !

25.May.2012

Great – Thanks for the info! I moved my refrigerator to a wall with a cabinet and counter beside it – no overhead cabinetry on that wall. So I want to put a shelf up there.

25.May.2012

Your kitchen is just gorgeous!!! I love the walnut counter-top on the island. I can’t wait to see the other counter-tops with it, I know it will be beautiful!

25.May.2012

Your new home is looking beautiful — I am very impressed with your vision as well as your ability to make it a (DIY!) reality.

I have a general question about living amidst constant transition: My husband and I are also DIY-ers, and are now in the beginning stages of a kitchen reno. This past Fall, we added a dining room, and the Spring prior we finished a major bathroom overhaul. I find myself constantly falling into the “once we get xyz done, THEN I will feel complete/settled/ready to entertain/able to use my home the way I want/etc.” I realize this isn’t a good way to live, but I find it difficult to properly focus on all the other important parts of my daily life when a major room is in transition. How do you keep from being overly distracted by wanting projects to just “get done” and how do you maintain a balance in your day-to-day?

25.May.2012

From UnderDog to WonderDog! Kudos to you and HH especially!

25.May.2012

Oooh, that’s too much for the comment section. Maybe a future blog post?

It’s so beautiful! What an inspiration. And the tips (like the tape on the drill bit) are so useful, I wouldn’t have thought of half of them :-)

26.May.2012

Can you see the drool running down my face? LOl. The cashmire coutertops were a great choice. I love that they don’t really have that granite look but yet have the convenience of granite. Everything is coming together so nicely. I can’t wait to see how you put your little tweaks on the kitchen with decor and paint. Didn’t you say before that you were going to paint the door? Can’t remember. Either way – the kitchen looks yummy!

31.May.2012

Yep, the door and trim around it still need painted.

10.July.2014

[…] *https://www.housetweaking.com/2012/05/24/installing-the-walnut-butcher-block/ […]

07.January.2016

Hey Dana! What do you use to clean your butcher block? Are you able to put hot plates on it without leaving any marks? Thanks!!!

07.January.2016

Since we sealed the walnut with Waterlox, I’m able to clean it with mild soap + water. Sweaty glasses, hot plates and warm mugs are fine. We don’t use coasters. I don’t place hot baking sheets, pots or pans directly on the wood top. I use trivets for items coming right off the stove. It’s really very livable and not too precious. Hope that helps!