...because home doesn't happen overnight.

One of the most frequently asked questions I get is ‘how do you make your mood boards?’ The short and easy answer is polyvore but I have a feeling that most people who ask want the longer, more detailed answer, so that’s what I’m attempting to give in a series of posts this week. I thought it would be really fun to put together a little polyvore tutorial complete with homework. Don’t worry. You won’t be graded. Or degraded. This is purely for fun. A learning experience. I find that it’s easier for me to grasp new tech-y stuff when I break it down into smaller, more manageable steps. That’s what I’m trying to do for you here. If you’re already familiar with polyvore, feel free to chime in with tips. If you have no desire to create mood boards, feel free to take a nap. Let’s do this.

For me, mood boards are a great way to brainstorm a room or space. It helps me to see everything {furniture, paint colors, accessories, fabrics, lighting, flooring, finishes, etc.} all together before I make any purchases or paint any walls. I’m able to get a pretty good glimpse at what the end result might be before I start. Sometimes it’s very obvious that the rug I’d been drooling over online won’t work in reality and I need to keep looking. Other times, a mood board will confirm my decor choices and give me the confidence needed to go ahead and start a project.

When I first set out to make mood boards for personal use, I was intimidated by all the different programs available. I needed something user-friendly and inexpensive. Photoshop was too expensive and I didn’t like the cartoon-y look that some of the other online programs gave boards/rooms. It was through an online blogging class that I was introduced to polyvore and it was a good fit.

Polyvore is user-friendly, free, readily available and flexible enough for different genres. It’s not just for the interior design world! It’s the only program I’ve ever used so I can’t compare it to similar ones. It’s easy enough for a beginner but broad enough for a seasoned user who wants extras like text and overlays. I definitely haven’t tapped into all the resources offered by polyvore. I keep finding new effects to try. I like that I can use it for interior design mood boards, fashion posts and product round-ups. Sort of a one stop shop if you ask me. And if you happen to have blog, it’s easy to post your boards to your blog. Like social media sites, you can follow fellow users and their mood boards and/or publish your boards to share with everyone else on polyvore. I have to say, I don’t use the social aspect of polyvore all that much. I do publish my boards but that’s just so I’m able to post them to House*Tweaking. But if you like the idea of browsing other people’s works of art, it is possible.

Does polyvore sound like something you’d like to try? Great! I’m going to walk you through, step by step {oh baby, gonna get to you girrrrrrl…sorry, I had a total NKOTB moment} this week. *I apologize in advance if you’re offended by my tedious steps. I don’t mean to talk down to you. It’s just that there was a time when I had no idea what a browser or toolbar was and I wish someone had spelled it out for me.* Hopefully, by the end of the week you will have a mood board you created yourself and can share it via a link in the comments section. I can’t wait to see what you create!

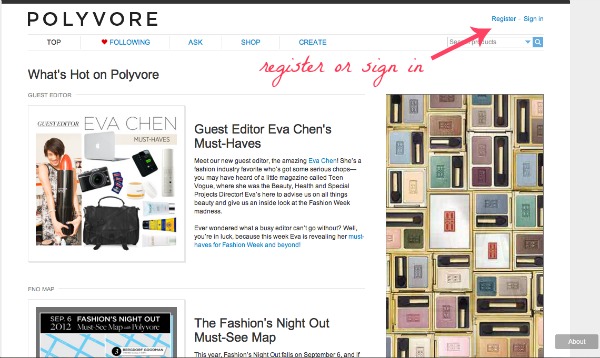
To get started, you will need to register – for free. Go here then click ‘register’ in the upper right hand corner. You will be prompted to enter an email address and password. {I’ve never received any mail from polyvore so don’t worry about your inbox filling with spam.} If you are already registered on polyvore then click ‘sign in’ in the upper right hand corner of the home page to enter your email and password.

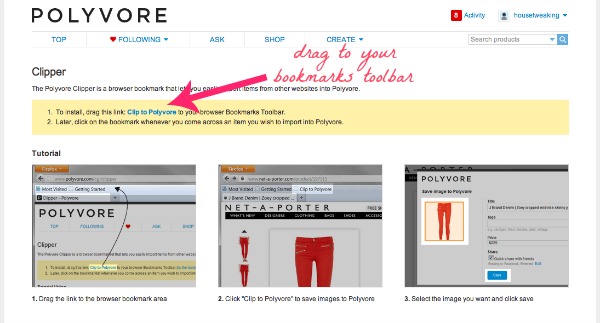
Once you have an account set up, you need to install the ‘clipper’ into your bookmarks toolbar. The clipper is the tool that will allow you to clip images from the web for your mood boards. It’s much like pinning things to pinterest. Go here to install the clipper.

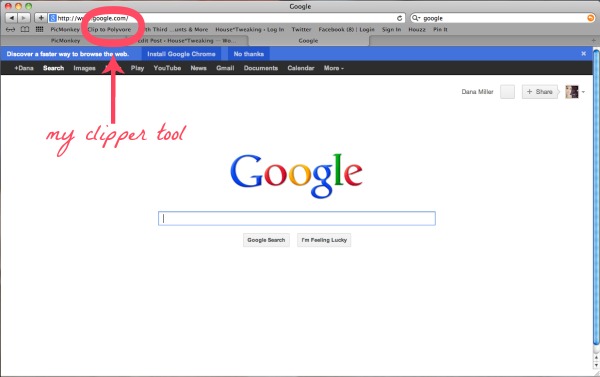
Drag the ‘clip to polyvore’ link in blue to your toolbar. Your toolbar is a bar of buttons or icons that runs horizontally or vertically – usually across the top of your browser. The buttons within act as quick access links or have specific functions. The ‘clip to polyvore’ button will be what you click on whenever you find an image you want to save onto your polyvore account for use in a mood board.

Okay, now that you’re all set up with your polyvore account and clipper tool, your homework is to think of a space that you want to create a mood board for. It can be a real room in your home that you’re wanting to decorate or it can be a made up, dream space in your mind. Once you have a space of interest for your mood board, share it in the comments section below. To keep me honest, I’ll be building a mood board from scratch with you. I’ll leave my topic of mood board interest in the comments section as well.

Then we’ll meet back here tomorrow and discuss the actual clipping of images and how to place them in a mood board.

Happy brainstorming!

images: Dana Miller for House*Tweaking

48 Comments

04.September.2012

One of my sisters just asked for help with the bedroom in her new apartment. {My other sister asked for help with her living room and dining room!} She wants to reuse some things she already has and purchase other things to create a calming, soothing retreat. Her bedroom will be my guinea pig for this polyvore tutorial.

04.September.2012

I want to create a board for a nursery for my new daughter. We close on our first house tomorrow so this tutorial will be great!

04.September.2012

Wow, this is timely — I just started trying out Polyvore last week. I’m a graphic designer and frequently make mood boards with Adobe programs, but my mom is slightly computer-challenged and looking to do some redecorating, so I’m looking for a simple mood board site that she can use. She’s very excited about the idea!

But I’m running into two issues with the site that are making it essentially unusable — maybe you can advise?

1. I know my mom will want to use Benjamin Moore paint, but their site seems to be unclippable (their sample images are made of hexadecimals, not image files, so the clipper doesn’t recognize them). I would just take a screenshot and upload the images somewhere else and clip them for her, but… (see problemo #2).
2. She’ll want to include some of her current furniture in her mood boards. Since she obviously won’t be able to find images of her decades-old or custom pieces online, she’ll need to take photos of them and add those photos to her set. However, Polyvore seems to make this impossible — you can’t upload directly to their site, and they don’t support clipping from sites like Facebook or Flickr. I’m stumped.

I sent Polyvore an email with these questions last week and still haven’t heard back :-/

04.September.2012

1. For paint colors, I can usually google images of the paint name I’m wanting to use. The swatches don’t necessarily come from the brand’s site. Even if I can find the color on an image that has other things on it that I don’t need {say, furniture} I’ll just crop the portion of the paint color I want to use for the mood board.

2. This is a downfall of polyvore. Like any other ‘clip’ or ‘pin’ tool, there are restrictions as to what you can/can’t clip. What I’ve been able to do via House*Tweaking {wordpress} is save unclippable images to my computer then make a draft page on wordpress including the image. If I preview the draft page, I’m able to clip images from there. Another trick I’ve applied is finding very similar yet clippable images of real life pieces that I want to use in a mood board. They aren’t always exact replicas of the real life version but are close enough to give me a pretty good idea of what to expect in vivo.

I find little tricks to get around these downfalls because I still think the cost of the program – FREE!!! – is worth it. Hope that helps!

04.September.2012

I like this idea! I usually just cut and paste into PowerPoint but they don’t come out that cute.
I’ll be creating a mood board for our laundry/mud room (real project).

04.September.2012

THANK YOU for this! I’m so excited to learn polyvore. I’ve been wanting to for a while, but I’ve been too lazy to poke around and sort it out for myself. I’ll definitely make a board for my master bedroom. It’s sorely in need of an update and I’ve been having trouble pulling my ideas together into a cohesive vision/plan. Hello, moodboard! I just hope it doesn’t reveal that the nightstands I just ordered are all wrong. Gulp. Looking forward to the rest of this series :)

I’m definitely interested in making mood/idea boards for unfinished rooms in our house. Thanks for the lesson.

04.September.2012

thank you for this! i’ve been wanting to make some boards myself but when I try to do cute things like the arrows in your previous post, it ends up looking horrible and i dont use it. Nice to find a fellow blogger unwilling to pay for photoshop!

04.September.2012

1. Aw duh! I should have thought of that myself. Thanks!

2. That’s a huge bummer. I get that they’re providing a free service, but as long as a user gives permission for their photo to be reused or reproduced, I don’t see why they should inhibit it. In this case, it’s probably going to cost them a user since it will take way less time for me to throw something together in Photoshop than to figure out workarounds and try to teach them to a tech-challenged senior citizen. Poop :(

Thanks for your help anyway!

04.September.2012

I’ll be creating a mood board for our living room. We’re waiting to close on our 1st house, so this pre-planning will keep me sane. I usually use photoshop for mine, but was looking for an easier method.

04.September.2012

It’ll be a nursery for me! Thanks for sharing this with us Dana.. I’m sure I’ll learn so much!

04.September.2012

I’m really excited about this! I remember back when, when you said you’d someday share detailed steps on how to make these mood boards. Can’t wait till I get a new laptop and can personalize it with applications like this… till then I will have to use my user ID on my husband’s Anti-Ergonomic computer… I will be making a mood board for my future living room, I mean the one we will have sometime in the future once we knock out two walls and convert to an open floor plan for much of the house :-D

04.September.2012

I just began subscribing, as well as reading through your blog and archives yesterday. I came across a post where commented on how you were a “visual” person and then began showing some mood boards. The first thing that popped into my head was..”I wonder how she makes mood boards”! I am also a very visual person, and haven’t been able to make progress in decorating my home because I haven’t figured out how to visually put a room together without having to buy things, bring them home, then return them because they don’t work. I am thrilled that the first post I received in my inbox was the beginning of a mood board tutorial. I am so excited to learn and want to thank you for taking time to teach me how to create one for myself. Thank you!!!!!!!!

04.September.2012

I love polyvore. I am more a fashion buff, but being able to use it for home ideas is great!

04.September.2012

well, well, well…it’s like you’ve created this tutorial just for me :-) ;-);-)

i will be creating a mood board for a client’s bathroom remodel.

quick question – can you create a background that isnt white. Patterned backgrounds that i already own, and insert my logo too?

04.September.2012

Good questions…

I haven’t tried creating a background that is entirely a different color. However, you can clip a paint swatch {or whatever background you want}, add it to a mood board, enlarge it to fill the entire board then place items {like a logo} in front of that. Polyvore will re-center your board each time you save it, so the ENTIRE background can’t be filled. But you can fill most of it with some white space around. Hope that helps!

04.September.2012

Perfect timing! I was just beginning to play with Polyvore last week, so I would love to read your tutorial! Your mood boards are always beautiful! Thanks! I need to mood my living room and bedroom.

04.September.2012

I am going to create a board for my son’s big boy room! I have a few ideas but I would love a place to bring them all together!

04.September.2012

I am going to create a moodboard for my entryway!

04.September.2012

Oh!!! This is perfect timing! I need to get a visual plan for our living room, which currently just has a lot of things I like but that don’t necessarily go together. So I’ll be doing a living room!

04.September.2012

Thanks for taking the time to teach us this….. I’m moving into a NEW home in a couple weeks. I need to think on which room is most important….probably the Master Bedroom !

04.September.2012

Very Fun! I always wonder what programs people use! Love it. I’ll use my bedroom for a board!

04.September.2012

Yay for tutorials!!! Thank you so much for doing this. As a newbie blogger this info is invaluable! Ill be doing a moodboard for our master bedroom. Cant wait for tomorrows lesson.

04.September.2012

Thanks so much! I am going to use this to plan the redesign of a bedroom that is now vacant since my son left for college. I have never been “creative” so I am looking forward to the challenge.

05.September.2012

Thank you for this, Dana! So exciting. I am stumped what to do for the first one, though–too many options! I’m helping my Mom redcorate her house–perhaps a bedroom for her? Or maybe the study?

05.September.2012

Your post has inspired me to learn how to use the Polyvore account I set up and abandoned! I’ll be creating a mood board for my office (possible closet-remodel-into-a-cute-office).

I totally appreciate your step-by-steps with pointy arrows, so THANKS! Your workaround for clipping “unclippable” pics is super validating for me too… there are times when I’m creating a workaround to solve a problem and I think, “There might be a better (correct) way but this is what you do if you wanna use that handy tool/program/facebook/Pinterest/Polyvore so you’ll do it an you’ll like it!!” Blog on, Dana! And thanks!

05.September.2012

Thanks for this, Dana! I’ve been wanting to try Polyvore. I made my one and only mood board in Picassa and it didn’t really have the look I was going for. I actually have an older version of photoshop that a friend gave me but it’s so very intimidating for a technophobe like me :( Would you mind sharing which online blogging class you took?

05.September.2012

Exciting! I’m going to create a mood board for our small rental apartment by the beach. I have always wondered how people make those boards, so thanks for sharing!

05.September.2012

Thank YOU!! I am trying to start my own blog and learning how to do a mood board is on my long punch list of tasks I need to do before I can feel like I am a real blogger. Even following the 2 steps in today’s tutorial took me a few tries (couldn’t find Links, the Favorites button was hiding . . . blurgh). Slowly but surely . . . and my first project will be a mood board for my daughter’s big girl room. She’s turning 2 in a few weeks and over the next year, she will likely be moving out of her crib. Thanks again!

05.September.2012

Following along on the tutorial with interest. I’m about to work on my master bedroom. I’m frozen when it comes to colors, so hopefully this will get me going in the right direction.

05.September.2012

Blogging Your Way, offered by Holly Becker of Decor8. An awesome e-course!

05.September.2012

Start small if you’re intimidated. Maybe just try a vignette with a console table, lamp, wall color, art, etc. Baby steps.

05.September.2012

Thank you, thank you, thank you. Step by step is just what I need. And small chunks of info… you are the best!! I am going to create a mood board for the dining room. Oh, and thanks again!

05.September.2012

You have no idea how excited I got when I read your post’s title today!! I am fairly new to blogging but have been wanting to try creating mood boards upon friends’ requests (and I wanted to try it for myself). But I had no idea where to start! Didn’t even realize Polyvore could do more than clothes! Thank you so much – looking forward to your posts for the rest of the week!

05.September.2012

Yay, I’m all for new ways of doing moodboards! I’ve done ours (for our new home) in Word, just snipping the pictures I want and placing them in the Word file. I’ll be making a moodboard for a gender neutral nursery, since we don’t have that baby yet, but maybe this exercise will help ;)

05.September.2012

Thank you for ‘talking down’ to ME!!! I totally learn something new by watching and by re-reading instructions 5 or 6 times. So a lot of tutorials that skip steps (because they figure it’s something so easy everybody should know to do it) or when they assume that everybody knows the terminology, leaves me in the dust. I have been wanting to make a mood board for my 16 year old son’s room so I can show him how it will look before spending the money and this came a long at a perfect time. THANK YOU!!!

05.September.2012

Such a great idea – I have never made a mood board before but have been struggling to decorate my guest room lately! This is just the motivation and help I need right now. Thanks!

06.September.2012

I sooo need this. I’m redesigning my kitchen right now. Can I do a kitchen?

06.September.2012

I don’t see why not!

06.September.2012

Thanks for your reply! Yep! Already on it! :)

07.September.2012

Thanks so much for creating this tutorial! I’ve been reading your site forever and I can’t believe this is the first time I have finally commented – I think it’s because you “assigned” homework, ha! :)

10.September.2012

I would like to thank you for taking the timeout to discuss with us “THE MAKING OF A MOOD BOARD” I cannot express to you how excited I am about these posts. I started blogging on my house renovations but I have no clue on what I am doing. I have been working on my kitchen mood board for a month or two in word and figure I was just going to copy and paste my ideas in a post.

[…] really, and so simple to use. For more tips, I found House Tweaking‘s recent blog posts on ‘Making of a mood board’ extremely helpful and easy to understand. Here’s my moodboard for my future living room. […]

[…] made the above board in Polyvore thanks to Dana’s tutorial at […]

[…] and wanna learn a quick and easy way to make your own, go to Dana’s blog and start with Part I – The Making of a Mood Board. She goes through everything in super clear, simple steps. She is my hero. So, back to my […]

[…] Lulu’s “must haves”, I got to work creating my first ever mood board. (Thank you, Dana from House Tweaking, for teaching me the way of the mood board.  I am eternally grateful and now forever distracted by […]

[…] Board post, I made my very first mood board with the help of a tutorial by the amazing Dana over on House*Tweaking.  I got an enormous boost of confidence when she featured my little mood board in her Made Me […]

04.May.2014

This will be fun! We are totally gutting our upstairs guest bath this summer and I have been wanting to learn how to create a mood board so I can get all my design ideas together. Thanks!!!