...because home doesn't happen overnight.

By now you should have a draft mood board of items. To polish it up and make it presentable for a blog post or client, you can add embellishments such as titles, text, arrows and decoration. This step can be likened to taking a loose photo and making it into a scrapbook page. It’s all about dressing it up and being creative.

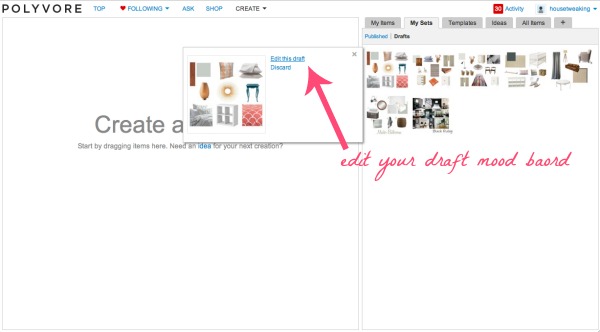
Log into polyvore, click ‘create’, click the ‘my sets’ tab, click ‘drafts.’ Select the draft board you want to embellish and click ‘edit this draft.’

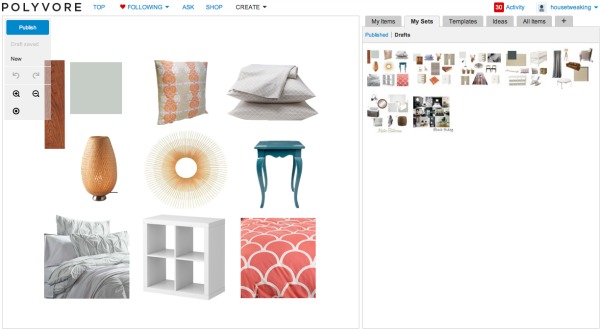
This should bring up the draft board that you saved previously. To add text to your board, click the ‘all items’ tab. Under the ’embellishments’ category, select ‘text.’

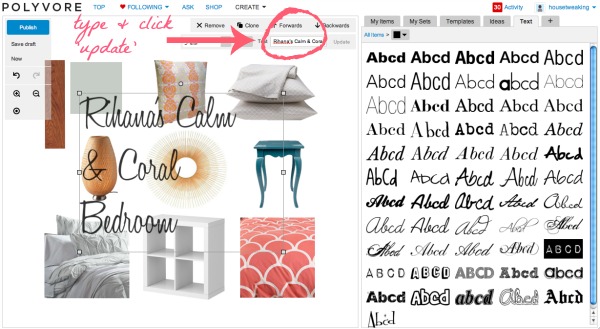
This will bring up a text box. Select a font and type in your desired text. Click ‘update’ to see it appear on your board. You can enlarge, shrink and pivot your text box the same way you would an item. Change the font or color of your text by using the drop-down menus in the text bar.

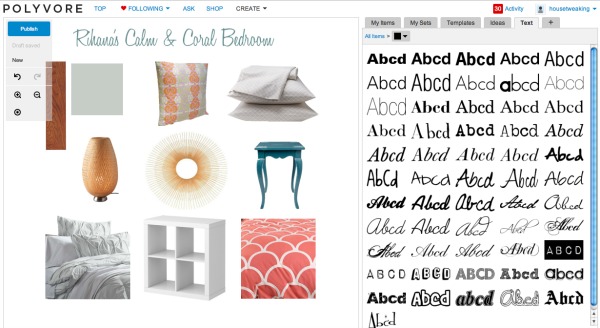
I widen my text box by dragging the right line of the box to get my title all in one line. I shrink my text and use a teal color to go along with my mood board’s color palette. I center the title above the board. Then I save my draft.

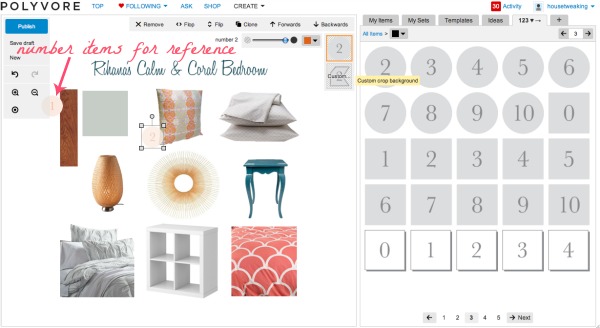
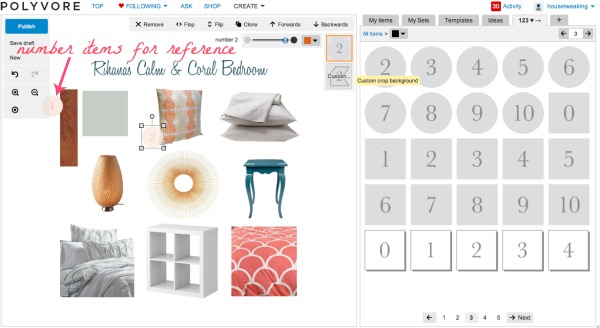
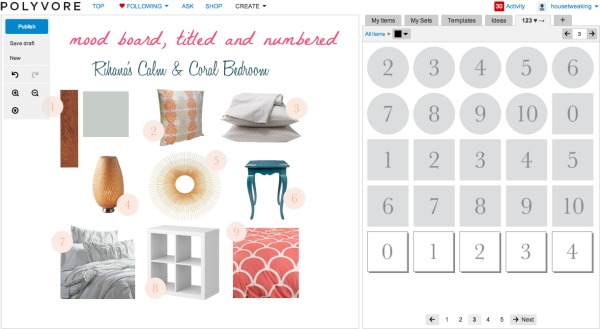
Sometimes it’s useful to number items in your mood board. This is helpful when you’ll be discussing each item in depth within a blog post or with a client. You can simply add lone numbers like you did with the title and then position them next to each item OR polyvore gives you the option of using ready made numbers that have a more professional appearance. To access the ready made numbers, click the ‘all items’ link in blue to the right of your board. Select ‘123♥→.’

This will bring up pages of arrows, numbers and other decorative labeling aides. Select the label you want and ‘add to set.’ You can change the color via the drop-down menu in the box. You can also lighten or darken the color using the fade feature. I use the round number stickers in orange and fade them so that they mimic the coral in my mood board.

When numbering, I like to layer the numbers slightly over the items so there’s no question which number goes with which item. I also try to stagger the placement of the numbers so your eye moves around the board in a flowing manner. With my mood board titled and numbered, I give it a once-over and save my draft.

For fun and to show you a little more of what you can do, I play around with my title’s color and give it some flair. {“I don’t really like talking about my flair.” Name that movie.}

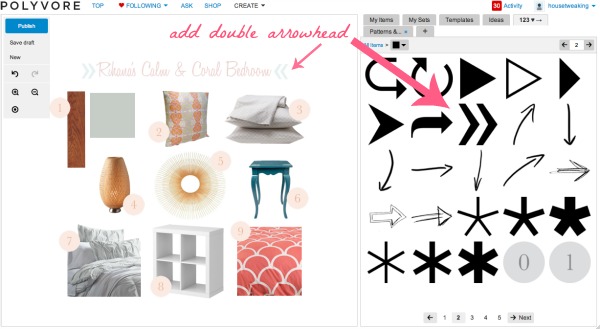
To highlight the title, I add double arrowheads to each end of the title. I decide the teal font and coral arrows work best. I save my draft.

If you’re wondering, I use the ‘text’, ‘123♥→’, ‘effects & textures’ and ‘patterns & overlays’ embellishments most frequently. My best advice here is to practice playing around with the embellishments. Try layering text over patterns and using different extras to amp up the wow factor on your boards. It’s just like cropping…you’ll get better with practice. That being said, if I’m making a mood board for personal use, I usually don’t add embellishments. I just want a feel for how certain items will look all together in one space.

Rihana's bedroom

Ta-dah! Wait…how’d I get my board onto my blog you ask?

Once you complete a mood board you have two options: 1) save it as a draft to view personally OR 2) publish it to share with others.

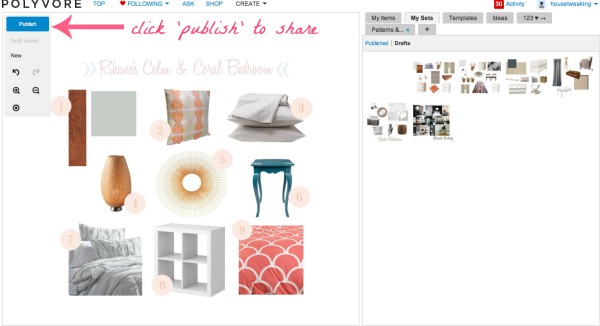
If you want to post your mood board to a blog or email it to a client, you will need to publish it. Click ‘publish’ in the upper left hand corner of your  board.

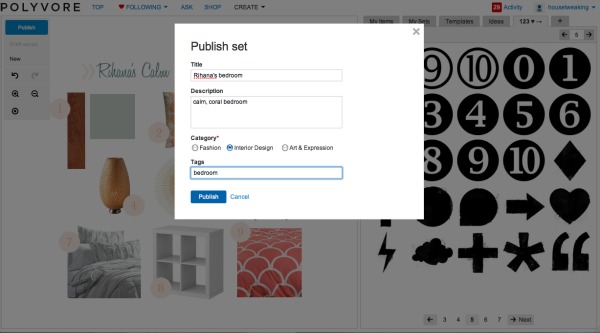
Populate the fields as directed. I don’t spend a whole lot of time or thought on this part since I don’t target my boards toward the polyvore audience. Click ‘publish.’

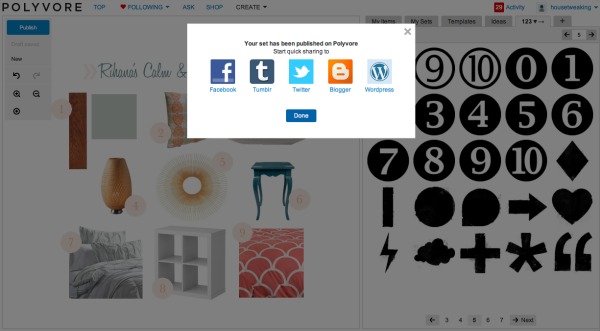
You are able to quick share via different social media sites but I click ‘done’ here. My boards are usually going into a blog post that I haven’t written yet or to a client via email.

Congrats! You just published a mood board! Feels good, doesn’t it?

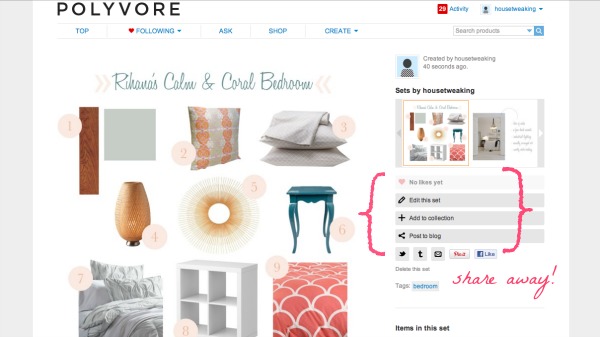
A great feature about a completed mood board is that you can hover over any of the items and it will bring up links to the items. Super convenient. There are share buttons for twitter, tumblr, email, pinterest and facebook. I use the email button to email mood boards to clients. The email includes links to all the items in the mood board which is another convenient feature. I also send a separate email to clients from my personal email account giving more details about the board – this is where those numbers come in handy. I specify furniture arrangements, each item’s placement, my thoughts on why I chose each item and other pertinent info. It’s easier for me to discuss one item at a time and I’m sure it’s easier for the client to see the mood board broken down into smaller bits.

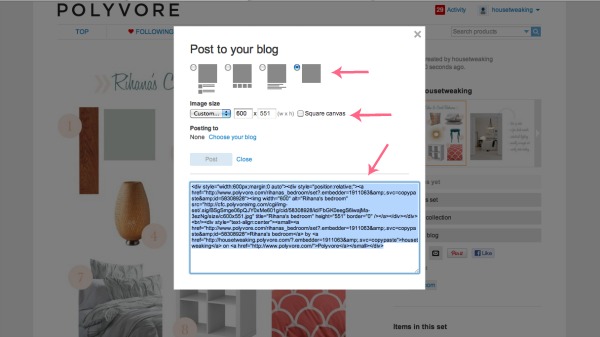
To post my mood board to House*Tweaking I click ‘post to blog.’ This brings up a box giving me appearance options. I always choose the last option in the first row which basically means I don’t want a list of all the items included with the mood board…I just want the mood board itself to appear on my blog. I set the image size to 600 pixels wide because that’s how wide my post column is on H*T. I skip the ‘choose your blog’ option and instead opt to copy the HTML code for my board. I paste the HTML code within the blog post I write pertaining to the mood board.

Rihana's bedroom

With the board in my blog post, I’m able to refer to each item via its labeled number. Voilà!

I’ll bet you would have never guessed all that went on behind the scenes when you’re reading a mood board post on H*T. No one is ever going to ask how I create anything tech-y again! Ha!

Sorry if this week was a total wash and you have no interest in mood boards. I’m happy if I inspire just one person to create their own. Playing around with mood boards is my idea of fun. I wish a step-by-step tutorial for polyvore had been around years ago when I started using it, so this is my way of paying it forward. Another reason I wanted to share this tutorial now is that NEXT WEEK I will begin offering mood board services for a fee. I know not everyone will be able/want to shell out the moolah for a custom mood board, so I thought sharing my process would give those readers the chance to DIY their own.

Happy embellishing! And I apologize in advance to the husbands, boyfriends, wives?, girlfriends?, children and pets of any polyvore monsters I created this week. SORRY. I would love for readers to link to their polyvore mood boards in the comments section below so I can see what lovely sets you’ve created.

Please feel free to ask any questions about polyvore and mood boards in the comments section below. Refer to Parts I, II and III of this tutorial if you’re just tuning in.

images: Dana Miller for House*Tweaking

66 Comments

07.September.2012

Thank you!!! You just made my weekend with this series. :). I have been trying to figure out how to do this without photoshop, and have tried a few other sites but they didn’t feel right. I for one can say I really appreciate the time you took to spell all of this out!!! My weekend plans have just been made ;). Thanks again, and hope your weekend is great!

07.September.2012

I love that you did this. I also love that you do not need a fancy computer program to make an awesome mood board!

07.September.2012

Thank you thank you!!! This has been hugely helpful to a completely non-computer savvy person like me. I made my first mood board thanks to you! It couldn’t have come at a better time. xoxo

07.September.2012

I so appreciate you taking the time to do this tutorial. My 12 year old daughter has been tearing out pictures from magazines and catalogs in preparation for re-decorating her room. This would be a fun project for us to do together.

07.September.2012

Alrighty…

Here’s my semi-finished board. This really was so fun, interior design dorks all the way! Thanks for teaching us so many fantastic tips!

http://www.polyvore.com/cgi/set?id=58330114

07.September.2012

I need help deciding on a new rug and ottoman…any input is surely welcome! Right now I have two of the leather chairs, two mirrors and a very similar sofa. The sofa is currently a camel chenille, but I am contemplating reupholstery or slipcovers to change it to charcoal linen blend. Feel free to weigh in on that as well! To Dana…thanks so much for this tutorial. I am not at all what you would call technologically-advanced, and this was a piece of cake because of your super tutorial!

http://www.polyvore.com/cgi/set?id=58330472

07.September.2012

Thank you. This looks much better then the corel mash-ups I’ve been doing. Love the easy text feature!

07.September.2012

We’re not planning on decorating, tweaking, or renovating any time soon, so these board are really just inspiration pieces for the future rather than actual items we want to source. I had so much fun doing this little project! Although my study time has suffered accordingly ;)

http://www.polyvore.com/cgi/browse.sets?uid=4645438

My favoutite is the study. Oh how I wish my study actually looked like that.

07.September.2012

This was a fantastic tutorial! I posted mine on my blog http://handmaidtales.com/2012/09/07/plans/.
I’ve used olioboard before, but I really like some of the features that Polyvore offers. Thank you for sharing!

07.September.2012

This was a fantastic tutorial. I appreciate the detailed step by step you provided. It was so easy to follow. Breaking it up into four days was helpful too so it didn’t feel too overwhelming. I am still working on my board, but will post it when I finish. It is fun to see what other readers have come up with. So glad to have found your blog!!!

08.September.2012

Here is the link to my first attempt. Cannot wait to play around with this some more :) Thx again, and I gave you a shout out on my blog as well. Don’t expect a surge of traffic from it though, I only have a handful of readers… :)

http://thenaptimecreative.blogspot.com/2012/09/living-room.html

08.September.2012

Thanks for such a great tutorial series. Any idea how to add numbers beyond 1-10?
I can’t seem to figure it out!

08.September.2012

Polyvore monster, oh my poor husband. But thank you for opening this world up for me!

Here are my first 2 mood boards
http://www.polyvore.com/beachside_unit/set?id=58229734
http://www.polyvore.com/library_reading_room/set?id=58354815

Oh, and I believe the quote is from Office Space, right?

08.September.2012

This is really helpful thanks! I have been using polyvore for months and you have just shown me how difficult I have been making it for myself. I have been adding my text is a totally different program for no reason at all it seems :) my latest mood board examples are in this post -http://www.designgratislondon.blogspot.com/2012/08/design-dilemma-mixing-furniture-styles.html?m=1

08.September.2012

Thank you, thank you, thank you! You’ve just upped my Polyvore IQ 100 points! I made my first mood board and am loving it. You’re amazing!

08.September.2012

So this is the first one I’ve ever done. I was basically trying to put the stuff I already had in my bedroom into one board.

http://www.polyvore.com/cgi/set?id=58383443

Thanks for the advice!

08.September.2012

Big, BIG thanks, Dana. I used Polyvore when it first came out, got a bit frustrated/disappointed and haven’t bothered with it since. I shall definitely be going back now that I have a tutorial I can refer back to; our reno boards will look much more sophisticated!
I want you to know that the time you took is MUCHO appreciated – pat yourself on the back, girl!

08.September.2012

Your tutorial was super helpful; thank you! I have made mood boards in PowerPoint but this is better.
Here’s the link to my laundry/mud room ideas.
http://www.polyvore.com/laundry_mud_room/set?id=58417240

08.September.2012

Thanks for the great tutorial. I was using powerpoint and boy did it just not work. Polyvore is much better and pretty easy to use after reading these posts. The one thing I had trouble with was adding images of fabrics I had already bought for the room. The images I found weren’t clipable and I wasn’t able to find similar ones. Is this a problem you have? I linked my nursery mood board.
http://www.polyvore.com/blue_nursery/set?id=58343722

09.September.2012

Great tutorial! Oh and Office Space…..one of my favs.

This is such a great reminder of everything Polyvore can do! Also, I never thought to use the HTML code and copy and paste into a blog post – once I hit publish to my blog and it did…just the mood board, days before I wanted to use it! Great tool to use and I should reallygo back and explore it further.

09.September.2012

I so appreciate you taking the time to do this tutorial.

09.September.2012

Sometimes with all my tricks, I still have trouble clipping certain images. Most times I can find the image somewhere other than where I’ll be purchasing it from and use that for my mood board. On the rare occasion, I do have to just leave it out because I can’t find something similar. In that case, if it’s for a client or a blog post I’ll still link to it and discuss it but it just won’t show up on the mood board.

Your nursery mood board turned out great! Love it!!!

09.September.2012

So great! I love the dark fixtures!

09.September.2012

Lookin’ good!

09.September.2012

Awesome mood boards! Love your attention to detail.

09.September.2012

Oooooh! So great! Love the two totally different designs. Fun!

09.September.2012

So the only way I’ve been able to do that is to manually number items…instead of using the ready made numbers. I’ll simply choose a font/color under the ‘text’ embellishment and add my number. Then I’ll add a sketched circle of my color choice and desired transparency from page 5 under the ‘123..’ embellishments tab. I put the circle behind the number. Done.

09.September.2012

Looks like you’re well on your way to making tons of pretty mood boards. So great!! Oh, and thanks for the shout out. I could care less about traffic. ;) That’s not why I do this at all.

09.September.2012

Love it! I’m really into multifunctional rooms as I’m sure you’re well aware.

09.September.2012

OMG! Love your sets! I think my favorite board is the bedroom. And I’m totally in love with that etsy pillow in your living room mood board.

09.September.2012

What color are your walls?? At first glance, I like the darker rug with the trellis pattern and the darker solid ottoman. But if you have dark walls, those choices might be too dark.

09.September.2012

Yay for baby girl nurseries! It looks great.

09.September.2012

I know that had to take so much time, but I so appreciate you showing all the steps! I can’t wait to try my own, and I’ll let you know when I have a board to look at!

10.September.2012

For my two cents, I prefer the chevron rug (7) with the darker ottoman (4). But all the options are lovely.

10.September.2012

Oh I love that pillow too! So, so, so almost bought it, but decided the $170 price tag and a toddler wouldn’t mix! I bought the other two (bottom left corner) for a third of the price. Don’t love them as much, but they work pretty well.

10.September.2012

That pink in the library is fantastic! I want that room!

10.September.2012

For some reason copying the html code to my blog didn’t work – maybe it’s a wordpress thing, or a me thing because I’ve had this problem before! – but just the code itself was displayed when I previewed my post. I got around it by emailing the board to myself then just copying the picture from my email. It was still pretty quick.

10.September.2012

This has been great thank you so much.

10.September.2012

Hmmmm… what platform do you use for your blog? I have to be viewing my post through the HTML code to be able to paste my mood board code to it.

10.September.2012

Thanks! So simple now that you’ve explained it!

11.September.2012

Thank you so much for doing this! I started fooling around in Polyvore over the summer after you mentioned that you use it for your mood boards – my first board was for our master bathroom redo. It totally helped my husband visualize everything together.

http://kissletsathome.com/2012/06/27/bathroom-mood-board/

12.September.2012

Ooooooh, purrrrrty.

13.September.2012

THANK YOU so much for this…been wanting to learn to create mood boards and have had a Polyvore account forever, but just seemed too overwhelming for me. I now get it…and created a simple one for my blog yesterday. Thanks for taking the time to go into detail. Your the best. XoXo

13.September.2012

This was fabulous information, my blogging is so much better now. Here’s my first, http://designingaround.com/category/the-cl-weekly-room/. Thanks so much!

14.September.2012

Thank you! Ever since you shared your mudroom progress, my ongoing dilemma of how to add built-ins to our tiny bedroom affordably has been solved. My apologies for pretty much ripping off your pax wardrobe idea to use in our bedroom! Here is my link, http://www.polyvore.com/cgi/set?id=58805287. Thanks again!

14.September.2012

Love it! Especially the bed.

17.September.2012

This was perfect timing as I was just in the midst of attempting my first mood board for a remodel on my husband’s office (unsuccessfully might I add). Thank you so much for this tutorial!

Is there anyway to print these out once completed to add to a project notebook or show to a contractor?

17.September.2012

Hmmmm….not that I know of. But that sure would be a great feature! Why not try contacting someone at polyvore and suggesting it? Until then, you can email your mood boards to people once published.

23.September.2012

Thanks for the tutorial, I was able to create my first board here: http://rosannes-blog.blogspot.ca/2012/09/master-bathroom-mood-board.html

24.September.2012

Looks like that’s going to be one fabulous bathroom!!

02.October.2012

Thanks so much for your inspirational posts and blog. I know that blogging is a lot of work, but you have completely inspired me with your home makeover. We’re moving into our new (to us) home in November and I have already started inspiration boards on Polyvore for some of the rooms. I can’t wait to make the place over!

11.December.2012

Dana, thank you so much for posting this series! I saw this back in September and mentally bookmarked it for when I had a little more time. I finally got around to going through your tutorial and it was incredibly helpful! I had been using Picasa to create mood boards but this is much better and easier. You can see my board I created for a future home office here,
http://blue11interiors.blogspot.com/2012/12/mood-board-experiments.html

One question though. If you look at my board you can see the rug coming through and breaking up the lines of the bookshelf. Do you know how to fix that?

11.December.2012

Love it! Totally drooling over that gold lamp. The only thing I can think of for the bookcase problem is that maybe you added it to the mood board using the auto-crop function {where polyvore does the cropping for you}. Sometimes the auto-crop can end up making items look wonky. Try the custom crop and see what happens.

07.February.2013

Thanks for the detailed tutorial. I followed step-by-step and love the outcome. Btw- I’ve been a blog follower for a few months’ and I love your blog. Keep it up!

22.February.2013

Dana- Thank you for the in-depth tutorial on Polyvore. I have been waiting for months for the opportunity to try it out… And now I’m hooked! I’m a Commercial Interior Designer by trade so when I get to explore the Residential Interior Decorating world it really gets my creative energy flowin’! I decided to create my first mood board here http://www.polyvore.com/cgi/set?id=73215965 based upon my existing eat in kitchen. I used all the same furniture and accessories I currently have or hope to have in the near future and see how it turned out… and it’s exactly how my kitchen looks and feels! It’s a really fun and creative way to get your ideas all on the same page. (I’m a big fan of cutting and taping ideas and inspirations all over my desk at work but this makes it look so professional!)

I trade a lot of designer services with creative friends around town. One in particular is a local photographer who I’ve known for years and is always a great person to bounce new crazy ideas off of. She is expecting her first baby this summer and needs to move her home office to their basement in order to make room for the nursery. I thought this would be the perfect time to give a client mood board a whirl. I’ve already interviewed her and I can’t wait to start collecting items for her mood board!

22.February.2013

Love your kitchen mood board! So fun and happy.

10.July.2013

You are a god send! Iv been working my way through your mood board how tos and they are just so clear and easy to follow you are great at explaining things because trust me, I need it! You have made me feel very clever with my end result too who wouldve thought I could create a mood board that looks as professional as the pros! Thanks so much really appreciate it :)

06.February.2014

[…] to PicMonkey which is what I use now. I pay a small annual fee for the Royale version. (I use Polyvore to create mood boards and round […]

07.March.2014

[…] *Lulu’s modern princess mood board created by her awesome mommy using my Polyvore tutorial. […]

15.March.2014

Thank you SO much for this A-Mazing post! It is exactly what i’ve been seeking, a step-by-step how-to to help encourage me to dive into creating a visual of what is in my head! You have encouraged so many of us, helping to demystify the mood board process so that creative beings can conjure up some visionary magic! One question for you….I too opted to copy the HTML code from one of my Polyvore mood boards. I pasted the HTML code within the blog post I write pertaining to the mood board, but when i go to preview my post, the HTML code is visible, not the mood board. What am i missing? Thanks for your guidance!

15.March.2014

Make sure you are pasting the HTML code into an HTML field – not a text field.

02.May.2014

Dana-I know I’m so late to the game, not sure how I missed this awesome series when you first posted it! Your tutorial was AMAZING. You are very generous to share your knowledge in such an easy to understand way. I just noticed that I can’t pin a mood board from my blog (or your blog–any blog, I imagine). When I click on my ‘pin it’ button the mood board pics show up as a broken link. I’m assuming that’s because polyvore prefers for us to pin from their site so they get the traffic? Just curious if you knew for sure. I haven’t been able to find anything through a google search. Thanks again–it’s such a pleasure getting to be a fly on the wall in your home :)

03.May.2014

I know, that is one downfall. I, too, assume polyvore wants credit for the mood board.

Thank you!!! Is there any way to print out the mood board so I can present mine to a group?

22.November.2014

Thank you from the bottom of my heart for the time and care that went into these posts. To see my art in a mood board makes my week. The fact that I was able to figure it out shocks me but much of this is due to your great instructions. Blessings!