...because home doesn't happen overnight.

You already saw our kitchen go from this…

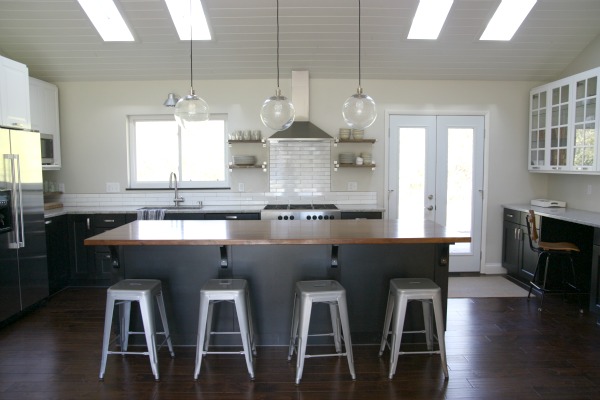
…to this…

Yeah. That was a complete gut job. Since then, we’ve been doing what we do best. Tweaking.

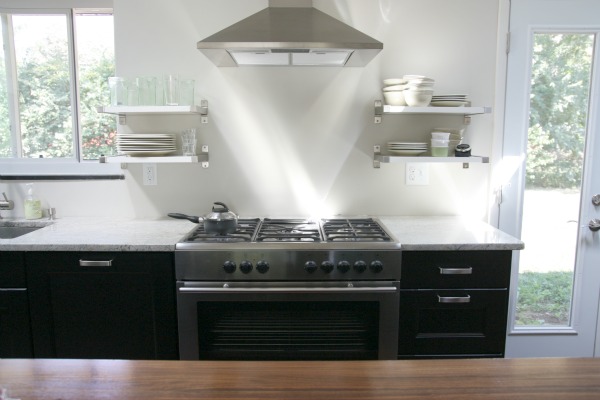
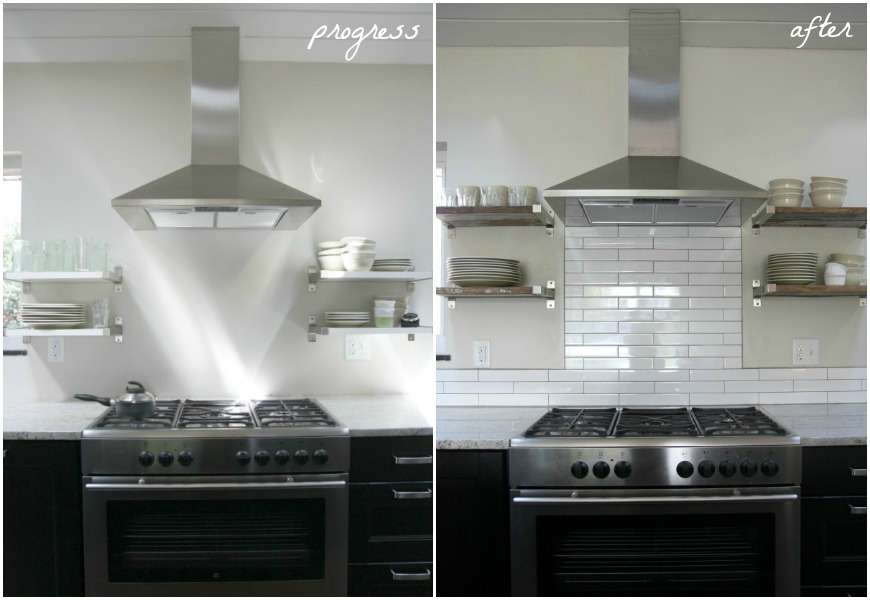
We originally installed four open shelves near the range. They were totally functional and got me on the open-shelving-in-the-kitchen bandwagon but left a lot to be desired. The white MDF boards got lost against the light-colored wall and looked a little meh. A reader with a keen eye also noted that the shelves seemed too low and would look better if they were in line with the hood.

We lived with them that way for a few months. I really liked having our everyday serving ware {plates, bowls, glasses, etc.} out in the open for quick access but felt that something was off. I went back through my kitchen inspiration photos and noted that many incorporated wood shelving. And after I looked further, I noticed that {as the wise reader above had suggested} the open shelving was in line with either: 1) a range hood 2) wall cabinets or 3) both. Aha!

I mentioned to HH that I thought the shelves would look better if they were raised so that the top shelves were in line with the hood and the bottom shelves were in line with the bottom of our wall cabinets {on the perpendicular walls}. He just looked at me.

He didn’t say a word but I’m pretty sure he was thinking, “What?! I just hung those shelves. They’re not going anywhere.”

Then I added, “And wouldn’t it be nice if we could find some reclaimed wood to replace the MDF?”

Still, the look and no words. This is what HH has to put up with on a daily basis. Have pity on him.

But I had planted a seed. And eventually it sprouted some roots because a few weeks later HH told me we had a few fence boards leftover from our DIY ‘love’ headboard. On top of that, they were 1″ thick – exactly what we needed. He thought we had enough to replace the MDF shelf boards. He also said something about installing a backsplash while he was at it.

I love that man.

I’ll have full-on ‘how we did it’ posts next week but feast your eyes on this…

How you like dem apples?

First, let’s discuss the most obvious tweak. The backsplash.

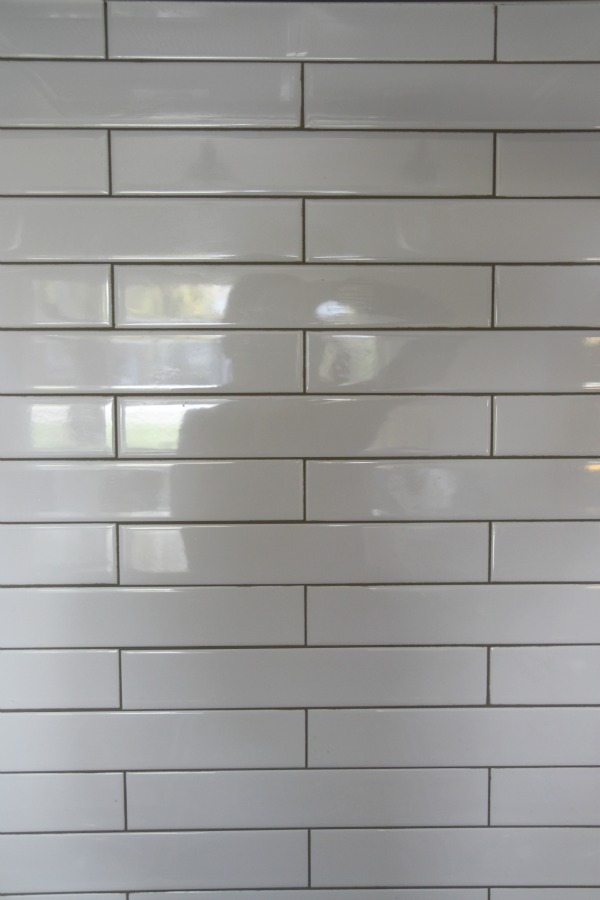
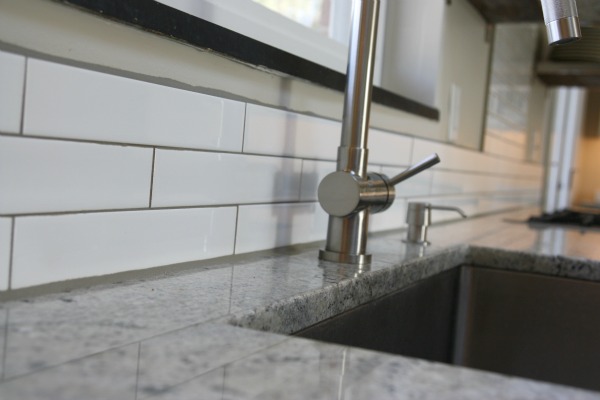
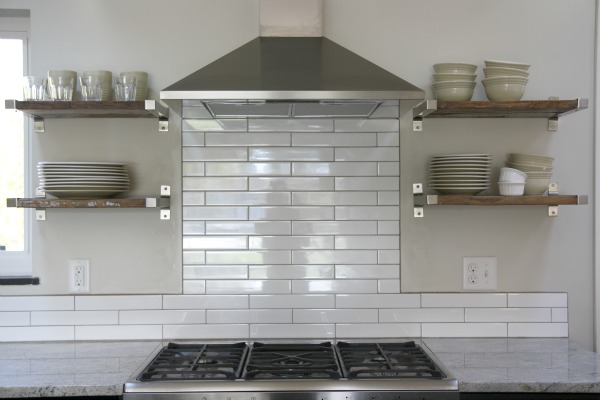
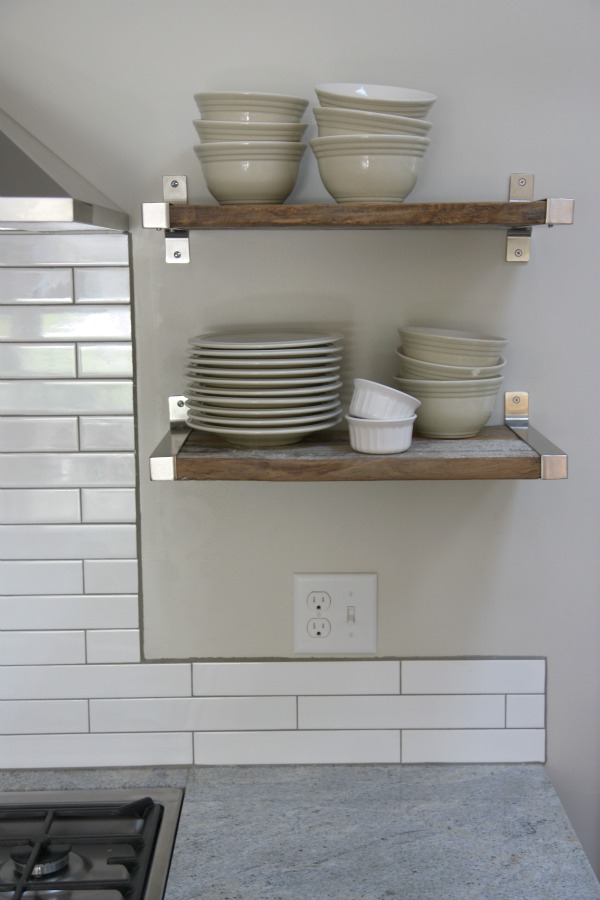
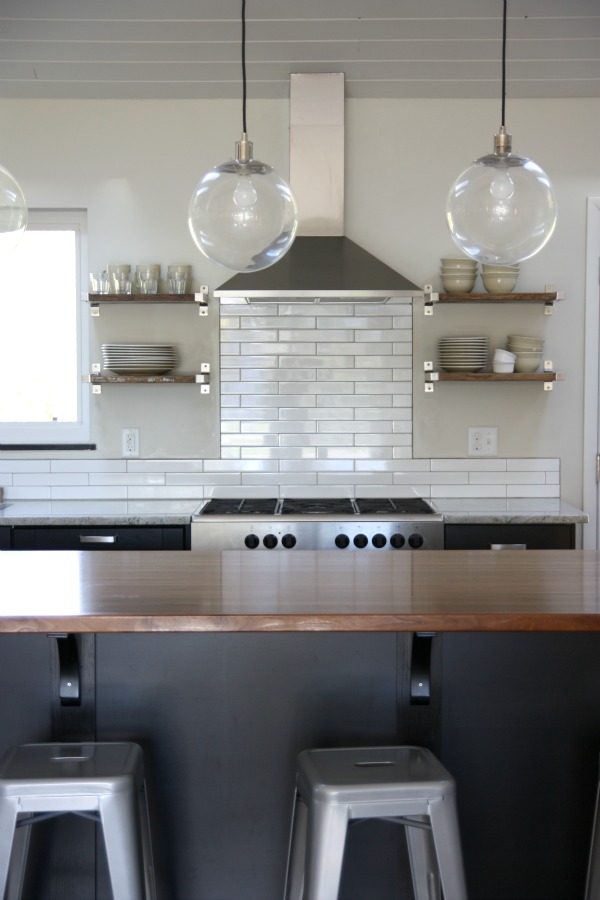
We chose 2″x12″ white subway tile and a contrasting warm gray grout.

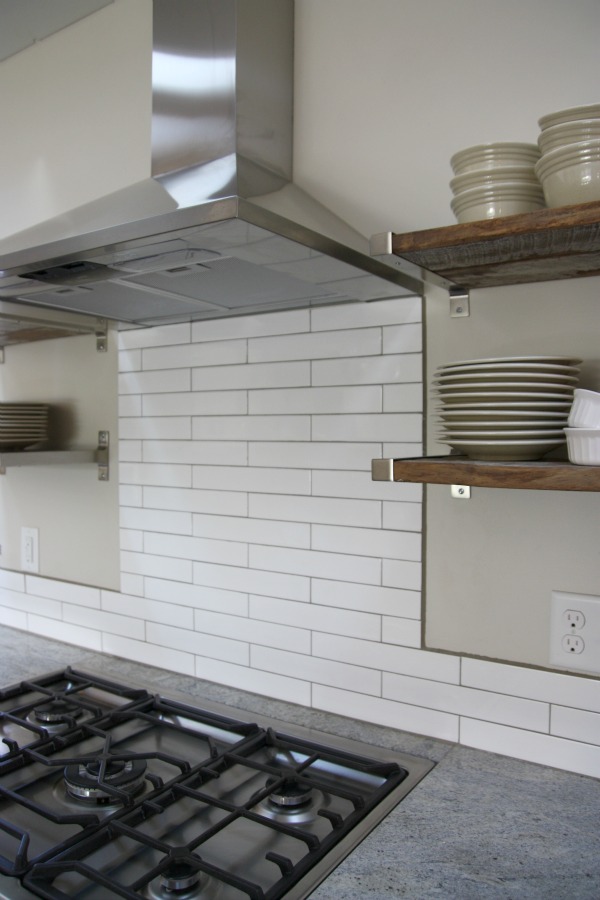
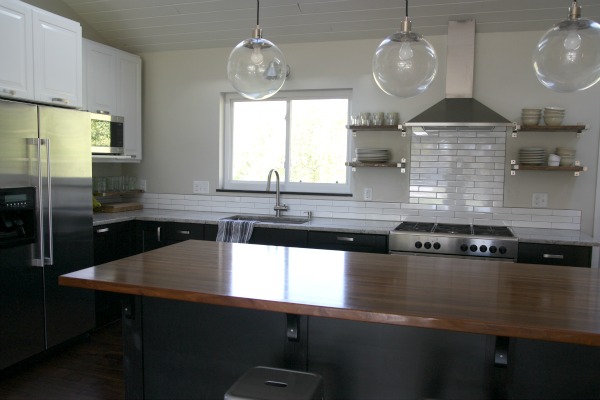
We decided to tile up to the hood but not to the ceiling because we really didn’t want the hood to be an ‘in your face’ focal point from the adjoining family room.

Likewise, we chose to only go three tiles high with the rest of the backsplash. Don’t get me wrong. I do enjoy an entire wall of tile now and again but when it’s visible from a not-so-utilitarian space {like our wide open adjoining family room} then it feels a little cold to me. Not to mention, keeping our backsplash minimal saved us time and money. Unless your kids are doing the cooking in your house {in which case TELL ME YOUR SECRET}, you really don’t need a backsplash that extends to the ceiling.

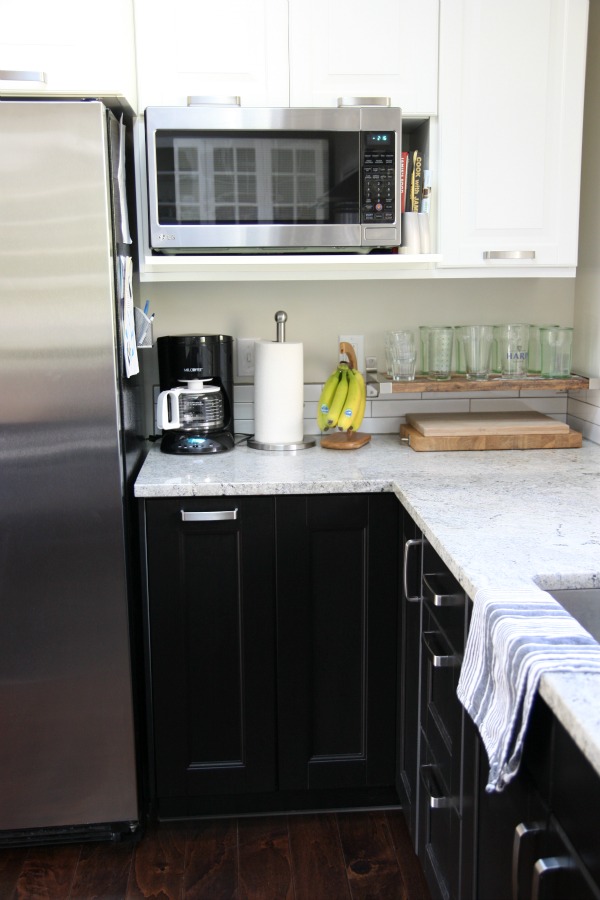
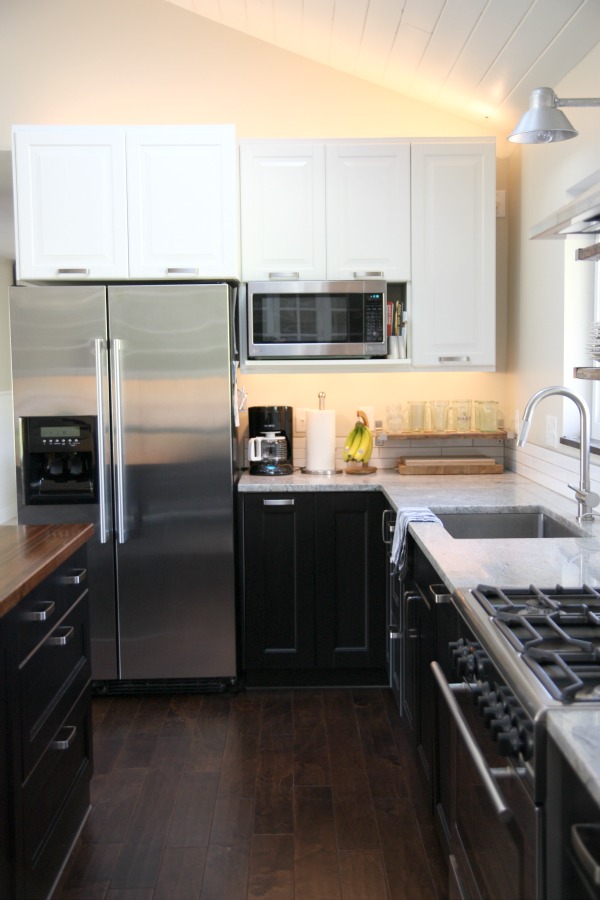
It’s hard to tell from this shot but the low backsplash wraps around under the microwave.

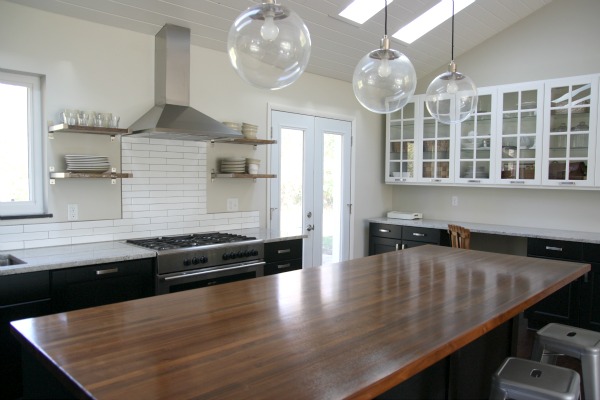
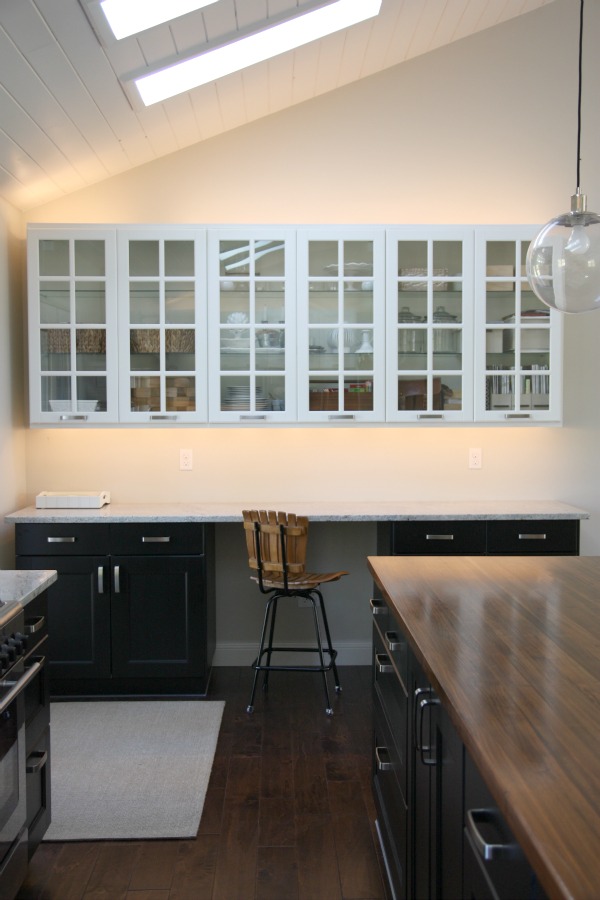
No backsplash along the desk area. I’m reserving the under-cabinet space for an inspiration board, memos, reminders, etc.

Now for the less obvious tweak. The reclaimed wood shelves…

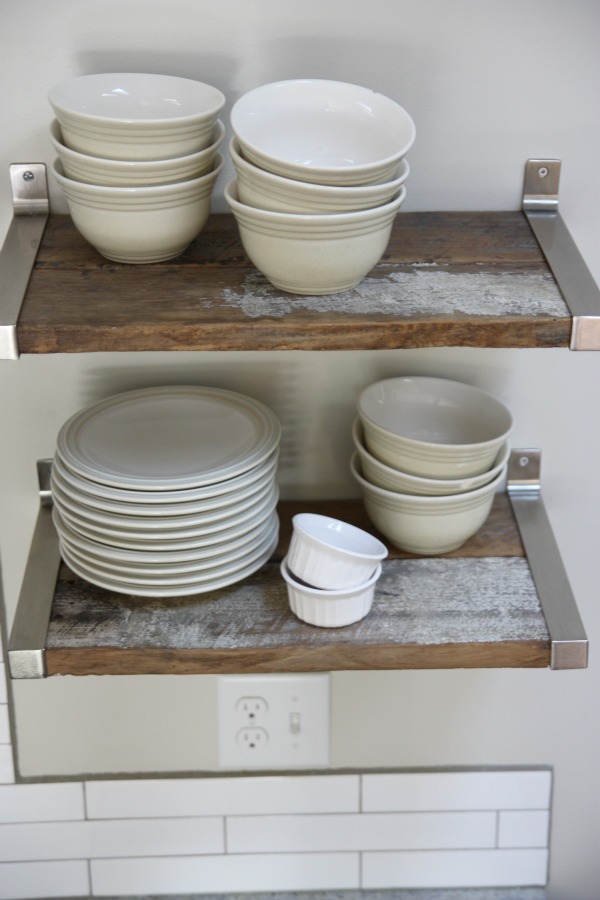
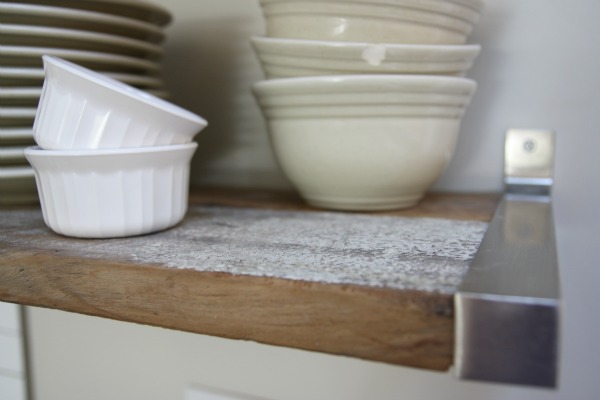
Seriously. They might be my favorite thing in the entire kitchen. Besides the skylights. The wood is old fence boards from HH’s family farm back in Pennsylvania. Like I mentioned, it was from the same lot that we used to DIY our previous headboard. {Don’t worry. HH sealed it so there’s no risk of contaminating our dishes with nasty chemicals or harmful dust.}

This shot shows how the raised shelves follow the lines of the kitchen better. I liken their new, higher position to a good {not Joan Rivers} facelift. It’s like that’s where they were supposed to be all along. Oh, and I have no problem reaching stuff on the shelves at their current height. At 5’4″, that was a slight concern for me but, turns out, it’s just like reaching up into a wall cabinet for something on the bottom or middle shelves.

The wood isn’t perfect. It’s bowed and warped which did pose somewhat of a challenge to hang. It has an aged patina that can’t be bought and only comes with time. We purposefully left some of the old paint on the boards.

Each shelf is actually made up of two boards placed side by side. Since we reused the IKEA brackets, HH had to cut the boards length and width wise to fit. Even though there are two boards and they aren’t perfectly smooth, it’s not enough to make our dishes wobble precariously above us.

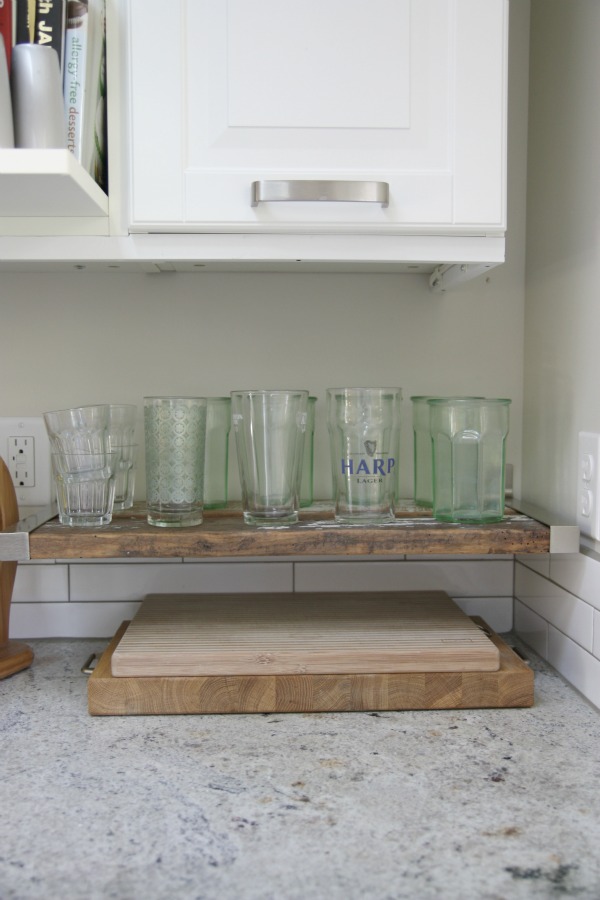
I love the function of the open shelving so much that I bought two more brackets and we added a low shelf over near the fridge for easy water drinking. {See how the backsplash continues along this wall?} The height of the shelf is in line with the backsplash and still allows us to utilize the electrical outlets properly. This corner needs work. I want to hang the paper towel roll and I’ll probably remove the coffee maker since we rarely use it.

HH was worried the area under the shelf would be wasted but it’s perfect for storing cutting boards.

Some more shots because I can’t enough of the reclaimed wood and it’s Friday!

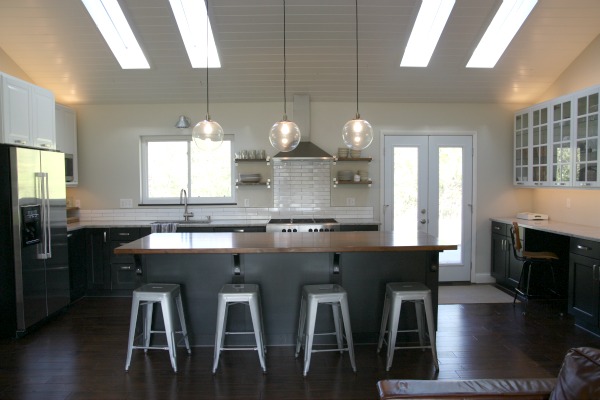
The mix of the shiny white tile, glass globe pendants, stainless steel brackets & appliances, weathered wood shelves, warm walnut island top, dark lower cabinetry and aluminum stools are so us. We love the contrast of light + dark, old + modern, shiny + matte.

I still have a short list of things to add to the kitchen, mostly final touches and accessories: window treatment, rug, maybe some hooks under the lower shelves near the range for towels/kitchen tools, wall art to the left of the window, etc.

Last week, one reader guessed another addition to the kitchen…

Cabinet lighting. {I’ve yet to paint those damn french doors. Why?! It’s not that hard!}

HH installed it himself. I have no idea how. I’m clueless when it comes to electrical work. I do know our electrician-in-law {who did the rest of the electrical work on the house} ran supply wire and hooked it up to switches so the cabinet lighting turns on/off with the flip of a switch. Presto! If you have any questions about it, feel free to ask in the comments section and maybe HH can answer them. I’m sorry. I have no desire to be an electrician.

But I do love what lighting can do for a space. I wish I could capture the ambience of the cabinet lighting at night. It’s the only lighting we use in the great room in the evenings after the kids are tucked in bed, lunches are packed for the next day and the kitchen is cleaned up. Cabinet lighting – that’s about as romantic as we get, people.

One last thing before I go…THANK YOU for voting for Mabrey’s room in the Room for Color contest over on Apartment Therapy. We won the dark division! I couldn’t have done it without you.

Have a happy weekend! I’ll be attempting a weekend warrior project that involves paint. Fingers crossed the kids cooperate.

Click here to see who won this week’s Bona giveaway.

images: Dana Miller for House*Tweaking

102 Comments

me–owww!!!! i don’t think i could love this latest tweak any more! i love love love your modern, clean-lined style, but adding the reclaimed wood was perfection. terrific job!

02.November.2012

I love the new tweaks! Well done. I have always admired the old + modern look and have been striving to accomplish that look in my own house. Thank you for inspiring me everyday.

02.November.2012

WOW! Pin, pin, pin… and congratulations on winning!

02.November.2012

LOVE!!! curious… where are your dishes from? they’re super cute.

02.November.2012

I love your kitchen – love your whole idea of buying a home and gutting it – and congrats on winning with Mabrey’s room!

02.November.2012

Looks beautiful Dana!

02.November.2012

Just curious, what did you do along the cut edges of the subway tile under the hood? Is that just a dark caulk? Or some kind of thin border?

03.November.2012

Wow, it looks so great Dana! I didn’t really know what you had in mind when you mentioned using the reclaimed wood, but I have to say that’s one of my favorite things in the room now too! (I’m also in love with your island counter top – it’s hard to choose which I love more, ha) Great job! Great inspiration!

03.November.2012

Hi Dana
I think you are doing a great job but the backsplash seems low, like you are not finished? Perhaps it is just the photos but to me without extending the tile all the way up the whole wall it draws attention to the area instead of creating a subtle texture variation. Anyways the place is completely transformed and good for you all….I feel tired when I look at the before and afters.
Cheers to you and your family

03.November.2012

The shelving is SO much more interesting with the reclaimed wood – paired with the metal brackets, it’s perfect ! And the height is great now ! Good luck for your painting project. Take care !

03.November.2012

How did you hnadle the outside edges of the tile? It looks like there is some grout there – am I right? I ask, because I may copy you and want to know how to finishe it off!

03.November.2012

On Pinterest I saw a post where they took the fake drawer piece off from in front of the sink and put the paper towel roll there. I love the uncluttered look of your kitchen and the open shelving. I can’t wait to redo our kitchen (it is straight from the 70’s). At this point we are thinking we will do a pant job on the counters and cabinets until we can gut it…will have to keep your ideas in mind for a few years. Love the open shelving!

03.November.2012

It looks terrific. I love the new shelves (and their placement). The cabinet lighting looks terrific as well. Congrats on winning. That room deserved it :)

03.November.2012

Wow! The slight change of the shelves made such a huge difference. I love them at the new height with the wood switch. I also love that you didn’t tile the whole wall. I really dislike that trend…it just seems so unnecessary to me.
Looks beautiful.

03.November.2012

wow! i thought the white ones were nice but these look so fantastic! it picks up perfectly on the island countertop and your new bar chair.

love your comment on not wanting to know about electricity [ i couldnt care less about plumbing- call someone!]

Beautiful! I love the reclaimed wood shelves! The white ones did get lost. And moving them up made a huge difference! I definitely have kitchen envy!

03.November.2012

I think I might have been the person who suggested moving the shelves up – that, in combination with the reclaimed wood, looks great!!

03.November.2012

Great tweak. It’s exactly what the shelves needed.

03.November.2012

In that case, thanks Anita!!

03.November.2012

Yes, there is grout on the outside edges of the backsplash. Our walls were very uneven {ahem, old house!} so HH used grout to fill it all in and give it a consistent edge. It’s actually an epoxy grout that never has to be re-grouted again.

03.November.2012

It’s the same warm gray grout that is in between the tiles. It’s actually an epoxy grout that never has to be re-grouted/resealed!!

03.November.2012

Oh my. Our dishes were a wedding gift – the ones we registered for. They’re Farberware and, knowing what I know now, I would have picked something lighter. They have a good weight to them but are a little heavy for everyday use. Nevertheless, we’ve used them daily for nearly 10 years so I probably won’t invest in anything different until these die…which is looking like NEVER. You can see that a few of the bowls are chipped; they just won’t break.

03.November.2012

Your kitchen is so beautiful! I really love the updated shelves, the wood is a great addition.

03.November.2012

My husband and I also just installed open shelving in our kitchen and LOVE it! It just opens up the space so well. We did similar thing with Ikea shelf brackets and old wood for shelves in our living room and bathroom. Great choices :) The tile/grout combo is different but really looks awesome!

03.November.2012

I love this!!! It adds such a good balance with the darker reclaimed wood as your eye travels from the top of the island. Love love it So personal, too.

03.November.2012

Oh, and congratulations on winning the contest at AT – had to put up with a little unfriendly chatter for that win, but you were by far the winner no matter what they said! ( :

04.November.2012

Love, love, love the way the new shelves tie in with the island counter top. Great move.

04.November.2012

I love the wood shelves and the contrasts you have in the space, beautiful. I have a question about the cabinet lights, would you mind showing them closer/telling more about them? I’m asking because we’re planning our kitchen reno and I’m especially interested in the lights above the cabinets; we’ve been thinking something similar so I’d love to know how yours are done.

Gongrats on winning over at AT, your room deserved to win!

04.November.2012

I love the new shelves! The backsplash tile/grout are a great choice but look very unfinished as-is. The height of the low part is really awkward. I don’t think you need to do the whole wall, but maybe add a few rows so that the lower part fills in up to the base of the cabinets?

04.November.2012

Love the tweaks! I especially love the reclaimed wood in the clean, shiny brackets! Glad to know that you can remove the MDF shelves for something more “homey”! Also… where are your dishes from? I’m in the market for some new ones (mine are just all wrong… the reasons are many…) and I really like the lines of yours and the neutral color! Any help in that area would be greatly appreciated! :-) I love that cabinet lighting is as romantic as y’all get too! We’re the same! A glass of wine with under the cabinet lights on… nothing says romance quite like it! Hope you’ve gotten lots accomplished this weekend!

04.November.2012

So pretty, I am jealous. Where do you guys eat dinner as a family though? The island?

04.November.2012

Those shelves? Wow! The make the perfect difference! I love that amount of warmth the reclaimed wood adds. Details…it’s all in the details.

Dana, your kitchen is STUNNING!

04.November.2012

Just curious about two things:

1. What did you do to prep for the tile. From the photos it looks like you put up hardie backer? Did you just put it over the dry wall or did you rip out the drywall and put up backer in its place?

2. Did you just use a polyurethane to seal the reclaimed wood? Some reclaimed projects I’ve come across almost have a wax feel to them, not sure what that is… Any info on sealing the reclaimed wood would be really great.

Thanks

04.November.2012

Would love any details on the cabinet lighting—-which brand did you pick and any tips for installing, etc. I have always wanted under-cabinet lighting and love yours and also love the lighting above the cabinets too–looks awesome. I’m sure it’s beautiful in the evening too. Your kitchen looks great—-well done.

04.November.2012

With what did you seal the wood shelves? I am considering bringing in an old weathered, paint-peeling storage cabinet on the family farm and using it as a china cabinet but I’m not sure how to make it “safe” for inside the house.

I love that subway tile. The 2″ wide tile is perfect for your kitchen.

05.November.2012

Yes, we eat all meals at the island. We’ve yet to eat in the dining room/mudroom. Not because we wouldn’t like to on occasion – mostly because that room is a disaster zone. I’ve been working on it though!

05.November.2012

The dishes are Farberware. They’re the ones we registered for when we got married.

05.November.2012

I’ll ask HH and get back to you. It might be a little while just because he’s away for work.

05.November.2012

Coming up later this week!

05.November.2012

Wow – wouldn’t ever have known what those shelves needed or that they needed anything but man – that wood just seals the deal, doesn’t it!

Are you going to hang some art on the other side of the kitchen window? Something to toss a dash of color into the space? Maybe something to tie in the colors in that piece you’ll have over the fireplace?

05.November.2012

Yes, art next to the window is a must!

05.November.2012

Looking really good. Nice job!

I also just recently went to open shelving in one section of our kitchen, biting my fingernails the whole time. (dust? grease? clutter?) Oh, why did I wait?! I love them. I will never, ever go back.

05.November.2012

I do think the shelves are better higher, I think less cooking matter will end up on your clean dishes, etc. I do however wonder if the tiles were 2-3 rows higher your wall switches and plugs wouldn’t stick out and more blend. Just an observation, however I do love them either way. :)

05.November.2012

you’re killing me! we are almost neck and neck with your remodel…and you guys seem to be having the same arguments/discussions/debates over the same thing. and yes, i am avoiding painting our french doors as well. and yes, they’re right off the kitchen as well. so, thanks for doing my homework for me. i’ve been arguing to build reclaimed floating shelves and my husband had the same response – “I JUST HUNG THOSE THIS SUMMER!”… so i’m going to show him these and show him that this can be a compromise – we’re swimming in white over here and need a little bit of rustic/patina to warm things up a bit. and by the way- your decision to get the overstock stools finally made my husband agree to them as well (we got them in red)…so thank you for miraculously “testing” out all our arguments for us. it’s looking great! i put a link to the latest pic (i had to dig a bit) so you can see how our house is similar to yours (tiny and full of walls – we gutted everything to open up the living space) and we’re doing everything ourselves as well! (well, except for the shipping container addition – WAY over my skillset) okay, blah, blah blah. looks great!

http://sweethotmess.blogspot.com/2012/10/yesterday-is-finally-over.html

05.November.2012

I’m still thinking tile to range hood height on that wall would be better. Less chopped up.

06.November.2012

I thought I liked the shelves before, but now I see they were so wrong! I cannot believe how much better and completely gorgeous that reclaimed wood ones are with the new placement. Before the shelves were just functional, now they are beautiful and functional. Well done!

06.November.2012

Your kitchen is looking fantastic!!

07.November.2012

I Love this kitchen! I have these same dishes and the pattern is Pfaltzgraff Cappuccino. I love them except for one issue … the metal in cutlery scratches. I clean occassionally with Barkeeper’s Friend to remove the scratches.

07.November.2012

I love the tweaking you did to the shelves. I like the contrast of the reclaimed wood against the walls, and they tie in nice with the slab of wood on the island. I do also love the choice of subway tile, but I agree with a few others. The tile stops at a really awkward height. I think it would be nice to raise it up to the underside of the upper cabinets and lowest shelf. Therefore, the outlets also blend in with the white tile. Then, so proportions are balances, I would raise the tile under the hood all the way up to the ceiling. Also, another nice detail I have seen instead of the grout is ending the tile with a metal L angle(http://www.schluter.com/2171.aspx) …it provides a straight clean edge. I really think you have done a great job transfoming your whole house, it is looking fantastic!!

09.November.2012

I was just looking at your old house tour on Apartment Therapy. It’s interesting to see how your style has evolved and changed. Your first home was beautiful, but I think that you were able to really stretch your design skills because you changed the bones of this new home to fit your aesthetic and needs for your family. I love what you are doing in this new house, it is inspirational to your readers. Thanks for sharing it all.

09.November.2012

OMG. This should prove to you how insane the last two weeks have been – me solo against three kids. The dishes are Pfaltzgraff NOT Farberware. I apologize to anyone who has been searching for these dishes under Farberware! So, so sorry! I need to sleep.

09.November.2012

OMG. This should prove to you how insane the last two weeks have been – me solo against three kids. The dishes are Pfaltzgraff NOT Farberware. I apologize to anyone who has been searching for these dishes under Farberware! So, so sorry! I need to sleep.

Here’s a link to the exact pattern…

http://www.pfaltzgraff.com/Cappuccino/CAPCN,default,sc.html

09.November.2012

Here’s a link to the exact pattern. I can’t believe they’re still available 10+ years later!

http://www.pfaltzgraff.com/Cappuccino/CAPCN,default,sc.html

09.November.2012

Pam, you are totally right! They are Pfaltzgraff. Thank you for catching my misstep here. I promise. I used to be smart. And take showers. That was three kids ago.

12.November.2012

Do you have power going to your island? If so, where do you have the outlets? Thanks! I am putting together my Ikea purchase now and don’t know what to do about power.

12.November.2012

Yes, we had to run power to the island per code requirements. HH and our electrician jackhammered up part of the slab in the kitchen off {what is now} the desk wall to the island and ran conduit. There is an outlet on either end of the island for a total of two outlets. The covers are black so they aren’t noticeable.

14.November.2012

Wow! Your kitchen looks gorgeous! I LOVE the reclaimed wooden shelves for a nice rustic/industrial like feel. I love it, you’ve done such a great job.

25.November.2012

Beautiful job! The colors and textures are gorgeous!
I have a question for you on the layout…Is the dishwasher next to the range?
I am struggling with how to layout my new kitchen and could achieve this layout with the dishwasher next to the range. Does it bother you there? Or do you wish you had put it elsewhere?
Thanks!

25.November.2012

The dishwasher is left of the range. There’s really no issue with this placement for us. In our household, no one is ever loading the dishwasher while someone else is cooking at the range so the possibility of tripping over the open dishwasher door is pretty much zilch.

28.November.2012

I love the white subway tile! We’ll be installing this in the new 2-3 weeks as well. Even though grout is such a small component of the project, did you have a hard time coming to the final decision of the soft grey?

29.November.2012

YES! I was so afraid we would end up with darker grout than we wanted and get a horrible busy, gritty look. Basically, we tried to find a soft warm gray that pulled from the gray tones in the countertop. I’m working on a post all about the backsplash and reclaimed shelving so stay tuned.

23.January.2013

Your kitchen looks incredible. I can’t wait to read more about the process of creating it!

Can you share where you got the island stools? I love them!

23.January.2013

Read all about the stools here.

27.March.2013

Your kitchen looks great! How did you find working with the Ikea gear? Any major hurdles? Looking at doing our kitchen Ikea at the moment.

28.March.2013

We love our IKEA kitchen! I was in my third trimester of pregnancy so HH assembled and installed the entire kitchen by himself – minus the granite. He especially loved the rail system for the upper cabinets which made the one-man job possible.

13.April.2013

Wow, I only just discovered your blog, you have hooked me in already. What an amazing kitchen! L O V E!! x

27.April.2013

I’m about to do a kitchen renovation (to the studs) with Ikea cabinets soon. I was wondering, though, what you put underneath the upper cabinets – it doesn’t look like the usual deco strip that hides undercabinet lighting. The picture where I see it is the 16th one, where you show the cutting boards stored under the shelf. Do you also have undercabinet lighting? Thanks!

14.May.2013

I was wondering how your tile backsplash is holding up behind your stove…has the heat caused the bondera to un-bond at all? is it still holding strong? I read another person using another brand of peel and stick type tile backing called simplemat and their tile is falling off after 3 months behind the stove area.

14.May.2013

Our backsplash is still going strong! No loose tiles here.

13.July.2013

Dana, what a beautiful design of the kitchen. We are remodeling our kitchen and I love, love, love the wall-lamp above the sink. Where did you get it?
Claudia W.

14.July.2013

Barn Light Electric!

27.July.2013

Love the reclaimed wood shelves. I have a question about their thickness. I like the brackets you used. According to the Ikea website, the brackets should be used for a 1 inch thick shelf. Mine are 2 inches. I was just curious how thick your shelves are. Online they look thicker than 1 inch.
Thanks,

29.July.2013

The wood shelves are 1 & 1/8″ thick.

03.September.2013

Love your kitchen! I’m curious (and sorry if I have missed it from another post), but what are the dimensions of your kitchen and of the island itself?

03.September.2013

The island is built from three 36″ wide IKEA base cabinets with a 15″ overhang for eating. The kitchen itself is part of our great room {living room + open kitchen} and measures roughly 20′ wide. The side of the kitchen with the fridge is ~7′ deep and the side with the desk is ~12′ deep.

03.September.2013

Wow! Thanks for such a fast reply and for the details. One other question… how much space do you have between the island and the countertops / side with the stove?

[…] via […]

[…] shelves, originally posted on,housetweaking , are just what I’ve had in […]

18.March.2014

Hi Dana! I have a major crush on your kitchen! We’re finishing up a new backsplash in our kitchen and we have flat edges where it ends, like you. What did you do to finish it up? Grout/Caulk?

[…] of how good all this will look together, wood shelving with stainless steel brackets it will be.  Dana’s are pretty awesome, too (pictured […]

29.May.2014

Love the look of your backsplash here! What size grout lines did you go with?

29.May.2014

The grout lines are 1/16″.

18.June.2014

What is the spacing between your countertops and the bottom of your light rail? I just installed our upper Ikea cabinets per the instructions and now I’m worried that if I install the side panels and light rail the distance between the countertops and cabinets will be too small.

18.June.2014

The spacing between the upper cabinets’ bottom trim (which disguises the under-cabinet lighting) and countertops is ~18 1/4″ in the actual kitchen and ~16 1/4″ at the kitchen desk. Hope that helps!

10.July.2014

[…] *https://www.housetweaking.com/2012/11/01/kitchen-backsplash-tweaked-shelves/ […]

06.August.2014

Where did you get the brackets to support the rustic shelves?

Many thanks!

07.August.2014

Ikea!

07.August.2014

Ordered the brackets this morning. Thank you! And I love the tree house and your master bedroom. I too stare at the ceiling and try to figure it out. Wish you come over and help us tweak. I think I will copy your headboard and reading light fixtures.

Jeanne

21.October.2014

[…] love the idea of thinking outside the box when it comes to building materials. As I mentioned, we repurposed reclaimed fence boards as kitchen shelving. We’ve also created outdoor art using wood salvaged from our home’s attic, and we […]

[…] I’d love to use open shelving instead of cabinets (as seen here on Young House Love and Dana’s kitchen ) so the kitchen doesn’t feel too closed in. I’m not entirely sure that a) the cats […]

15.March.2015

The low shelf, the one with the glasses, it looks like the tops of the brackets are attached to the wall drywall and the bottom is attached to the tile. Did you do anything special to make that work?

17.March.2015

We cut the tile and installed it around the brackets. (The shelves were installed first.)

18.May.2015

Just stumbled across these pics of your shelves – I’m in the middle of doing the same thing. We actually got the stainless steel shelves and brackets from ikea but like you thought about the MDF, I think they look a bit “meh” – my question is do you know where I can buy 1″ reclaimed wood shelves ? Love your pics as they give me a great idea how it will look when finished- thanks

19.May.2015

No, but I think a previous commenter recommended stair treads!

10.January.2016

Love you transformation! The mix of textures is beautiful and inviting. I was wondering g if you would share where the pendants lights are from. I have been looking for simple glass globes with the black cord. Thank you!

11.January.2016

You can find a complete source list for the kitchen right here…

https://www.housetweaking.com/2014/07/10/the-kitchen/

The globe lights are from West Elm!

31.January.2016

Hi – did you ever end up posting about treating and staining the reclaimed wood for the floating shelves? I did some digging but couldn’t find a post. What stain did you use? Working on open shelves and love the stain you used. Thanks for all the inspiration.

01.February.2016

I didn’t really write a post on them because we didn’t stain the reclaimed fence boards. I liked the innate wood tone. We simply sanded them down a bit and used a matte sealer. (I didn’t want anything shiny.) Hope that helps!

29.November.2016

Hi there! My husband and I are so thankful for your beautiful images of your backsplash because they have saved us from an unfortunate mistake with our switch plate placement (long story). Anyway, your backsplash design has been the solution to our problem!

I’ve been able to find the same tiles on The Tile Shop webpage, but have one question. Do you happen to remember whether your tiles were bullnose? They don’t seem to sell an Imperial Bianco field tile in the 2×12 size and I’m just wondering if the bullnose version works as a field tile or whether they used to sell the field tile version when you completed your backsplash and no longer carry it.
Thanks!

12.December.2016

Ours are not bullnose. Funny, at the time, we couldn’t find a bullnose to do the edging! It all worked out though. I hope yours does too!