...because home doesn't happen overnight.

painted bathroom 1

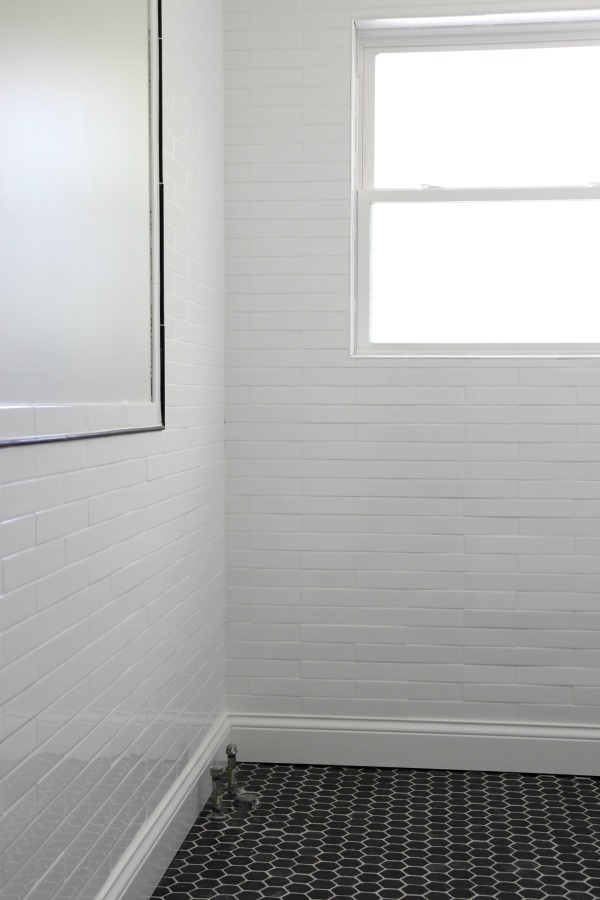
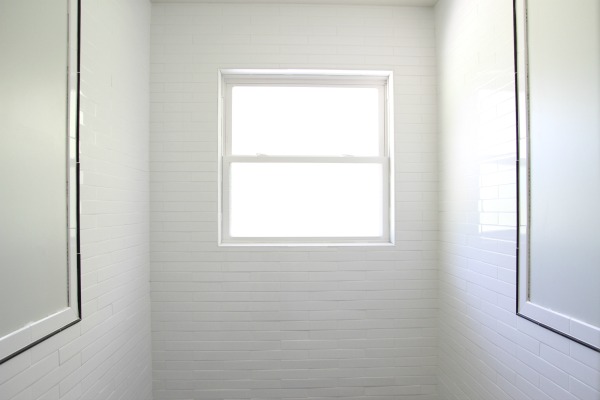
Staying true to the “slow and steady wins the race” motto, we’ve been plugging away at the hallway bathroom when time allows. All the grout has been sealed. Baseboards have been installed, painted and caulked. The walls are painted, too. I’ve been doing this for a while now but the effect of finishing touches (like baseboards and paint) never ceases to amaze me. All of a sudden a project feels like a room!

painted bathroom 2

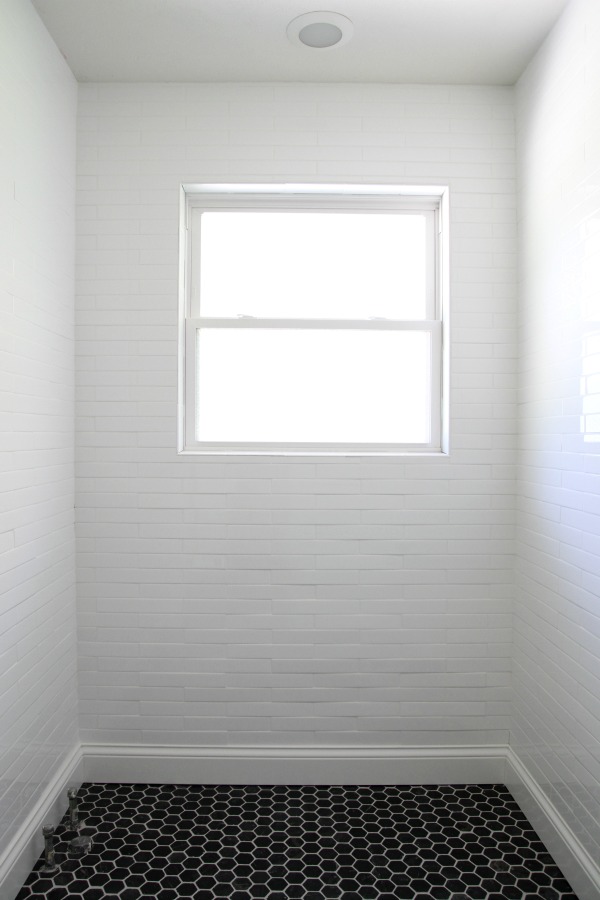
We had to order additional base molding to match the baseboards in the rest of the house. We had a small section leftover from the whole house renovation but were ~20′ short. The baseboards in the rest of the house are painted Benjamin Moore white dove but when I held a swatch up to the subway tile in the bathroom, it was too creamy. I ended up painting the baseboards in Benjamin Moore super white. It’s a great match but I’d be lying if I said having a different white in the bathroom doesn’t make me the slightest bit twitchy. The tile is a very cool white with bluish undertones and the room itself is north-facing so the light in here isn’t as warm as in other areas of the house. But it’s all good. I think repeating black and wood accents in the bathroom will help to tie it in with the rest of the house.

painted bathroom 3

Steve and I had assumed I would paint the walls Benjamin Moore tapestry beige to match the hallway and main living space. But when I painted a swatch on the bathroom wall, it looked so wrong (i.e. dirty) in the context of the bathroom. That’s when I made the executive decision to stop worrying about “matching” the bathroom to the rest of the house. Instead, I focused on selecting a paint color that suits the room and its cool light.

I considered painting the whole room out in BM super white but, (I think I’ve mentioned this before) as much as I like looking at white rooms online, they don’t feel right in real life…at least not in this house. The super white looked, well, super white. So stark, so cold. I kept looking and searched hundreds of paint colors and finally landed on Ace Paint lost spur. (The color number is D35-2. Ace Hardware should have an Ace Paint color deck at the paint counter. If it’s not on display, ask for it. My local store doesn’t have it on display.) I had it mixed in Clark + Kensington primer + paint in one. This is my go-to brand ever since I painted the mudroom walls black. I’ve used it in the boys’ room and on the brick fireplace and TV surround. The coverage is great. (Not sponsored, just sharing.)

painted bathroom 4

painted bathroom 5

I love the color. It’s a subtle green-gray with some blue in it. It’s one of those colors that looks different every thirty minutes. Sometimes it’s white, sometimes gray, sometimes green, sometimes blue. Sometimes it’s warm, sometimes cool. I love chameleon colors like this – colors you can’t put your finger on. I like that it’s light but not an obvious match to the tile. Also, this room is so difficult to photograph. I wish you could see it in person. You really have to be in the room to get the full effect.

painted bathroom 6

Steve and I installed the wall sconce last night. It’s the same light we have in the master bathroom. I’m itching to get the vanity in so I can start The Great Mirror Search. But, first, the tub.

unpainted tub

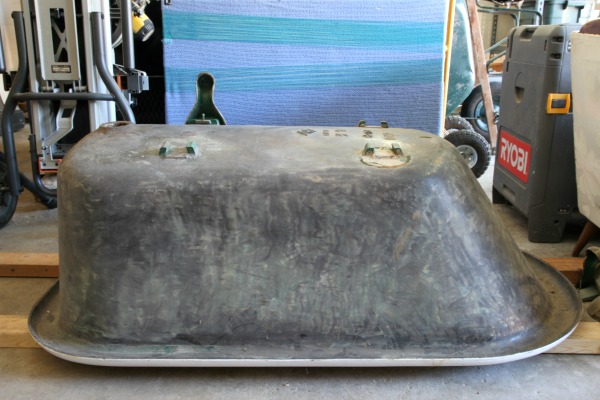
Here it is hanging out in the garage in all its one-legged, heavy cast iron glory. We recently cleaned out the garage (yep, this is the cleaned up version) to gain access to the tub. We hadn’t looked at it in years and were pleasantly surprised to discover the inside is in excellent condition. (The previous owners had it reglazed.) There was a lot of drama surrounding the acquisition of the tub. So much so, that I think we forgot about the condition. To be safe, I tested the interior and exterior for lead. The results were negative. I know it looks kinda shabby but I think it just needs a good cleaning and a few coats of primer and paint on the exterior.

black jack paint swatch

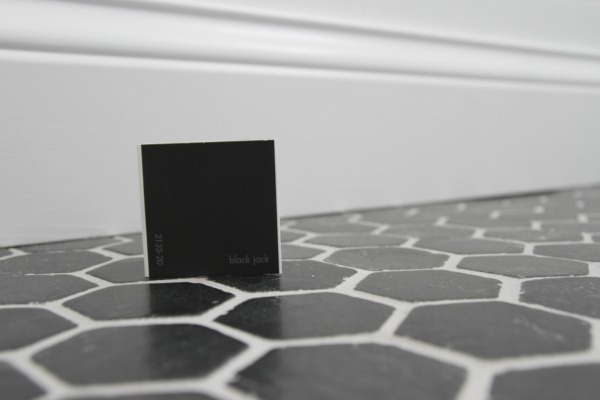
We’ve already agreed on a paint color for the exterior. It’s Benjamin Moore black jack. I’ll probably go with an oil-based paint in a satin finish for durability and ease of maintenance.

reclaimed beam

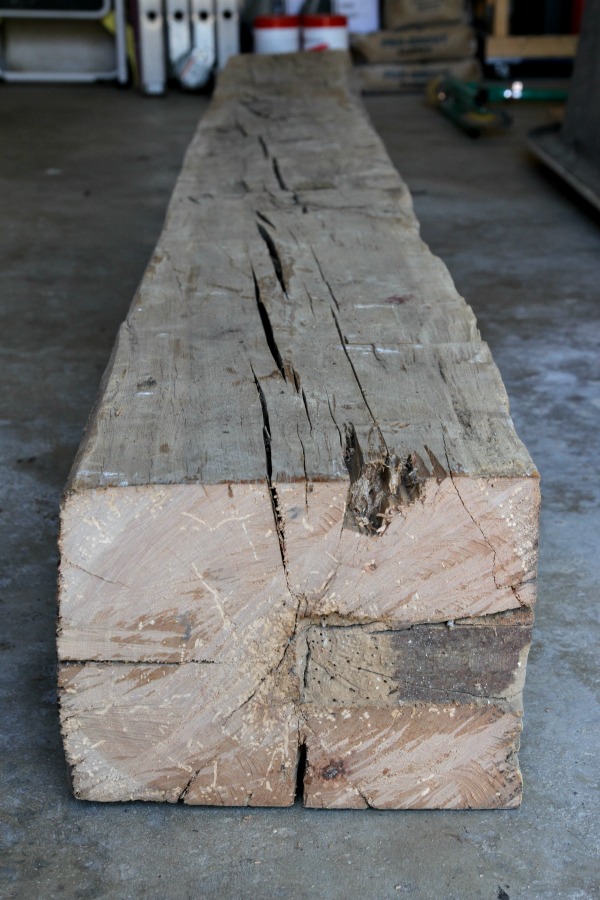
For weeks we’ve been scouring the internet for wood to attempt a DIY cradle base for the tub. We were looking for specific dimensions. The ideal beam turned up at a local reclaimed materials supplier this week. It set us back $40 and Steve hauled it home in his truck on Wednesday. After some deliberation, it looks like we’ll need to take it to a saw mill to have it cut. We don’t think the rough cut of a chainsaw is the look we’re going for. We don’t want perfection (it is a reclaimed beam after all) but we don’t want rustic either. We’re hoping to have it cut to size this weekend. Steve and I both predict that once the tub is in, things will roll pretty quickly. Let’s hope so!

painted bathroom 8

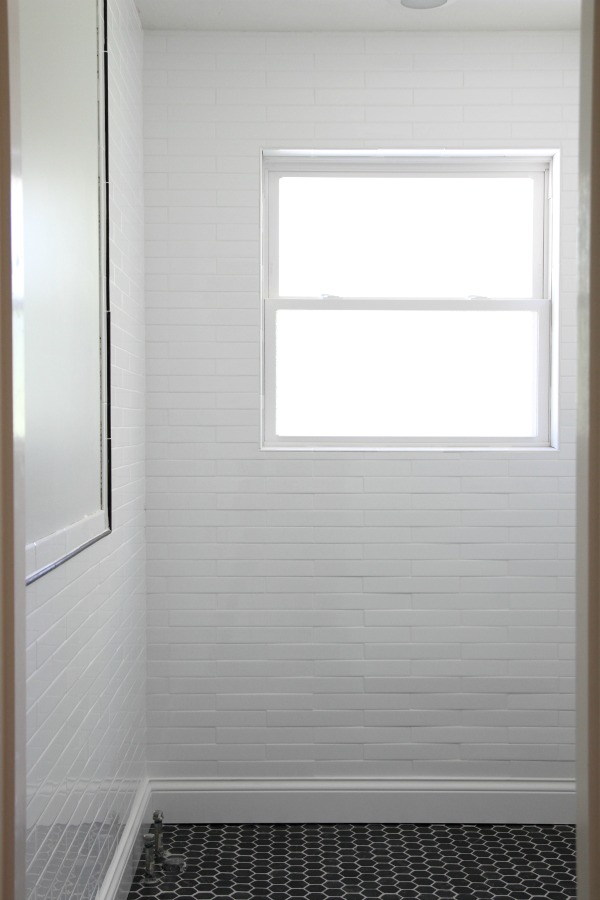
So that’s where things stand with the bathroom. We ran out of caulk and still need to caulk around the window and where the tile meets the drywall but that’s small potatoes. I swear. Gathering supplies is almost always the rate limiting step for us in any project.

painted bathroom 7

In other news, Cheetah is my shadow and quite the camera lover. Such a photobomber! Is cat modeling a thing? If so, I’m signing her up for the next animal talent search.

images: Dana Miller for House*Tweaking

36 Comments

26.September.2014

Your cat is so beautiful! (Oh, and the bathroom is pretty great, too.)

26.September.2014

I am loving your subway tile! So classic, yet modern at the same time.

And that kitty is pretty adorable, too!

26.September.2014

The accents look awesome in the bathroom. It’s a nice touch to the tile. I bet it’s gonna look amazing once it’s all complete.

26.September.2014

We had a clawfoot tub with a shower attachment growing up. When my brother-in-law came along and used it, he likened it to showering inside a ziploc bag. Hahahaha- it was so normal to us! But (and this is all in reference to your tub post) I think a fabric liner and maybe a more expansive curtain rod would have helped.

Looks great!

26.September.2014

Lovely progress! I love the texture of the subway tiles.

Can you include a random Cheetah pic in every post? She’s adorable!

26.September.2014

Does that barn light throw off enough light? We’re considering one for our powder room, but now sure if it’s bright enough. Thanks!

26.September.2014

I love the bathroom! It’s coming along so well, Dana. And good lord is Cheetah a beaut!

26.September.2014

I understand why different baseboard colors make you a little uneasy, but this bathroom, with the colors you’ve ultimately chosen, is seriously stunning. Everything, including that light fixture, just seems to belong together. I’m very excited to see your vanity and mirror.

26.September.2014

The wall sconce is from Barn Light Electric. It can hold up to 100W. I found similar sconces for less money but they couldn’t provide as much wattage so we went with this one. The sconce plus the recessed light above the tub / shower area provide plenty of artificial light for the small bathroom. We have the same setup in our master bathroom and it works great!

26.September.2014

Looking good… can’t wait for the finished result. For the record, I don’t think you need to worry about different whites at all for the bathroom. I think it will look “right” because of the tile.

On another note since you mentioned Tapestry Beige– is your living room really 100% Tapestry Beige or did you cut it down? Not that it’s important, but I recently went on The Great Paint Search, looking for a warm neutral for my living room, and TB was just soooooo much darker than all my other contenders. But it looks so light on your walls! Maybe it’s your skylights.

27.September.2014

I really like how this bathroom is coming together and all the choices you’ve made. I especially like the wall color and that you didn’t try to match it or go with stark white. I agree that white rooms look beautiful online with the blown out photoshop, but in real life, it is super sterile looking!

I have a small question and I hope this is not coming off as being snarky. I noticed that the bottom tile portion of the bathroom (around the tub area), looks uneven. But it seems to create a weave pattern. Is this intentional? I can’t tell if it is or if it cannot be helped due to all the difficulties with the curvy wall. In the end, it shouldn’t matter too much because the tub will block most of it, but I was curious.

Love everything so far and I am looking forward to seeing the claw tub in there!

27.September.2014

Ooh love the beam! Can’t wait to see how that will turn out – you know my love for reclaimed wood (recycled cubby #2 is getting there!).
The colours look great – it’s actually hard to imagine that bath will fit in that space! It looks so narrow – photos can really distort size! I remember looking at mine wondering how everything would fit / turned out we had plenty of space
Looks like you’re close to finishing – how exciting! You will have your own bathroom again! However will you cope taking a shower without a little person having to go potty?!? Ah bliss… Xx

27.September.2014

your subway tile seems to have some different thicknesses to it…is that the case? I love it and am looking for a little bit of an irregular tile myself. where did you find this one? thanks so much!

27.September.2014

Such a gorgeous kitten!
I had wondered whether Cheetah would get her own personal garage bathroom before the hallway bath was completed. It’s looking great so far and I’m sure the whole family will love having another facility.

27.September.2014

Is the tile basketweave? It looks like it has different thickness along the walls?

27.September.2014

Nope…just old wavy walls :(

27.September.2014

I think you’re just seeing the effect of our wavy walls. It drives Steve bonkers. But most of the larger fixtures (tub, toilet, vanity) will sit in front of the worse spots near the bottom of the walls. I guess if you like the look, tile an old bathroom! Haha. The tiles are 2″ x 12″ (a little longer than standard subway tiles…which made installing them evenly across wavy walls more difficult…) imperial bianco gloss tiles from The Tile Shop. Hope that helps!

27.September.2014

Haha. I think I’ll manage ;)

27.September.2014

The “weave” is just the effect of a very uneven wall…the worst spot being the back wall near the bottom. It was NOT intentional and it irks Steve but the tub will sit in front of it so it shouldn’t be as noticeable in the end. Oh, the joys of working on old houses…

27.September.2014

The main living space and hallway are the real tapestry beige. I think all the natural light (from the large picture window and skylights) in the main living space makes it look lighter. It looks darker in the hallway. In fact, I originally painted our master bedroom and bathroom tapestry beige as well but those rooms don’t receive as much natural light and I hated the color in that context.

27.September.2014

How come the walls were wavy? Didn’t you have new dry wall installed? Just wondering for our own future projects… Thanks!

27.September.2014

I’ve read you should have 2 lights over the vanity to prevent shadows but I love yours. Is this a problem you think?

27.September.2014

We had so many people warn us about the wall sconce over the sink causing unwanted face shadows in our master bathroom! I was starting to think we had made a mistake. HOWEVER, we don’t have any problems with shadows. I think it’s because our vanity is deep enough so that we aren’t standing directly under the sconce. Maybe it depends on the depth of your vanity but we love the light. Hopefully, it works just as well in this bathroom.

27.September.2014

Good memory! The back wall was demo’d to the block wall. Steve installed furring strips and we hired out for the backer board installation. For whatever reason, this particular (block) wall is a bit wonky and the installation of the backer board wasn’t perfect. Pair that with extra long subway tiles (which don’t give as much play on a wavy wall as shorter tiles) and, well, the results are less than perfect.

Luckily, Steve started the tile installation at the bottom of this wall and noticed the problem right away. Since the tub will sit in front of the first few rows of tile, he didn’t remove them and start from scratch but did make adjustments to the backer board (with additional screws and some thinset) in the rest of the room to try and correct the unevenness as much as possible. He was cursing those walls the entire time! He told me to remind him to shore up wavy walls before tiling next time. In retrospect, it would have been ideal to check the (un)evenness of the walls before tile installation. Or install the backer board ourselves.

I’m just happy Steve is open to tiling a “next time” – haha!

28.September.2014

You did say (in your 02.07.13 post) that: “HH also removed and rehung the backerboard under the window because the drywallers did a shoddy job”. What more could he have checked that was apparently missed at that time?

28.September.2014

The seams were our biggest issue. That and the innately wonky wall.

29.September.2014

This bathroom is just gorgeous. Even thought its all walls and hex tiles at the moment! Looove the tub and I cant wait to see it in place. Chameleon colors are the best. Our living and dining room walls are chameleon colored. Sometimes they look more blue, other times theyre more green.

29.September.2014

Lookin’ good Dana – love that tile combo!

I can’t wait to see you tub when it’s finished! You have me dreaming of a bathroom re-model…. We also have a claw-foot tub sitting in our garage… We’ve been hoarding it for a potential future re-model but we have to finish our kitchen first ;)

29.September.2014

*your tub – oops!

29.September.2014

I am in love with your bathroom! It is so simple, classic and inspiring! I love the beam also, it adds the perfect touch! And those tiles! Everything about this makes me super giddy!
Thanks for sharing :)

Kassandra

30.September.2014

first of all i looooove your bathroom, second we are also doing a clawfootish tub in our bathroom, we purchased it for $50 on craigslist, on the way home our tub also slid and shattered our back window.. I thought you would like to know you were not alone in the “this tub is so heavy it will never slide” department

01.October.2014

Ahhh! So sorry to hear about your window. The things we do in the name of home improvement…

[…] & Home Magazine art director, Mandy Milks. And even though the space isn’t finished yet, this bathroom over at House*Tweaking {one of my major blog crushes} is looking fantastic already with […]

06.February.2015

[…] *https://www.housetweaking.com/2014/09/26/bathroom-update-baseboards-paint/ […]

21.July.2015

What paint sheen do you use for your bathrooms? I like matte looking paint but know sometimes it’s not the best for bathrooms.

21.July.2015

Eggshell on the walls and semi-gloss on the trim! I like different paint brands for different applications. For bathrooms, I really like the Aura line from Benjamin Moore.