*THIS GIVEAWAY IS NOW CLOSED.*
Congrats to Stacey who likes the idea of a wood accent on the stairway wall in her living room.
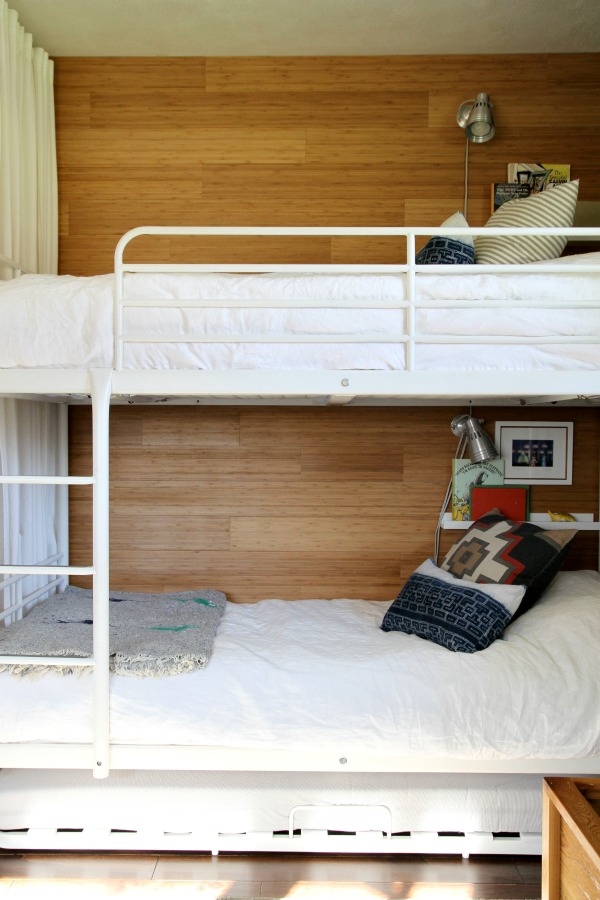
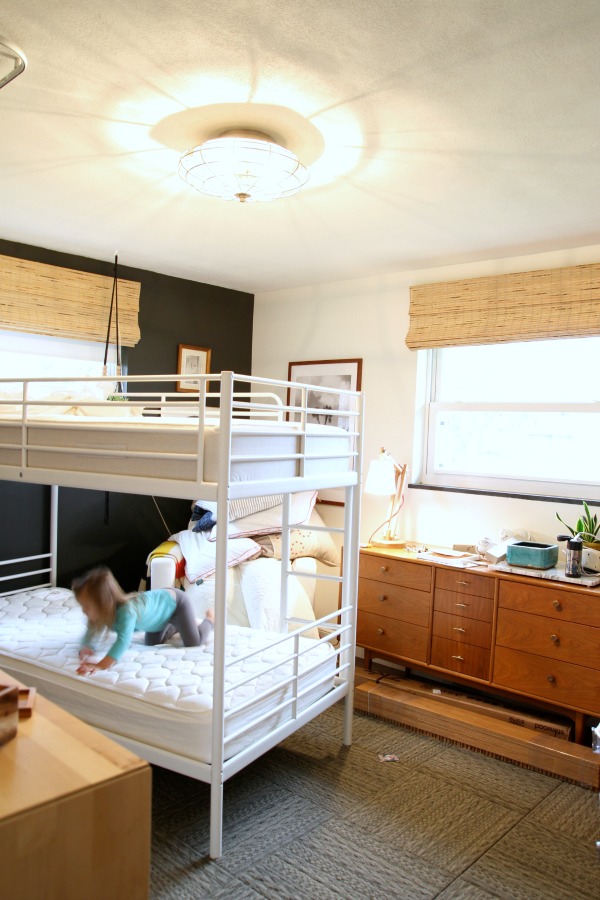
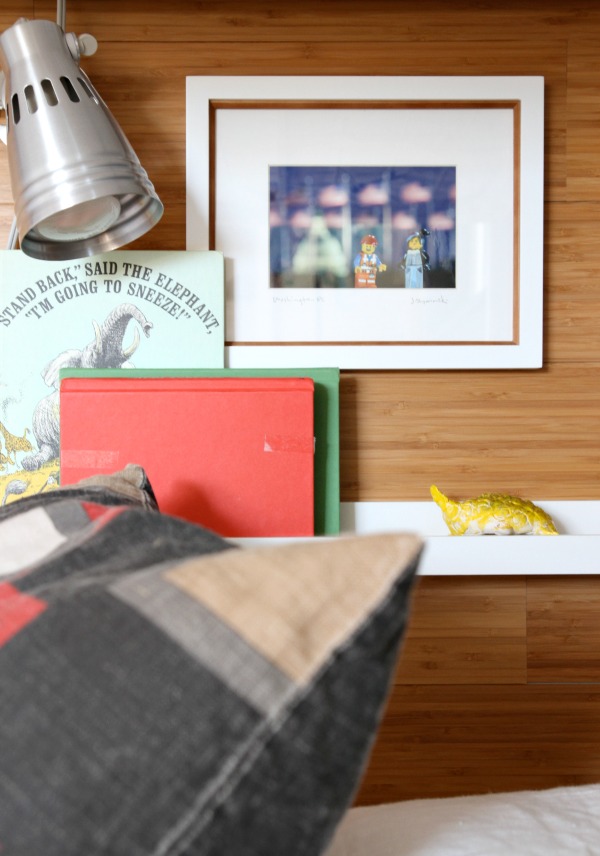
I’ve had a hard time with the boys’ room. Especially the recessed wall that the boys’ beds are pushed up against. It’s the perfect spot for the bunk but I’ve always felt like it needed something. After I brought in the vintage dresser, I was pretty sure that something should be a warm-toned wood wall. But I didn’t want it to feel rustic. I just wanted it to balance out the wood tones on the other side of the room.
After a lot of searching, I came across Stikwood. (Btw, this post is NOT sponsored but I did ask Stikwood if they would be interested in doing a giveaway for you guys. Spoiler alert: They said yes!) Have you heard of it? Essentially, it’s peel-and-stick solid wood planks meant to be used on walls. There’s no nailing, no finish work. You simply measure, cut, peel, stick. I ordered a bunch of samples and quickly settled on the caramelized bamboo. It had the same warm tones as the dresser. I measured the wall (roughly 8′ x 8′) and ordered accordingly.
Even though the wood planks are VOC free, upon arrival the boxes had a smell to them. I sat them in the garage for several weeks to off-gas since we were in no rush to install them.
Once the smell had dissipated, I brought the boxes into the boys’ room to acclimate. Can you see them under the dresser? Last weekend we finally got around to installation.
We pulled the beds into the center of the room and unloaded the wall. Steve used painter’s tape on the black wall to note the placement of the sconces and shelves. He took a few measurements and wrote them on the tape for reference later.

We decided that Steve would be the measurer and installer; I would be the cutter. I hooked up our Ryobi flooring saw (the same one we used to cut and install all the flooring in the house) to the vacuum to keep the sawdust mess to a minimum.

You can read how-to instructions and see a video here but I wanted to share a few in-progress shots of our own.
1 – It was important to us that there be a full plank at the ceiling (since it would be visible) so we worked from the top of the wall to the bottom. The first plank we installed was actually one row down in the middle of the wall. There are three peel-and-stick adhesive strips that run the length of each plank on the back. To install a measured and cut-to-size plank, you simply peel away two of the protectors, fold over a short section of the third protector, place and level the plank, then remove the remaining third protector with the plank in place. This allows some room for adjustment when placing the planks. We didn’t use any of the fancy installation tools that Stikwood offers but we did find a rubber mallet to be helpful to achieve a snug fit.
2 – Once the first plank was in place, things moved along swiftly. We were careful to vary the lengths and seam placement. It was the most uneventful project we’ve completed in a while. That might make for a boring blog post but it was super nice not having any unexpected problems arise.
3 – We had the wall knocked out (figuratively speaking) in one afternoon. Instant gratification! We lucked out and ended up with a full plank at the baseboard so I didn’t have to make any cuts length-wise and we only had to work around one outlet. The most difficult part of the entire project was rehanging the sconces and shelves but even that wasn’t too bad. We were worried that we might have to put up some type of trim in the corners but I brought my A-game to the flooring saw and made precise cuts so no trim!
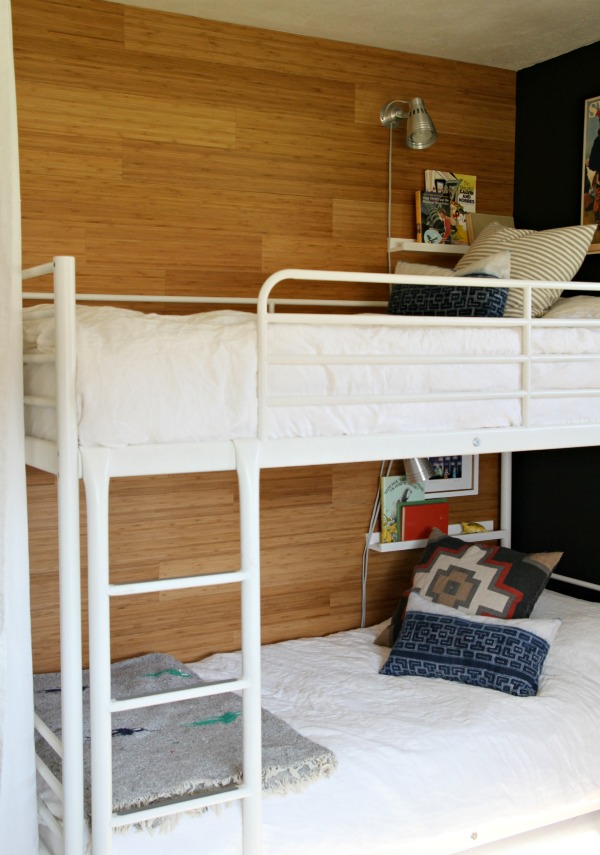
Everyone LOVES the wood wall. Steve thinks it makes the room look bigger. He says you can now tell that the wall is set back from the rest of the room. The boys say it feels like they’re sleeping in a cabin when the bed curtains are drawn at night. I heard the word “cozy” come out of Layne’s mouth. I think the wall is the perfect balance to the large wood dresser on the other side of the room. And I like the contrast between the warm wood and white beds. There’s probably some rule against two accent walls in one room but it’s a kids’ room. Who cares.
I don’t know if it’s our age or the sheer exhaustion from being in (what has felt like) perpetual renovation mode for the last 2+ years or what, but Steve and I are slowly warming up to products that promise quick and easy results – even if they cost more. Stikwood is definitely quick & easy. It’s also made in the USA, high quality and eco-friendly. The only drawback is the cost, but you get what you pay for. To help ease the sticker shock, Stikwood is kindly offering up a gift card today. See entry details below.
PRIZE: one $280 gift card to Stikwood plus a complimentary samples set
RULES: You must be at least 18 years old and have a shipping address (no P.O. boxes please) within the U.S. One entry per email address.
TO ENTER: Sign up for Stikwood’s newsletter here then leave a comment on this post sharing which plank you would use and where. (The entire time we were installing the planks, I kept telling Steve “Wouldn’t this be great for a TV wall? Just picture it with a flatscreen and floating console.)
DEADLINE: Enter before 9:00 p.m. EST on Thursday, December 18th. One random winner will be announced Friday, December 19th.
Good luck!
images: Dana Miller for House*Tweaking


DIY, giveaway, kid-friendly