
Wood bead garlands have been popping up in interiors for years. I think I first noticed them styled in Scandinavian vignettes. Then they became pretty popular as holiday garland on trees and mantels. More recently I’ve spotted them casually gracing tabletops in interiors with a natural, organic vibe. (Lauren Liess’s coffee table and Anissa’s dining room table come to mind.) I love how effortless they look. Oh, this ol’ thing I just tossed on my table?
A few weeks ago when cabin fever hit hard, I was itching to make something. Putting my spin on the famed wood bead garland sounded fun so I gave it a whirl. Obviously, I’m not reinventing the wheel here but it was nice busying my hands and tweaking little details to my liking. Here’s what I did…

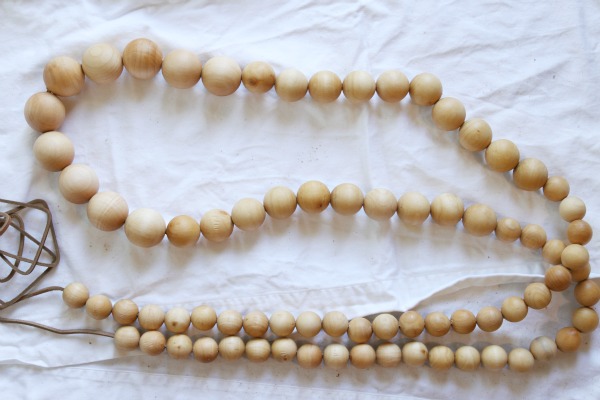
I knew I wanted a pretty substantial strand with a longer length and chunkier profile (no measly little necklace of wood “pearls”) but when I started gathering my supplies I quickly discovered that pre-drilled wood beads are expensive! And I needed quite a few. To save money, I ended up buying wood balls in various sizes and drilling the holes myself. I bought three bags of 1″, two bags of 1¼” and one bag of 1½” wood balls along with four yards of leather cording. I raided the garage and found some heavy duty grip pliers to stabilize the balls during drilling.
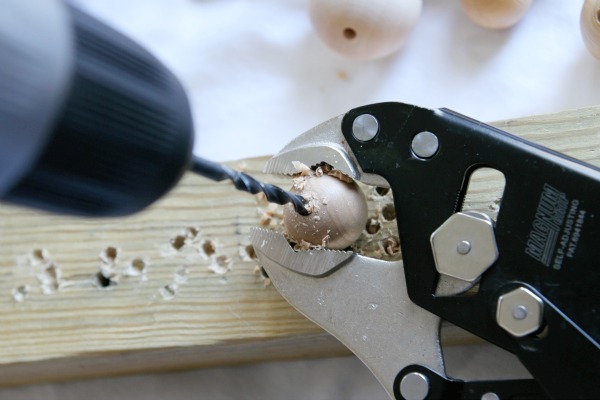
One by one, I placed each ball on top of a scrap piece of wood, secured the ball with the pliers in one hand and drilled a hole through the center with my other hand using a 3/16″ drill bit. (I’m a lefty so if you’re a righty flop the image above for a better visual.) You can drill whatever size hole you want. The key is to drill a hole at least slightly larger than your preferred stringing material: rope, string, jute, yarn, etc. Keep a firm grip on the pliers!
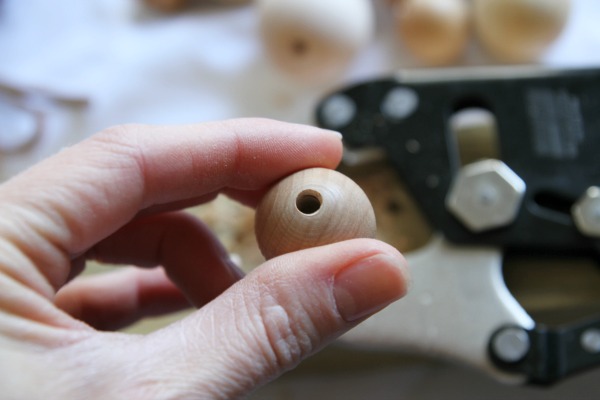
Drilling through the ball into the wood scrap below prevents splintering and produces a clean cut. Ideally, this would be an outdoor project but below-zero temps kept me indoors. I kept the vacuum nearby and swept up sawdust as I went along.
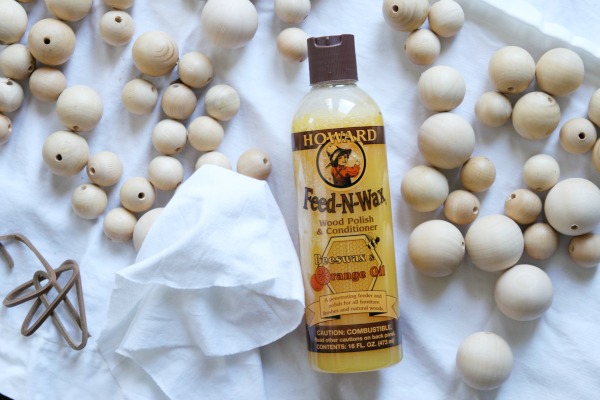
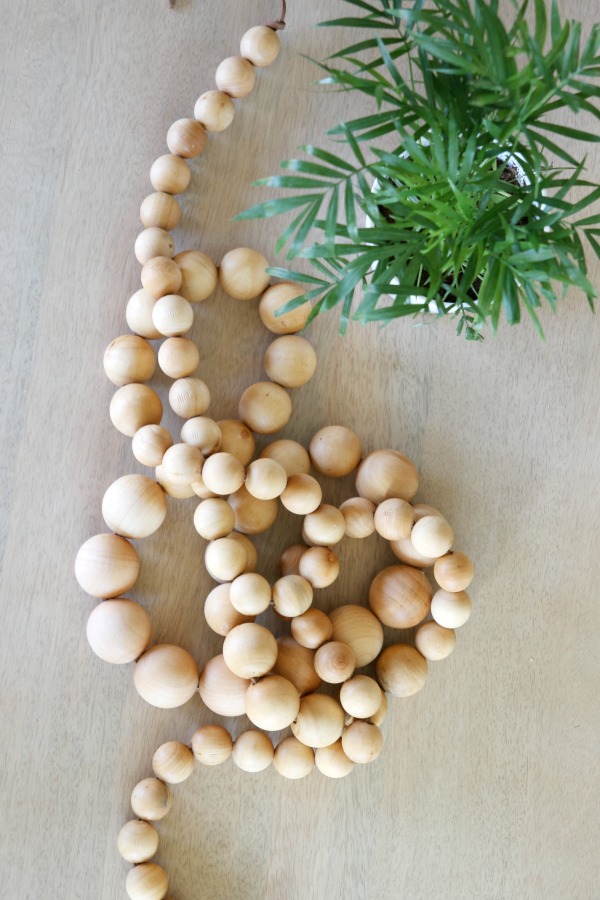
After all the holes were drilled, I wasn’t digging the cool grayish tones of the unfinished maple. I busted out my trusty beeswax + orange oil wood conditioner (previously seen here) and applied it with a soft cloth.
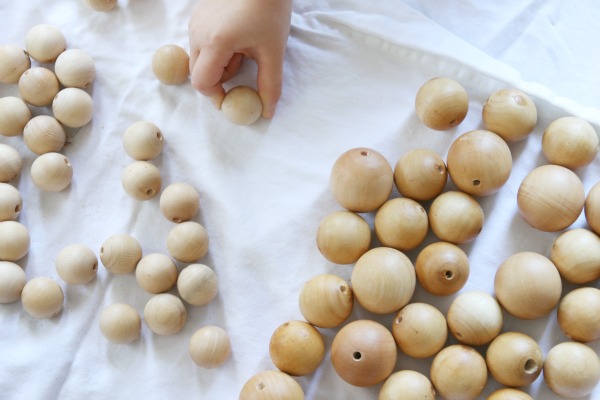
This was about halfway through the waxing process. The beads on the left are unfinished. The beads on the right are waxed. I love how the beeswax warms up the wood tone and emphasizes the graining. Instant patina!

Once waxing was complete, I strung the beads onto the leather cording.
I decided to string the largest beads near the center of the garland and the smallest beads near the ends for a graduated effect.

After all the beads were strung, I went back through and spaced them out a little so the garland wasn’t too stiff and had some play in it. I wanted the garland to drape easily. I knotted the ends and cut the excess cording. Done! (You could also tie the ends together to create a circular garland.)
The end result is so pretty in a natural, unfussy way. I love that you can see little indentations from the pliers. Living proof that they were touched by hands – not just a machine. There’s really no wrong way to style them. They kinda just do their own thing and go with everything. They’re the J. Crew of home accessories. I’ve already had a heyday trying them out all over the house.
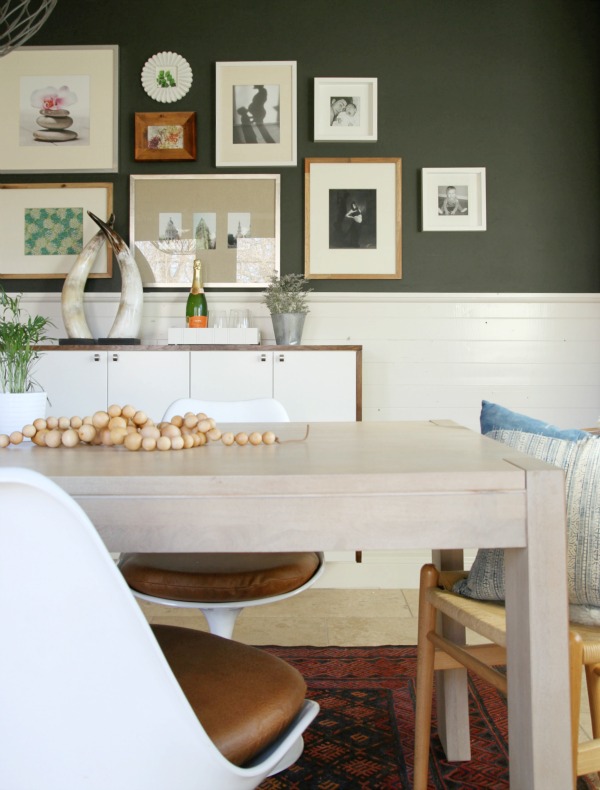
As a cat-friendly centerpiece on the dining room table.
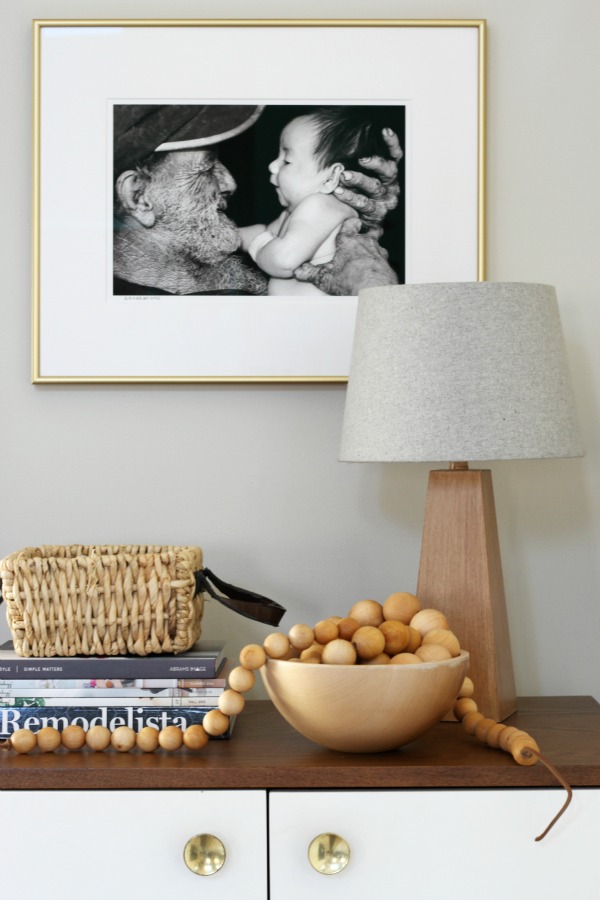
Spilling out of a thrifted bowl on the media cabinet.
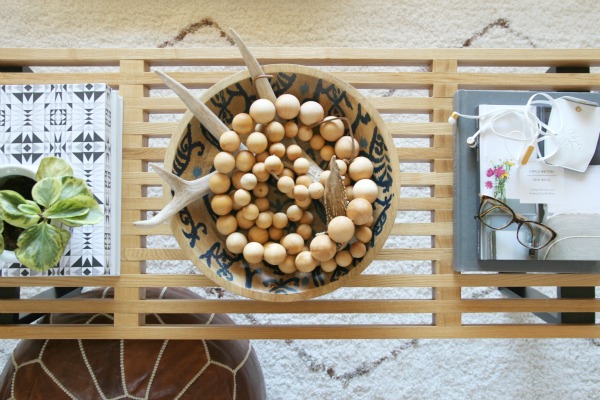
Curled up in a large bowl on the coffee table.
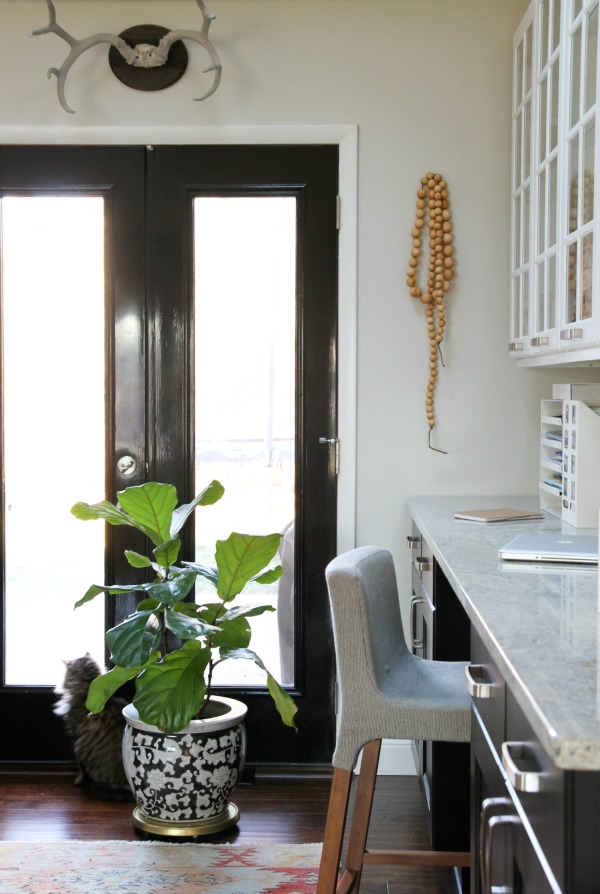
Dangling from a hook on a sliver of wall.
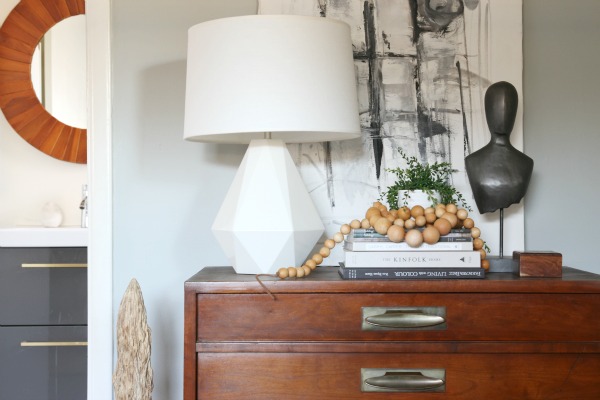
Draped over a pile of books on my dresser.
They’re so versatile. I keep moving them around. Who knows where they’ll end up. I’m going to start a new blogger game called Where Are the Wood Beads? Should be a good time.
images: Dana Miller for House*Tweaking

Sarah (a graphic designer), Kalyn (a finance guy) and Finn (a peppy schnauzer) live in a small Ohio town in their 1,100 sq. ft. starter home. I’ve been following Sarah’s blog for years and our offline lives finally collided when I started renting a studio space downtown. (Sarah works part-time for an interior designer in the same warehouse.) I’ve long admired Sarah’s creativity, DIY skills and knack for styling so I was crazy excited when she welcomed me into her home for a tour. Get a peek inside and read Sarah’s thoughts on everything from buying a foreclosure to hanging wallpaper to living in a small town…

On buying a fixer-upper: It was never our intention to purchase a fixer-upper. We looked at multiple homes with our realtor and this was the only house that required a renovation. I fell in love with the original character of the home and loved the fact that it was built in the early 1900s. It had obviously been neglected and sat empty and overgrown for more than two years. The stench upon walking in the front door was enough to avert even a serious buyer. I suppose we were the lucky crazy ones who decided to tackle this project. It just made sense for us financially (we bought it for less than the price of a brand new car) and we were capable of completing the majority of the construction ourselves. I also jumped at the opportunity to really make a house our home. Many of the properties we viewed just didn’t feel like us and were priced higher, meaning we had no additional room in the budget to make adjustments…so we settled on the foreclosure.
It was an insane amount of work and took over a year to complete but I’m so proud of what we’ve created and, more importantly, that we built this space together. Our first Thanksgiving in the home (two years ago with no heat), we skipped a warm and cozy dinner with our families, opting to stay in the house instead, reworking the plumbing and electrical. I remember setting up our camping table and chairs, eating fast food, shivering in our Carhartt overalls and laughing about our terrible Thanksgiving meal in our new home. We couldn’t envision ever having a completed or furnished dining room. I also remember my embarrassment the day Kalyn had a port john delivered, which sat in our driveway next to a dumpster during most of the renovation. Later, I was thankful to have a “restroom” while working on the home but even more grateful we didn’t live in the house during the chaos of construction and days without plumbing. Before my blog, Room for Tuesday, was up and running, I started a personal Tumblr to share with family, solely devoted to the transformation of our house. The before and after images are unrecognizable (luckily) but it’s fun to look back at where it began.

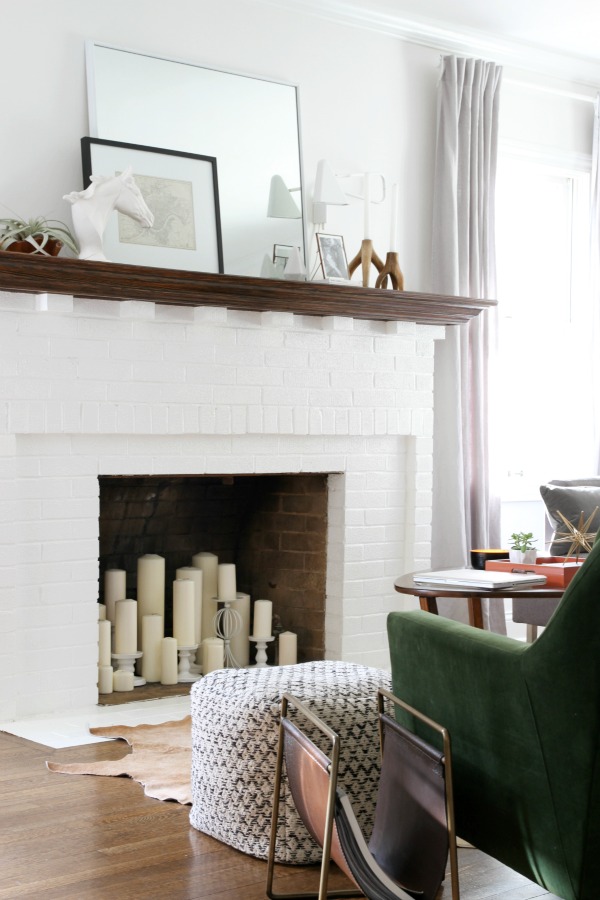
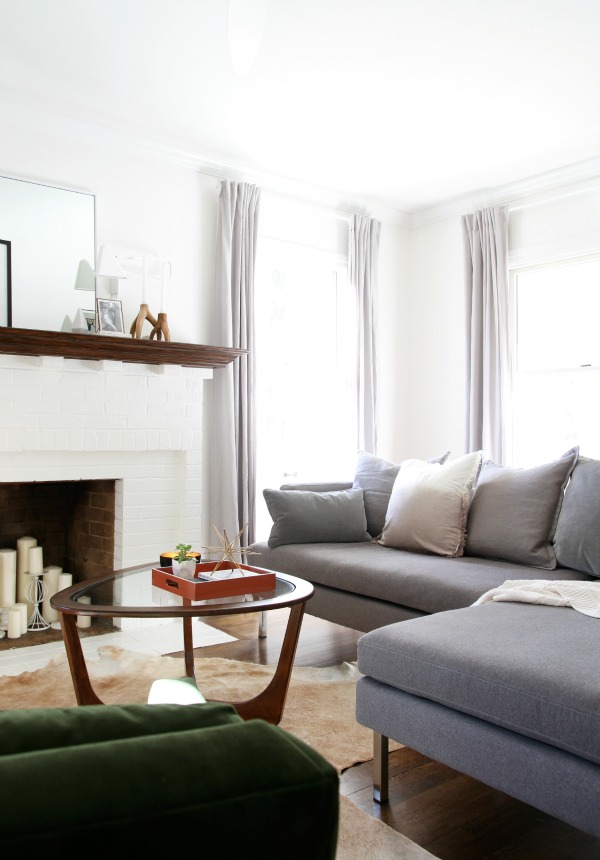
On compromising with your husband: Aside from hanging wallpaper together (which I would not recommend doing with your significant other), the living room floor plan has been our biggest challenge. Of course being the typical guy, he wants a huge TV. Normally, I would be cool with that but our living room is tiny. There is a giant fireplace and three windows, leaving only one viable wall for the TV. Long story short, we have two focal points: the TV and the fireplace. This does not sit well with me but it’s something I live with because I know that ugly eyesore of a TV makes him happy.
I will say, I am super thankful he allows me to get my way 90% of the time because he trusts my interior instincts. He’s also pretty creative himself and many fantastic ideas have manifested in his brain rather than my own (hallway wainscoting, landscaping, and bathroom expansion, to name a few).
On living with a rambunctious puppy: A week before our shoot, Finn decided to destroy the tufted back cushions on our sofa. Kalyn walked into a house filled with fluff and I immediately began to panic. My quick fix and cost-effective solution was to buy a variety of down throw pillows to line the sofa back. It’s definitely less expensive than a new sofa but I think it’s a sign we should upgrade. Kalyn has complained about our sofa being uncomfortable since the day it arrived so maybe it’s a happy accident.
Living with a large, high-energy dog can be challenging. Our windows are never clean and always have nose prints. Our freshly painted walls are now a little scuffed up, and our newly refinished floor is scratched but we wouldn’t have it any other way. It didn’t take long to achieve that “lived in” look, ha! The one thing he has going for him: no shedding.
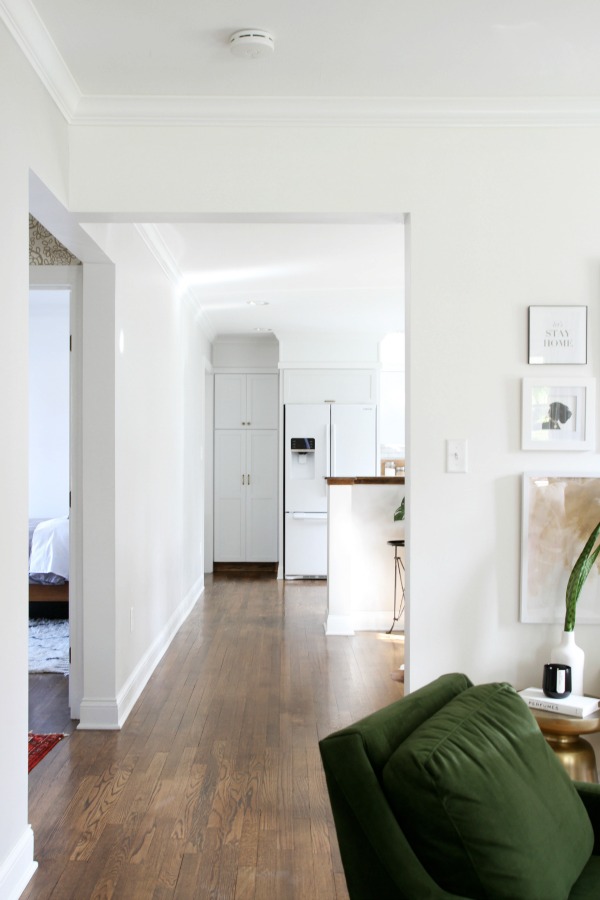
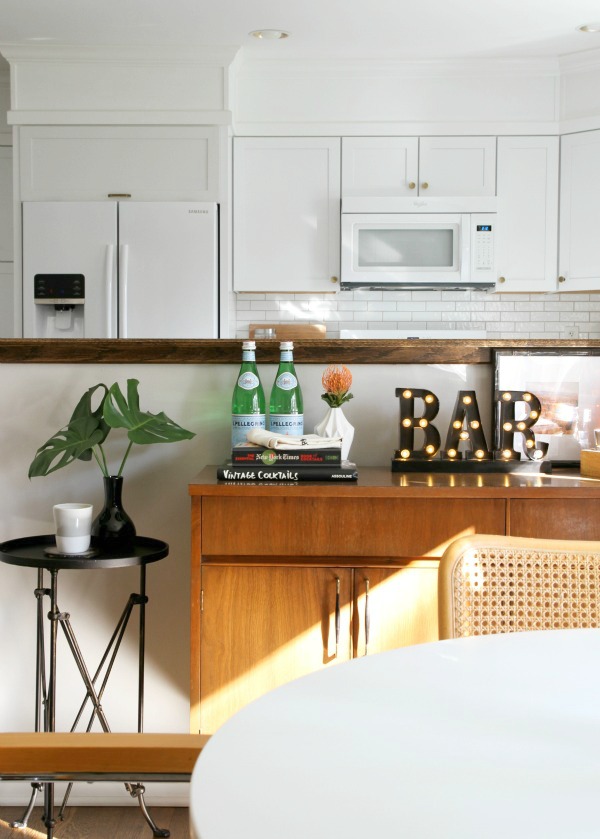

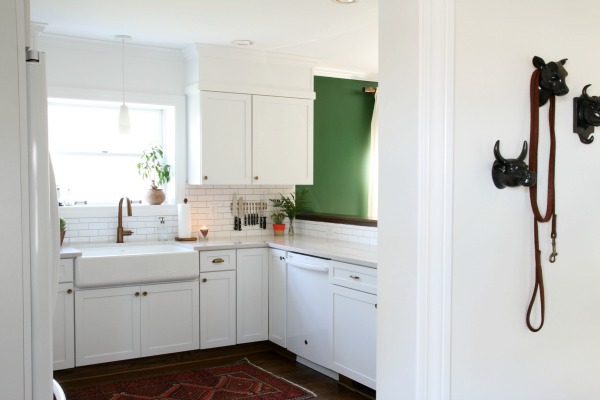
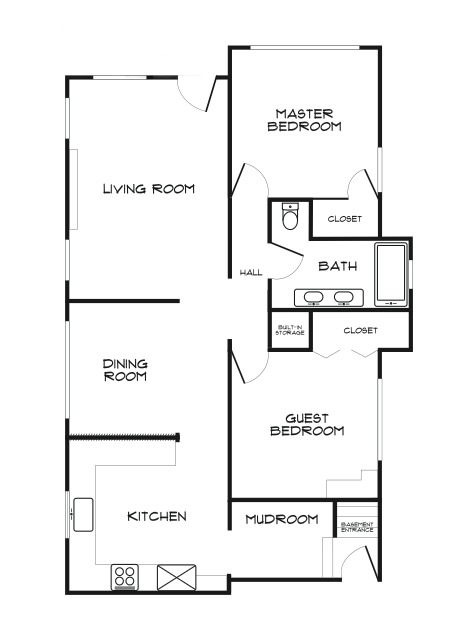
On creating flow: This has been one of our greatest construction challenges. The home originally was very closed in but we love open concept layouts. After determining which walls were load-bearing, we wanted to open up as much as we could. We increased the traffic area between our dining room, hallway and living room (it’s the weird center intersection you see in the photos). We also knocked out a wall between the kitchen and dining room but then rebuilt a pony wall. It made the kitchen larger, dining room smaller and helped to designate an area for the dining table and bar credenza. I like the functionality. It hides anything on the countertop so guests in the dining room aren’t looking at a mess. It also provides a bit of separation, without feeling closed off.
Floor planning and furniture just fell into place, for better or worse. Most key pieces could only fit into one configuration. That’s the trouble with small houses. For instance, the master bed had to be placed in front of a large window; it wouldn’t fit elsewhere. The guest bed had to be positioned in its current space because of an architectural built-in that hides the pitch of our basement stairs. Perhaps the living room has been the most challenging because of the TV.
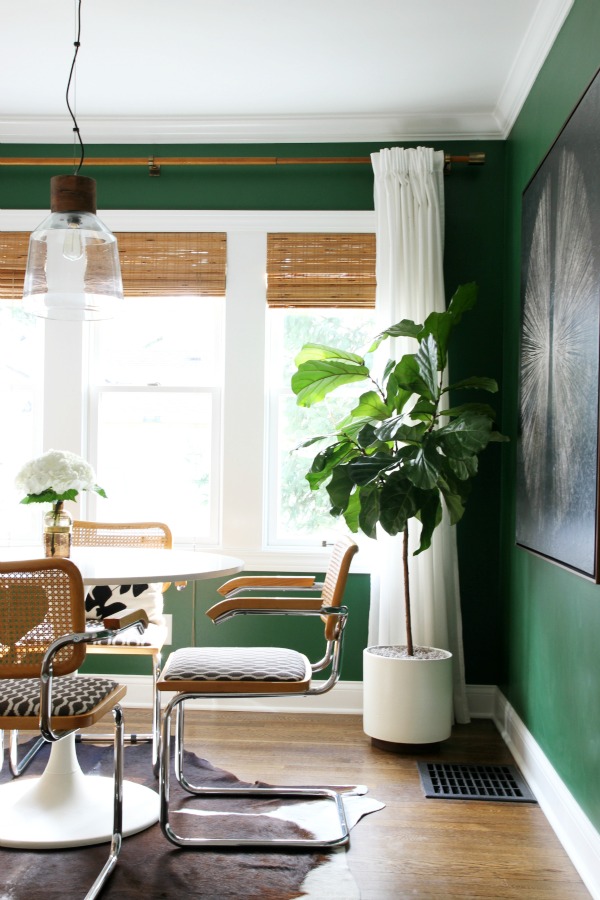
On those gutsy green walls in the dining room: Green tones have always been in my comfort zone. I know many people favor navy and calming blues but it’s always been green for me. I treat it like a neutral. It was the first paint color I selected for the house. I try to sprinkle it throughout our home with houseplants and accessories so it feels cohesive and acts as a common thread of color.
To this day, the Breuer dining chairs are my best find! I can’t even believed I snagged them for so cheap. This is the before, after and tutorial on reupholstering. They’re some of my favorite vintage items in our home!
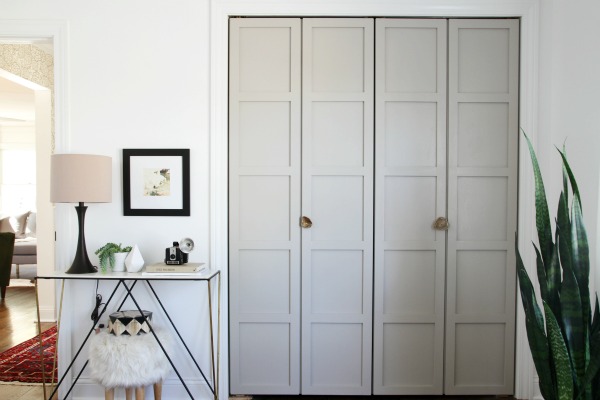
On dressing up the mundane: I recently took a seminar on millwork and the importance of scale, proportion and keeping trim historically accurate. Moulding is supposed to make you feel safe. It sounds insane but that is its purpose! It looks as though it’s helping to hold things up and in place structurally. I tried to be sensitive to keeping the base and crown accurate to the original trim, as well as adding woodwork in places that could be enhanced (wainscoting in the hallway and bi-fold closet doors in the guest room).
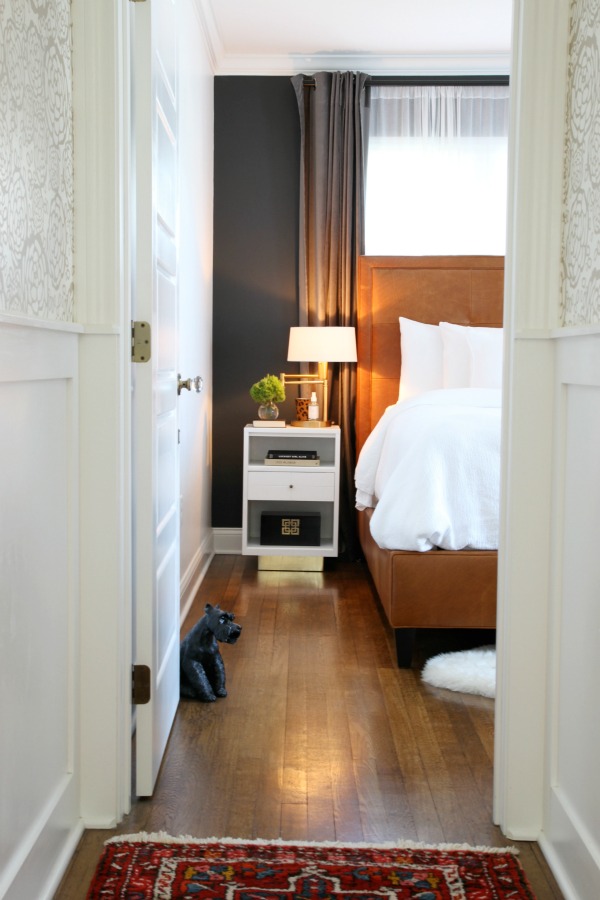
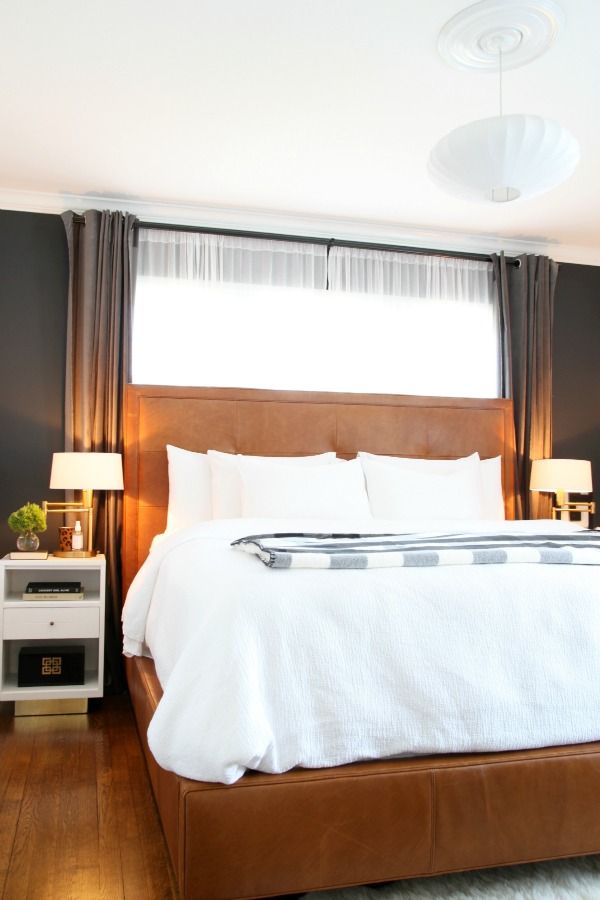
On splurging: My favorite splurge would definitely be the bed in our master bedroom. I custom designed the piece, from sketching the waffle tufting, scale, specifying my favorite cognac leather and even the charcoal wood tone on the tapered legs. It’s perfect and we’re so glad we upgraded to a king, even though it’s a little tight in the room.
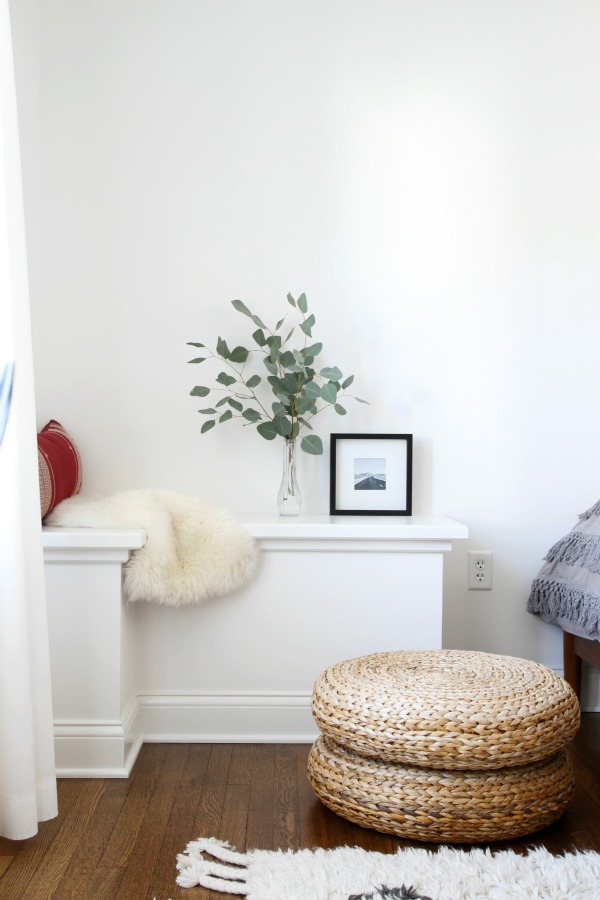
On living with two closets: I’m not going to lie. Living with two closets is the worst. Without our basement, this house wouldn’t work for us; it’s definitely been our saving grace for storage. We’re big outdoor enthusiasts and with that comes a lot of gear. We love camping, skiing, hiking, kayaking, etc… so our equipment is divided between our basement and garage. I’ve also learned to shop smarter. We try to spend our money on quality, key pieces, rather than quantity… simply because we have limited space.
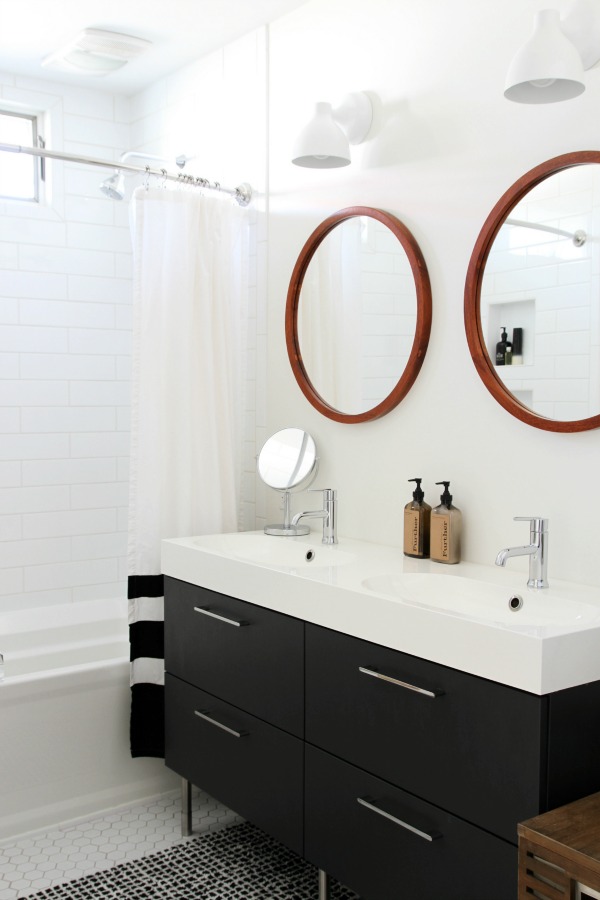
Originally, the house had three closets. We sacrificed a small linen closet in the hallway to expand the bathroom. The toilet now sits where the closet used to be. It was a tough decision but I’m confident we made the right one.
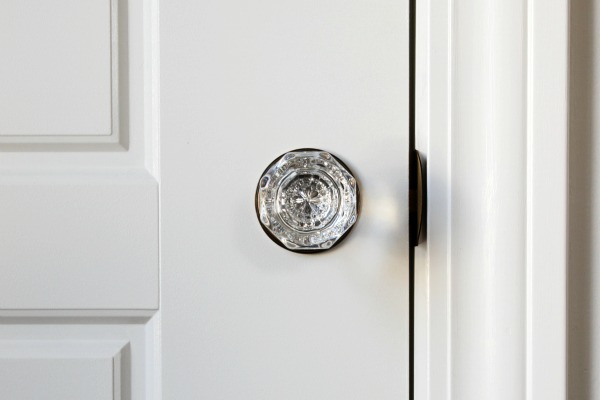
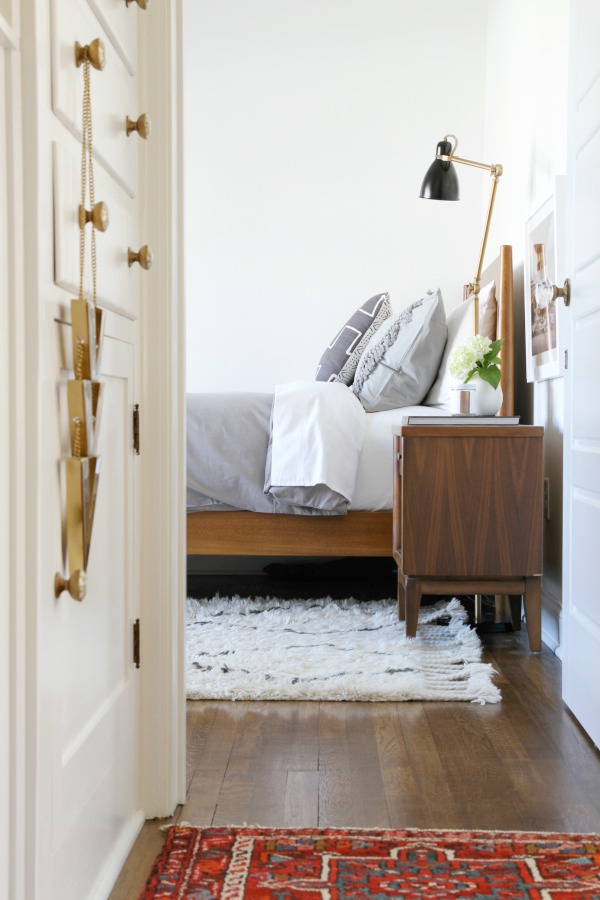
On minding the details: I’m such a detailed-oriented person! The original doors in the home had beautiful glass knobs. I tried to restore them but they were cracked, foggy and too far gone. I wanted to keep the hardware details and moulding as close to the original as possible. Kalyn sourced the glass doorknobs online and demanded to have skeleton keys (his grandpa used to collect them) so I rolled with his idea and they turned out great. Although, guests sometimes are confused and lock themselves in the bathroom :)
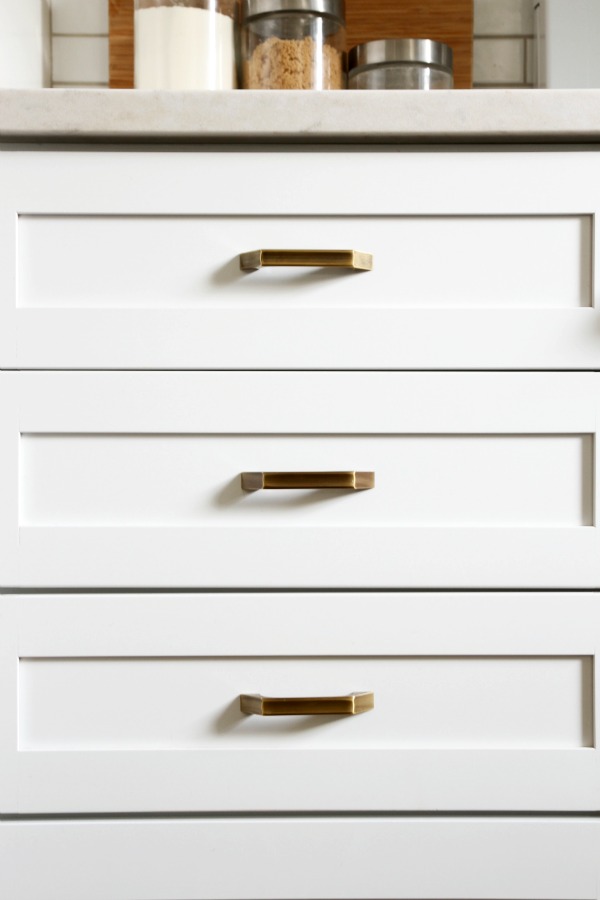
The kitchen cabinetry hardware is from a small, family-owned business in Connecticut. Each piece is handmade and special. I wanted a variety of hardware (knobs, handles, cup pulls, etc.) in the same finish.
On living in a small town: Our town is so small that it isn’t even considered a “town.” We live in a village and don’t have a mailman! That’s right, Finn and I walk to the post office everyday to retrieve our mail and packages. Kalyn and I both grew up on farms and, let me tell you, this is larger than where we come from. Ha! We love having a yard that backs up to a cornfield, the freedom to have campfires and enough space for a garden. Someday we’d love to be closer to the city but, for now, this location makes sense for us. It’s quaint!
Thank you for sharing your lovely home, Sarah!
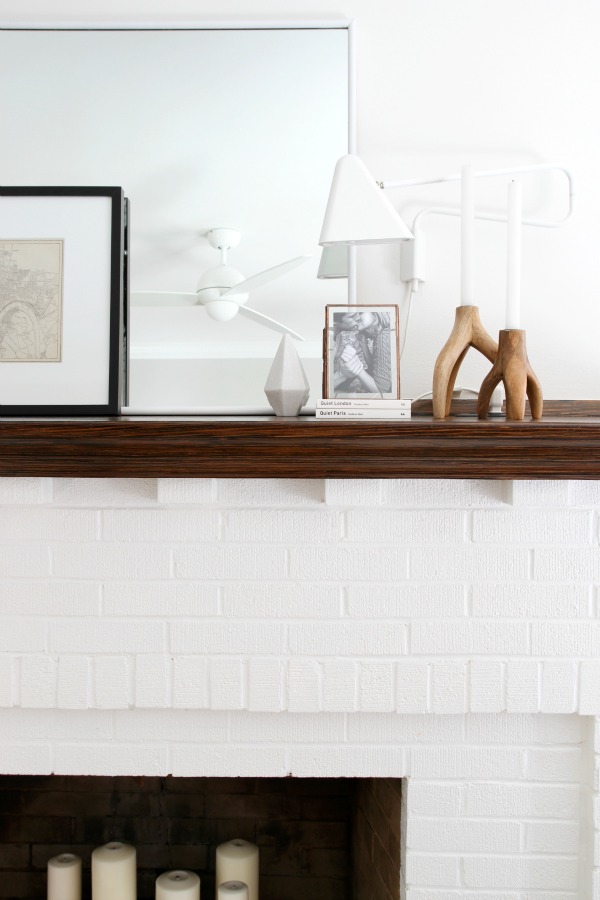
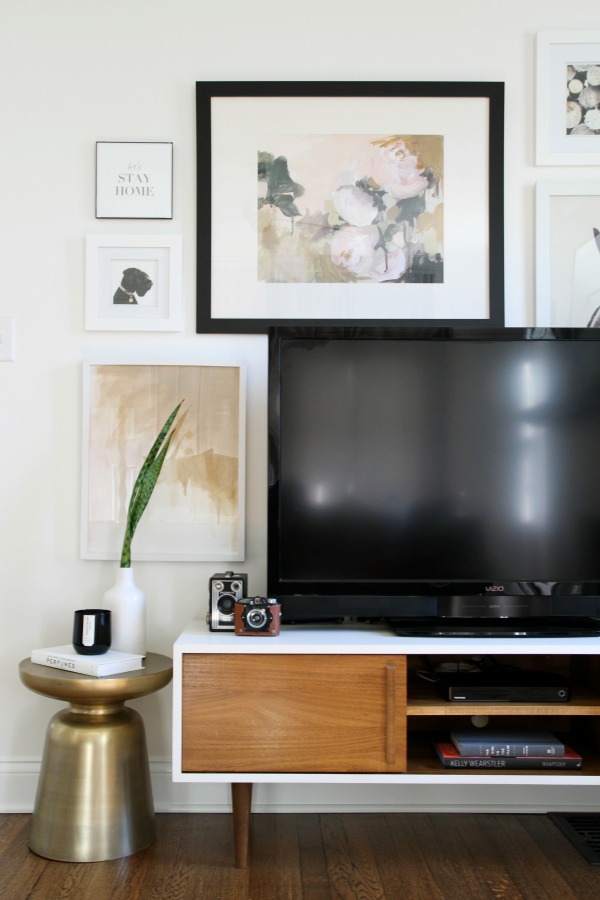
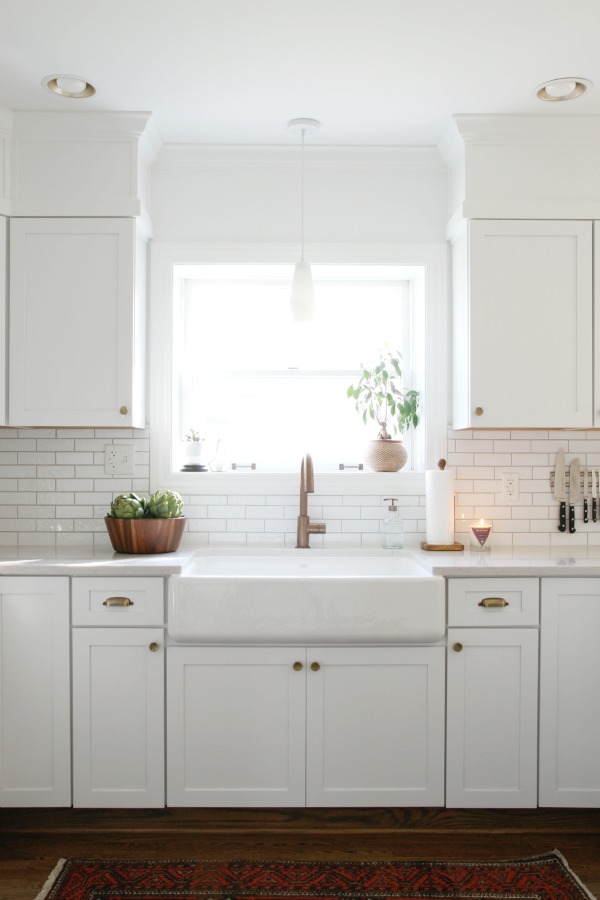
Isn’t this space amazing?! Obviously, I love the overall renovation but what I noticed most in person were all the little details like the crown moulding, beefy baseboards, wainscoting, trimmed out bulkhead (in the kitchen), hardware, light fixtures, carefully curated vignettes and artwork on display. Every time I spotted a vintage camera or schnauzer paraphernalia it made me smile. What caught your eye? Did you happen to spy the rose gold recessed lighting in the kitchen? Such a pretty and understated surprise!
Resources of note:
LIVING ROOM
wall paint – Benjamin Moore super white
flooring – red oak, stained with Minwax’s dark walnut
curtains – Ikea
sofa – West Elm with Restoration Hardware pillows
coffee table – West Elm
armchair – West Elm
magazine holder – Crate & Barrel
ceiling fan – YLighting
horse sculpture – etsy
wall sconce – Ikea
wood candleholders – West Elm
media console – STOR New York
peony art – local artist Katie Stratton
horse photograph – F2IMAGES
KITCHEN
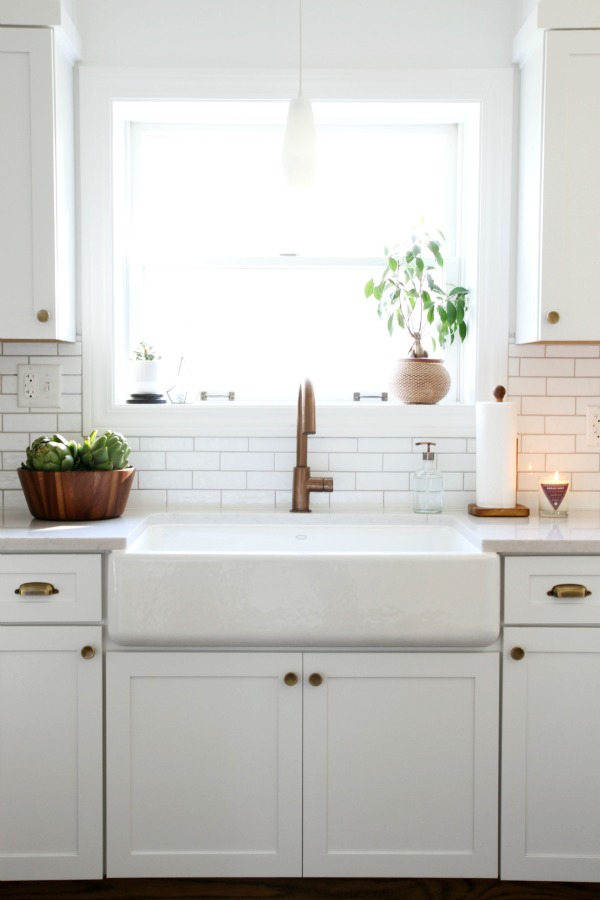
cabinets – Kraftmaid
hardware – Colonial Bronze Company
sink – Kohler
faucet – Brizo
countertops – Silestone
backsplash – The Tile Shop
pendant – vintage
rug – vintage
DINING ROOM
wall color – Sherwin Williams evergreens
table – Ikea
chairs – vintage, reupholstered
pendant – CB2
art – Leftbank
sideboard – vintage
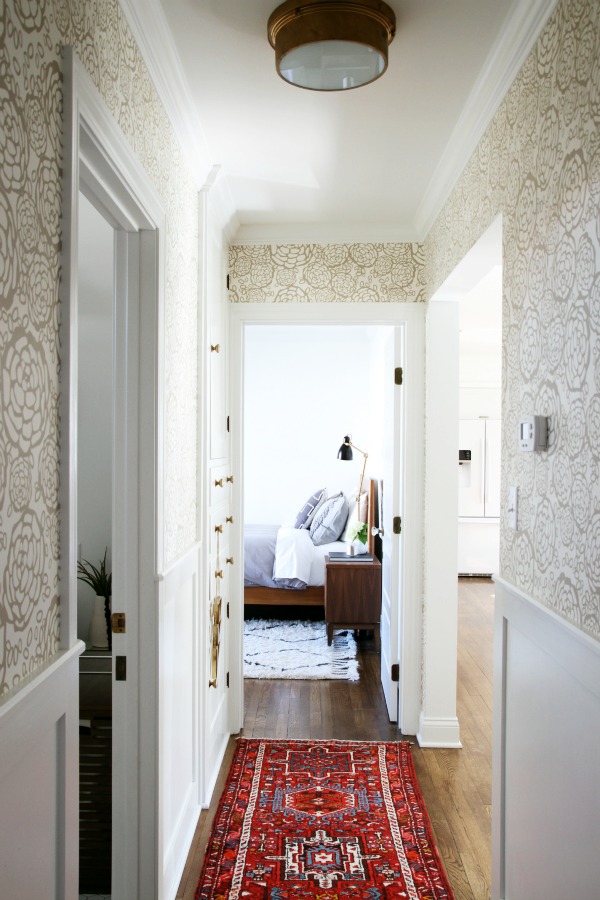
HALLWAY
wallpaper – Hygge & West
light – DIY, Home Depot
rug – vintage
hardware – Anthropologie
brass chevron hanger – Target
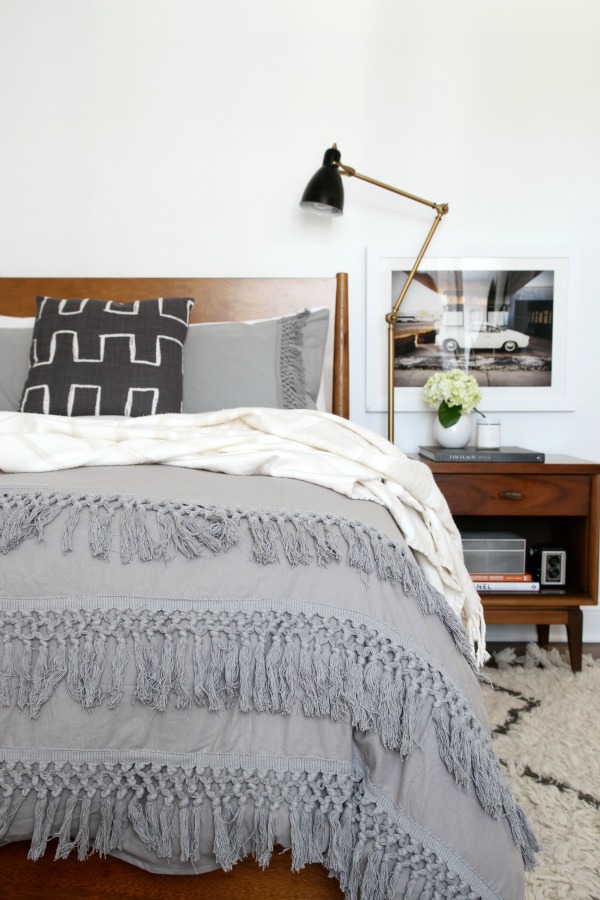
GUEST BEDROOM
bed – West Elm
nightstand – vintage
bedding – Urban Outfitters
automobile photograph – Minted
closet knobs – Anthropologie
MASTER BEDROOM
accent wall paint – Benjamin Moore black panther
bed – custom, Lee Industries
nightstands – vintage, DIY
bedside lamps – Ralph Lauren
pendant – YLighting
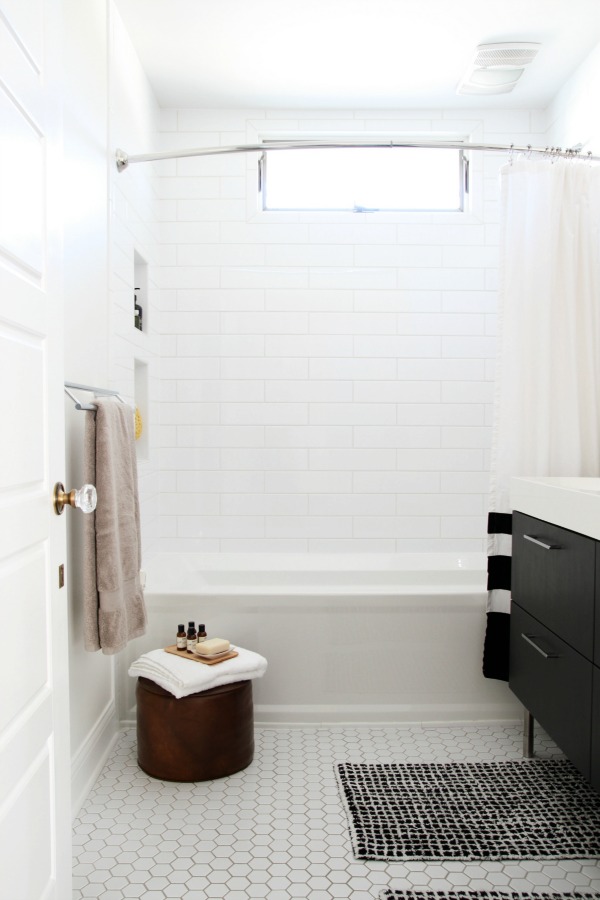
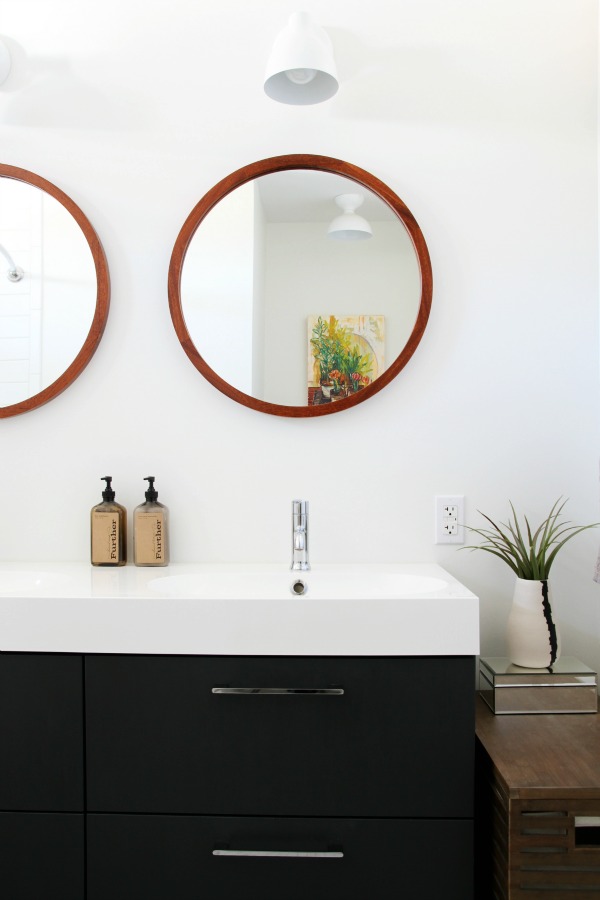
BATHROOM
vanity – Ikea
mirrors – Miles & May
wall sconces – West Elm
subway tile – The Tile Shop
hexagon floor tile – The Tile Shop
art – Lauren Stern
glass doorknobs – Look in the Attic & Co.
MUDROOM
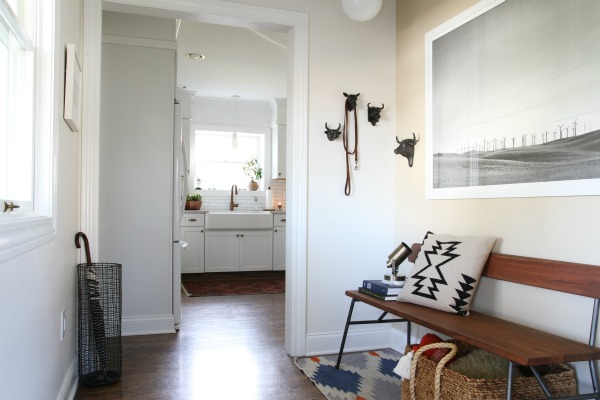
bench – CB2
animalia hooks – vintage, CB2, HomeGoods
engineer print & frame – DIY
pendant – Schoolhouse Electric & Supply Co.
images: Dana Miller for House*Tweaking


budget decor, DIY, inspiration