...because home doesn't happen overnight.

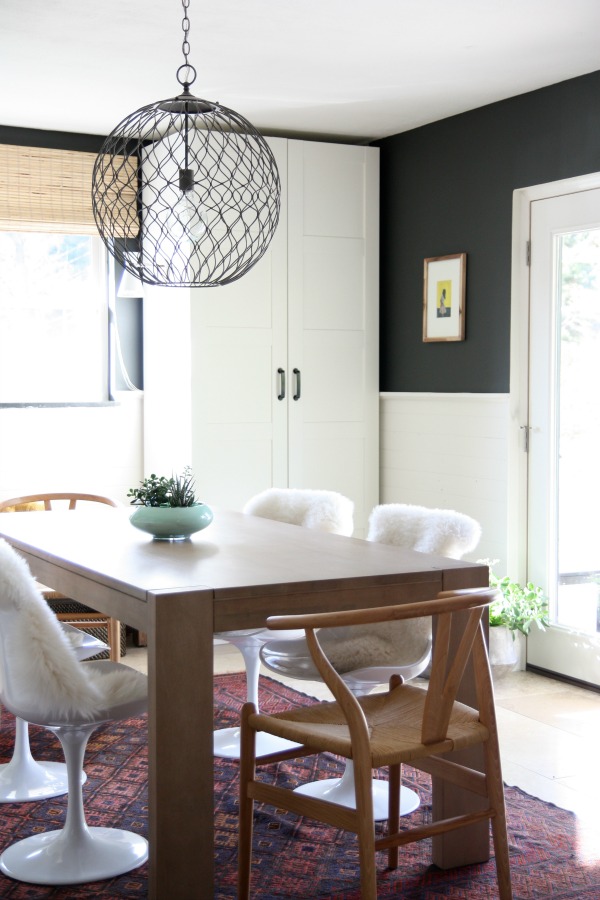
That image is one I shared when I painted the dining room / mudroom for the THIRD time. I’ve made some progress since then {a new table, a new rug, a DIY succulent centerpiece, a cozy window nook, etc.} but have always envisioned discreet yellow artwork occupying the wall space between the wardrobe and french doors.
And there she blows. She’s yellow and dainty and perfect. Exactly what I had in mind.
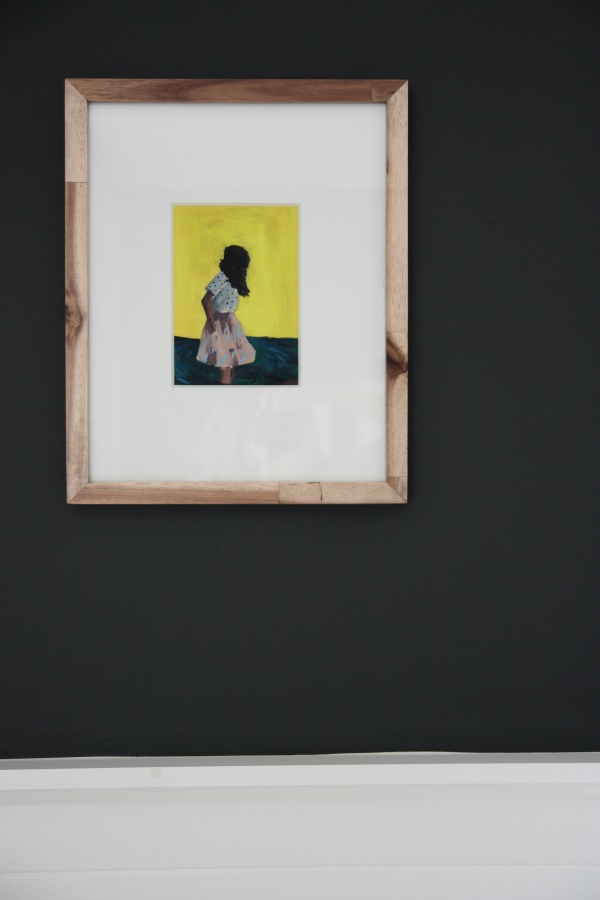
It’s Swirl by the ever popular and insanely talented Clare Elsaesser. I popped the giclee print into one of my favorite walnut frames. I love how the natural wood tones of the frame and the bright yellow of the print look against the dark wall.

The piece has a lonely and mysterious vibe so I thought it fitting to hang it by itself on a sliver of wall in a room with two other gallery displays. I find myself staring at this new stranger wistfully throughout the day.
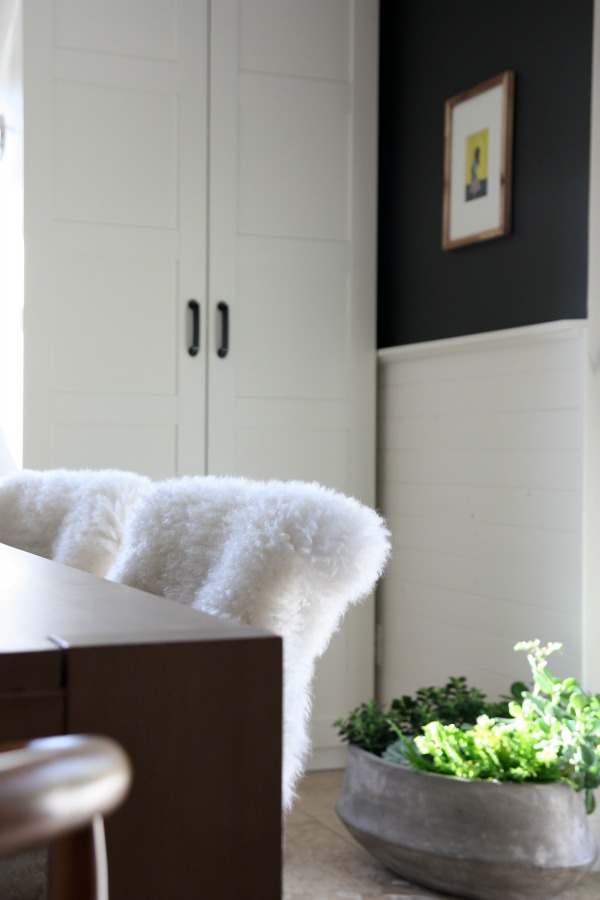
Also, I brought my outdoor planter inside to save it from the frost. Technically, HH brought it inside but whatever. I don’t know what I’m more proud of: remembering to bring it in or the fact that I transplanted these babies and kept them alive all summer? I wasn’t sure where to put it but I quite like the planter here. It receives good light and is mostly out of the way. If these plants live to see spring, I’ll consider it a miracle.
Me + living green stuff usually = dead brown stuff.
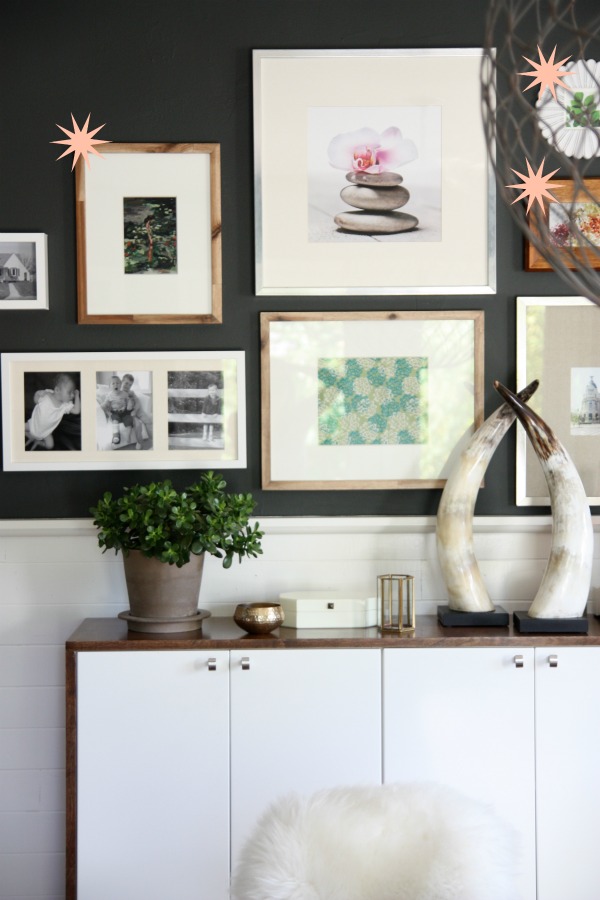
Hanging new art motivated me to finally fill up a few empty / temporarily filled frames in the gallery wall. {The jade plant was an outdoor plant that I recently brought inside as well. Finding spots for all of these LIVING outdoor plants is a problem I’ve never encountered before!} I marked them with starbursts above.
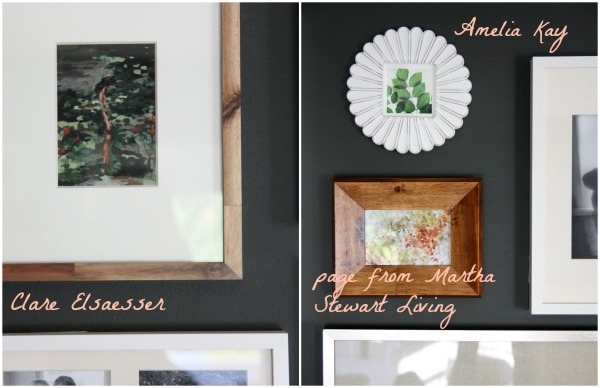
What’s better than one really great Clare Elsaesser print? Two really great Clare Elsaesser prints, of course. I was so happy with the first piece that I ordered a second one, Watching Trees. The mini green leaves are from Amelia Kay and the abstract looking piece under them is just a page I tore out of Martha Stewart Living. I think it’s actually a photograph of different salts but I was drawn to the colors and textures so up on the wall it went.
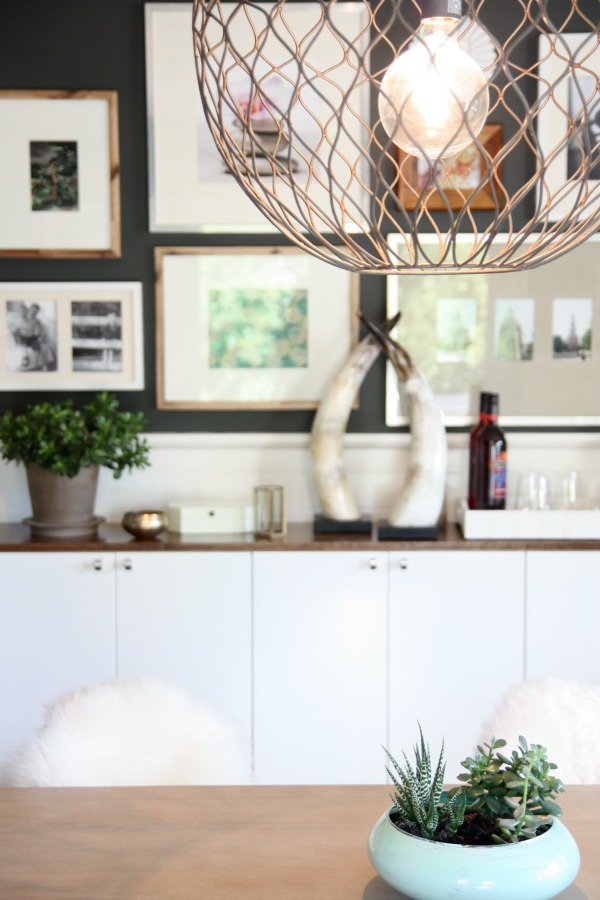
No more empty frames on the gallery wall! But that’s not to say I won’t switch things up whenever I feel the itch which happens often and causes HH to imagine cuckoos circling my head.
Oh! And the lightbulb in the dining pendant…I’ve received so many questions about it! We found it here and it’s the largest lightbulb we have ever owned. HH and I are all for saving the world with CFL’s but neither of us can stand the harsh blue light that some of them cast. We have CFL’s in other fixtures but we wanted this room to have a nice warm white light to eat by and the bulb needed to be shapely since it’s visible through the wrought iron pendant. This oversized globe bulb was the best we could find. Any suggestions for CFL’s that give off a warm white glow and are pretty to look at?

That’s the latest and greatest on the dining area. I’m anxiously awaiting the tulip chair seat cushions to return from the upholsterer. If they turn out anything like the image I have in my head, they are going to be awesome. Can’t wait to share!
images: Dana Miller for House*Tweaking
One week from today our outdoor dining patio will be featured on the Home Depot’s blog, The Apron. To hold you over until then, I thought I’d share a few of the DIY projects that were involved in the makeover. The Home Depot provided us with a dining table and bench to help furnish our back patio and the rest was up to us. There were budget and time constraints – not to mention the Ohio weather was NOT cooperating at all until a week before the already extended deadline. But I think projects like these {ones that require little time and not a lot of money} provide the most opportunity for creativity and inspiration.
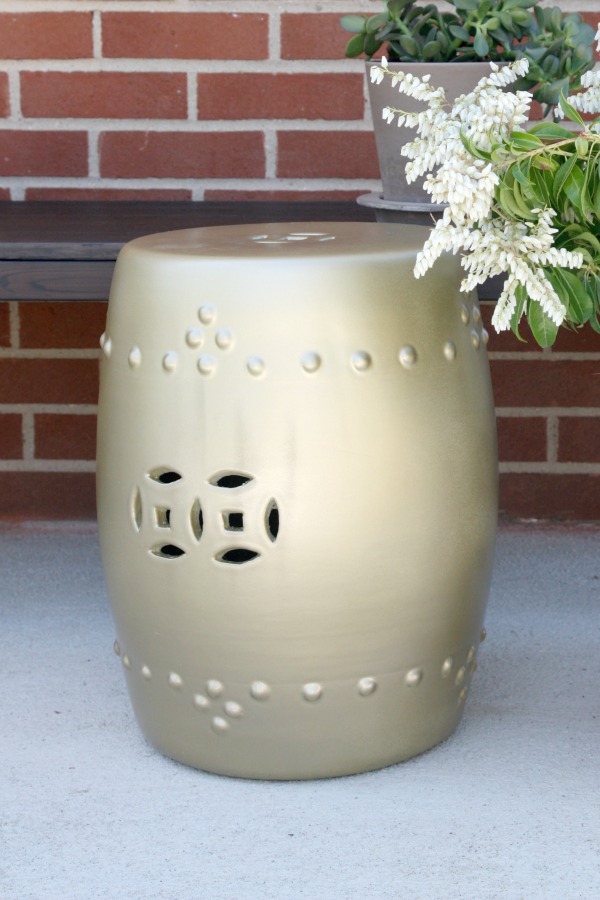
Patio project #1: Update a garden stool. We had a ceramic garden stool sitting in our garage just begging for a makeover. Originally, it was a glossy green. {You can see the original stool here on the front porch of our previous home.} I had been eyeing pricey gold versions for our patio makeover so I decided to try painting ours. HH was concerned that regular spray paint wouldn’t adhere to the shiny, slick surface. After a little research googling, I discovered that applying a few coats of flat white spray primer first would be my best bet. I wiped down the stool, applied two coats of Rust-Oleum primer then finished with two coats of Rust-Oleum pure gold spray paint. Behold! A much cheaper alternative to the trendy gold and brass versions floating around on the internet. I like that the finish isn’t brassy but is a little on the “champagne” side. Very sophisticated. It’s been outside for a few weeks now and is holding up superbly.
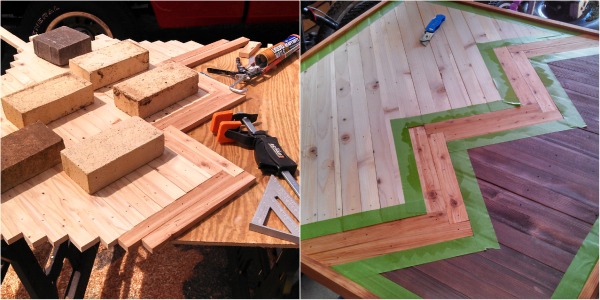
Patio project #2: DIY a modern outdoor art piece. I can’t get over Ariele Alasko’s work. As much as I’d love to own an original piece, it’s just not in the financial cards for us. So I did the next thing best thing. I sketched a simple chevron design and handed the drawing over to HH who brought it to life. HH started with a 3′ x 3′ piece of treated plywood as the base. He borrowed a neighbor’s planer to rip 2 x 8’s {leftover from demo’ing the original 8′ ceilings in what is now our vaulted great room} down to ½” thick strips. Using a compound miter saw, construction adhesive and finish nailer, he attached the wood strips to the plywood base. He trimmed the outside edges and framed them then stained and sealed the entire piece. We hung the outdoor art on our home’s brick exterior with concrete anchors. The piece is sheltered by a deep 3′ eave and hangs on the north side of the house to avoid rotting and fading.
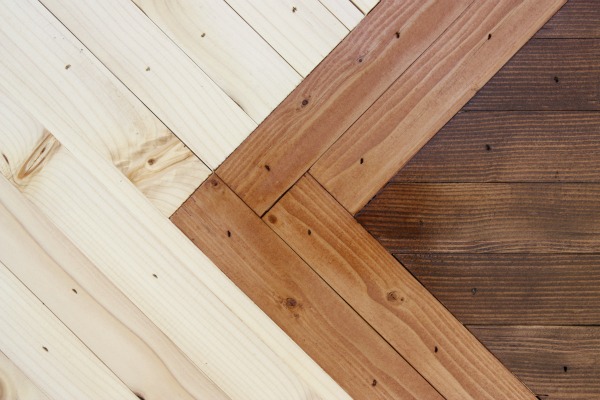
It is my favorite part of the entire patio because 1) it’s a personal design and 2) we used wood salvaged during our home’s renovation. It’s just a bunch of wood but it holds a lot of meaning for us. It turned out so great! HH and I are thinking we’d love to incorporate more pieces like this inside the house.
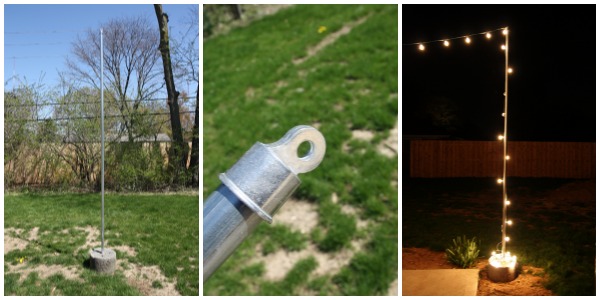
Patio project #3: Create portable light poles. Ever since I started brainstorming the patio makeover, I knew I wanted to string globe lights above the patio but there was one teensy, weensy problem. There aren’t any outbuildings or trees in the backyard to string lights to and I didn’t want to sink poles into the ground permanently. Along with HH, I came up with an idea for portable light poles.
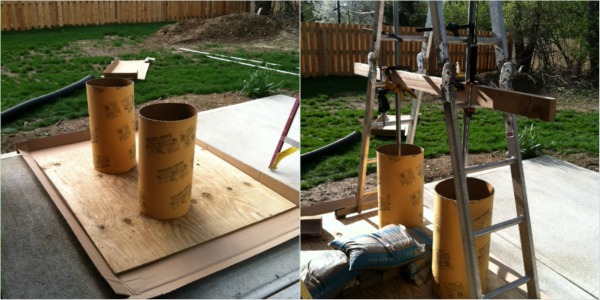
HH poured 7″ of concrete into two concrete tube forms, set fencing top rails into the wet concrete, placed 4 eye bolts into each concrete base {for tethering purposes if necessary}, then held everything level and in place with a clamp/ladder system for 24 hours. It wasn’t until after the concrete was dry that we realized the clever clamp/ladder system had a fault. The only way to remove the ladder was to turn the entire apparatus on its side and slide the ladder off the metal rails. Oops! Luckily, it wasn’t a huge problem. More funny than anything. We removed the forms and cut the poles to our desired height. We added looped end caps to the top of each pole. String lights can be secured to the loops with zip ties. To be honest, we weren’t confident these poles would work out but, so far, they have been wonderful! They are sturdy enough not to topple or lean when lights are strung from them (or even during thunderstorms) yet they are light enough to move around. We haven’t had to tether them.
There are a few peeks at our patio tweaks. Can’t wait to share the final result next week!
images: Dana Miller for House*Tweaking


budget decor, DIY, interior design