I get a lot of emails asking how we’re liking the engineered hardwood we installed in the majority of the house. I haven’t been avoiding the questions. I just wanted to live with the floors for a while before I gave my two cents. So, here ya go…
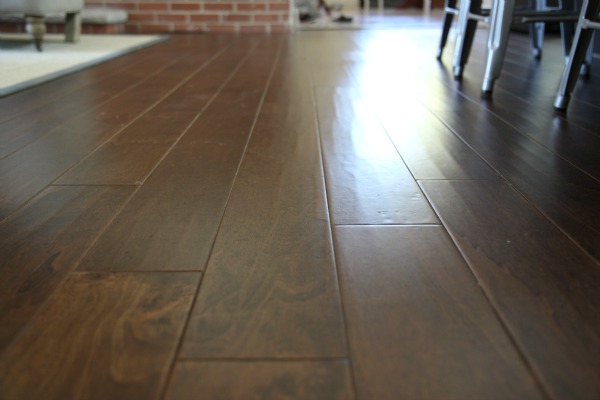
They are the Jasper handscraped birch in the texas brown finish. We bought them with our own money at $2.04/sq ft through Build Direct after receiving a recommendation from a reader about the online flooring site. We installed them ourselves in the great room {kitchen + family room}, hallway and all three bedrooms. We used an underlayment – also from Build Direct – that provides added insulation value, acoustic insulation and a moisture barrier.
The underlayment and engineered wood are installed on top of a concrete slab. {We have no crawl space or basement.} It is a floating floor but NOT a snap-and-click installation that you might expect. Each plank is glued to all of its neighbors. There’s a lot of glue and back-breaking time in the floor. If we had to do it all over again, I think we may have shelled out the extra cash to buy something with a similar aesthetic but an easier installation method. HOWEVER, if we had a subfloor instead of a concrete slab, we would use the Jasper birch again since we could easily nail it into the subfloor. That’s not to say we wouldn’t recommend using it on a concrete slab. Just know installation is going to take about 3x longer than the easier snap-and-click method. Consider yourself warned. Hehe.
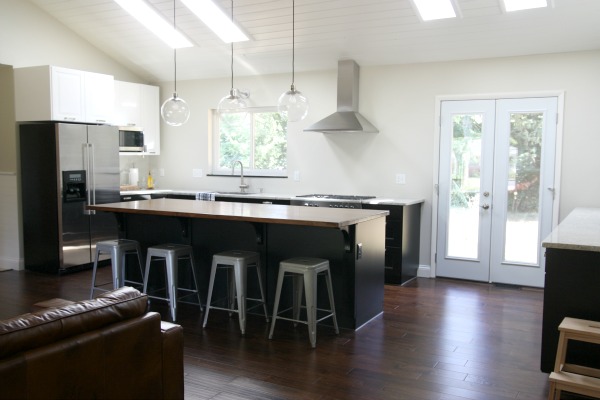
It’s been nine months since the floors were installed. As far as aesthetics, we absolutely LOVE the wood floors. I’m a high contrast sort of gal so I like the dark wood with the white trim and light wall colors. In natural light they have more of a brown hue while under artificial light they take on a reddish tint. I like them both.
Everyone asks if they show dirt and dust. Yes, they do. But now that I’m no longer living with any carpet, I keep thinking about all the gross stuff that was clinging to the carpet in our previous homes that I never saw. I sweep up the kitchen with a broom daily. But I did that before with light vinyl in our previous kitchen. Then once or twice a week or whenever I can no longer stand it, I sweep up all the dust bunnies throughout the rest of the house. When I notice the floors looking dull, I bust out my Bona cleaner and soft mop to get them shining again. Super easy. {Btw, thanks to all of you who recommended Bona over Murphy’s oil. I love it!} That happens maybe once a month.
How are the floors holding up? Well, they’ve have seen a lot of traffic. We’ve had movers and a plumber with dollies in and out of the house, guests, kids running around and tons of things dropped on the floor.
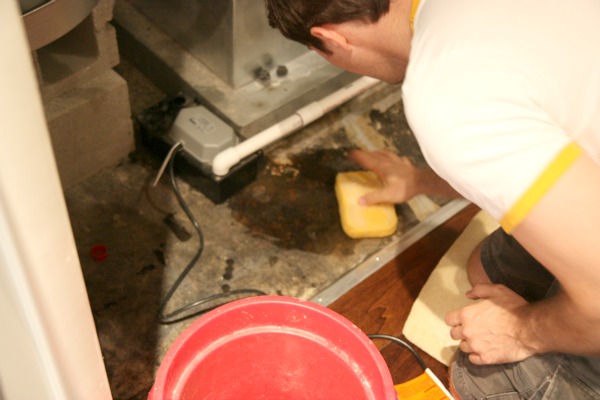
Unfortunately, we also had a flood scare when the pump on our A/C failed and water leaked under the wood floors and they had to be put on life support.

Even with all that {!}, the floors have held up nicely. Are they in perfect condition? No. Like with any wood floor in a home with small kids, there are scratches, dents and dings. But I was expecting that. We adhere to the ‘no shoes in the house’ rule and we don’t have any house pets.
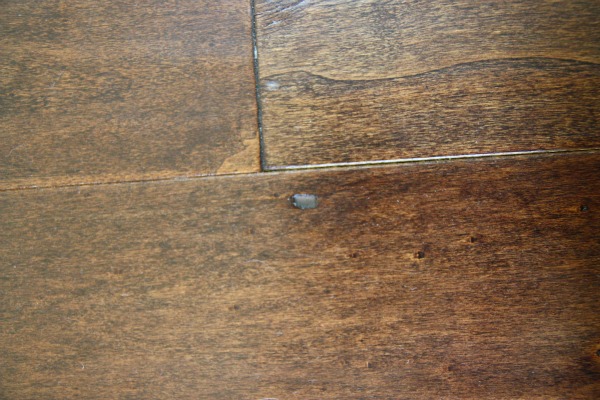
The handscraped texture does a good job of disguising the imperfections that do turn up. I keep a dark wood touch-up Sharpie handy for deeper scratches and dents that works wonders.
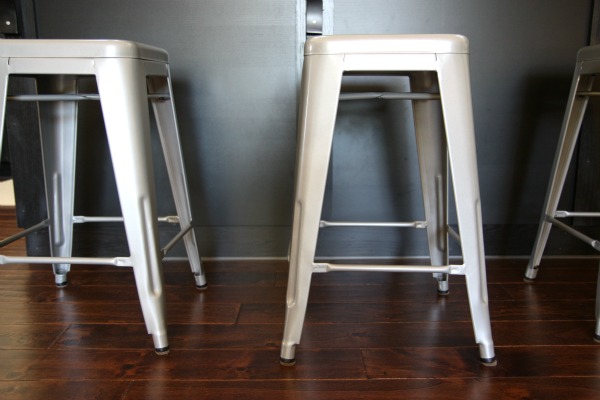
Probably the area of hardwood flooring that sees the most abuse is at the eat-in kitchen island. The boys routinely drop food, silverware and drinks here. It still looks great though.
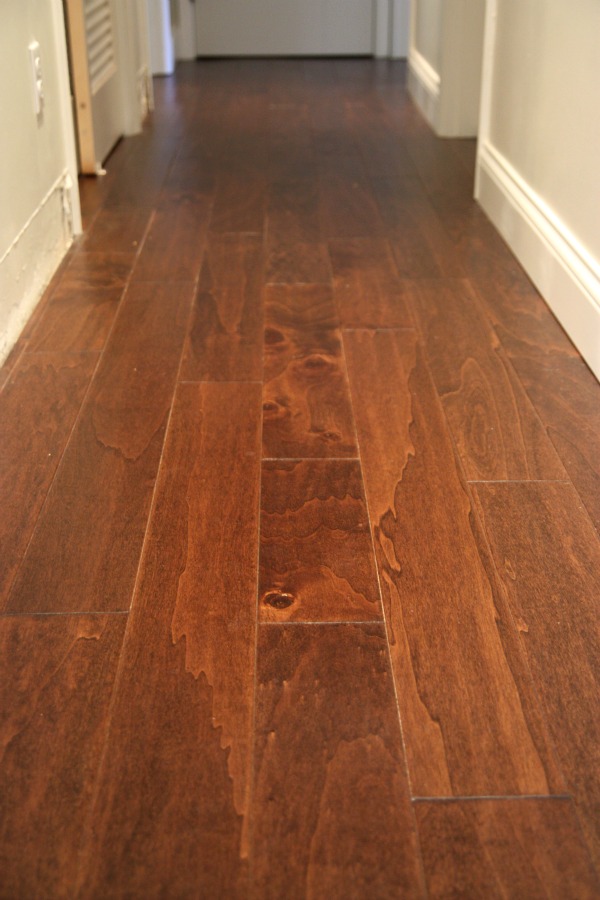
The flooring in the hallway and entrance to our master bedroom was affected by the aforementioned water leak but it hasn’t warped, rippled or buckled.
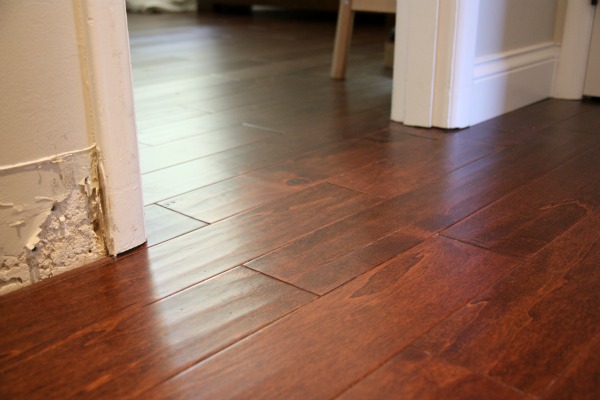
Thank goodness! It could be that we acted quickly to dry out the floors and remedy the situation or it could be that the underlayment did its job {the water actually seeped under the underlayment} as a moisture barrier or it could be a combination of those two things. We’ve since had the restoration company back out to test for moisture and the wood floors are dry nearly two and a half months later. Yay! Now we can finally put the baseboards back on.
So, would I recommend the Jasper birch to others? Sure but with some stipulations:
*Birch is a softer wood so I wouldn’t recommend it for homes that have indoor pets with long claws/nails.
*A ‘no shoes in the house’ rule keeps the wood cleaner longer and you avoid scratches from small rocks caught in the soles of shoes. If you routinely wear high heels in the house or any other type of shoe that could easily dent up the wood, then I would suggest buying a harder wood.
*If you are installing on top of a concrete slab, please be aware that this flooring does NOT feature the snap-and-click method. If you’re installing on top of a subfloor, you’re good to go with a nail gun.
*For higher traffic areas, such as a mudroom, I’d suggest a more durable flooring.
*Use area rugs to protect the floor in busy areas: family room, kitchen, entry.
Basically, if you have a house full of cats and wear high heels all day at home then look for something else.
Do you have any other questions about our engineered hardwood floors?
images: Dana Miller for House*Tweaking

With all of the kitchen base cabinets installed, Handy Hubby was able to knock out the rest of the hardwood flooring! If you’ll remember, a few short weeks ago this is what the kitchen looked like…

HH researched the installation of a floating engineered hardwood floor and found that it was recommended to install any kitchen base cabinets prior to installing flooring. From what I understand, since the base cabinets are attached to the wall laying a floating wood floor beneath them could cause problems down the road when the floor expands and contracts. It could result in shifting of the cabinets and damage to the walls. {This isn’t the case with a nailed down wood floor since in essence it’s not a floating floor.}
As much as we were aching for the hardwoods to be done already, we weren’t willing to chance screwing up the kitchen cabinets and walls due to expansion/contraction in the future. So, the flooring install was put on hold while HH assembled and installed the base cabinetry in the kitchen. We chose not to worry about the few upper cabinets since their installation wasn’t necessary for the completion of the flooring. {For more details on our kitchen layout, click here.} Normally, it’s much easier to install upper cabinets first then move on to lower cabinets but IKEA has a nifty rail system on which the upper cabinets are installed so we figured installing the lower cabinets first wouldn’t pose a problem. I’ll let you know how that pans out.
We also opted to forgo the drawers and doors until the flooring was complete.
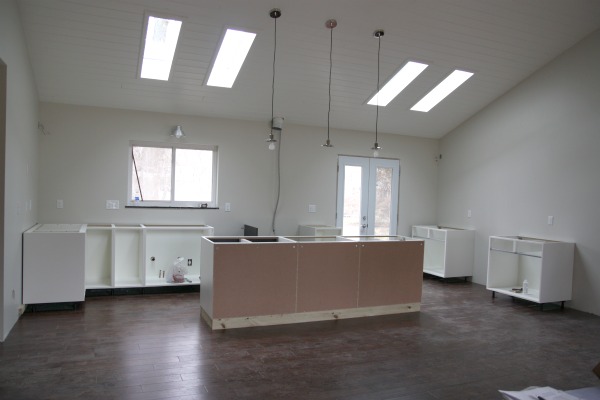
HH assembled and installed all the base cabinets himself…in between numerous business trips. {That’s why it’s taken me so long to get you some after shots.} In talking to him, he found the process to be relatively easy. But you have to remember he’s comparing this project to tearing down walls, vaulting the ceiling, upgrading the HVAC system, etc. AND he’s an engineer so his evaluation of the situation might be a little skewed. I’m sorry I don’t have detailed in progress shots of the cabinet install…HH doesn’t think of that stuff when he’s DIYing and my bed rest has necessitated my absence from the Underdog. But once HH is back from his most recent work trip {tomorrow!}, I plan on sitting down with him and getting all the details to share with you and maybe even trying to capture a few close-ups so you can see how he attached the cabinets to the walls and installed the kitchen island.
For now though, here are the latest pics I snapped a few days ago when I was feeling pretty good. They should give you a better idea of the kitchen layout.
The view from the front door…
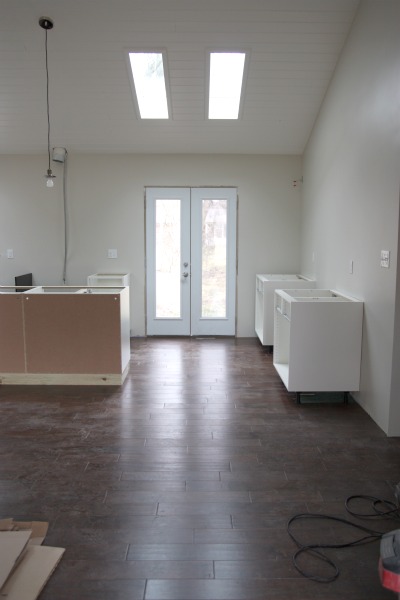
I love that you can see all the way through the house to the backyard upon entrance into the Underdog. A window used to live where those French doors are. HH and I debated back and forth between replacing the original window with a set of doors or not. We knew we’d love the doors but hadn’t planned on putting them in right away. We’re both so happy we bit the bullet and went ahead with the French doors. No regrets one bit. At some point, I’ll paint the doors. I haven’t decided what color…black?…gray?…red? Who knows what hue they’ll end up!
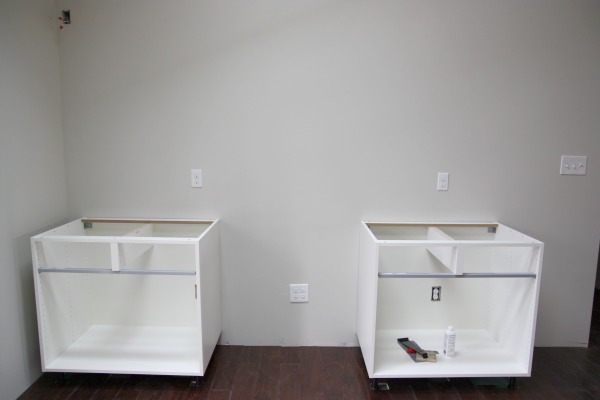
Just to the right of the French doors you’ll see two base cabinets. With a continuous length of countertop connecting the two cabinets, this area will eventually become a desk area. There will be a few shallower upper cabinets for added storage. I see this space being used for making grocery lists, sorting mail, paying bills, filing paperwork, blogging, etc. Organization will be key. I can’t wait for everything to have a place!
If you do a 180° and look the other way across the kitchen, this is what you’ll see…
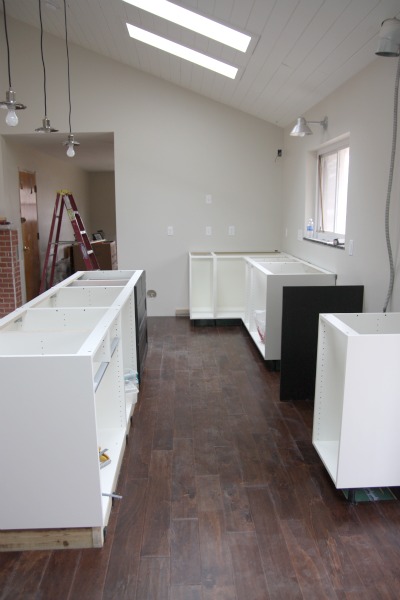
Our kitchen is pretty wide {~25′} but not very deep. It has a galley feel to it but instead of two parallel walls closing it in, we removed one of the walls and added an island in its place to open things up. There’s a nice, wide walkway between the island and cabinets along the wall to make for easy maneuvering.
Moving across the kitchen right to left {sorry, I’m left-handed so I tend to do things bass-ackwards} from the French doors…
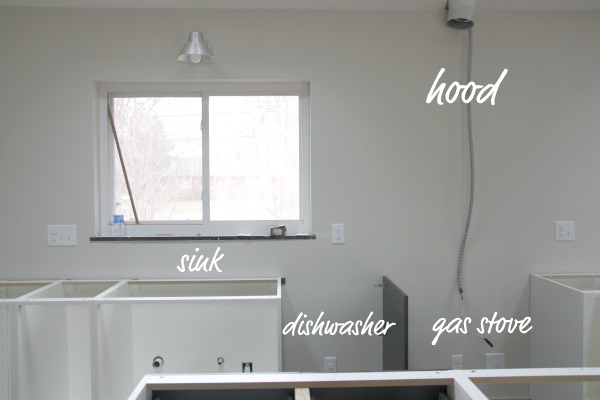
The hood will be centered between the sink window and French doors. We thought it’d make a better focal point than the fridge. This did require us to have a gas line installed at the new stove placement. {The fridge will live where the stove used to.} To the left of the stove is the dishwasher then the sink. Have I mentioned that I’ve been hand washing our dishes for the past six months? The apartment’s dishwasher works as if someone is spitting water onto your dishes…dirty water. I used it once and vowed not to touch it ever again. I look forward to the day I can throw our dishes into a fully functioning dishwasher!
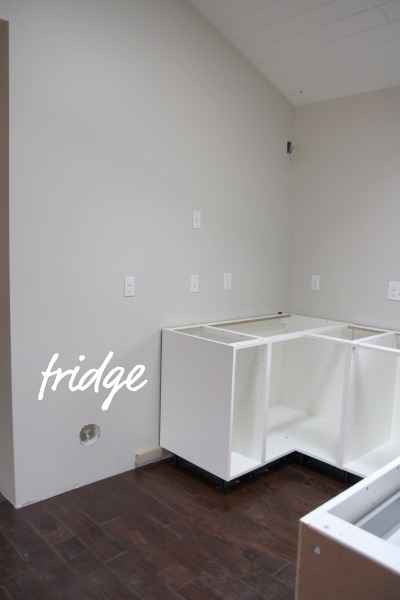
The far left side of the kitchen will house the fridge. This was the original placement of the stove but, like I said, we chose to move it, move it. Not only does this keep our fridge from being the center of attention, but it moves it closer to the garage entrance which should make putting away groceries a cinch. A few shallower upper cabinets will go along this wall as well. One will hold our microwave {which we haven’t purchased yet} and a deeper storage cabinet will top off the fridge.
The hole in the wall in the upper corner is wiring for above cabinet lighting. The uppers on the other {right} side of the kitchen will get above cabinet illumination too. That was another one of our electrician’s ideas that we hadn’t given much thought to until he mentioned it, but I think it will be a great investment and make for some lovely ambiance at night.
Looking back towards the desk area from the fridge…
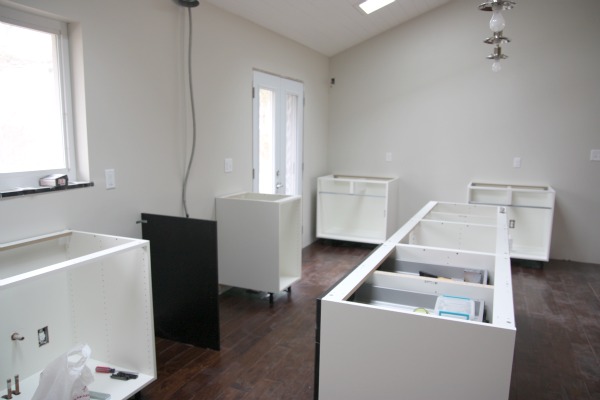
That concludes a little walk through our preliminary kitchen. Let’s get back to that flooring.
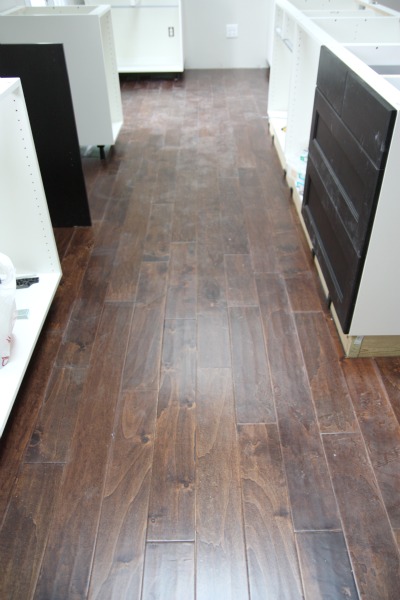
After all the measuring, bending, cutting, squatting, and gluing and gluing and gluing, we LOVE this floor! Sure, it could use a good scrub but we’ve deemed it worthy of all the hard work it took to DIY the install. With that one set of black drawers installed on the island, you can get a good feel for how the black base cabinets will look next to the floor. I like the way the black in the cabinets draws out the darker grain in the floor. But I also like that there’s enough contrast between the brown floor and black cabinets that they feel separate. A darker floor would have been too dark. {With the white cabinet frames, you can see how the hardwood could work nicely in a white kitchen too – in case you were wondering.}
With the island and base cabinets in, HH finished up the rest of the flooring just last weekend {on one of the two days he was home in between work trips}. He floored right up to the island…
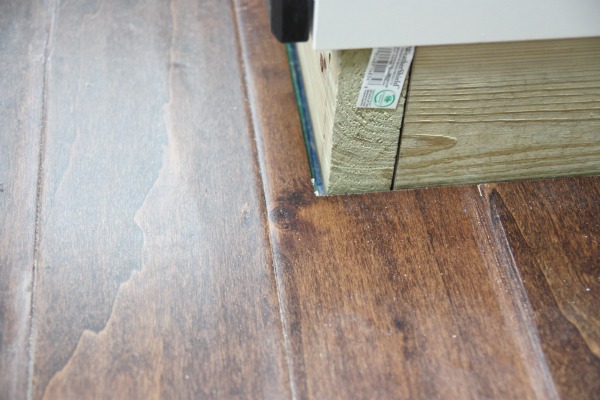
…and base cabinets…
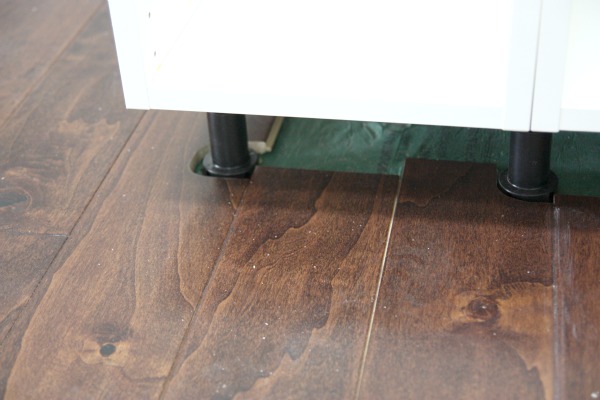
The island and base cabinets will get a toe kick treatment with black plinth that matches the cabinetry. It will hide the island’s framed base and the lower cabinets’ undercarriage. There was no need to floor all the way under the cabinets. HH cut notches in the flooring for the legs of the cabinets.
By contrast, HH installed the wood floor underneath all appliances.
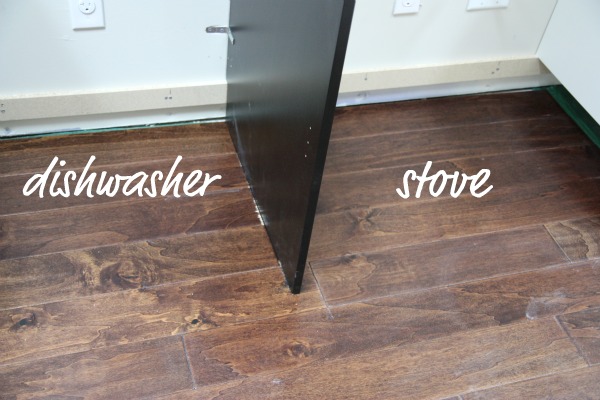
This is due to the fact that the appliances – while hooked up at the walls – are not ATTACHED to the walls. Their freestanding properties, unlike the screwed in cabinets, give them more wiggle room for any expansion and contraction that may occur with the flooring later on. Again, this is the case for us because we installed a floating engineered hardwood floor onto a concrete slab. If you are nailing down your wood floor onto a subfloor {lucky dog you!}, then there shouldn’t be a problem installing the flooring underneath base cabinets if you choose to do so.
Luckily, our major appliances {fridge, dishwasher, stove} have adjustable feet so that we can keep them level with the cabinets when it comes time to install countertops. HH did take the heights of the appliances into consideration when installing the cabinets, so everything should be flush. Unlike custom cabinetry, IKEA cabinets have adjustable feet on them so you can finagle their height to your requirements as needed. Or you can always build a base using 2×4’s…similar to what HH did for the island.
For fun, let’s take one last look at the flooring done-zo. Well, minus trim, baseboards, thresholds and a good cleaning.

Not too bad considering she once looked like this…
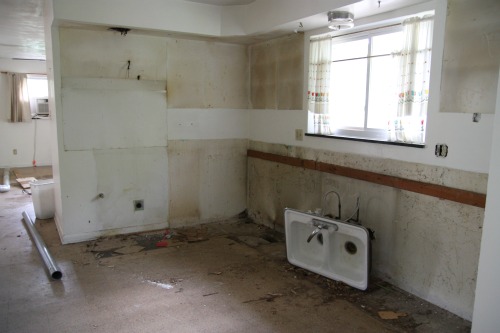
Ack!
Next up? The master bathroom. We’re sort of jumping trains and moving away from the kitchen for a little while. We’d like to get one bathroom completed before finishing up the kitchen, so that’s where we’re headed next. Tiling here we come! Although it doesn’t look like I’ll be doing much tiling. I have strict orders to take it easy for two more weeks at least. I haven’t quite figured out how to ‘take it easy’ with two busy-body kids, a traveling hubby and a house under renovation but I’m doing my best. So far, so good. Baby is still cookin’.
I mentioned above that HH was home for 2 days in between work trips this past weekend. You saw what he did one of those days and the other day he was home we were doing this…

…celebrating our older son’s 7th birthday! My dad graciously let us take over his house for a low key, laid-back family party. We couldn’t fit everyone into our teeny apartment. For some reason, this birthday was a real stinger to me. I can’t believe Layne is 7. He’s so grown up! He wouldn’t let me decorate – not that I could have gone all out anyways with the whole bed rest thing. He even turned down balloons saying, ‘uh, Mom, balloons are kinda babyish.’ Everyone kept commenting on how mellow and quiet he was, too. But that’s just Layne. He’s not one to want to be the center of attention.
His brother and my sister have that covered.

Two peas in a pod, I tell ya.
Happy weekend!
**Congrats to Katie whose lil’ guy replies, “I wuv you awww da way to da dirt!” every time his Dad says, “I love you all the way to the moon!” Also congrats to Becky who, ironically, loves her sweetie more than sweets. Katie and Becky are the winners of the Signs by Andrea giveaway.**
images: all Dana Miller for House*Tweaking


DIY, interior design, renovation