You may remember that I enrolled in the Sheffield Interior Design School months ago. The program is targeted towards people who want to learn about interior design but have other obligations {work, family, finances, etc} that keep them from enrolling full-time at a typical college or university. Students are given 3 years to complete the course at their own pace. Good thing. Because so far, my pace has been similar to that of a turtle. Slow and steady wins the race, right? Well, I intentionally took a few months off because I learned that part of my work as a Sheffield student is to design a room using the concepts learned through my studies. While the school intends for students to do this on paper, I thought it would be fun to try it in real life as well. And now that I have plenty of rooms to make over {thank you old, decrepit Underdog}, it’s back to the books for me!
I plan on giving each room of the Underdog a makeover, but I’d like to share the long, drawn-out, in depth process of transforming one particular room from start to finish here on House*Tweaking. Even better, I’d like you to tell me which room you want to see receive the design student makeover. This will be the room that I work on {on paper and in real life although maybe not simultaneously} for my design student project. I’ll share all my thoughts, plans, designs and rookie drawings throughout the process. I’ll probably even change my mind a few times. Maybe seeing a room come to life from the first to final steps will inspire you, take the intimidation sting out of decorating, or just show you how bat @#$! crazy my mind can be at times. Sound good? Okay, let’s put it to a vote.
I’ve narrowed down the playing field to three Underdog rooms that meet the requirements for my school project.
LIVING ROOM – You immediately enter into the living room upon entrance from the front door. The room will be open to the kitchen. Activities that will take place in this room are: watching TV, relaxing, playing, casual entertaining and reading. Pros: the room has an original fireplace as its focal point and a large picture window that provides tons of natural light. Cons: the room is small-ish for all the activities that will take place in it and needs new flooring. I’ll need to figure out ways to add disguised toy/game storage, seat an optimal number of people comfortably, stylishly add in a TV and all its components, carve out a spot for guests to hang coats and bags, and arrange furniture to highlight the fireplace without impeding traffic flow.
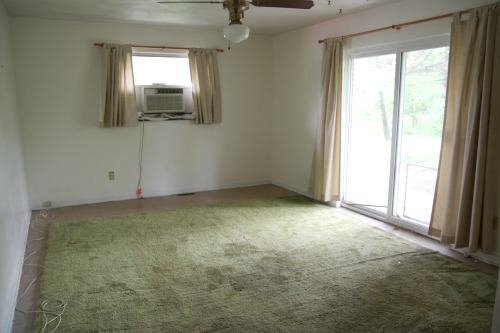
DINING ROOM/MUDROOM/LAUNDRY ROOM – You immediately enter into this space upon entrance from the garage. The room is just off the kitchen/living room and has sliders that open up to the backyard. It also contains a closet will house the washer, dryer and radon mitigation system. Activities that will take place in this room are: dining {although everyday dining will most likely take place at the kitchen island}, taking off shoes/coats, hanging up everyday bags, emptying pockets, laundering, coloring and crafting with the kids, sewing, and passing through to the backyard. Pros: the room receives natural light from the patio sliders and is connected to the outdoors. Cons: once again, the room is small-ish for all duties that will be required of it, it needs new flooring and it has no existing focal point. I’ll need to add dining furniture that will double as a sewing/crafting table. Somehow, I’ve got to incorporate the laundry closet into the rest of the room without hiding it behind cumbersome doors. A part of the room will be designated to mudroom duties: shoe putting on/taking off, hanging up backpacks/purses, storing outerwear and dropping keys. This room needs to provide storage for my sewing supplies {including a sewing machine}, kids craft materials and, ideally, even household staples {like toilet paper}. And it needs to hold all of that stuff out of plain sight so that when the room is being used as extra dining space, it doesn’t feel like you’re dining in the laundry room/mudroom/craft room. Whew. That’s a lot to ask of one room. Aesthetically, the room needs a focal point…other than the window A/C unit…and a new ceiling fixture.
MASTER BEDROOM – This room is at the end of a long, narrow hallway. Activities that will take place in this room are: sleeping, reading and dressing. Pros: the room has two nice-sized windows in it {although one has a cracked pane}, is a decent size itself and has an adequate en suite bathroom. Cons: closet space is limited, the room has no architectural focal point or overhead fixtures, and the room needs new flooring. In addition to a bed, we’ll need furniture to make up for a teeny closet. I’d like to sneak in a dressing area if possible. We’ll also need bedside lighting for nighttime reading. More than anything, this room needs to feel like a safe haven at the end of every busy day.
Now that you know a little bit more about each room, tell me which one you’d like to watch get tweaked to life, in detail.
[polldaddy poll=”5188232″]
Vote until July 1st at midnight EST.
images: Dana Miller for House*Tweaking












budget decor, DIY