Still no sign of spring. But that’s not stopping us from turning our attention outdoors. Last fall we had two plain Jane concrete patios poured just outside the two sets of french doors {one in the mudroom & one in the kitchen} at the back of the house. We have plans to build a platform deck spanning the gap between the two patios.
These are HH’s hand drawn plans. We’ll be implementing Trex materials to build the deck. Looking for inspiration online, we came across some pretty elaborate deck designs that were amazing but a little over the top for us. Our house is a single level ranch on a modest flat lot and we don’t want our deck to look like we pulled it off the back of a large home with sweeping lake views. So, we’re going with a simple 15′ x 17′ design.
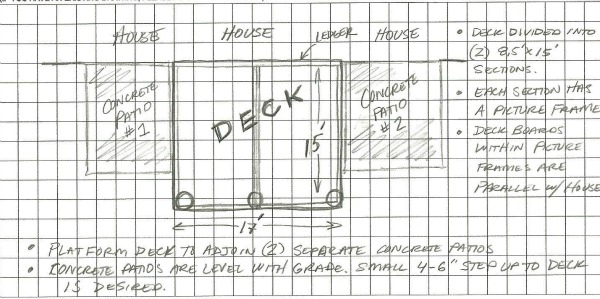
If you can’t read HH’s notes, here are the details:
*The deck will adjoin two concrete patios that are flush with the ground.
*The deck itself will sit ~6″ higher than the patios.
*The deck floor will be split into two equal sections.
*Each section will have a picture frame detail at the borders and the deck boards will run parallel to the house.
HH put together a more detailed 3D design using Trex’s deck designer tool. You can view the pdf here – Platform Deck Plans – if you’re a visual person. It’s a better representation of what the deck will actually look like although the decking material will be more of a gray color. As you can see, the deck is low enough that no railing is required. Our backyard isn’t that large so we like the idea of a low deck sans railing to avoid obstructing views and chopping up the yard. The window looking out onto the deck is the window above our kitchen sink. We’re hoping to use the deck as a casual outdoor seating space and the patios as dining and grilling areas.
With the way the weather has NOT been cooperating, it’s likely we won’t start on the deck until mid April after a little spring break action. To give you a better feel for what we’re working with {not much!}, I’ll be sharing some real time photos of our backyard soon. I’m also working on converting one of the patios into a dining space. Stay tuned. Have I mentioned I am so ready for spring? You?
We have partnered with Trex to build our deck. They will provide us with some of the materials for the build but all other materials, designs, labor, injuries, flubs, four-letter exclamations, opinions and reaping of the benefits {i.e. chillaxing with a beverage on our new deck} will be our responsibility. If you’re considering an outdoor space, see what a few pros have to say about designing, entertaining and living outside.
image: Dana Miller for House*Tweaking
*THIS GIVEAWAY IS NOW CLOSED.*
Apartment living is a little stifling to my inner designer. While I can’t change everything I dislike {like the faux wood trim, faux wood doors, cheap plumbing fixtures, outdated kitchen, carpeting, etc.} keeping the place clean makes it more doable. I say the next best thing to having a well designed home is having a clean home. So when Black & Decker contacted me to review their new steam mop, I was in. Goodbye sticky, grimy vinyl flooring!

I was happy to learn that the steam mop uses only tap water to kill 99% of germs. You might find it odd that I have never owned a mop. I’ve always disliked the idea of smearing possibly harmful chemicals all over a floor that my kids walk, sit, play and sometimes – I’m afraid to admit it – eat on. But with the Black & Decker Steam Mop there’s no risk of exposing my kids to nasty chemicals. With my worries eased, I set about assembling and trying out the steam mop.

It took me less than 5 minutes to assemble the mop straight out of the box. Very simple, just 3 clicks was all it took to attach everything together.

The mop comes with a resting pad {the black pad} and a set of removable cloth wipes that adhere to the bottom of the mop. The resting mat helps to keep your floor from getting too hot when the mop is sitting in one spot while it warms up.

The mop also includes a small measuring cup to add tap water to the water tank. It snaps securely onto the handle when not in use. The mop requires a surprisingly small amount of water to operate. I filled my tank with two measuring cupfuls but one cup would have sufficed. Now I know.

Once the water tank is filled, simply plug in the mop and press the power button. A red light appears to let you know the mop is warming up.

The red light turns to blue when the mop is ready to go. It took less than 10 seconds for my red light to turn blue. In fact, it happened so fast I had to turn the mop off and start over just to get pics for this post! Crazy fast! I was expecting it to need minutes of warm-up sort of like an iron. But not so.

With the mop all hot and steamy, I turned the Smart Select dial to tiles-vinyl since the apartment’s kitchen and bathroom floors are some type of vinyl. The mop also works on sealed stone, marble, hardwood and laminate…just be sure it’s sealed. Then I started mopping away. I was very impressed with the way the mop ran smoothly over the floors…barely any resistance. And it’s super light – less than 4 pounds. My biggest surprise? I had fun! And I’m not just saying that because I’m reviewing the product. I had fun steam mopping my vinyl floors. It was quick, easy and dried quickly. The way the mop worked and sounded reminded me of an iron. It was quiet with only random huffing and puffing when steam was released. I’d venture to say it’s quieter than your average iron.

It’s so easy even a three-year-old can do it! Everett was so bored of being home with me while his big brother was in school all day interested that he asked to mop the bathroom. Of course, I let him since my boys have some aiming issues in the bathroom. It was light enough and ran smoothly enough for Everett to maneuver around the toilet and vanity. The head of the steam mop actually swivels to access tight spaces. I was a little afraid the steam would make the floors extremely hot and that I might burn my bare feet on them if I stepped on them right after but that wasn’t the case. They were just warm by the time my feet caught up to them.


Twenty minutes later we were left with sparkling clean floors. No, they aren’t of the best quality but at least they’re clean!

I let the mop cool down then I removed the machine washable cloth pad. Ew!
So that’s 25 minutes total. 5 minute assembly + 20 minute steaming = 25 minutes to clean, healthy floors. And next time it will take me even less time now that I have all the mechanics down and won’t be eating up some of that time to take pictures of the process. I’m guessing I could do it in 15 minutes next time.
A few things to keep in mind if you ever get the chance to use the Black & Decker Steam Mop:
- make sure to only use the steam mop on sealed flooring
- dry sweep your floors with a broom before steam mopping to get up any loose dirt or debris
- always use the black resting mat when the hot mop will be sitting in one place for more than a few seconds
- empty the water tank after each use
- don’t use laundry softener or bleach when machine washing the reusable cloth pads
So, wanna try one for yourself? Good news! Black & Decker is offering up one steam mop to a House*Tweaking reader. Here are the giveaway details:
- PRIZE: one Black & Decker Steam Mop
- RULES: must be at least 18 years old and have a street mailing address {no P.O. boxes} within the U.S. or Canada. One entry per email address.
- HOW TO ENTER: Leave a comment on this post proclaiming “I’M ALL STEAMY!”
- DEADLINE: Enter before Wednesday, August 31st at 9:00 p.m. EST. The winner will be picked at random and announced on Friday, September 2nd.
- WHILE YOU’RE AT IT: Divulge your celebrity crush…you know, the one that gets you all steamy. I’m a big George Clooney fan. I think he’s old enough to be my dad but his voice? Like butta. Ah.
Don’t forget to ‘like’ Black & Decker on Facebook and follow them on Twitter!
images: all Dana Miller for House*Tweaking


DIY, inspiration, renovation