I’m so happy to share our front entry with you! To avoid a lengthy photo laden post, I’ll be sharing the entry’s exterior and interior in two separate posts. Look for a second post later today. Now, onto the exterior!
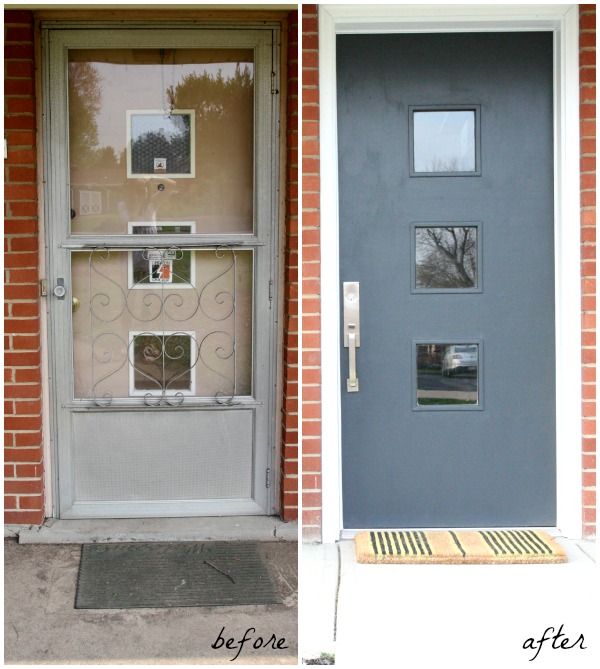
The biggest undertaking in improving the entry was rehabbing the front door. When we moved in, using the front door was cumbersome. There was a heavy screen door that was so LOUD when opened and closed. The process of opening one door outward only to open another door inward didn’t make sense to us so we removed the screen door to reveal the original front door. We loved the midcentury vibe of the front door and decided to keep it.
Steve rebuilt the jamb and added a new threshold so the door would open properly. (We rarely used the front door during the first year of living in the house because it was so difficult to open.) Once the door was working we focused on modernizing it with hardware and paint. Steve installed a sleek mortise handset. A mortise lock is one that requires a pocket to be cut into the door. Installation isn’t for the faint of heart but the handset comes with a template – whether you choose to DIY or hire out the installation. The new handset immediately brought a high-end quality to the door. Its simple design fit the midcentury door perfectly.
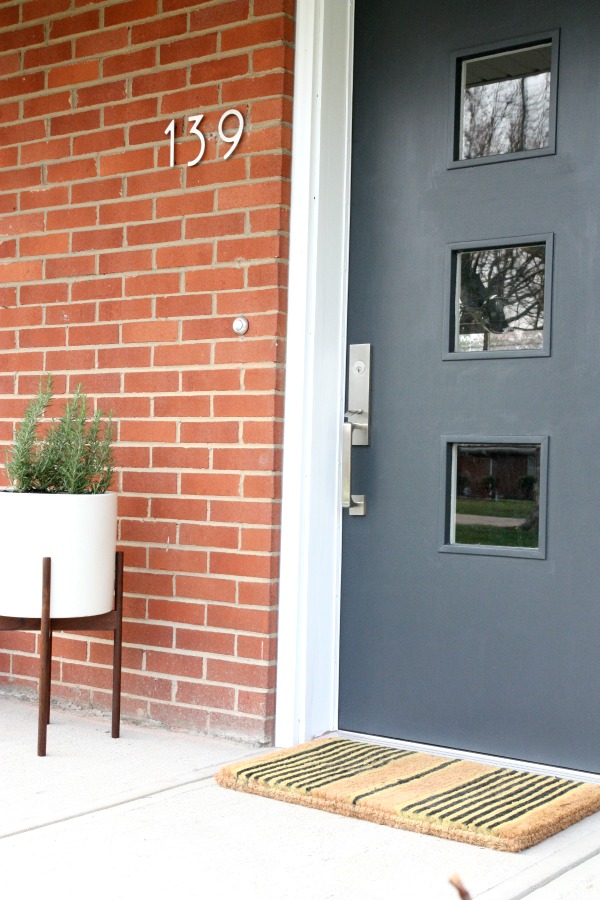
With the handset in place, Steve filled the holes left behind from the old deadbolt. I removed privacy screens and security stickers from the trio of windows then painted the exterior side of the door in a deep, moody blue-gray to contrast with the red brick. We also added new trim and painted it out in crisp white. Our old door looked brand new!
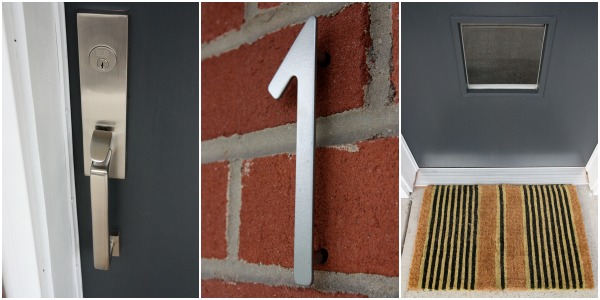
No longer embarrassed by the state of the front door, we were itching to bring in a few details to make the entry feel more welcoming and fit in with our simple modern style. The previous house numbers were so small and difficult to read from the road. We switched them out for 3″ stainless steel numbers with a standoff mount. A striped doormat made of natural fibers hints at what to expect from the decor inside. (I love stripes and natural textures.)
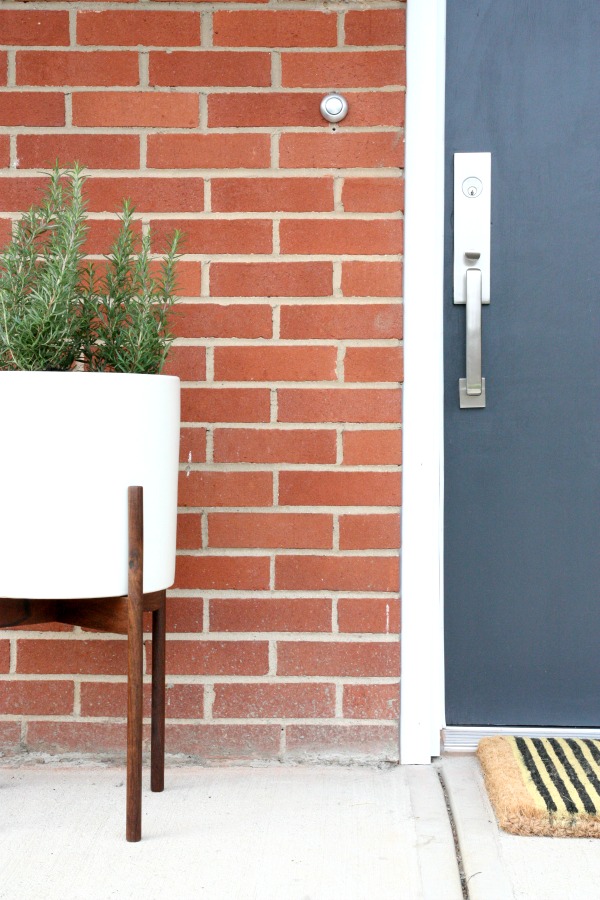
We also switched out a boring doorbell for a larger button-like one. The metal finish is similar to that of the handset and house numbers to keep things cohesive.
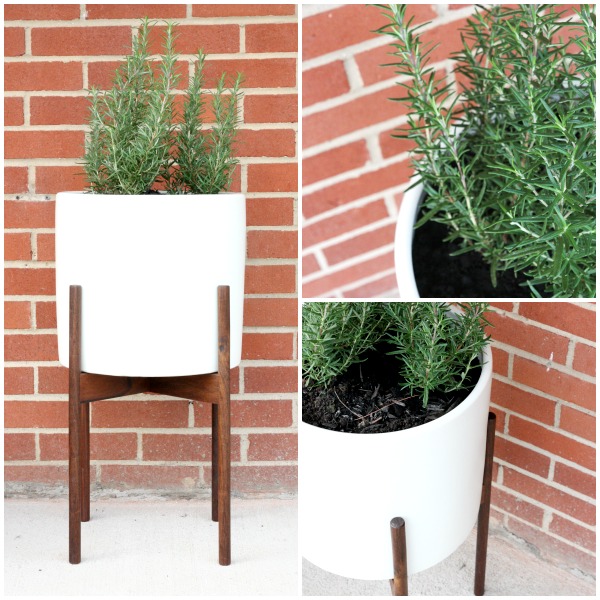
I brought in a modern plant stand to hold greenery. The planter fills an awkward bare spot next to the door and the height brings the eye up to the doorbell and house numbers. Our front door faces south so I wanted to choose foliage that thrives in the sun. I went with rosemary! I love the color, texture and fragrance that it adds to the space. The scent of rosemary is such a welcome surprise at the front door.

I hope you enjoyed the mini tour! We’ve received so many compliments on the improvements from visitors, neighbors, passersby and even the UPS man. (The futuristic doorbell is a hit with the neighborhood kids and the UPS man.) I used to be embarrassed by our front entry and was always apologizing to guests for it. But now I love it!
Our entry isn’t much. There are no steps leading to a covered porch, no double doors, nothing fancy. And we didn’t want to make it something it’s not. The goal was to respect the original entry but modernize it. A few tips to keep in mind when making the most of a small exterior entry:
*Make a statement with the front door. Choose a style that suits your home’s exterior and paint it an unexpected color to contrast with the facade.
*Focus on quality hardware. Splurging on little details like an entry set, door knocker, house numbers or even a fun doorbell can make all the difference. For a cohesive look, stick to one finish for all hardware.
*Less is more. Use only a few favorite decorative items to avoid cluttering a small exterior entry. Accessories should hint at what to expect inside.
*Get creative with greenery. Consider color and texture when choosing greenery. Think outside the box. Fragrant herbs can be a fun and fragrant choice. *BONUS* You can cook with them!
Sources:
door – original, vintage
door paint – Behr Evening Hush
house numbers – Wayfair*
entryset – Emtek*
doorbell – Wayfair*
planter – Modernica
doormat – Wayfair*
*This post was sponsored in part by Wayfair and Emtek. Items marked with an asterisk were chosen by me and kindly donated by Wayfair and Emtek. All opinions and images are my own. Read more about my entry over on Wayfair.
Stay tuned for a look at the interior entry!
P.S. – I know showing house exteriors and house numbers online is a touchy subject. We have a security system and a neighborhood watch program so we’re comfortable with the decision to share images of our entry.
images: Dana Miller for House*Tweaking
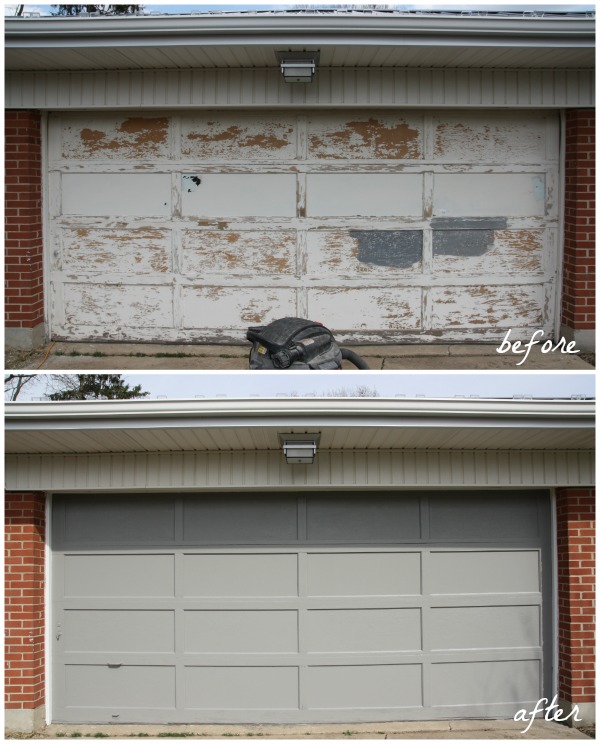
The weather was so nice this past weekend that I just had to tackle an outdoor project. It meant skimping on the kid / guest bathroom but it was totally worth it. My skin hasn’t felt warm sunshine in six months! So while the kids rode their bikes and played with neighbor-friends, I set to work scraping, sanding and painting our decrepit garage door.
We plan to replace the garage door all together within the next year but I couldn’t stand it’s peeling paint any longer. (You can see images of the original door here.) And I needed an excuse to be outside. I have a hard time being anywhere…I always have to be doing something. #busybody It’s something I need to work on. Can you relate? Tangent aside, I’ve mentioned painting the garage door several times to Steve but his response was always the same.
I don’t think it’s worth the hassle since we’re going to replace it eventually.
Guess what. It was worth the hassle.
I used an old school Red Devil paint scraper (similar to this newer one) to remove the peeling paint. It worked well but the garage door’s humble state became even more apparent once the paint was removed. The door’s frame is wood but the recessed panels are made of fiber board or the like. When I scraped the paint from the panels, I was left with a cardboard-like surface. Cardboard garage doors aren’t big sellers for obvious reasons. Sections of wood are splintering at the bottom of the door. So, yeah, our garage door is on its last leg but at least it’s going out with grace.
After scraping, I hit up the paint store for a few paint samples.
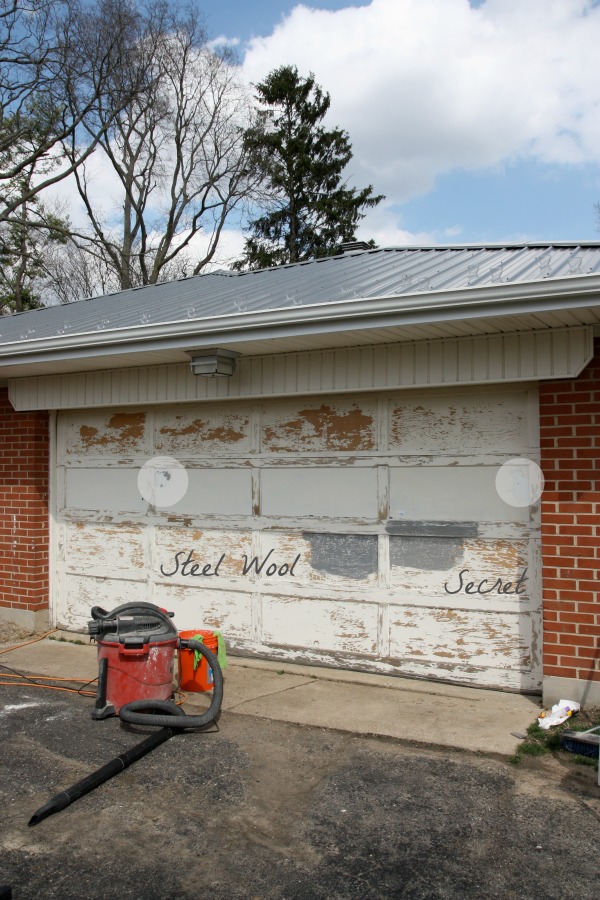
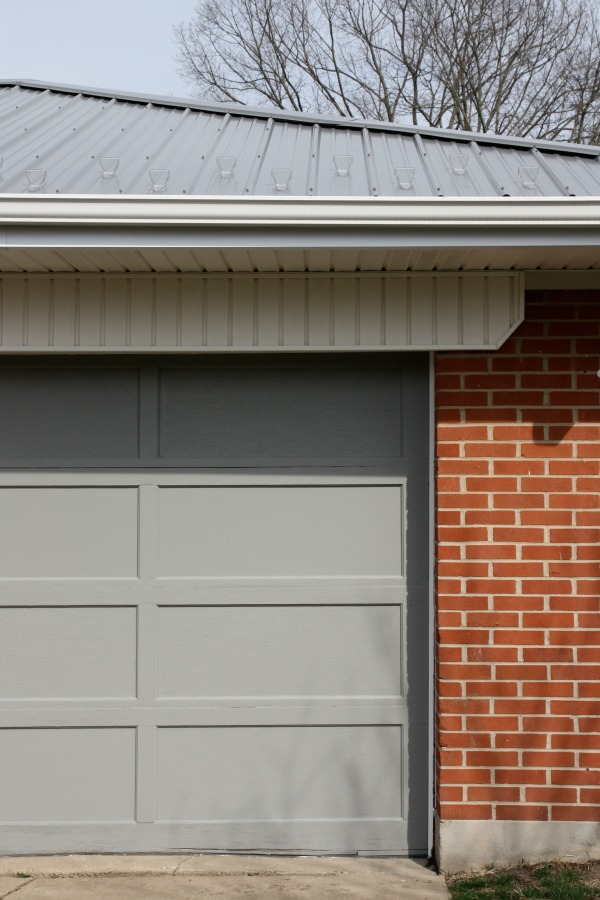
I grabbed Benjamin Moore’s Steel Wool and Secret thinking they would pick up on the metal roof. (The photo above was taken after Steve went over the door and sample paint patches with an orbital sander.) Perfectly matching the roof is difficult because it reflects the sky and sun so it looks completely different on a cloudy, gray day than it does on a bright, sunny one with blue skies. At any rate, we chose Secret and bought two quarts of exterior paint from the Ben line to cover the door and our mailbox post which was looking rough, too.
The highlighted circles show where Steve and I spent an hour trying to scrape who-knows-how-old paint from the windows. I tried a razor blade, Goo Gone, fingernail polish remover…nothing worked well. We like the idea of garage door windows and wanted to reveal them. But after discovering how long it would to take to de-paint them and reminding ourselves that this was meant to be a quick and inexpensive temporary solution we opted to forget them and save days of our lives. (The interior side of the windows are painted as well so that would have doubled our work time.) Why someone would ever paint over perfectly good windows, I’ll never know (I’m guessing it was done out of fear of Peeping Toms or burglars) but we vow to buy a new garage door with windows when the time comes.
With the paint color selected and the decision made to keep the windows painted, I vacuumed the door and the paint chip-covered ground with the Shop-Vac. I wiped the door down with a wet cloth, let it dry then applied two coats of exterior paint in a low luster finish. I didn’t worry about primer. Again, STOPGAP. I also hit up the mailbox post (not shown) with the same taupe-gray as the door and brushed on two coats of white paint on the trim around the garage door.
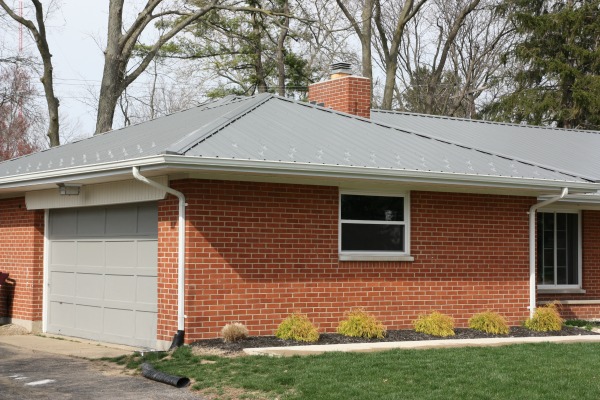
I’m not 100% sold on the color of the finished door but it looks so much better. Steve and I joked that even a green door would have been an improvement. Steve also happily pointed out that the new color perfectly matches the DirectTV satellite. If you take away anything from this post let it be that Benjamin Moore Secret = DirectTV satellite gray. Haha. The safe thing would have been to go with white to match the trim but since we know this door isn’t staying forever we thought we’d try a color. I don’t know? I do think it would look better with windows. And don’t get me started on that awkward vinyl trim above the door. It’s so odd.

Admittedly, there was an ulterior motive for my madness. We’re scheduled to have our cracked asphalt driveway replaced with concrete in the coming weeks. I couldn’t stand the thought of having a nice, new driveway leading to a sad, peeling garage door. I have never been so excited about a driveway before in my life! We have saved our pennies for this. It always been on the renovation list.
As is, there is no “clean” way to reach our house. There’s a gap between the driveway and front walk. There’s a large piece of trodden yard separating the end of the driveway from the back patio where we enter the mudroom. And entering through the garage itself is a disaster and probably unsafe. The new driveway will be widened to meet the front walk and lengthened at the back of the house. We will add large square pavers with creeping Jenny in between them to meet the back dining patio. You don’t know how happy I am at the prospect of having (not one but) two paved ways to enter the house! Right now the majority of dirt in my house comes from dirty / muddy shoes walking up through the yard.
The driveway itself hold rocks, dirt, water and mud in all the cracks and low spots. It will be ripped out and excavated to make way for a wider and longer driveway. Concrete is our material of choice for its sustainability. It’s more expensive up front but will last longer and requires less maintenance than asphalt. Plus, we think it just looks better when driveways match their home’s walks and patios. Having a new driveway is really going to improve our home’s curb appeal. Our neighbors are going to be relieved. For two years, I’ve been cringing when I pull up to our house just because of the driveway. It’s baaaaaad.
So that’s how I spent my weekend in the warm weather. If you ask me, it was worth the $30 in supplies and two half-days of labor. The garage door is definitely looking better but I’d love to know your thoughts on the future door’s style and possible colors. White? A bluer gray that more closely matches the roof and decking? Also, what happens to that odd vinyl trim piece? Sometimes a third-party eye is better at this stuff.
images: Dana Miller for House*Tweaking


budget decor, DIY, inspiration, renovation