
It’s no secret that I’m slightly obsessed with tiny houses. There’s something about fitting life into a tiny, tidy dwelling that appeals to me. I love the way it encourages creative space planning, minimal possessions, intentional choices, practical organization, financial responsibility, eco-friendly features and a reliance on community. We are a family of five living in ~1,600 square feet and I often dream of living in a smaller home. So when a long-time reader and her husband offered to share their tiny house story, I was all ears (and eyes). I’m happy to share their story with you today. I found it so inspiring and I think you will too.
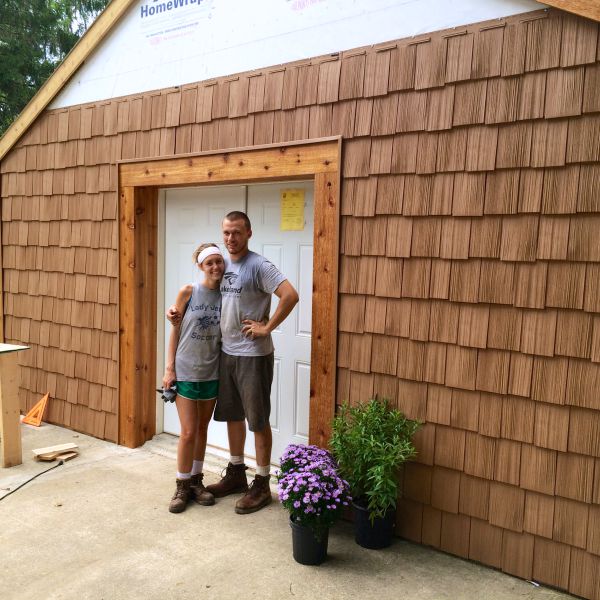
LeAnne and Derek bought a foreclosed fixer-upper shortly after graduating college and getting married. The original plan was to DIY the house into a modern cabin. But after a few grueling months of renovating and living in an apartment off-site, they made a conscientious choice to turn a small, detached garage into their living space. Find out more about their 350-square-foot tiny home (affectionately named “Bunker”) below. Plenty of photos included!
What prompted you to convert your detached garage into living space?
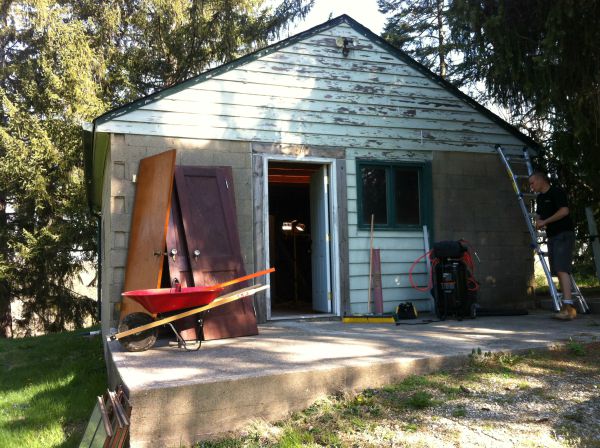
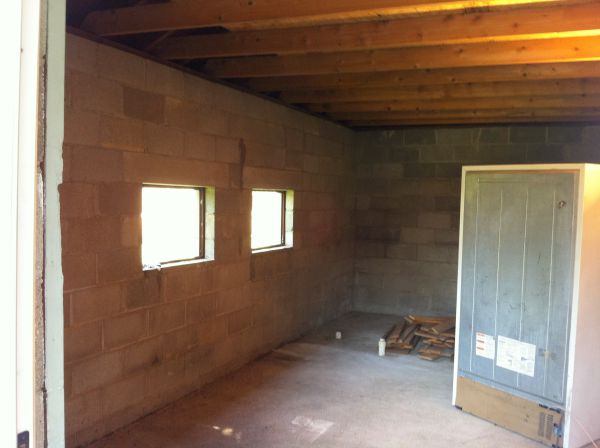
When we purchased the foreclosed property in January 2014, we immediately started on the house which was a wreck. After a couple of months of renovating and an impending apartment lease coming to an end, we knew we needed to either resign a year lease or come up with a better option. At the time, we were living in a 550 sq. ft. studio apartment in downtown Indianapolis, so living in a garage didn’t seem too far-fetched! Before Bunker was Bunker, she was the garage that was holding all of our tools, leftover doors, windows, and anything else we thought we may want to save. I specifically remember standing in that little garage crammed full of stuff and trying to imagine all of Derek’s ideas. He really was and is the visionary behind this project.
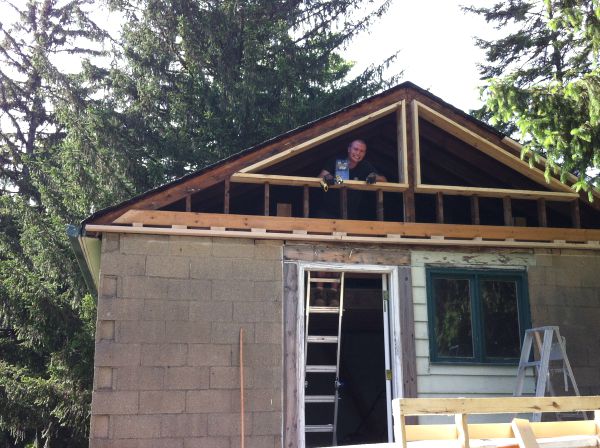
In April 2014, we officially switched our focus from Longshot (the house) to Bunker (the garage). Our original goal was to be moved into Bunker by June, but a stop work order hanging from our door two weeks before the move kept that from happening. We ended up going through the whole inspection process and moved into Bunker October 1st, 2014.
What were your must-haves for the space?
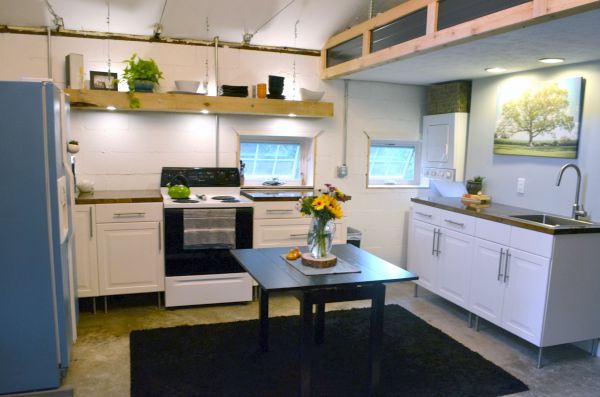
His? Tall countertops. Mine? A closet. We actually ended up with both! Our kitchen is Ikea but we did the countertops ourselves. Ikea has a variety of legs to choose from, so adding height wasn’t a problem.
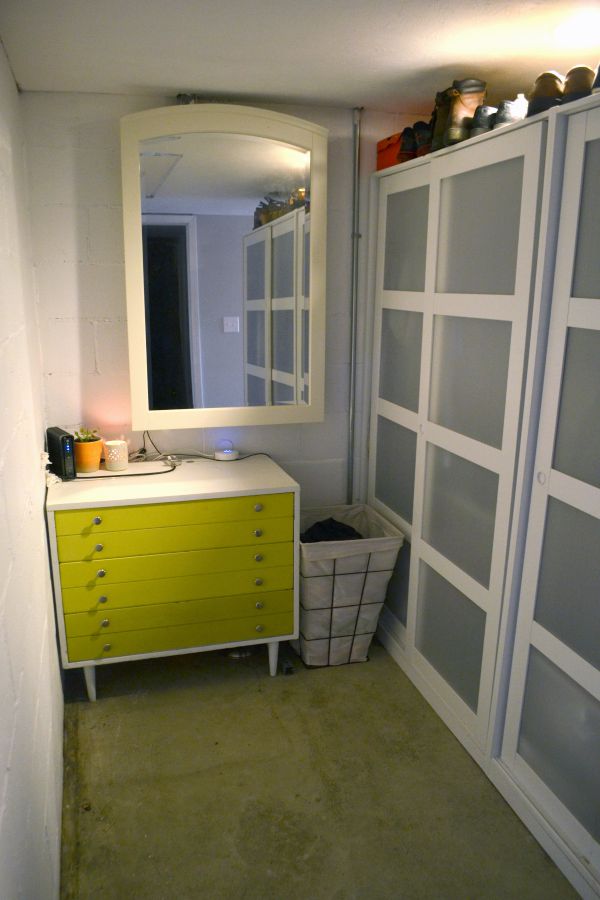

The closets are Ikea wardrobes. We put two separate units together to create a closet space and to break up the “box” feeling of Bunker. We didn’t come up with the closet idea until three weeks before moving in. I was getting a little nervous about how we were going to store things!
How did you make the utilitarian space feel cozy and livable? (i.e., How did you make the space feel less like a garage and more like a home?)
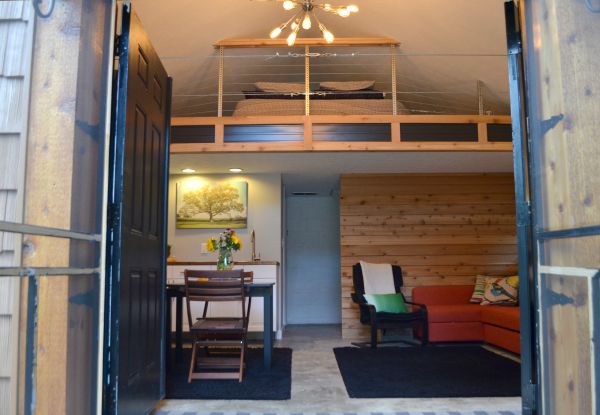
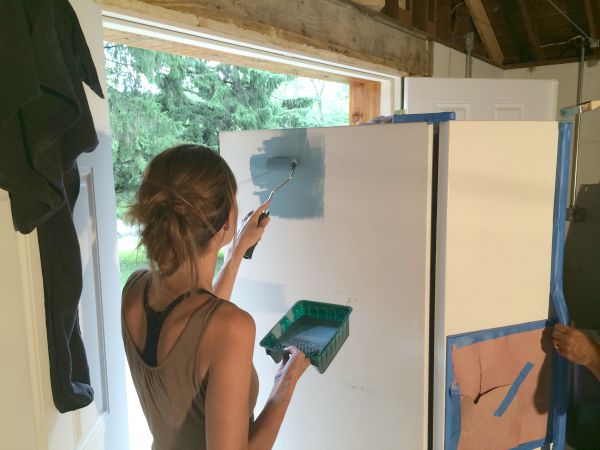
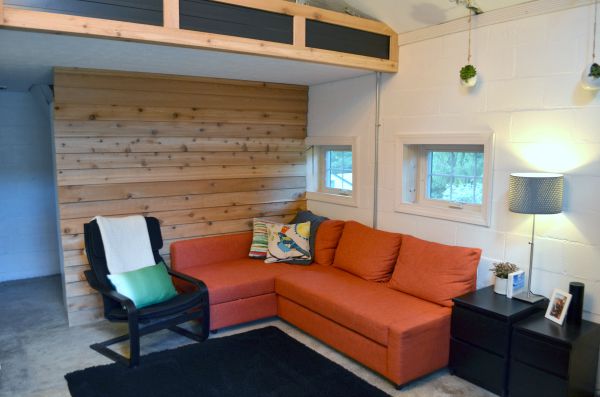
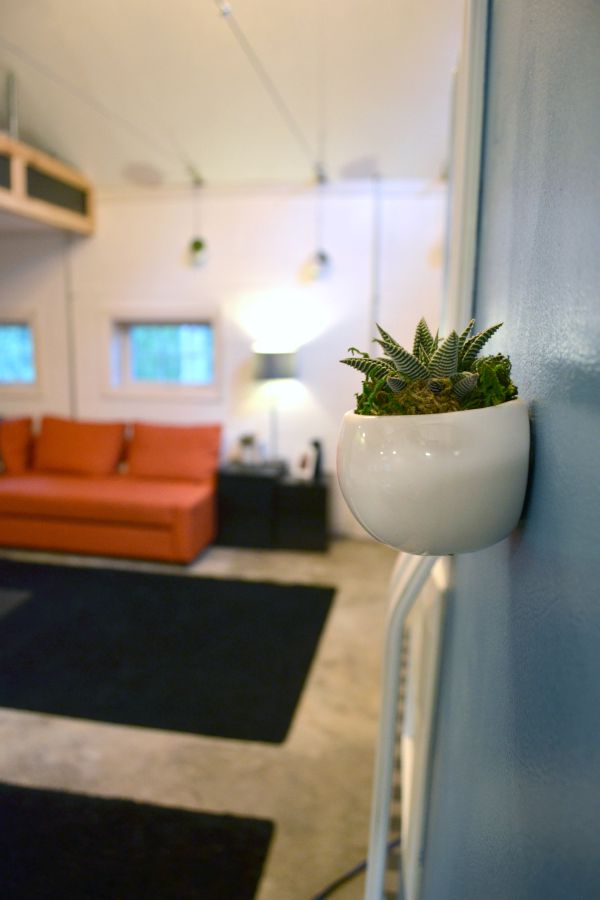
Our style has morphed into comfortably modern with an industrial cabin twist. Is that a style?! Every piece or detail in Bunker has been chosen just for her. Decorating a small space has been great because it forces me to be very intentional with what I buy. If I don’t have a quiet squeal moment in the store, I won’t buy it. My favorite pieces that add to the cozy factor is our DIY painted (blue!) refrigerator, our orange Ikea couch (which is also a full sleeper), and the cedar accents throughout the house.
What is the hardest thing about living in 350 sq ft? The easiest?
The hardest part is keeping it clean. The easiest part also happens to be keeping it clean. With such a small area, when mail is sitting on the kitchen table, the whole place looks cluttered! The good news is that cleaning up takes barely any time at all. I try to straighten it up every morning before I leave for work. Then when I get home, I can swing open the double doors and don’t have to worry about it looking like a disaster. I would not describe myself as a clean freak, so our home has forced me to be more organized.

What is your favorite Bunker project to date? Least favorite?
My favorite is the cedar siding wall we created to cover up the backs of the closets. It was a Sunday afternoon and I had mentioned that I would LOVE to get something to cover up the closets and shoes. We headed to Home Depot and strolled through the aisles. We came across packs of cedar siding and I quietly squealed. The project was so simple. The cedar planks were already the exact length of our closets. We just lined them up and screwed them in! Within an hour, we had a great accent wall for under $50.
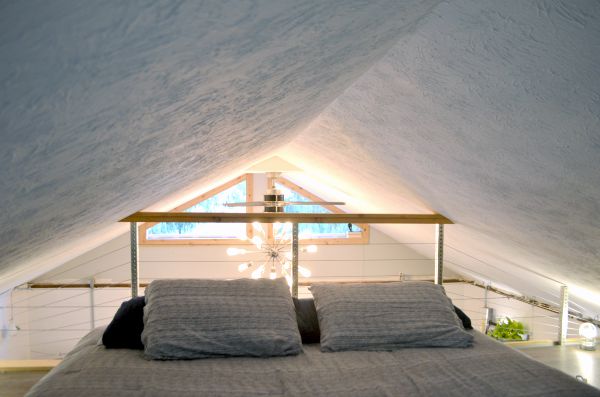
My least favorite would have to be the DIY steel & wire railing in the loft. I absolutely love the way it turned out in the end but it took a while to dream up, assemble and finish. In the meantime, I was sleeping in a loft with no railing to keep me from falling. The railing was Derek’s baby. We bounced around a lot of ideas. (We went months without any railing.) Eventually, we settled on steel frames with a single wire roped through a pulley system. The black portion of the railing is leftover metal roofing material, trimmed out in leftover cedar. My husband completely geeked out during this project and I love the way it came together.
Are you motivated to start work on the house now that you’ve conquered Bunker? Or are you content living in Bunker for a while?
This is a constant topic of discussion between the two of us. At this point, we are planning on being in Bunker for a few more years. We really enjoy what we have made, the convenience, and how much money we’re saving. (Our mortgage is 85% less than what we were paying in rent.) Longshot is currently being used as a workshop. We aren’t necessarily committed to any one thing and are keeping our options open.

What is your next project?
As you can see from some of the pictures, we are still working on finishing touches. Most of the trim has yet to be completed. I have been avoiding some painting projects, and we would like to work on the outdoor patio area and landscaping.
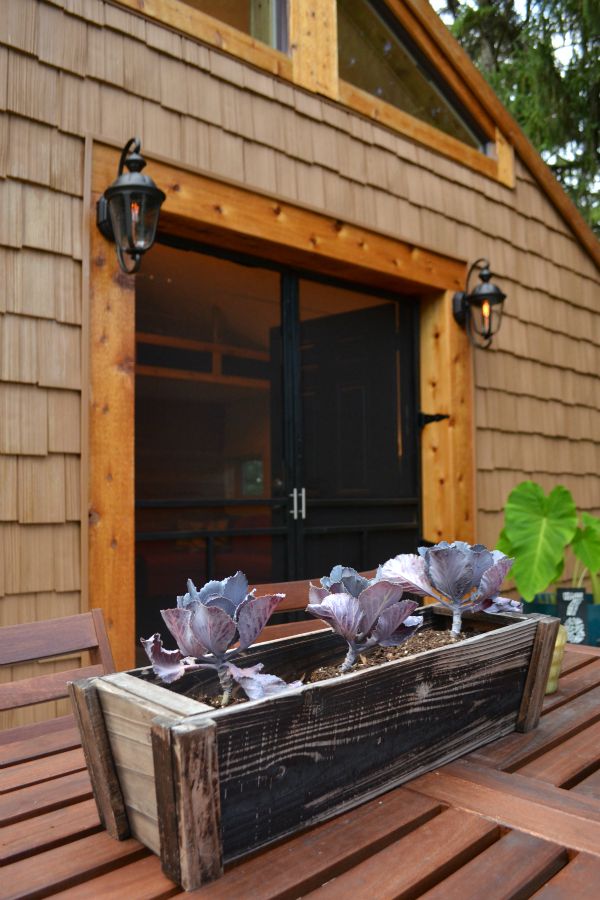
I have never been a flower girl since I prefer to eat plants instead of smell them. Therefore, we opted to do edible landscaping this year. We tilled up some beds around the house and grew kale, cabbage, tomatoes, onions and lots of herbs. We also had our first ever garden which keeps me on my toes! Next year, I would like to trim out the beds and mulch. One thing at a time. As with most homes, there are ALWAYS projects!
Are there any other tangent stories or details you’d like to share?
We like to keep it real in the Lavender household so you must know that living in a tiny home isn’t always glamorous. When we first moved in, we were essentially taking over the space from spiders, mice and, the worst creatures of all, crickets. There was a point where we were literally up several nights in a row at 3:00 a.m. desperately trying to find the crickets that were chatting with each other. One of my favorite memories is my husband standing on the kitchen countertop sporting a head lamp with shop-vac in hand, trying to vacuum up a cricket when it would peek out of a crack in the concrete. There were many sleepless nights…which made us realize we are NOT ready for children ;)

On a final note, Bunker was a complete DIY project except for the electrical work (which Derek did do, but when we got busted by the county, they made us tear it out and hire an electrician) and the water line.

Thank you, LeAnne and Derek, for sharing a big peek at your tiny life!
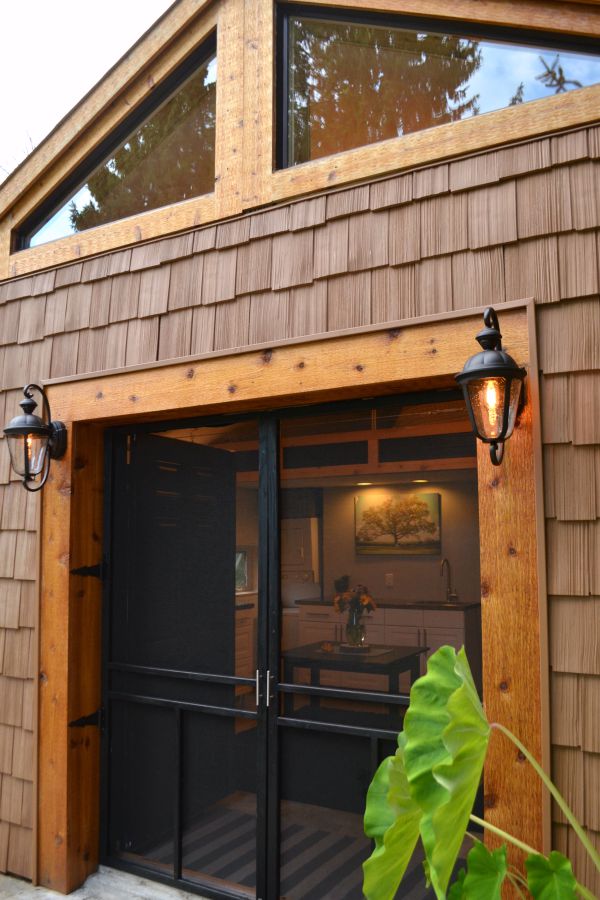
You can see more of LeAnne and Derek’s tiny house on their blog. I have to say, I’m so envious of the couple’s mindfulness at such a young age. We could all stand to learn a thing or two from them: living within your means, choosing patience over instant gratification, making the most of what you have, being resourceful with DIY and having the courage to resist the (expensive!) norm. As for Bunker, she’s quite the cutie. I love the mix of homey accents (warm wood tones, sputnik chandelier, greenery, etc.) and practical elements (concrete floors, freestanding wardrobes, double screen doors, etc.).
Would you ever consider living in a tiny house? What would be on your must-have list? I don’t think I could live happily without a washer + dryer.
If you’re interested in reading more about tiny houses, I’d highly recommend Tiny House Living and The Big Tiny. And I really enjoy seeing how one growing family is making their tiny house work for them.
images: LeAnne Lavender
How exciting is that post title? It just grabs your attention and pulls you in, right? Haha.
I like a good renovation as much as the next house-loving person. But I have to say it’s been nice living in a post-renovation home. We’re able to make it through entire weekends with no dust flying, no rooms off limits, no major disruptions. It feels like we’re finally living in our house. Maybe that doesn’t make sense but, if you’ve ever lived through a major remodel, maybe it does.
When/if we get the itch to DIY, we have several little projects still on the to-do list. This summer we crossed off a few of those things and even tackled some projects that weren’t on the list. We built screens to disguise the trash and recycling bins and the electric meter. (So far, we haven’t received any hate mail from the meter reader.) We also added a refrigerator side panel and organized the garage. I haven’t written about the garage yet, but we parked a vehicle in it for the first time ever! #postrenovationgoals
Today I’m sharing a few more outdoor projects we worked on this summer. They aren’t really post-worthy as stand alone projects so I’m lumping them together in one meaty post.
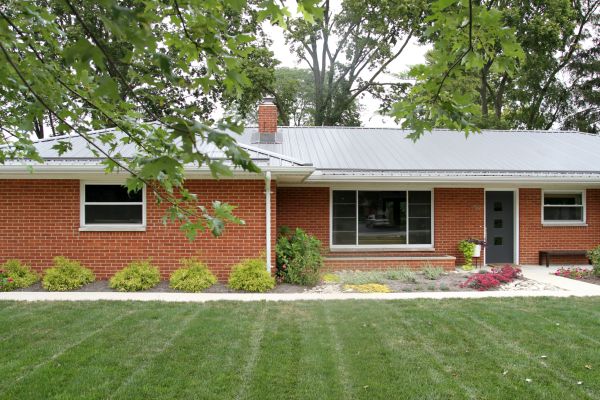
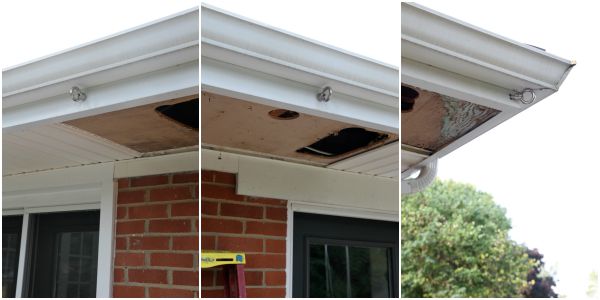
We added snow rails to the metal roof. (And by we, I mean Steve.) You may recall that we originally installed clear plastic snow guards on the roof above the exterior man doors and garage door. (You can spy them here and in most of the exterior shots of the house.) They were *supposed to* prevent snow and ice from avalanching off the metal roof in the winter to protect our gutters and any humans on the ground. But after our first heavy snowfall two years ago, the guards over the front door slid right off with the snow. (!) It wasn’t exactly the protection we were hoping for. We think their failure had everything to do with the pitch – or lack thereof – of our roof.
The good news is we found a local company that was able to manufacture snow rails for us. The bad news is it took TWO YEARS to finally get the snow rails in our hands. (For the company’s sake, I’m not naming them publicly. While their product is excellent, we can’t vouch for their customer service.) The snow rails were color-matched to our existing roof and set us back $500. Steve easily tapped off the plastic snow guards with a rubber mallet. Then he cut sections of the snow rail to length and screwed them into the metal roof ribs with stainless steel screws. (The ribs are the raised “lines” on the roof.) The screws are rustproof and boast rubber washers. The major stipulation was that each continuous length of rail had to end on a rib. You can see how each rail ends on a rib in the photos above and below.
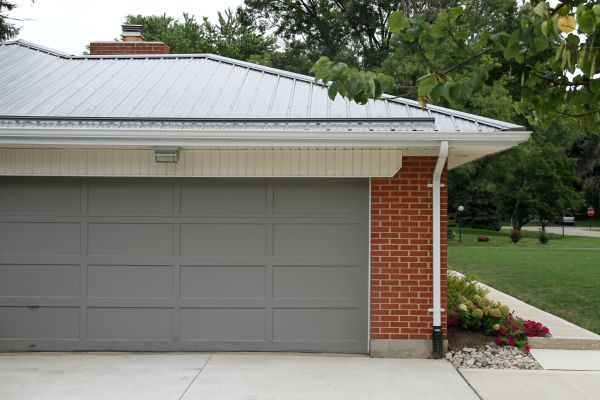
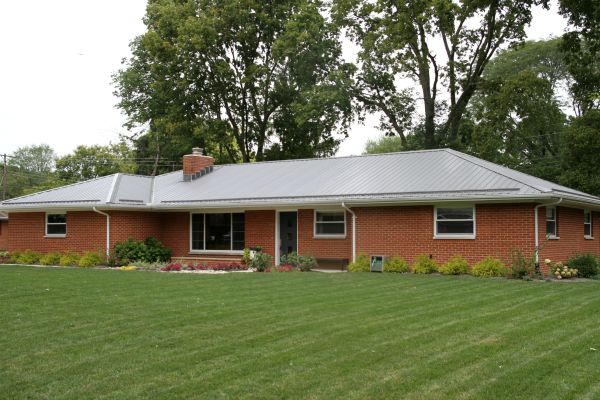
The rail extends around the entire perimeter of the roof – front, sides and back. With help from his dad, Steve knocked out the job in two hours. We actually love the aesthetic of the snow rails and we’re glad to have the rails in place before winter hits. Of course, this means we’ll probably get no snow this year. So be it!
$500 plus two hours of DIY labor isn’t the end of the world but if you’re considering metal for a low-pitched roof in a colder climate, it’s just something to keep in mind. Learn from our mistakes, people. We’re your guinea pigs ;)
We made an outdoor shelf for the kitchen window. (And by we, I mean I told Steve what I wanted it to look like and he built it.) I’ve always thought the window needed a shelf to better connect it to the deck area.
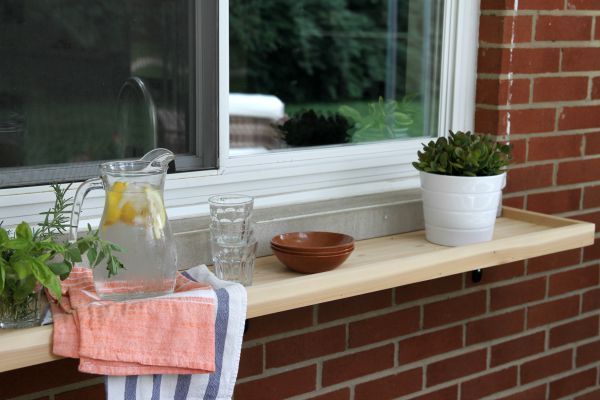
The shelf is constructed of cedar boards and off-the-shelf exterior brackets – both from Menards. The brackets are screwed into the brick facade with Red Head wall anchors. FYI – Red Head refers to the type of screw, not the color ;) Steve added a lip of trim with nails and wood glue. I like that the lip provides a little security for loose items.
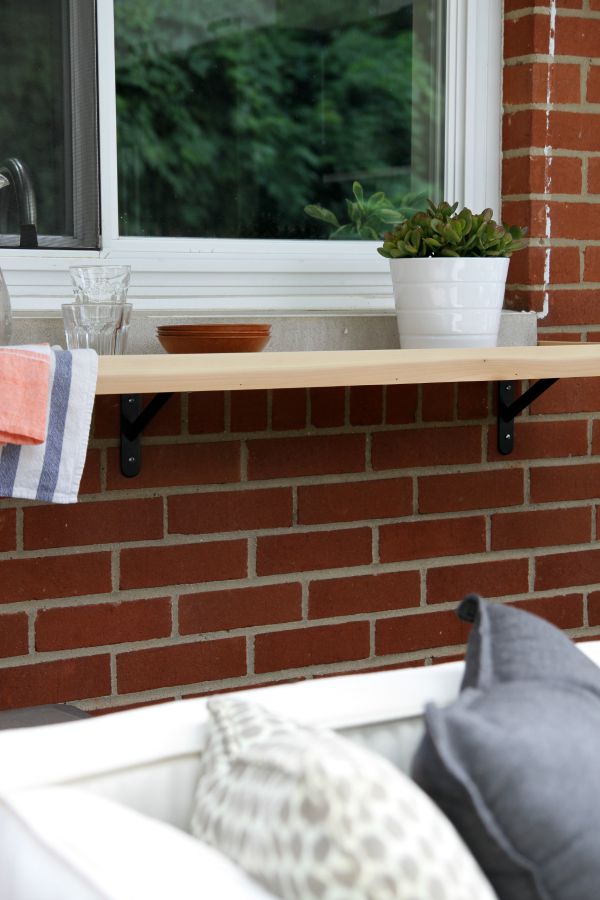
The shelf is a great spot for drinks, napkins and dessert plates when we eat outside. We purposely didn’t make it deep enough for dinner plates because it’s not really conducive to acting as a pass-through… which would have been a cool idea but not practical. The kitchen sink is just inside the window but it’s difficult to access the shelf through the window.
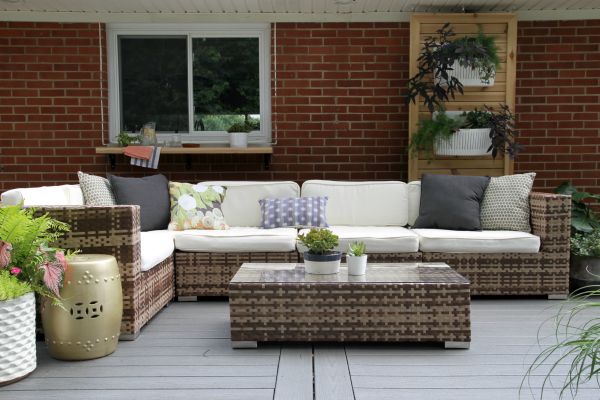
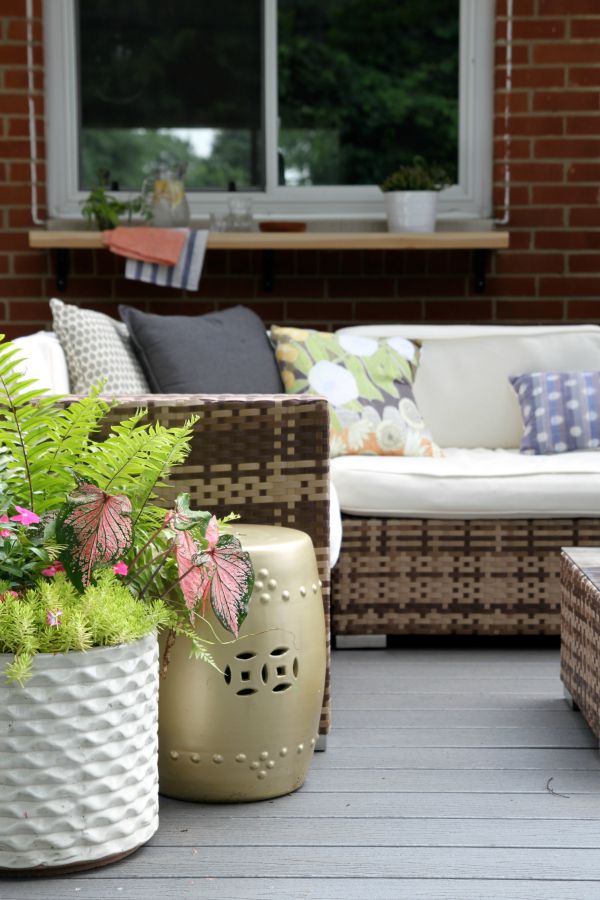
While I’m thinking of it, many of you want to know how the outdoor furniture is holding up. The plastic wicker-like bases are in mint condition. No breakage, no fading, no rust. Covering them in a high quality cover during the winter helps immensely. (See how we store the outdoor furniture here.)
The cushions are a bit more needy. They aren’t meant to be left out all the time. I only place them on the sectional when we’re using it. In the summer, I stash the cushions behind the sectional under the deep eave for added protection from the elements. In the winter, I store them in the attic. The covers are machine washable and I wash them each fall before stashing them away for the winter. They’re in pretty good condition. The zippers still work. There aren’t any tears or holes. There is a spot on one cover where a pile of dead leaves left a stain. The cushions are reversible so I just turn that side down. I line dry the covers after washing but there has been some shrinkage. They still fit the cushions but you can see how the piping doesn’t line up perfectly now. It’s not a deal breaker but, again, something to keep in mind.
Also, those Woolly Pockets are the bomb. I love them.
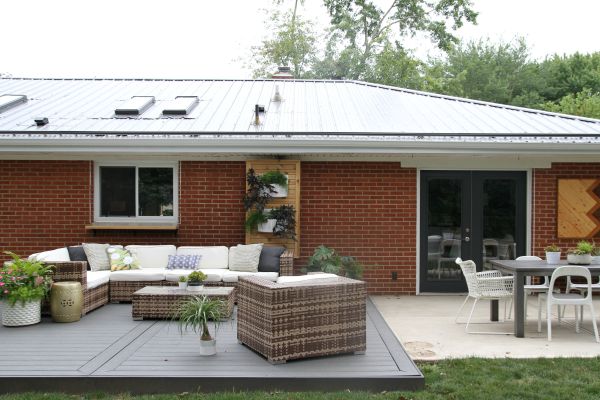
We added hardware for future shade sails. Adding shade sails above the deck and dining patio has been on our wish list for a while. A few readers suggested checking out Costco for affordable options. Thank you! We did give them a look but we really feel like our space would benefit most from custom sails. We’ve determined a larger rectangular sail over the deck and a smaller triangular sail over the dining patio is the ideal setup for us. Because of ongoing insurance quandaries resulting from Everett’s accident earlier this year, we don’t feel comfortable shelling out money for the actual sails this year.
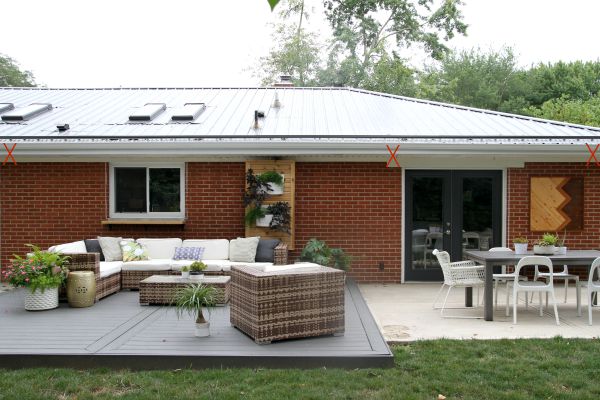
Instead, we purchased and installed the hardware (basically a trio of heavy duty rings) along the eave and have loose plans to put in a trio of posts in the yard this fall. (I marked out the general locations of the rings in the photo above with red X’s.) We’re hoping to add the sails next summer. I’ll keep you posted. Sometimes, this is how bigger projects go. We piecemeal them into smaller projects as time and money allow.
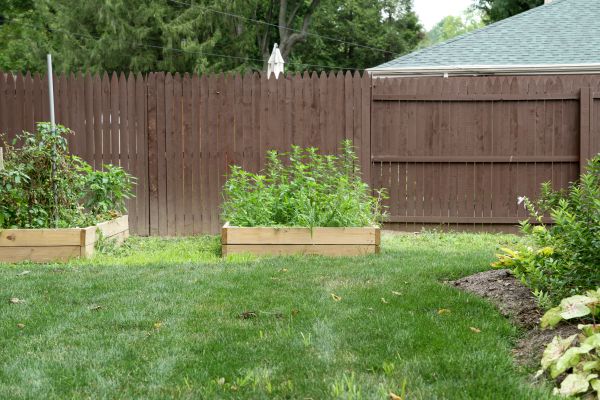
We put in two garden beds. I wish the picture better portrayed how much joy this project has brought to our lives. I also wish our neighbor’s fence was charcoal or black.


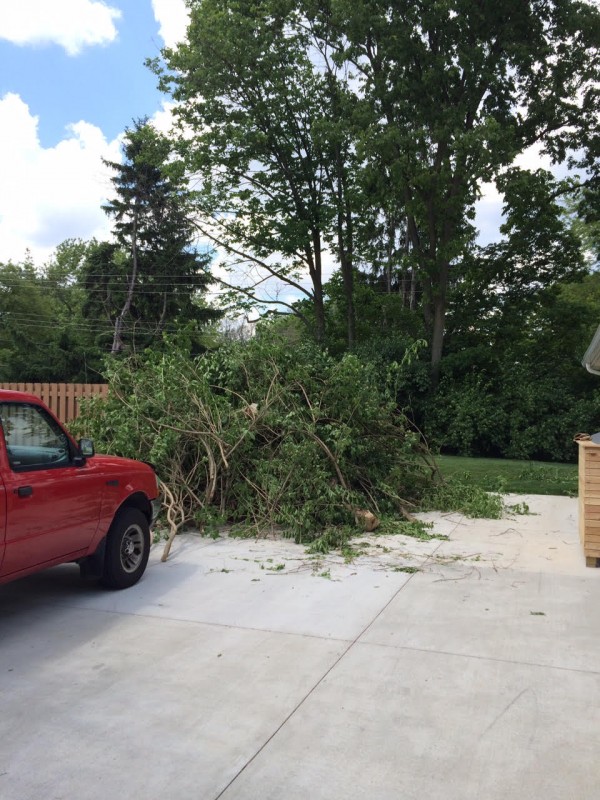
One side of our backyard was overgrown with LARGE random shrubs. We cleared them out earlier this summer with the help of a chainsaw and a rented stump grinder and paid a tree trimming crew to come out, mulch everything and haul it off. That brush pile was three times bigger when it was all said and done. Then we made two basic 4′ x 8′ raised garden beds. We had rich soil + organic compost delivered to fill the beds. Layne had grown a few hot pepper and cucumber plants from seed at school last spring so we plopped those in one of the beds and let nature do its thing.
Clearing out the space for the beds opened up our backyard to a neighbor’s backyard. His name is Bassim. He’s Lebanese and the sweetest person. As soon as he saw we were attempting to grow a garden, he offered up two tomato plants from his garden that weren’t doing so well. He thought they would fare better in our raised beds. Plus, he’s just really nice. The tomato plants took well to the transplant. We had a decent first harvest: first cucumbers, then tomatoes and now hot peppers. I have no idea what we did right but we’re so into this gardening thing now.

The kids LOVE going out and checking the garden everyday. They pull weeds and pick whatever is ripe. They bring in their mini harvests and wash it all by hand. The cucumbers usually don’t make it to the fridge. The kids eat them fresh of the vine. I’ve been making all of my favorite tomato recipes including this one. Bassim lets me clip fresh basil from his garden. It’s so good as a garnish.
Everything you’ve heard about growing your own food is true. It’s opens you up to whole new community. Okay, maybe one neighbor isn’t an entire community but still. When Bassim sees us outside weeding, watering or harvesting, he comes over to say hi and talk garden talk. And seeing the kids’ sense of pride and excitement in growing, picking and eating their own food is priceless. It’s something I want to continue to nurture.
The second bed is growing impressive weeds. Cue the womp, womp sound effect. We didn’t plant anything in it because we wanted to see how the first summer went with one bed. I thought about making it a cutting garden so I could grow flowers to bring inside for decoration, but our family has enjoyed growing food so much that I think we’ll plant more veggies next year. Suggestions?
That pretty much brings you up to speed on outdoor projects around here. Have you crossed off any outdoor projects on your to-do list this summer?
images: Dana Miller for House*Tweaking


budget decor, DIY, inspiration, interior design, organization, renovation