...because home doesn't happen overnight.

Last week I showed you how Handy Hubby made the barn door in our master suite.  Today I’d like to share with you how he actually hung it.  After ‘shopping’ several websites and getting quotes for a sliding track, we purchased the hardware from Crown Industrial located in San Francisco, CA. Specifically, we purchased the #43H standard flat track hanger in a painted flat black finish for doors weighing up to 400 pounds.  As I said before, the cost of the door itself was minimal {the cost of one gallon of paint}.  We decided to splurge on a quality track/hanger system. We didn’t want anything flimsy, wobbly or possibly hazardous given it would be supporting a ~125 pound door. The cost of the sliding/hanging hardware came in just under $400…including taxes and shipping. You could substantially cut that cost if you were able to pick up the product yourself {hint, hint all you California boys and girls} because shipping is expensive given the weight of the product and how far we live from CA.  The parts included were the flat track, all the custom cut spacers, 2 rollers/brackets, 2 track stops, 2 anti-jump blocks, bottom guide & rail, and carriage bolts for the door.

There are a bunch of different track and hanger styles but the flat track was definitely the cheapest option.  For those wanting an even cheaper option, you could look into galvanized box-section barn door track and hardware from Lowe’s, Home Depot or Tractor Supply for about a third of the cost.  The trade off is a dull gray/galvanized finish, bulkiness, and noisier operation once the door is hung.

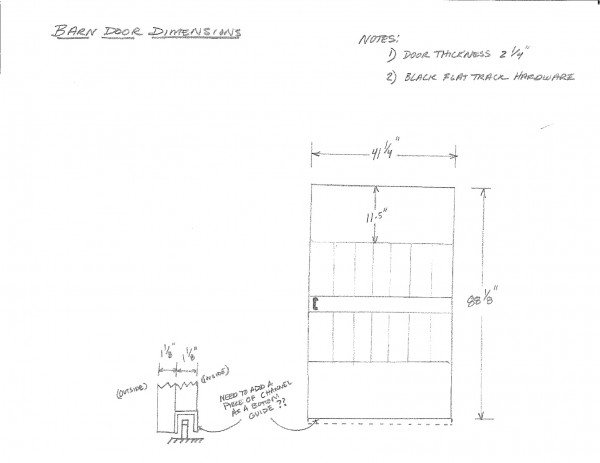
There are several measurements and pieces of info that Crown Industrial asked Handy Hubby before he placed the order.  If you’re thinking of DIYing a sliding door, DO NOT SKIMP ON THIS STEP!  Measure 5 times, question yourself and then measure 5 more times. Here are some hand drawings that Handy Hubby sent the company to ensure proper fit and function.

Drawings aren’t necessary.  You can simply answer the questions that Crown Industrial asks.  But Handy Hubby is an engineer, so by nature he usually goes above and beyond the call of duty when organizing a project.  The hardware company also created their own images based on the info that he gave them.  Handy Hubby was asked to review and approve them before the order was placed.  Key point here? Marry an engineer.  {Or ask Handy Hubby a bunch of questions in the comments section below.}

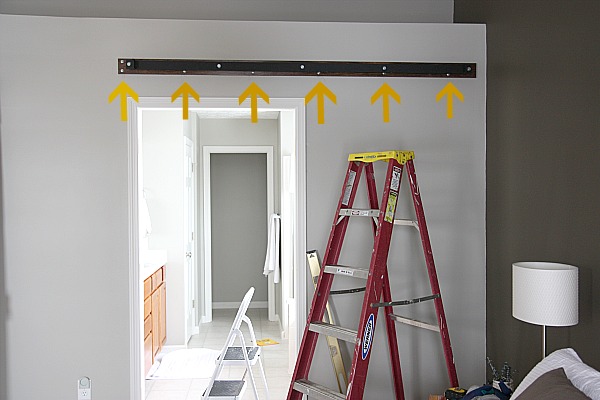
As for installing everything, Handy Hubby used a blocking method to secure the system to the wall above the bathroom doorway.  He cut a 1″x4″ poplar board to size {ours was 8′}, stained and polyurethaned it, measured & leveled for placement and then screwed it into several studs above the doorway.  The sliding track was mounted onto the board.  {You can tie directly into the studs without blocking BUT you must know where your studs are and have Crown Industrial drill holes into the track at those specific points.  Handy Hubby opted for blocking which he found to be easier and more practical.} Here you can see where the poplar board was screwed into 6 studs {under the track}.  The slider/hanger kit did not provide the hardware for blocking.

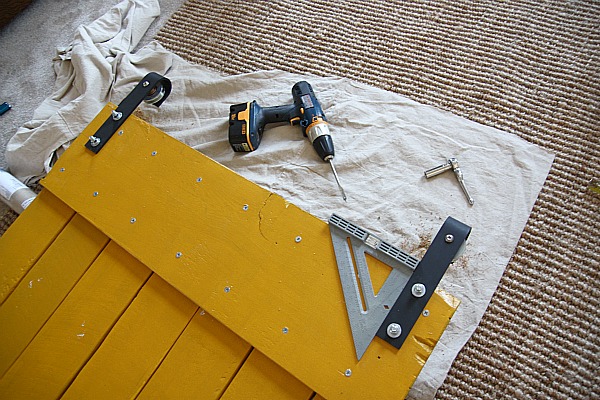
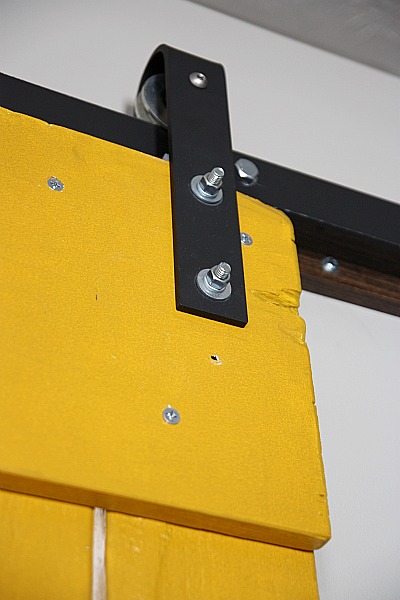
Next, Handy Hubby attached the hangers to the top of the barn door using the supplied carriage bolts.  {Carriage bolts are just large bolts that grip into the wood to keep the bolt from turning when the nut is tightened.}

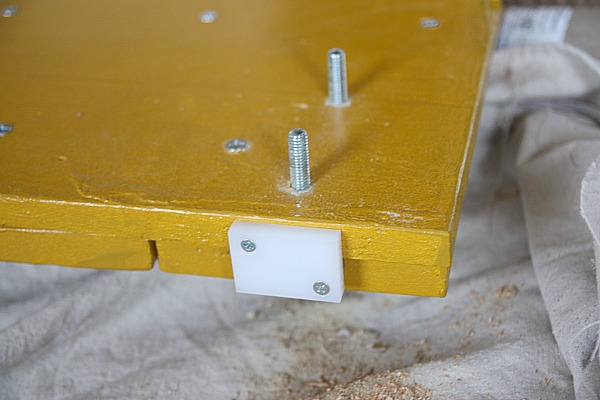
Notice the location of the screws in the top of the door.  Remember me mentioning to make sure you know where your hanger hardware will need to be attached before you screw the top of the door together?  Now you see why.

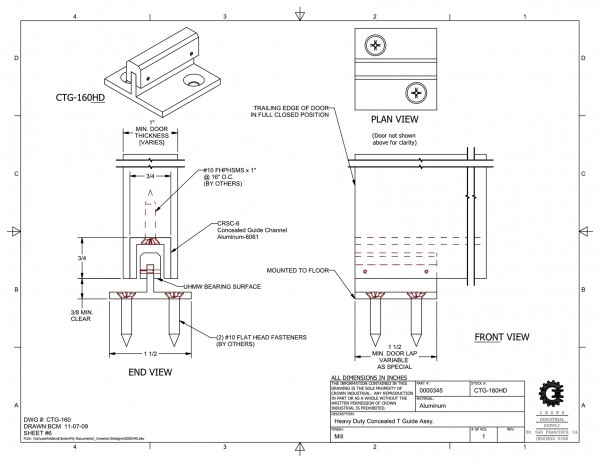
Not only is the door secured at the top but there is also a track down on the floor.  This keeps the door from swinging out/in.  Handy Hubby screwed the floor track right into the floor {through the carpet}.  Then he routed a channel out on the back {bathroom side} of the barn door at the bottom and screwed in a thin guide for the floor track to slip into.  Sorry, I don’t have an image of this available but here’s a drawing from the company showing how the concealed floor T guide works. This shows the guide being centered along the bottom of the door.  Handy Hubby channeled our door along one side {the bathroom side} at the bottom.
I’m happy to say that our barn door slides open and closed very smoothly…no jumping off the track, shaking or getting hung up.  It’s very solid and sturdy.  As far as noise goes, it isn’t completely silent.  It doesn’t squeak, creak or groan.  It’s more of a ‘roaring’ sound, if that makes any sense.  But it’s not loud.  {Unless my 2-year-old is closing it and tries to push it further than the track allows!  Luckily, there are safety stoppers included for those instances to keep the door from flying off the track.} All-in-all, we are very satisfied with the quality of the sliding track and hangers. Again, we paid for that quality but it seemed worth it since the door itself was so inexpensive to DIY.

Do you have any questions about the barn door, track/hanger system or installation process?  I’m sure I’ve missed something here since I wasn’t really in on this project.  {I did watch the kids though while Handy Hubby worked away.}  Feel free to post your questions in the comments section below.  Handy Hubby has agreed to answer anything that pops up.  You may have to give him some time though since he works all day…and helps take care of the kiddos and cooks and puts up with me and my antics.  He is good.

Later this week, I’ll show you the door handles that Handy Hubby added to the barn door recently. They look great!

FYI – I was not compensated in any way for this post.  I just love sharing some good DIY.

images:  1&2) Steve Miller  3-6) Dana Miller for House*Tweaking  7) Crown Industrial

74 Comments

14.February.2011

I adore this!!!!! might need my husband to make me one!! :)

14.February.2011

My only question- how on earth did you get so creative? ;)

14.February.2011

thanks for the tutorial…i’ve wanted to do this kind of door for our (non-existent as of yet ) guest room…!…when the room is built we’ll be sure to follow your awesome instruction!

14.February.2011

I love this so much. I wish it would work for the big hole over my fireplace, but sadly I don’t have enough wall. The door itself though is very inspiring for my application.

14.February.2011

Great summary. Only one correction. I didn’t end up routing out a slot in the bottom of the door for the T Guide on the floor. Instead I had an aluminum channel included in the order, which I screwed to the bottom of the door. Then I slid the bottom front cross-piece down a little so you didn’t see the track from the front (see the first drawing above for the barn door dimensions). Worked out nicely. If you have a solid door, routing the door would work just as well.

14.February.2011

Handy Hubby – I knew I’d miss something. Thanks for your input!

14.February.2011

Money well spent! Anyone with nasty builder grade sliding doors knows that you get what you pay for when it comes to door hardware!

I like the look of the poplar board under the track… that seems like a strategy that you could use in other situations where you want to be secure but the spacing of the studs and predrilled holes are not cooperative.

Love the drawings, too! My son is obsessed with google sketch up, and has used it to made plans for a few of our projects…maybe that’s a bonding activity the boys would enjoy with dad when they are a bit older?

14.February.2011

Hi there, I just found your blog by coincidence and I’m so gonna stay. I love that barn door and your headboard. I bookmarked it, for the time I move out of my little appartment in Hamburg and move into my dream house somewhere country :)

Yvonne

14.February.2011

Emy,
There are several options for sliding doors. If you don’t have enough room for the full door on one side of the fireplace, you might consider using two doors, one on each side.

14.February.2011

I absolutely love this door — the style, the color, the hanging technique… it’s so awesome.

But I have a question about something else I see in your bedroom: What color & paint make is your grey accent wall? It’s such a beautiful, rich color — something I’m looking for. Thx!

14.February.2011

What awesome details to share with all of us. And I married an Engineer. Thank god for his math & DIY skills. ;-)

14.February.2011
14.February.2011

Thanks for the information. We have been looking for slider hardware for a barn door style cupboard that we made. I looked into Crown and then I saw your post. I have asked them for a quote and it’s so expensive even if I pick up. I am only 45 mins from SF. OUCH still 379.31 for 8ft. I may have to go with the Stanley set from the hardware store. Love your bathroom door and headboard.

14.February.2011

Stephanie – Thanks for the link! My readers are awesome!!!! So good at keeping me in the loop.

14.February.2011

Karen – The accent wall in the bedroom is Sherwin Williams Suitable Brown. It looks more brown at night in artificial light and grayer during the day in natural light.

14.February.2011

Carole – Wouldn’t that be something? Three engineers all to myself to plan and carry out all my design ideas!

15.February.2011

Thank you!! This is exactly what we have been looking for!! We are having an addition (400 square feet) built to enlarge our small house (1200 sq ft) as our family of 5 is VERY crowded especially since our old house was 1800 sq ft (prior to a move of 4000 miles). Plus we also have a 1840’s farmhouse located on 60 acres in NY state which needs to be gutted… Once again thank you for all the detailed information!! It will come in handy (plus I am sure my hubby has a number of questions which I know I can’t answer!)

15.February.2011

omg, i’ve had this vision in my head since we moved into our house 3 years ago. we have the same type layout of master bedroom to bath. our opening appears slightly smaller. no room for swinging door (there’s no door at all now). i just put up a curtain. i love this!! thanks for the detailed instructions. my hubby’s handy too! yay. just sent him the link. pam

ps love the grey blanket on your bed!

15.February.2011

Thank you so much for these posts! I have a TV niche that I want to cover with a siding bar door. Well at least that’s Design Plan #437 for the TV niche.

16.February.2011

If you are interested in a more finished look, consider http://www.modernus.com. They offer all the most innovative and current design with the latest sliding technology.

[…] has two posts up on how to create a similar look in your own home.  Check out part one and part two for step-by-step instructions and info on where to get (and how to hang) the hardware.[via […]

[…] L’explication de l’installation sur le mur est un peu plus technique dans la mesure où le poids de la porte doit être compensé par un solide ancrage du rail dans le mur. C’est là qu’on se souhaite d’avoir comme elle un « handy hubby » (mari bricolo) à la maison. Somme toute, c’est un projet relativement accessible pour  ceux qui veulent économiser sur l’achat et l’installation d’une porte coulissante préfabriquée, généralement assez chère. […]

29.March.2011

Hi Dana
Love your barn door!
we did a barn door on our bathroom and just love it.
I added your link as a resource at the bottom of my post, i hope that is ok!
Misty
http://notanemptyroom.blogspot.com/2011/03/bathroom-barn-door-and-other-details.html

29.March.2011

I’m thinking about making a double sliding barn door. How is the track when you open/close the door? Is it noisy? Does the door flop around at all, or is it heavy enough to stay still?

29.March.2011

Nevermind my last comment. I just reread the post and you answered my questions!

03.April.2011

I’m enclosing a bricked patio with screens and large [9ft] screen doors that are framed in cedar. I’m considering using Crown Industrial for the hardware. I do NOT want a floor track because I’m afraid that someone would trip over it going through the patio door opening. The floor is brick so the track can’t be buried into any carpet.

They have suggested the ‘Concealed Stay Rollers’ and ‘Concealed Stay Roller Channel’ and indicate that the doors will NOT swing out. This is how they describe this system working:

[quote]
“The concealed stay roller doesn’t go across the opening. We provide you with the CRSC-14 aluminum channel that is cut the full wide for each door (2@9’). Your contractor needs to prep your door by routing a 1-1/4” x 1-1/4” channel in the bottom of the door. They he will slide each piece of the aluminum in each door. Then attached the CRS-14-2 wheel on the brick floor in front of the wall where the door over laps the wall. When it is done, the door will simply travel over the wheel. Nothing is in the opening.”
[/quote]

My question: Did you consider using this ‘concealed’ floor system… and chose using the floor track instead..??..

05.April.2011

Jann – We did not consider the concealed floor system, as the floor track we have in place is only located along the wall to the right of the doorway {it doesn’t extend in front of the doorway so no tripping concerns}.

[…] From House*Tweaking: […]

29.May.2011

[…] for building and hanging the yellow sliding barn door pictured below (read details here and here).  My fascination with the sliding barn door has been renewed!  Apparently, I’m not the […]

21.June.2011

Does the barn door have a lock inside the bathroom for privacy? If so, what kind?

22.June.2011

Cynthia – No lock on the barn door. Since it’s the master suite, we didn’t feel we needed one. We just shut and lock the master bedroom door if we feel the need to lock ourselves in {which rarely happens}, and the toilet is located behind the shower wall in a water closet for privacy.

28.July.2011

One question my own semi-handy hubby is worried about – how big of a gap is there between the door and the frame when it’s closed? Does it seem ‘closed’ or can you peek in? Thanks – this is really great!

29.July.2011

Jessica – There’s a 1.5″ space between the molding around the doorway and the door. If someone wanted to peek in they would have to stand right up next to the wall that the door is on and look into the gap from the side. Even then all they could see is the window in the bathroom. If you’re worried about peeping Tom’s maybe consider your bathroom and what someone looking through the gap would be able to see. The space has never been an issue for us.

12.August.2011

I appreciate this post hugely. We have a barn door planned for our kitchen, and the hardware has been tricky to figure out. We don’t have a large wall expanse, but enough to have two small doors hung in the same track pull together to close (not overlapping – butting into each other). We’re using two ‘mini’ closet doors that came with our house to make it. I hadn’t ever read about a floor track, clearly a good thing you did this post.

What would you say as to sound? We hope the door will muffle our kitchen/living room area from the bedrooms at night when the kids are sleeping in our tiny house. Does it offer some muffling, or not really much?

12.August.2011

Capucine – The door does block sound and light from the bathroom in the early mornings when HH is getting ready for work and I’m trying to catch a few extra minutes of zzzzz’s. Probably not as much as a solid door but it still works for us!

18.August.2011

Thanks for showing me your awesome project! I am moving into a loft and have been trying to figure out how to build my bedroom wall out of this. Now I know exactly how! Thanks so much! I love the color- it pops. :)

07.September.2011

Just wondering if you can show a pic of the bottom track? I hung a door in my small rental house bathroom using a bifold door track and covered it with a soffit but the bottom swings out a bit. I’m just trying to figure out how to prevent this. Thanks.

08.September.2011

Hi Dana, just wanted to say we liked this idea so much we used it in our own house. See the just finished results here: http://20booth.com/?p=1135
thanks!
Peter

08.September.2011

Peter – Looks waaaaaay amazing! Your space is to die for!

24.September.2011

I’ve been thinking about doing this for our master bath entrance as well, but we have an archway there, not a real door. I need opinions, so weigh in people! Do you think it would look weird to do this in front of an archway instead of a traditional doorway?

04.November.2011

Hi!

I was wondering if you could give us an estimate on how much the track system cost. I am trying to get an idea of whether or not this project is even possible for me and there is no pricing on the website you guys posted a link to.

Thanks so much! You are SO creative!

06.November.2011

Cathryn – As listed in the post, the cost for hardware came in just under $400. Not the cheapest {or most expensive} we researched but it was high quality and kept the door on track with little to no noise.

11.January.2012

Hi Dana
i love your finished product. can you tell me generally, how this type of door is opened from the back side, in your case, from the bathroom?
thank you so much for sharing

11.January.2012

Lili – See the backside of the sliding door here…

https://www.housetweaking.com/2011/02/17/can-you-handle-it/

22.January.2012

Finally! I have been trying to figure out how to attach the hardware to the wall for the longest time! The studs in my house aren’t at equal distances and it has been driving me crazy trying to do this. My hardware will attach from either the side or top so I thought I had figured out how to do it from the top, but this is much easier! Thank you.

24.January.2012

Thanks for the great info.

We’ve got a small place and kids, so saving space is critical. I’ve done a couple of pocket doors for our bathrooms, and I’ve been considering a sliding barn door for our master bedroom—currently, it has no door, just a 60″ opening to the main/great room. The problem is that I’d like the door to seal reasonably well, mostly to keep out noise. Space is tight, so swinging doors are not an option. A pocket door might work, but the maximum opening for such a door is about 48″, and I’d prefer to keep the 60″ width, if possible. So, I was considering using a sliding barn door and constructing a cover for the open door. That is, I’d build out so that the door slides into a “pocket” when open (I hope this is reasonably clear). It seems to me, that this would do a better job of keeping out the noise, since there wouldn’t be any gaps at the edges.

Do you think this would work? Do you think it’s necessary?

20.February.2012

I want to do this in a room that we use for a upstairs den. Currently it has double doors that swing there by rendering that space useless for behind the door. My question is can I keep the existing framing that is there and apply the kit above that frame ? Also should you be able to apply this system to any type of door ?

21.February.2012

Tonnie – I would highly suggest contacting the company we used for our hardware. They will walk you through step-by-step measurements and instructions. We were able to keep our existing door frame and install the kit above it. And since we used a door that we made out of old fence boards, I’m sure you could probably use the kit on just about any door! Good luck!

28.February.2012

Hey there…another question for you on the old barn door post (that I’ve had saved in my file since the day you posted it). I’m planning on doing one over our laundry room door. The only issue I have is that we sometimes leave our dogs (65lb and 50lb in the laundry room (doggie door to the backyard on a door in there). So my husband is concerned that without the track on the bottom in the door space that the dogs would be able to push the door “up”, at an angle. Does that make sense? Does the track allow for that kind of movement? Hope this makes sense, and that you are getting your rest!!

29.February.2012

Erin – There is a bottom track for the door although it doesn’t run in front of the doorway…just along the wall on one side of the doorway. Still, when the door is in the shut position it is engaged in the bottom track. Several times our kids pushed on the door from inside the bathroom when it was shut and we had no problems with the door swinging out or coming disengaged from the bottom track. But they were only 30-45lbs at the time and weren’t really trying to get out; they were just being boys.

I guess if your dogs really wanted to they could probably push on the door’s one bottom corner that isn’t engaged in the bottom track when in the closed position. We don’t have pets, so I’m probably not the best person to ask about this. I would suggest talking to the company that I mentioned above and asking them. They were very helpful to us.

Hope that helps! Good luck!

18.March.2012

I love your door. My husband and I made a barn door out of some long pallet boards. We just bought the galvanized box rail from TSC and are going to paint it black. I am not sure on how to keep the door from swinging out. You mention a channel put on the bottom of the door. I am having trouble finding such a channel. I would like to use the channel with the floor guide like you mentioned, but all I find I’d the big clunky stay rollers. Can you post a picture of the channel you have on your door and details on how you installed it? I would be great full.
You have great ideas! Thank you.

19.March.2012

Connie – Unfortunately, we no longer live in the house with the sliding barn door. {We’re renovating a fixer-upper!} We simply screwed in a coordinating floor channel into the floor {right through the carpet} to the right of the doorway when looking from the bedroom to the bathroom. That way, the door didn’t swing out from the bottom but we didn’t have a floor channel acting as tripping hazard in the middle of the door way. The channel was so small, it was concealed within the carpet. You’d have never known it was there by just looking.

Hope that helps!

19.March.2012

Do you know where I could get that channel?

03.June.2012

where do you buy the bracket

[…] how to build the door (Part I) and how to mount it (Part II) from Dana at Housetweaking.  Thanks Dana! Building An Interior Sliding Barn Door […]

30.August.2012

Thanks for posting such great tutorials. I’ve been wanting to find an easier way to mount a door into our master bathroom and your posts have really made this project seem doable. I’ve included a link to your site in my post today related mounting sliding doors. Thanks, Angela @ Mrs. White Twig & Tea

29.September.2012

I am so excited about this post. It is exactly what I was looking for. LOVE DIY posts. My husband was curious about one thing though, is it loud? I get up earlier then the rest of the family to get ready and he was concerned that we’d be exchanging bright bathroom light for a loud banging door. What have you observed? Thanks for you help!

15.February.2013

Gee, cut the hardward cost significantly by making your own track and door hangers… It is just unbelieveable the cost being charged for the hardware.

09.April.2013

Not sure if any of the previous comments have asked. Our master suite also has an open bathroom but water closet for toilet privacy. We are debating about adding a full door, pocket door, or barn door. I really like the barn door for decor reasons but am also really wanting light and noise reduction for early morning or late night when one of us might be sleeping. Is the “roaring” pretty loud? Does it reduce the other distractions enough since that is the point of us adding a door? Thanks so very much!

09.April.2013

The sound of sliding barn door {in our previous house} did wake me up but I’m a light sleeper by nature.

31.May.2013

Hi. Is there a way to lock the door? My husband and I want to use it between our master bedroom and not quite private bathroom. There’s another door leading from the hall so guests will also use the same bathroom.

31.May.2013

No lock.

11.June.2013

Love your teamwork with Handy Hubby! I have an engineer HH, too, and love that he can build whatever I ask him to! We have a huge 9′ opening we want to cover with three doors (ganged together–I think that’s the correct term) to act as one giant door. I’m trying to imagine if pulling one giant door would be a problem. I’m actually trying to imagine lifting it (as one piece) onto the track!Can you think of any problems I would encounter so it wouldn’t work? I’d love to hear any thoughts or advice you have for me? Thanks for the recommendation for Crown, I hadn’t checked them yet.

19.September.2013

Would you please post a link with purchase information for the rail and wheels? Thank you.

08.March.2014

I wanna do this to my bedroom but I’m sure my dad won’t pay 400 dollars for the slide rail. Are there cheaper ones out there???

17.August.2014

After you hung your hangar for the barn track into the studs, what did you attach the track to? (1×4 and????)

Thank you in advance for your response!!!!

08.September.2014

I just purchased this exact set from Home depot for 149.00! What a deal. I am having someone install it for me and I will have to buy another door. The previous one has a hole in it from the door knob. Unless I use it as a dummy pull to slide the door open. I have tile on the floor so I don’t think I can screw into the tile without breaking it.

08.September.2014

home depot 149.00

[…] House Tweaking: DIY Sliding Barn Door: Part II […]

[…] Check out the full DIY tutorial HERE […]

28.October.2015

Now that this has been up for a while, can you tell me how well it muffles noises from another room? We are thinking about installing one over the opening to our laundry room to muffle the noise from the machines. I don’t expect it to completely shut out the noise, but if it makes any difference, I’d be happy.

04.November.2015

You’re right. It muffles but doesn’t completely block sound.

03.April.2016

Hello. We installed interior barn double doors that meet in the middle. Although the bottom of the doors meet perfectly. The top of the door so not meet. We can’t figure out what we did wrong. Hoping u can help.

05.July.2017

My barn door is loud. I am looking for a solution to quiet down the sound it makes when opening and closing. I am thinking of putting weather stripping down into the track. Any better ideas?