...because home doesn't happen overnight.
02.03.11 / Against The Grain

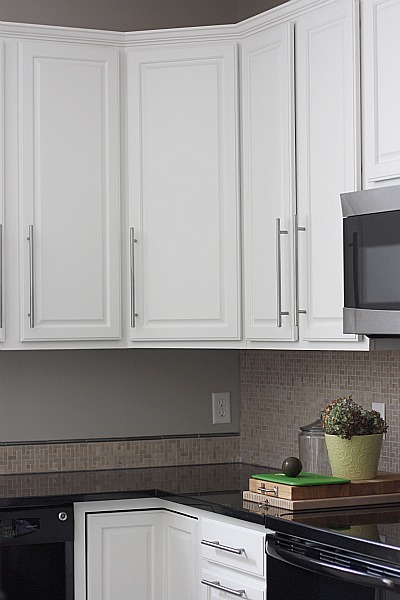
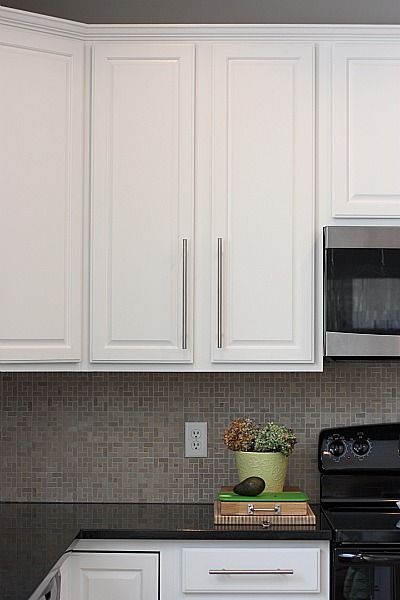
We painted our builder oak cabinets white nearly a year ago, but I still get so many questions about them.  Aside from how we did it, I usually get asked about the results.  Specifically if the wood grain is noticeable.  The short answer is ‘yes‘.  The texture of the original wood grain does show.  The long answer, though, is ‘yes but only under artificial light when looking just the right way.‘  I took some pictures to demonstrate.

When looking straight on in natural light, the cabinets look like this…

Pretty much like they were white all along, right?  When looking straight on under some artificial lighting, they still look smooth and white with a touch of warmth from the recessed lighting.  See…

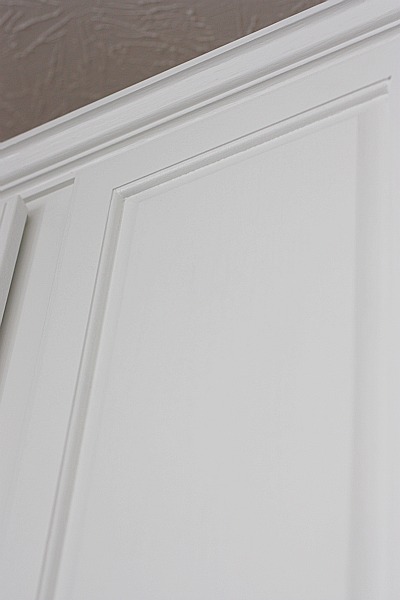
Here’s a close-up in natural light, looking up at an upper cabinet…

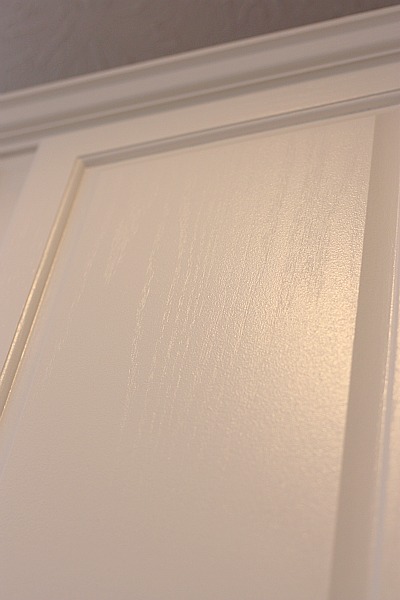
Still nothing very noticeable.  The only time the grain is noticeable is when you look up at the cabinets under artificial lighting…

Basically, the only time we see the wood grain is when we stand at the oven preparing dinner, get bored, lean forward and inspect the upper cabinets.  {Which we did a lot at first after we painted them because we were newly enamored.}  But, honestly, we don’t do that anymore.  We don’t pay much attention to the grain.  When we were still researching the process of painting the cabinets, we read about using some sort of roll-on filler {Brushing Putty maybe?} to fill in the grain.  However, we weren’t turned off enough by the idea of the grain showing through to include that step.  It looked pretty labor intensive for something that wasn’t going to bother us that much. I can say for a fact that I wouldn’t change anything about ’em.  So, if you’re considering painting your wood cabinets, I hope this helps clear up all the hype about going against the grain.  Literally.

FYI – It’s probably worthy to mention that we used Sherwin Williams oil-based primer tinted to Greek Villa along with Sherwin Williams latex enamel paint tinted to Greek Villa in a semi-gloss finish.  We applied both with small foam rollers, using a 2″ trim brush only in tight spots, to keep brush strokes at bay.  For more info, check out this post and its comments section.

images:  all Dana Miller for House*Tweaking

22 Comments

03.February.2011

THANK YOU for really explaining your results instead of the standard, “They look great!” explanation! Awesome!

You make me want to paint my cabinets. But do I have the guts?! Hmmm…..

03.February.2011

We were actually thinking of painting ours white (ok I was but the fiancee would go along with it), the only thing is that our appliances are also white (microwave, oven, fridge). Would the two whites contrast too much? Our counters are black like yours and the backsplash is travertine. What are your thoughts?

03.February.2011

Thanks for the details! Your kitchen is beautiful. I have the same oak cabinets you used to have and have been debating on whether or not I should paint them. I love the look of white cabinets but am still afraid of taking the big jump. I’m worried that it will be an insane amount of work and that we wouldn’t be able to pull off a professional look. How long did it take you to paint all of yours? Would you go through the process again? Any tips would be super appreciated!

03.February.2011

Oh gosh, this post makes me nervous and excited all at the same time. It’s my next “big” project and as badly as our kitchen needs it- it’s scary to take that plunge!

I really appreciate all the tips, hints, and points for this project. More than you know.

03.February.2011

Shelby – I’ve seen some fab all white kitchens! I think you’d just need to be careful about choosing a white paint. Definitely bring home tons of samples to see how they’d look next to your appliances. I haven’t seen your kitchen, but you could always paint them gray or a nice gray-green too!

03.February.2011

Jenny – From start to finish, it took us 2 months. We obviously didn’t work for 2 months straight. We had to take a lot of breaks in between {for Thanksgiving & Christmas as starters} to let paint dry, go to work, keep up with the kiddos and sleep! Definitely the hardest part is prepping…deglossing, sanding, cleaning, taping off. Then several thin coats of primer {sanded lightly between coats} followed by the paint {several coats sanded lightly in between also}. The drying/curing time is key so that you get a good durable result. I’m not gonna lie and say it was clean and easy. It was pretty messy and tedious. HOWEVER, I would do it all over again knowing what the end result looks like! Handy Hubby and I constantly say, “why did we wait so long to do it?”

03.February.2011

Tami – We were just as scared and nervous right before the first brush stroke. But as soon as we got the first coat of primer on, it looked better already…and it wasn’t even even…if that makes any sense. Just read up and prepare before you do it. And take your time. It’s not a race!

03.February.2011

Perfect! Just what I was looking for. Thanks so much for the close-up pictures and further explanation regarding selection of primer, paint, coats and timing. You have convinced me even more to take the plunge and turn my orangey-oakish cabinets into their beautiful white counterpart. Here goes nothing…

04.February.2011

Unrelated to the post…but I noticed your stacked cutting boards. Did you add those handles yourself? Brilliant idea. I am a new reader so you have have talked about this before. I love the painted cabinets. My mom did this in her house also and I couldn’t believe the difference.

04.February.2011

before we painted our cabinets, we did some test samples on the inside of the door with different types of rollers. Rollers with different “naps” (think roller hair length!) make slightly different textures on the surface. We chose a low-nap roller (1/4 inch, I think)–but that might not suit everyone. However, when we painted our fake-wood bedroom doors, I think we used a longer-nap roller to help hide some of that awful fake woodgrain!

04.February.2011

Jeny – One of the cutting boards {the thickest one} was actually left over from the butcher block countertop we installed onto our island. Handy Hubby added the handle. Read all about it here…

https://www.housetweaking.com/2010/09/21/gettin-a-handle-on-things/

04.February.2011

On the subject of roller nap, the foam rollers really work nice on smoother surfaces. They leave a very slight texture (see the last pic), but it’s uniform across the whole surface and gives them some softness. One thing to note when doing raised panel doors like these, make sure to roll (or ‘strike’) the flat surfaces off one final time while it’s still wet … to get rid of any brush strokes leftover from painting the recessed sections. Oh, and if you are painting your cabinets a light color (like white), it helps to caulk the recessed cracks before priming. If not, the dark cracks will jump out once they’re painted … and no one wants to see your crack ;)

04.February.2011

Yeah, I don’t see the harm in noticing the grain at all anyway! The kitchen as a whole looks fabulous and seeing the grain/not seeing the grain doesn’t detract from that in my opinion though I understand wanting them to be as smooth as possible.

04.February.2011

Handy Hubby – Look at you!…all jumpin’ in on the commenting action and making jokes. The Steelers must be in the Super Bowl this weekend ;)

04.February.2011

I always thought that if you used oil based primer and painted over with latex that the latex will peel off. Did you do something special to prevent this?

04.February.2011

Elizabeth – You actually can use an oil-based primer with latex paint overtop. Just make sure that the oil-based primer has dried completely before painting. When painting over oil-based paint with latex paint, you must use oil-based primer in between.

04.February.2011

I have the exact same cabinets and I just flipped when I saw how beautiful yours are now! I want to do this to mine!!

I have one question: The woodwork in the room is white, and all the appliances are white. However, they’re not the same shade of white. The woodwork is a bit more creamy. I was thinking about painting the cabinets the same real-white as the appliances, but now I’m leaning more toward the woodwork color. That way everything would match when the appliances are changed out.

Match the woodwork, or match the appliances. What do you think?

Thanks for your help!

Elaine

04.February.2011

Elaine – If you like the trim color, then paint your cabinets accordingly. If you will be replacing the appliances in the future, then I probably wouldn’t try to ‘match’ their current color. Another option would be to paint your trim and cabinets white. I know it doesn’t sound fun {i.e. lots of work!} but it would keep things cohesive. Good luck!

04.February.2011

I just painted my bathroom cabinets. I sanded, deglossed, used an oil based primer and a latex paint made specifically for cabinets. I like how they turned out, but don’t love them. I made the mistake of trying to match my cabinets to my doors and trim which are white with a greyish under tone. It is not obvious in the trim or doors, but super obvious in the cabinet because they are pretty shadowed. Oh well, I am not painting them all over! I have had one or two small dings in my paint already. How have your kitchen cabinets held up? Did you put a poly coat on them? I have been thinking about doing my kitchen cabinets as well, but am worried about them getting too dirty with cooking and little kids. If I do them I think I will use an oil based paint instead so it is super duper durable and scrubbable (is that a word?!).

04.February.2011

Erin – Our cabinets are holding up nicely. I think the reason may be that we splurged on an enamel latex topcoat. {No poly because we didn’t want it to yellow.} It’s super durable and wipeable. I have gone around once with my paint can and touched up a few dings, but nothing awful. I’d do it all over again in a heartbeat! Did you use a semi-gloss or gloss finish? That is easier to clean as well. Ours is a semi-gloss enamel latex topcoat.

07.February.2011

I actually prefer the woodgrain showing if you look closely…anything too completely flat and it starts to look like laminate.
I painted our kitchen cabinets white, and it’s held up super well. However, we used oil based paint (Benjamin Moore Satin Impervo), and I’m not sure I’d do that again, it has definitely yellowed. I would try Ben Moore’s latex Satin Impervo. I love the sheen of the Satin Impervo, but the oil based is a pain, and as I said, it yellowed.

18.January.2012

I just painted my kitchen cabinets white just like House*Tweaking did (all the same steps except I didn’t sand between primer and paint) and I LOVE, LOVE, LOVE my new white cabinets! I would do it all again in a heart beat too! I also changed my interior paint color from yellow (Ralph Lauren’s Tangier Island) to Bonsai and Castle Path ALL because of finding H*T! I’m am SO happy with the fresh, clean, new brighterness (is that a word?) of everything. I also changed my bedroom and I’m planning a big trip to IKEA soon..Thanks H*T for all the great inspirations and showing me HOW to get the look I’ve always craved. I do have to say though that my husband is not a fan…lol. He doesn’t see the point of interior decorating. He’s and engineer too, but not really as ‘cool’ as Handy Husband! Thanks again!