Obligatory preamble rambling: When we were renovating our kitchen, I searched high and low for any information I could find on Ikea kitchens. The results were few and far between. We did end up with an Ikea kitchen (which we love) but I’d like to shed more light on Ikea kitchen renovations from the perspective of other real life homeowners. It’s something I wish we would have had access to when we were considering Ikea for our own kitchen remodel. Plus, it’s fun to see how others use Ikea to suit their personal style and needs in the kitchen. I hope you find these posts helpful and inspiring – whether you ultimately end up with an Ikea kitchen or not. Enjoy!
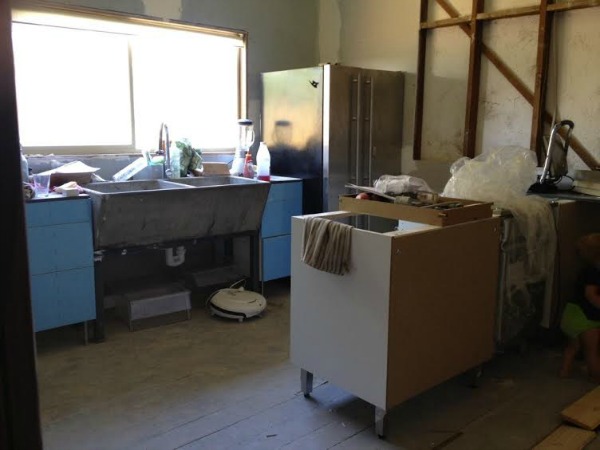
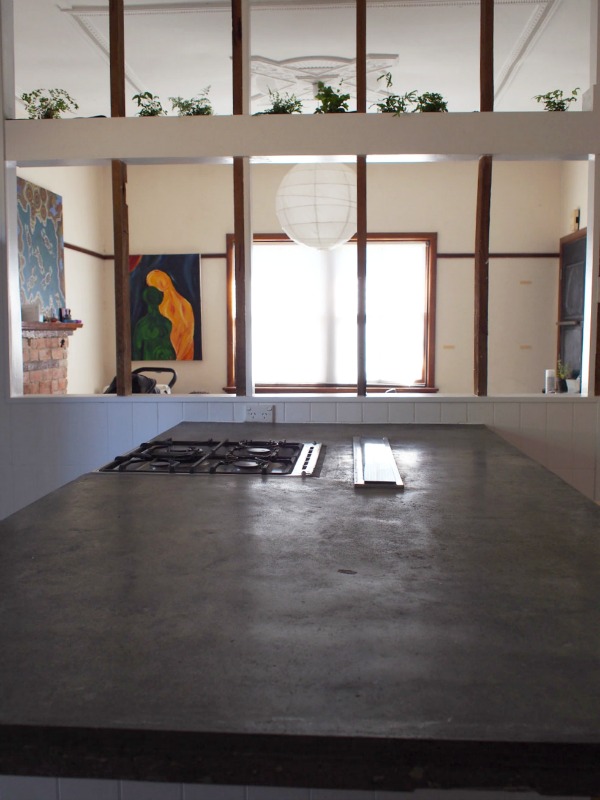
Lila describes the “before” of her kitchen in rural Australia as small, cold and clinical. With inadequate storage and an awkwardly placed (and inoperable!) wood stove, the space wasn’t working as well as it could be and it didn’t reflect the family’s warm, organic style. On a tight DIY budget, Lila and her husband used Ikea cabinets and a healthy dose of ingenuity to create a unique but warm kitchen. I had the pleasure of interviewing Lila about her kitchen renovation. Find her answers and the inspiring “afters” below.
Which items in your kitchen hail from Ikea?
Most of our cabinets are from Ikea – except for the ones we custom built for awkward spaces (i.e., under the sink and the narrow space between the dishwasher and the wall).
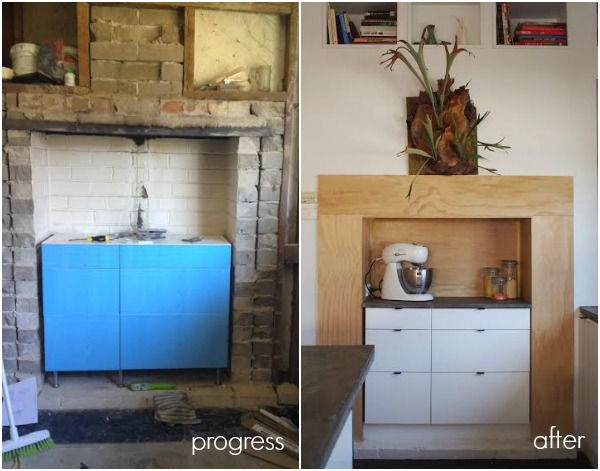
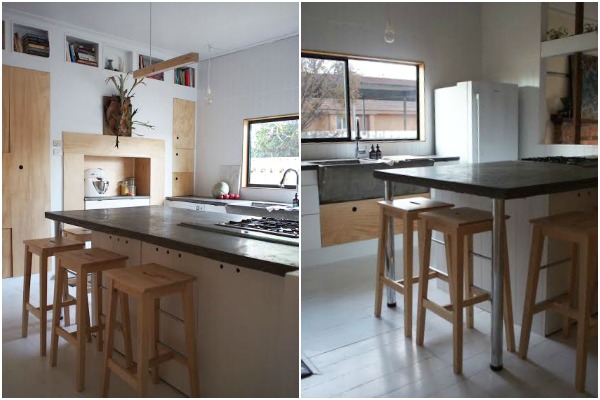
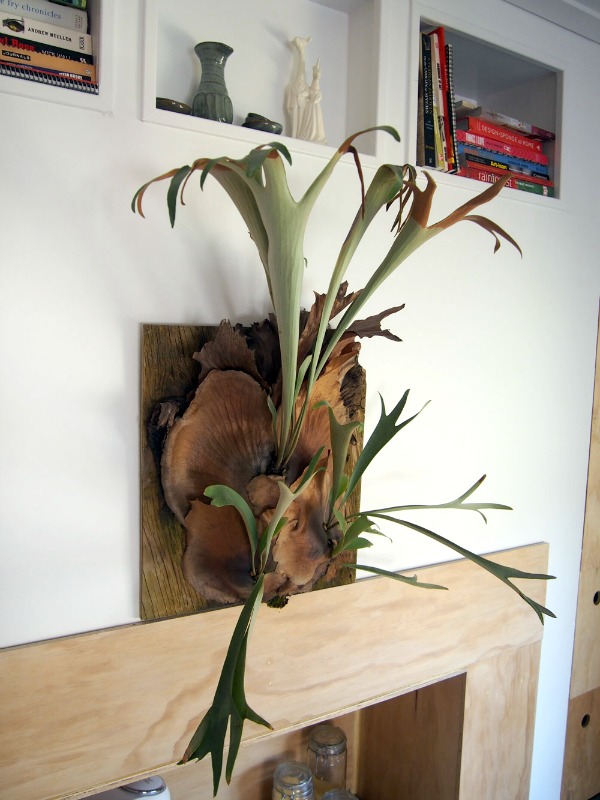
The cabinets in the non-functioning fireplace are narrow cabinets from Ikea. It was fantastic to find off-the-shelf cabinets that fit to give us more storage. They hold all of my baking spices, ingredients and tools.
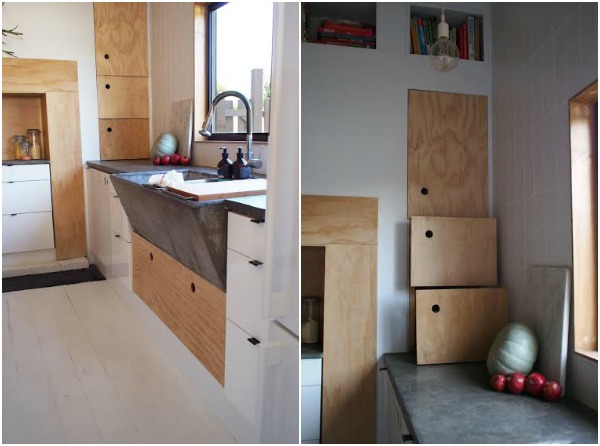
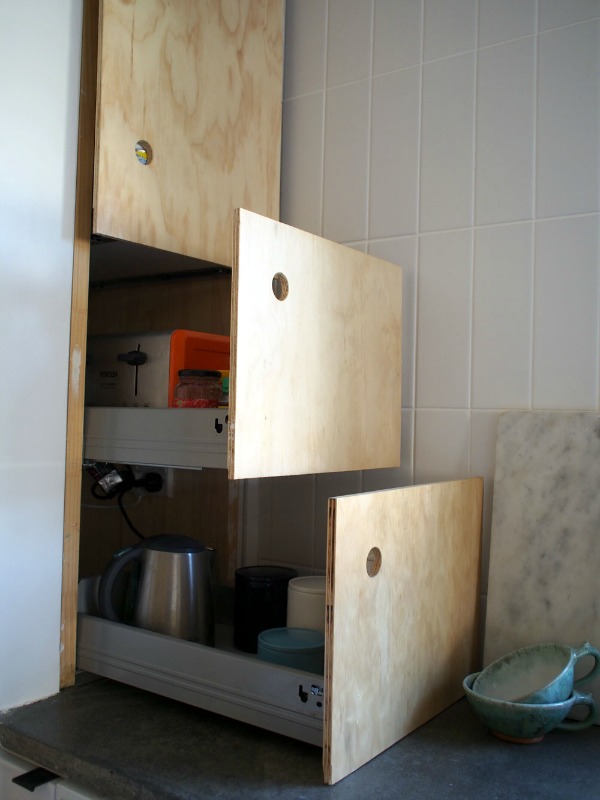
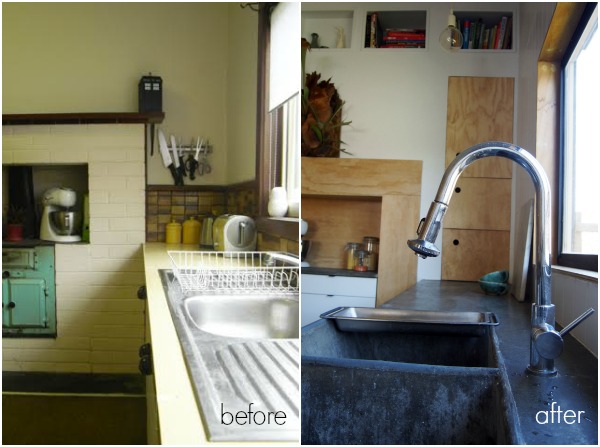
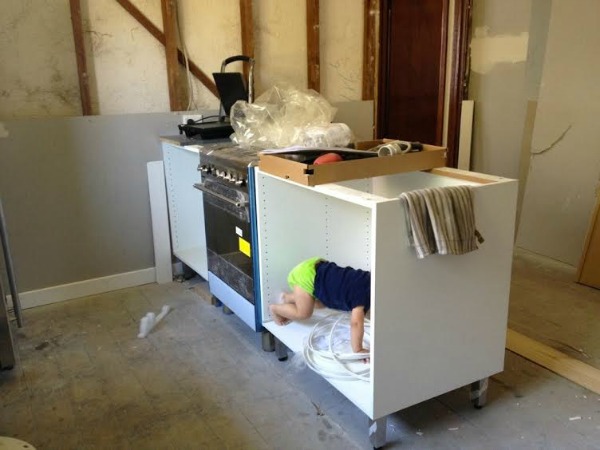
Because we chose to install such a large sink (it was originally the laundry trough in our exterior laundry), we bought the DOMSJÖ colander and chopping board to place over one sink, enabling it to double as a work surface. We used Ikea drawers and made our own plywood fronts for the appliance drawers which house our kettle, toaster and blender. We have Ikea drawer organizers that we’ve used not only for cutlery and utensils but also to keep my spices close at hand near the stove.
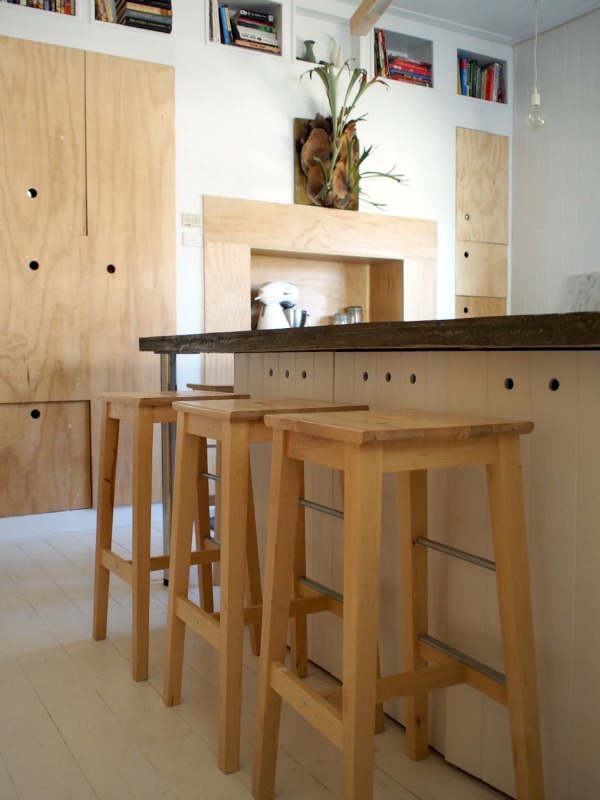
We purchased the BOSSE stools as our island is essentially our dining table. Our home is <900 square feet. The kitchen isn’t only a kitchen; it’s a dining room!
What made you decide to source these items from Ikea?
It had a lot to do with budget. We are renovating our house week-to-week without borrowing additional money to do so. I also felt the cabinets were of higher quality and more attractive than what a local cabinet maker could have produced. Not to mention, with Ikea we could save money by doing the labor ourselves.
Who designed your kitchen? What aesthetic were you aiming for?
We designed our kitchen ourselves. We were going for warm, organic and industrial with a slight Scandinavian feel.
We designed the kitchen into zones so that items are grouped according to function. To the left of the oven are knives, cooking spices, pots and pans; to the right are the glasses, cutlery and plates for serving food.
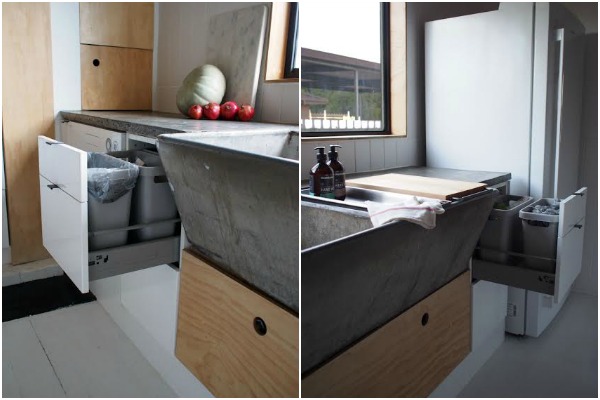
We installed trash pull-outs in between the sink and dishwasher so plates are easily cleared before washing. We grouped the kettle, coffee and tea brewing needs, the toaster, the spreads (jellies, jams) and the blender along with everything my husband needs to make his protein shakes. And, of course, my baking station holds all the things I need when I bake with my stand mixer plugged in and ready to go. It was important to us that these things were easily used but just as easily hidden when not in use. It keeps the small room feeling clean, uncluttered and spacious.
Did you assemble and install all Ikea kitchen components yourself? If not, what did you seek help with?
Yes, we put it all together ourselves. It was pretty straightforward and fast…and cheap! I know a lot of people find assembling flat pack stressful but I actually enjoy it.
How did you customize your Ikea kitchen to suit your needs and preferred aesthetic?
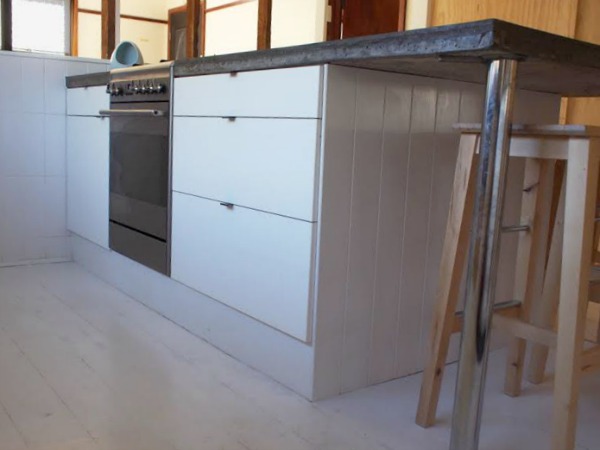
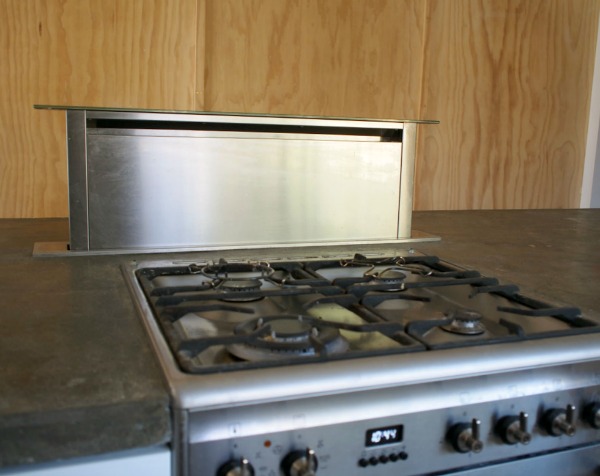
We used plywood fronts on some drawers, poured our own concrete countertops and wrapped the island in vertical join board to soften the high gloss fronts that we chose from Ikea. Choosing countertops from Ikea wasn’t an option because the closest Ikea is 400km (approximately 250 miles) away, making transporting items like countertops dicey.
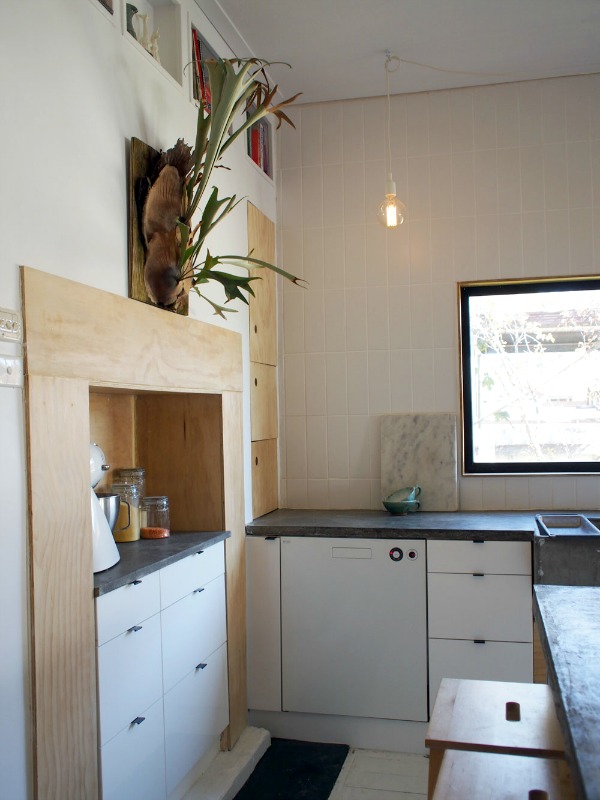
We chose to tile vertically to the ceiling with matte white subway tile. The bones and organization of the kitchen are Ikea but we’ve blended it with a variety of other materials to avoid the dreaded “straight from the catalogue” look.
How long was it from design to the final product?
It took about 17 months from concept to finish. We had quite a few hiccups along the way with asbestos found in walls and discovering the floor mostly missing under the original cabinets. We only worked on weekends and some evenings which also stretched the build out.
How long have you lived with your Ikea kitchen? Have you encountered any problems?
We’ve had the cabinets in for over a year and they have been fantastic. We originally had drawers to the left of the oven but ended up removing the bottom two drawers and replacing them with a door because the 60cm (~24″) cabinet wasn’t the best choice for housing my pots and pans. I also failed to allow enough space between those drawers and the wall and they would brush against the wall tiles when we used them which drove me insane. If I could go back in time I would have put the 80cm (~32″) drawers there instead and allowed enough room!
What is your favorite thing about your kitchen? Least favorite?
That it’s finally finished! But really I just love that it’s white and fresh but not cold and clinical.
I hate the chrome faucet and the legs on our island but replacing them would be really expensive so at the moment I choose to ignore them. One day I’ll switch them out with something nicer.

Would you recommend Ikea as a source for a kitchen remodel? If so, which items?
Absolutely, I’d recommend the cabinets and organizing accessories. I haven’t used other items but I’d expect them to be great too considering how good the products we have are.
Would you consider Ikea for a future kitchen remodel?
I would use Ikea again in a heartbeat. I can’t speak to the quality of the appliances or countertops but the cabinets and organizational stuff are fabulous. They’re better than some of the custom made items I’ve had in previous houses.
Resources of note:
ceiling, wall and trim paint – Dulux wash and wear in White on White
floor – Feast Watson floor paint tinted to Dulux White on White
wall tile – Beaumont tiles, 300 x 100 Satin White
island light – Tradition Blasted KL1 Lamp purchased from Great Dane Furniture
other lights – Muuto E27 in white purchased from Surrounding
dishwasher – Asko D5424 (it’s a fantastic dishwasher!)
oven / stove – Smeg 60cm dual fuel
downdraft – De Deitrich
refrigerator – Samsung
plywood – from local hardware store
countertops – DIY hand poured concrete
Thank you so much, Lila, for sharing your darling kitchen!
What a creative use of space, right?! It’s unlike anything I’ve ever seen. The fireplace turned baking station, the appliance garage, the automated downdraft in the island, the ceiling height book niches…they’re all such clever ideas for a small kitchen. I love that Lila and her husband put their own spin on things by DIYing plywood fronts and concrete countertops. And don’t even get me started on that trough sink. THAT SINK! You can read more about Lila and her commitment to savoring life’s little things over on her blog.
If you’re in the mood for more Ikea kitchens, check out the rest of this series:
An Ikea Kitchen in the SF Bay Area
An Ikea Kitchen in Northfield, Minnesota
An Ikea Kitchen in Orange County
An Ikea Kitchen in Texas Hill Country
An Ikea Kitchen in a Barn (in France!)
And if you have an Ikea kitchen (it doesn’t have to be 100% Ikea) that you would be willing to share on House*Tweaking, please email me at housetweaking@gmail.com for consideration.
P.S. – Thanks to everyone who has already submitted an Ikea kitchen. I really, really, REALLY appreciate the time and effort you’ve put into bringing these posts to fruition. I have a slew of Ikea kitchens sitting in my inbox waiting to be featured. I apologize for the lapse in time between submission and the post going live. I’m buried in Ikea kitchens – in a good way! Keep ’em comin’!
images: Lila at Little Wolff


budget decor, DIY, IKEA kitchens, inspiration, organization, renovation