We’ve been living with TWO bathrooms for almost a year. It still feels like a luxury after sharing one bathroom for nearly three years. I get a lot of questions wanting to know how the main bathroom is or is not working for us. Now that we’ve lived with it a while, I thought it might be helpful to share my thoughts on the space: things I’m loving, things I would change if I had it to do over and how I’m keeping the room looking as good as new. (Hint: It has something to do with The Honest Company and their promise to deliver safe and effective products at an affordable price point. I’ve been using their products for years on my own, unsolicited, and am happy to share a discount from Honest at the end of this post. If you aren’t interested in the offer, feel free to skip it but I hope you still find this post helpful when/if you’re brainstorming a bathroom renovation.)
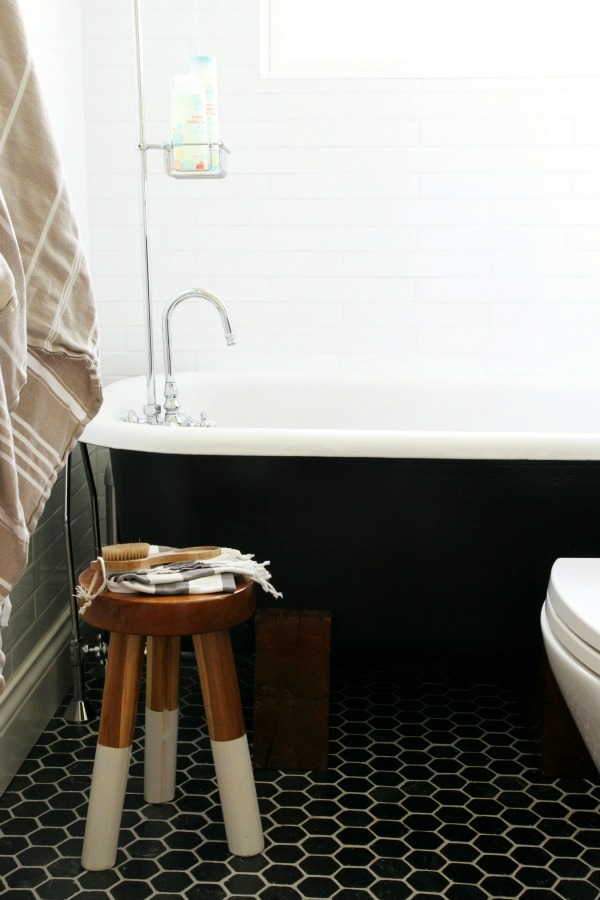
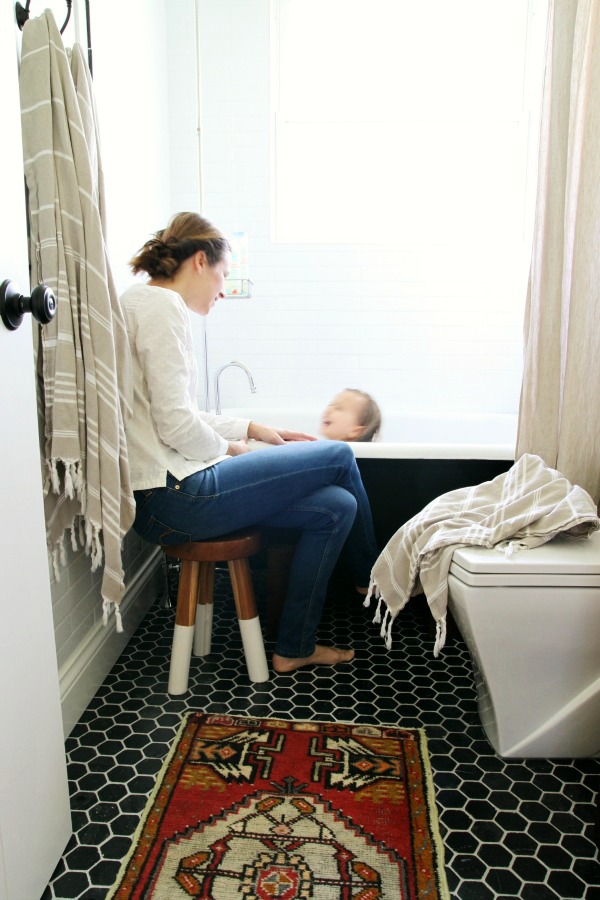
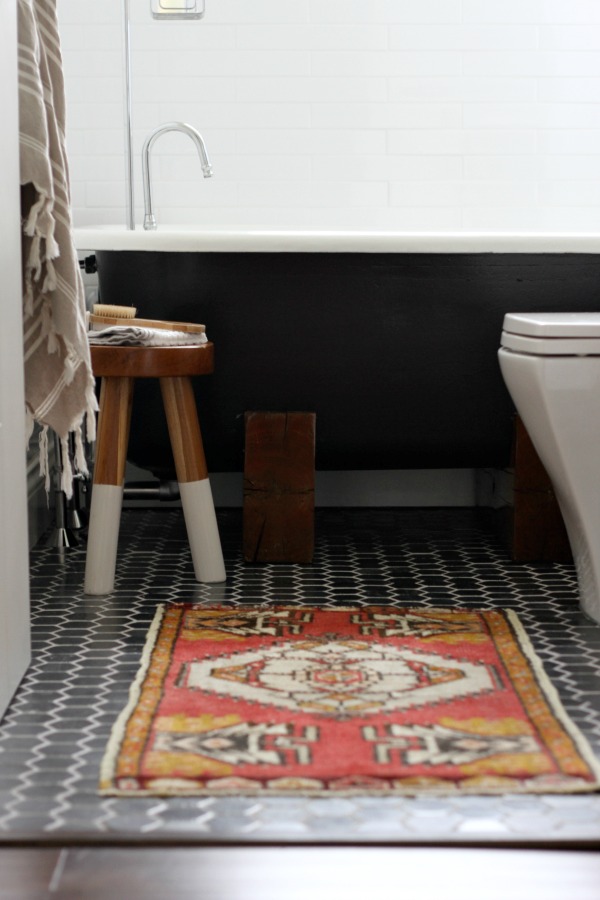
First up, the tub and its DIY cradle base are solid. We LOVE them. I was really nervous about losing the claw feet and adding the wood base (which we kind of made up as we went) but the setup turned out beautifully. Steve did a superb job contouring the wood cradles to match the profile of the tub because the tub hasn’t budged, not even a wiggle. The cradles are protected with Waterlox so inevitable bath time splashes aren’t a problem. I’ve only managed to take one bath in the deep tub but it was glooooorious. It needs to happen again. And I’m even not a fan of baths. Scratch that. I made it happen last night.
Many people warned us about cumbersome showers in an old cast iron tub, claiming water would spray everywhere and the curtains would stick to wet bodies. Surprisingly, neither of those things have been an issue. As long as we remember to close the curtain (there are actually two separate liners that enclose the entire tub), water from the shower head stays in the tub. Using liners with weights along the bottom and running the ventilation fan during showers prevents the liners from billowing into the shower and doing that annoying curtain-to-skin-contact thing.
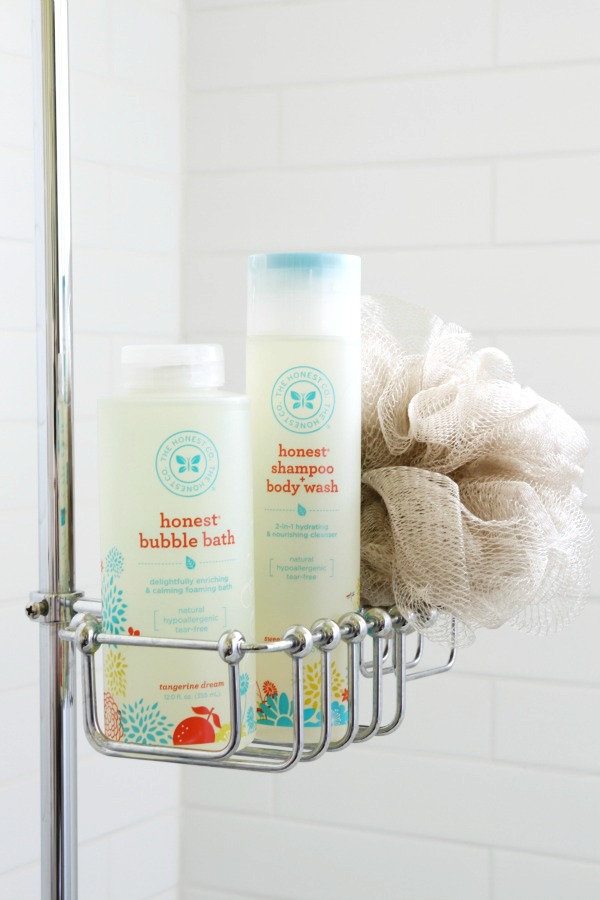
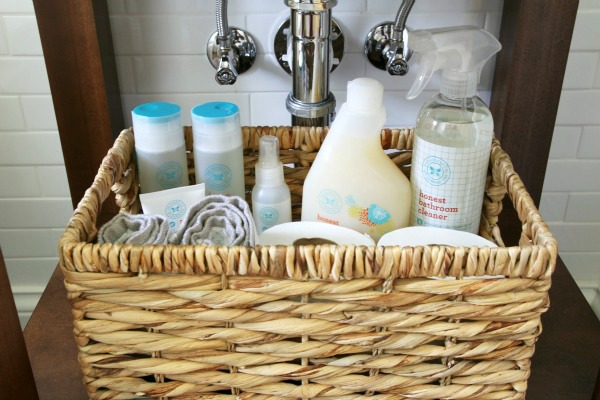
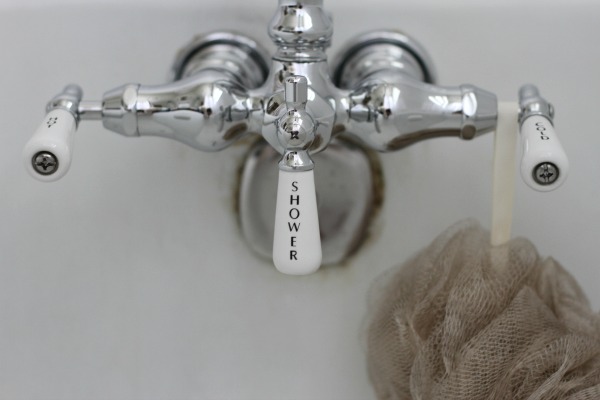
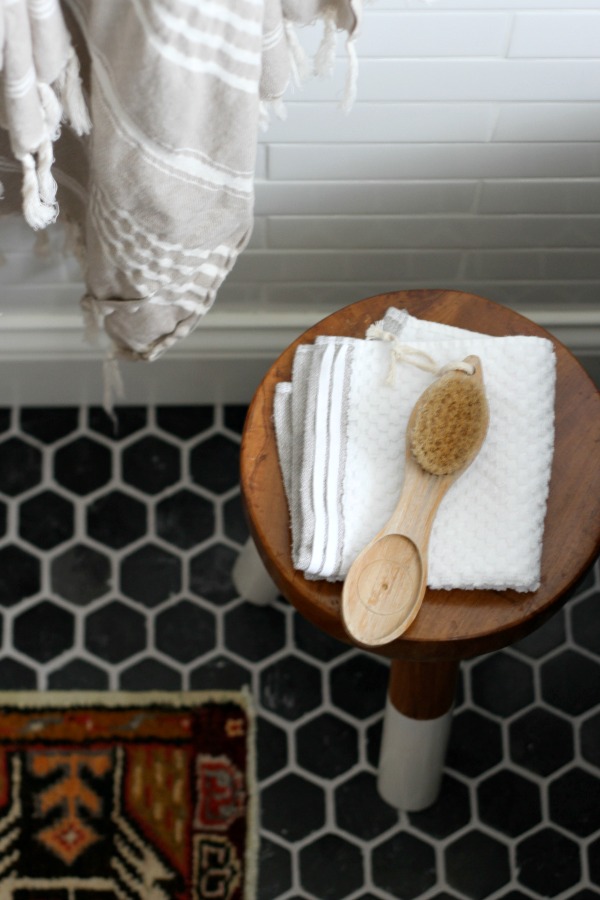
If there is one thing I would go back and change, I’d add recessed wall niches near the tub, if possible, to hold toiletries. As is, we only have a small rack on the plumbing kit. It’s big enough to hold the kids’ shampoo + body wash and a bottle of bubble bath from The Honest Company but it would be nice to have a little more room for rinsing cups and guests’ toiletries.
By the way, we’ve been using the shampoo + body wash as a family for years and I can’t recommend it highly enough. Steve even uses it. Real men use body wash. Ha! Obviously, the combined function is ideal for small bathrooms. It’s one less bottle in the shower. It’s naturally tear-free (it contains no added numbing agents like other tear-free products) and super gentle which makes it perfect for kids AND color-treated hair. Plus, it smells delicious. My favorite part, though, is that since it is soap-free we don’t get the nasty pink build-up caused by bacteria feeding on residual soap scum. It’s a win-win-win situation.
One thing that was a little unexpected is the height of the shower head. It’s slightly lower than what we’re accustomed to. It’s because the floor of the tub is higher than a standard tub or shower pan, and the ceiling is 8′ so we didn’t have extra vertical space to work with. It’s not a deal breaker, just something we’ve noticed. Steve and I have taken showers in the bathroom with no problem. Oh! And we remedied the leaky shower head. The company sent us a replacement. Problem solved.
Overall, I would do this whole tub / cradle base / shower setup again but I’d consider the addition of a wall niche or two.
I wouldn’t change a thing about the wall and floor tile. I’m so happy we took the subway tile to the ceiling in the tub area and then carried it around the rest of the room at a height of ~41″. It’s super easy to wipe down and, with kids, that’s definitely a pro. I’m also glad I threw in the pencil liner detail at the last minute but, in my opinion, the best part of the bathroom is the hex tile on the floor. It was an absolute pain to install but totally worth it in the end. The black travertine hex paired with a light gray grout has proven to be extremely kid-friendly. Our boys seem to be, um, distracted when using the bathroom. Still, their stray streams (if you catch my drift) haven’t discolored the tile or the grout.
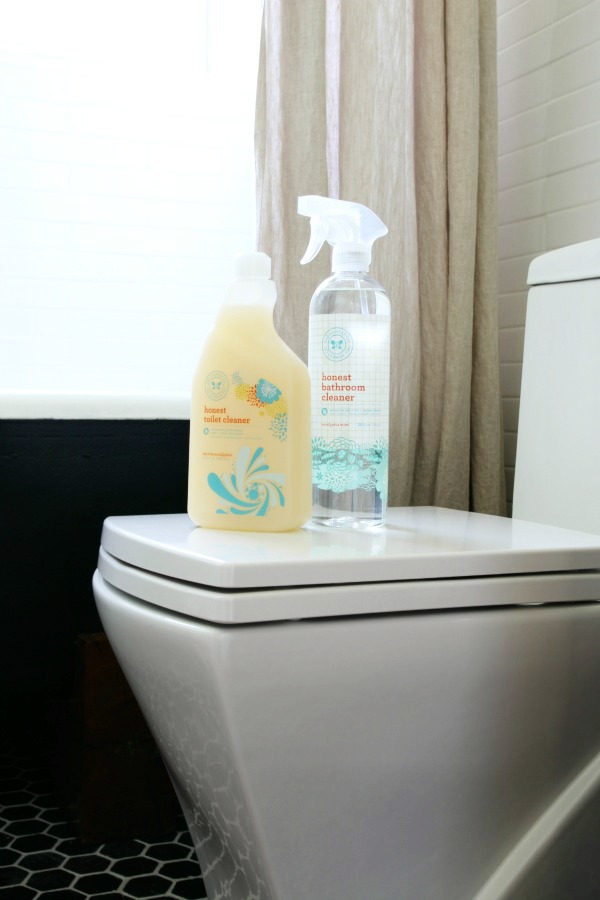
After trying various store-bought and homemade cleaning solutions on the travertine hex with subpar results (I was usually left with a hazy film on the matte tile), I turned to Honest‘s bathroom cleaner and couldn’t be happier. It cleans mean and smells nice.
As for the square toilet, it’s a good thing it’s cute. It’s comfortable to the tush (inquiring minds want to know) and I love the modern shape against the old tub, but I didn’t even consider how difficult it would be to clean the interior of a square toilet. (!) Without giving away too many repulsive details, the corners can get pretty gross. I avoid chemical-based toilet cleaners because I like this planet we live on, but my homemade concoctions were no match for this toilet. I needed something thicker that could be easily directed toward the offending corners. Enter Honest‘s toilet cleaner. The natural ingredients work like a charm and have the faintest, most pleasant eucalyptus scent. It’s the best. Ever. Hands down. Seriously. HAVE YOU ORDERED THIS TOILET CLEANER YET? Yes, I’m attempting to proselytize toilet cleaner. This is what happens when you own a square toilet. My only words for someone considering a toilet with a square bowl are “How bad do you want it?”
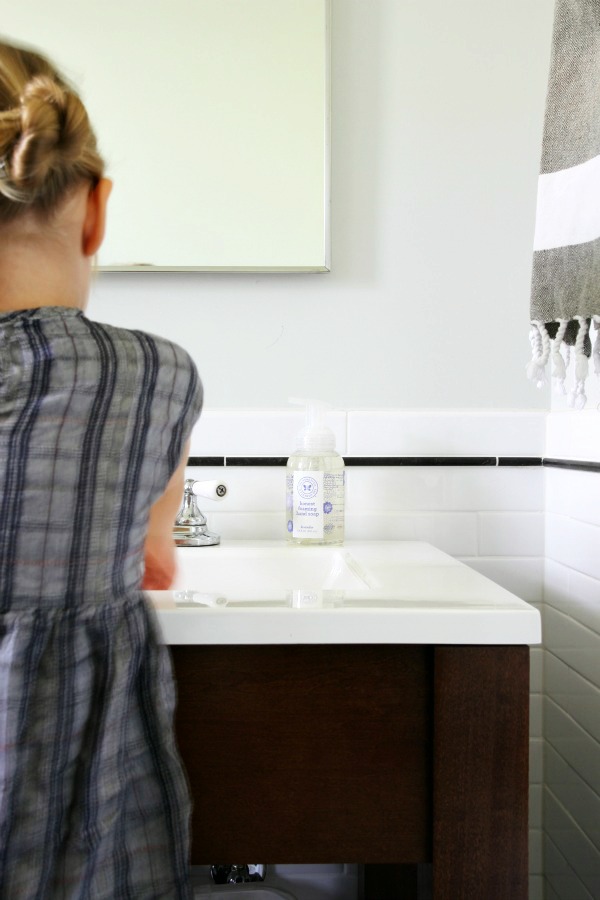

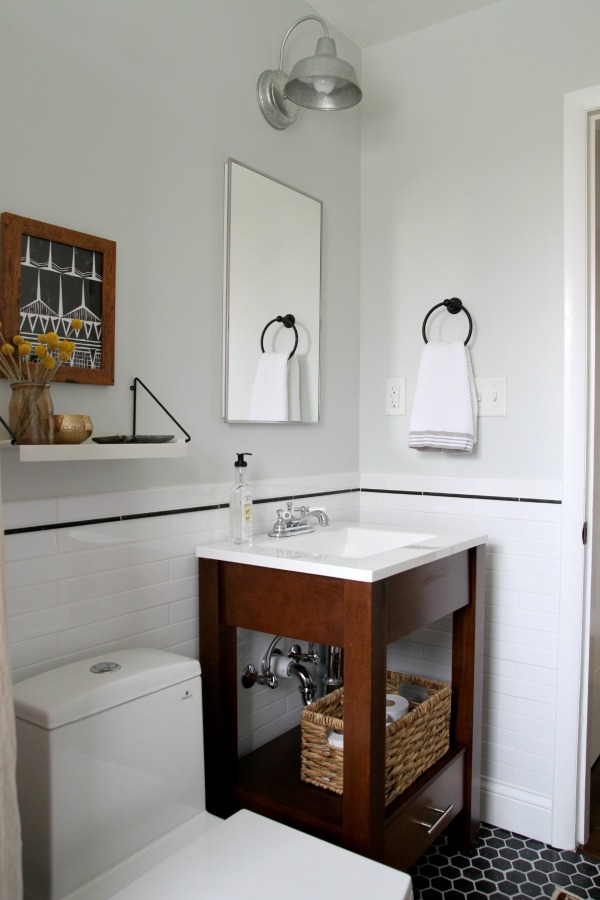
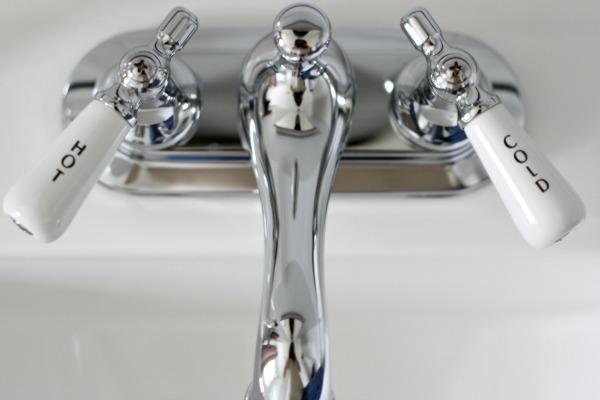
I wasn’t sure how the double handle sink faucet would go over with the kids but it’s worked well. If anything, we’re using less hot water because it’s easier for them to just turn on the cold. I’m NOT a fan of the vanity. Save for a basket (which I added) and a small drawer too low to be of much use, the vanity provides no real storage. If I had to do it again, I would go with a white version of the same floating Ikea vanity in our master bathroom. Yes, it’s ubiquitous, but for good reason. For starters, it’s affordable. The deep drawers provide ample storage and the floating design is practical for small bathrooms. The recessed medicine cabinet is totally saving my a$$. We’d be lost without it.

Not having to share a bathroom with the kids means the master bathroom stays cleaner longer. We like having a bathroom close to the main living area, too. And I think our guests appreciate not having to pass through our bedroom to use the bathroom anymore. That always felt awkward. I love you second bathroom.
And, obviously, I love Honest products. This is a sponsored post which means I’m being compensated to share my thoughts about the company with you. But it’s easy when it’s a brand I’ve been subscribing to and paying for on my own for years after buying and reading The Honest Life. Without being preachy, the book raised my awareness of what’s really in the products we bring into our home. It’s not about being perfect. It’s about making informed decisions. The subscription service ensures that I have only what I need when I need it. I can easily edit my bundles and shipping dates to suit my family’s needs. Typically, I receive orders 4-6 times per year.
I regularly order the shampoo + body wash, conditioning detangler (necessary for combing through Mabrey’s mane!), toilet cleaner, bathroom cleaner, dryer cloths and stain remover. Honest let us try the bubble bath and foaming hand soap for this post :) When Mabrey was a baby, I also used the wipes and organic healing balm. Looking ahead to the winter flu season, I added the organic breathe easy rub to my last bundle. Fingers crossed I don’t have to use it.
Do you subscribe to The Honest Company? Which items are your favorites? If you’re interested in trying safe and effective household essentials in your home, Honest is offering an exclusive 25% discount to House*Tweaking readers on their first bundle. Use the code HT25OFF at checkout.
*Offer valid only for first-time bundle buyers at Honest.com now through November 30th, 2015, 11:59 p.m. PT. This offer can only be redeemed once per customer and cannot be applied to international surcharge, taxes, shipping, previous purchases, current bundles, the purchase of gift cards or gift bundles. Offer cannot be redeemed for cash or combined with any other coupons or promotions. Terms of offer are subject to change. This post has been sponsored by The Honest Company who provided products and payment. All opinions are my own. Thank you for supporting the brands that support this blog.
images: Dana Miller for House*Tweaking
(shouted) WE HAVE TWO FULLY FUNCTIONING BATHROOMS AND I FEEL LIKE I WON THE LOTTERY. Let’s do this.
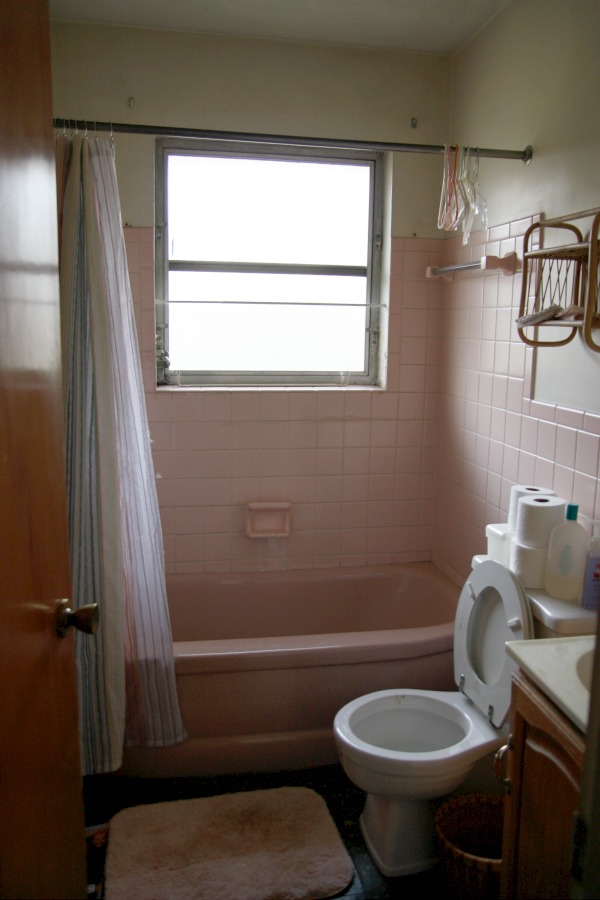
The main bathroom is located in a small hallway just off the open kitchen-living room. The original fixtures were outdated and in disrepair. There was no overhead lighting or ventilation fan. The one thing it had going for it was a window which let in a good amount of natural light. Before renovations started, we had planned on living with the bathroom as-is for a while. But when we demo’d the other (kitchen) side of the wall on the left, we discovered black mold. A few of the shower tiles were cracked, allowing water to seep into the wall.
We ended up gutting the entire room, updating the electrical, installing ventilation to the outside, replacing the window, adding foam insulation to the exterior wall & a can light above the shower / tub area. We lived with the unfinished, non-functional bathroom for over two years while all five of us shared the master bathroom. It was such an eyesore and we hated that we weren’t using usable space. We finished the bathroom at the end of 2014 after working on it off and on for almost a year. It mainly serves as the kid / guest bathroom.
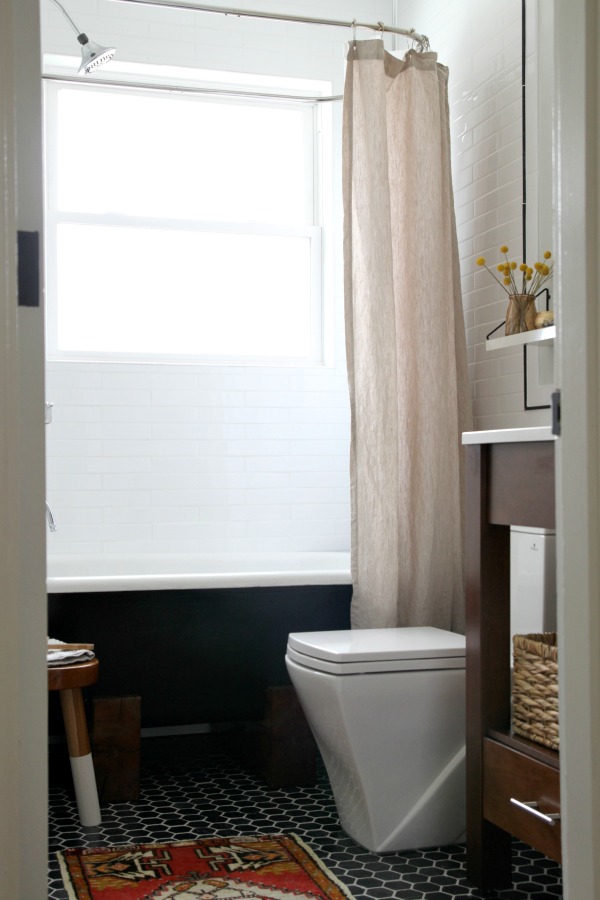
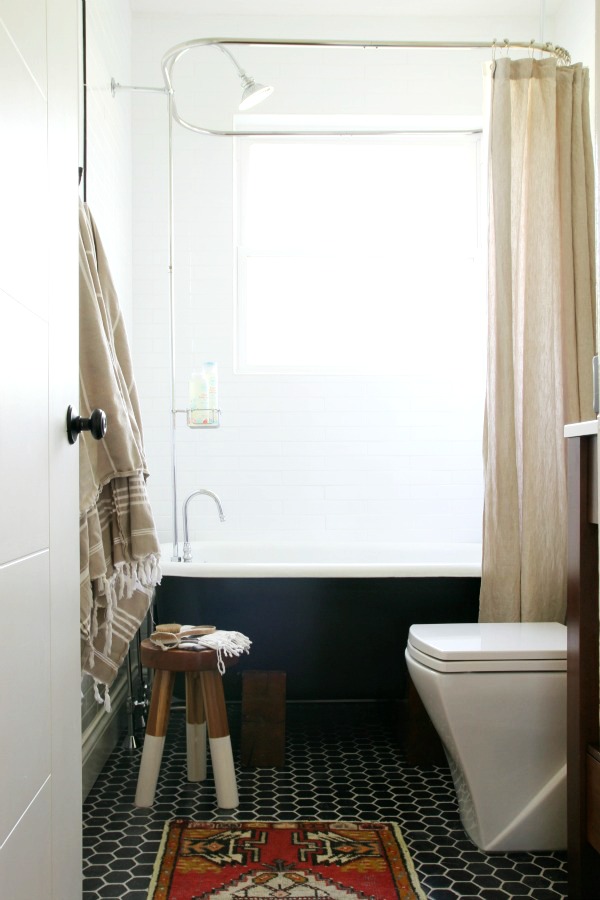
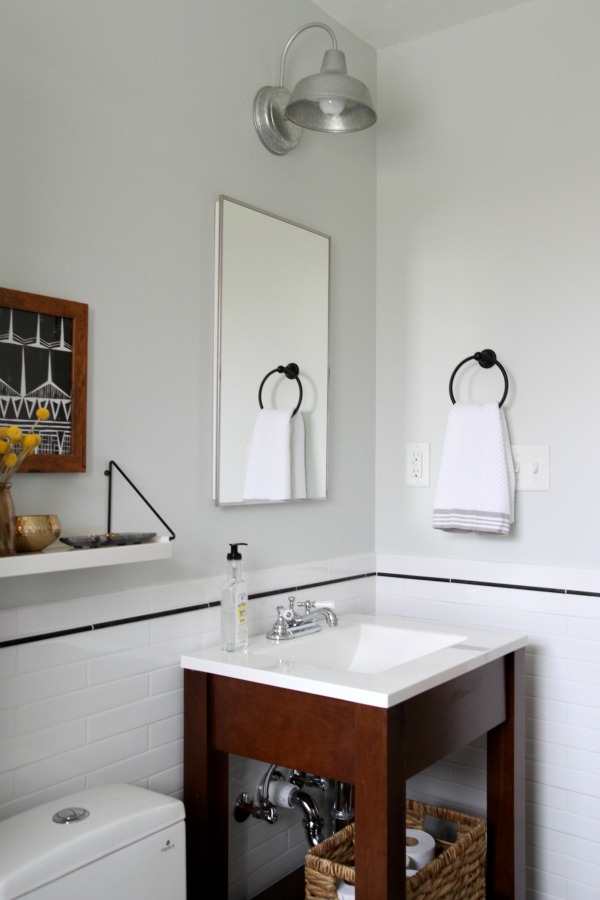
To keep costs down, we worked with the original layout and brought in new materials and fixtures. We chose elongated subway tile for the walls. It reaches to the ceiling at the shower and is 36″ high around the rest of the room. It’s the same tile we used for the kitchen backsplash but here we paired it with white grout. I didn’t think the small bathroom (it’s ~5′ x 7′) could handle the busyness of contrasting grout lines. At the last minute, I added a black pencil liner to the design to tie in to the floor which is a tumbled travertine hexagon. I chose a light gray grout for the floor. The black travertine and dirt-colored grout are super kid-friendly.
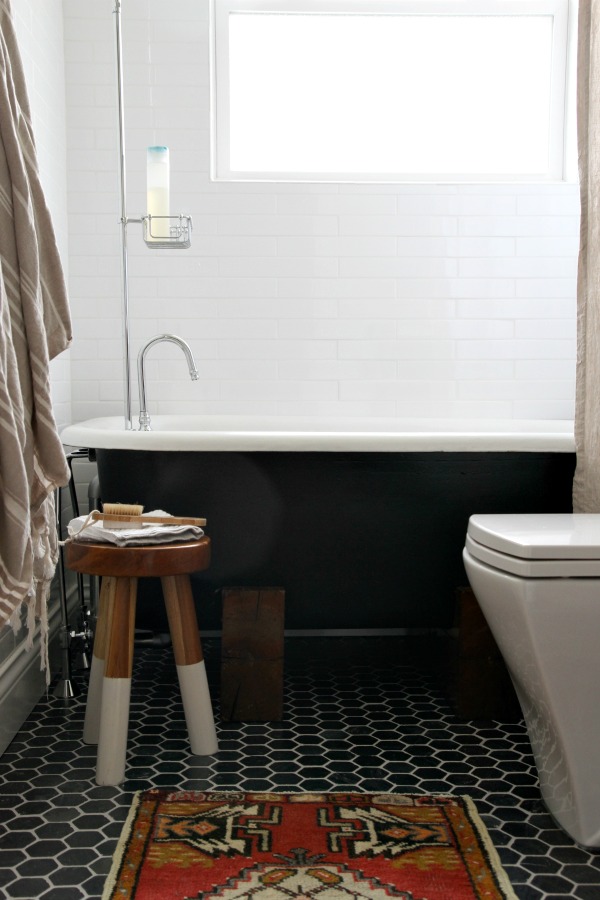
In the early stages of planning, I got stuck on the idea of a clawfoot tub resting on a wood base. We found a 4½’ vintage clawfoot tub on craigslist. The interior was in good condition but two of the feet had broken off and the exterior needed a fresh coat of paint. We DIYed two wood saddles from a reclaimed beam to support the tub and painted the exterior black. The chrome plumbing fixtures are new but have a vintage look. We went through two matching shower heads but each of them leaked so, for now, we’re living with an inexpensive one that I picked up at Lowe’s. It doesn’t pivot and we wish it did.
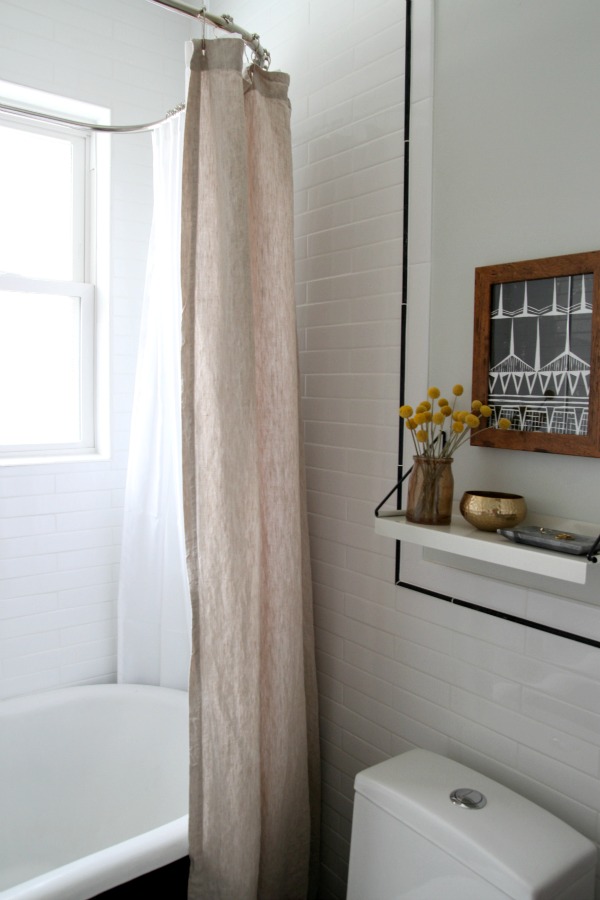

I hung a white fabric shower curtain liner on either side of the ceiling support (two liners total) to enclose the shower when necessary. The liners hang outside the tub for baths and inside the tub for showers. On the side visible from the door, I hung a single linen curtain in front of the liner. I love the natural texture it adds to the space. The curtains hang from rolling rings.
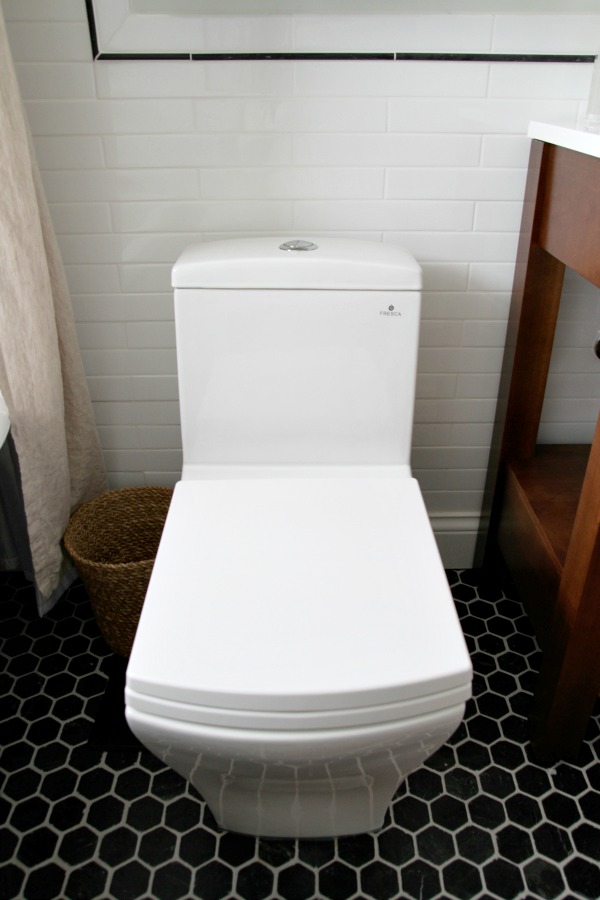
We had planned on using the original toilet but it was accidentally broken during renovations. Oops. Steve had always wanted a sleek, modern toilet (#mandreams) and this seemed like the perfect excuse to try one. He chose a dual flush model with clean lines. The kids have a ball showing off the toilet and its buttons to guests.
The angle of the camera stretches the appearance. In real life, the toilet takes up significantly less floor space than the toilet in the master bathroom due to: 1) the small tank and 2) the ability to install it closer to the wall. The exterior is much easier to clean, too, but it takes a little elbow grease to clean the corners of the bowl (do bowls have corners?) inside. And it isn’t exactly easy to plunge. TMI? It’s worth noting that I don’t know what we’ll do if the seat or lid needs replaced. Special order from the manufacturer?
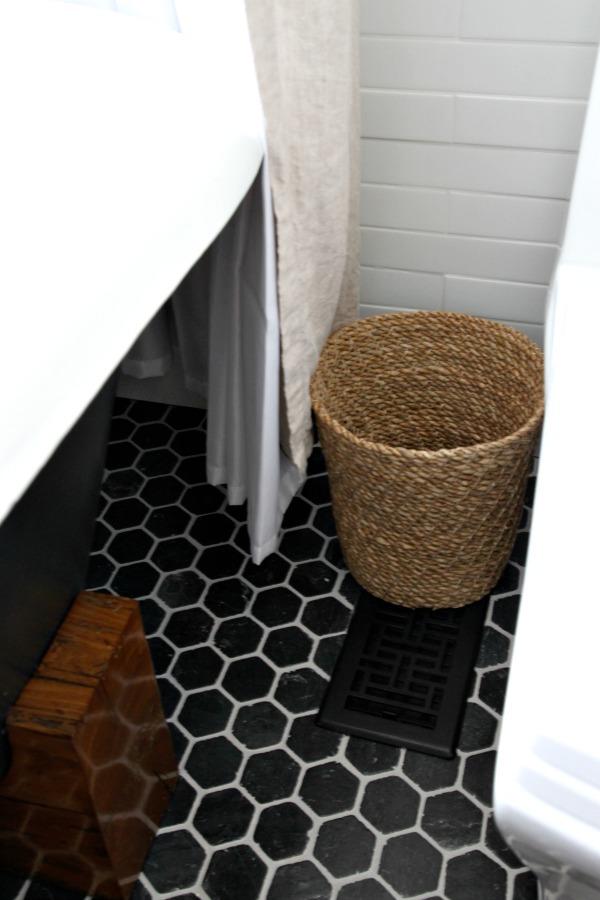
I snuck in a seagrass trash bin between the tub and toilet. FYI – For bathrooms, I use a textured bin and place a smaller plastic trash can, lined with a plastic bag, inside. I removed the plastic can + bag for this shot because I didn’t think anyone would want to see our bathroom trash. I couldn’t find a black register cover so I bought an oil-rubbed bronze one and spray painted it matte black to blend in with the floor.
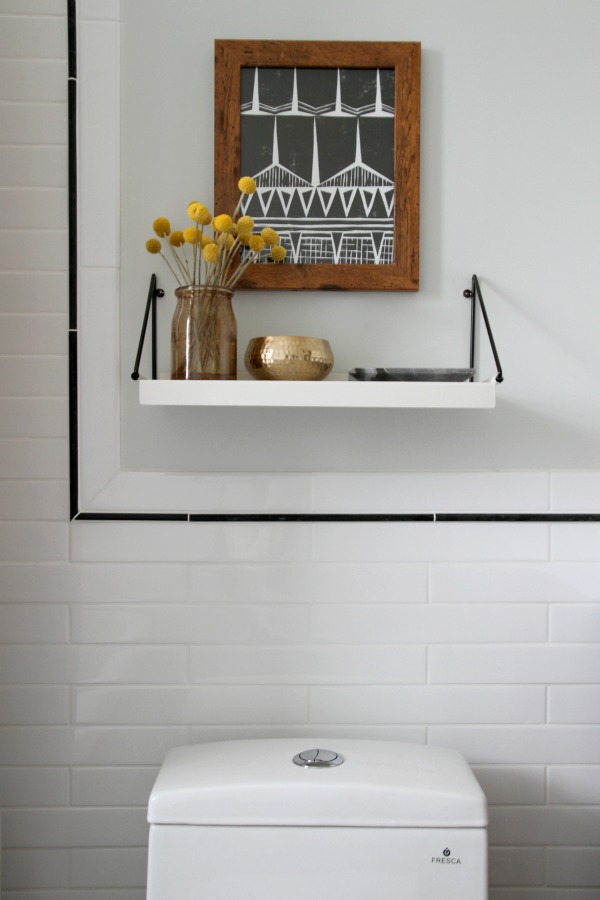
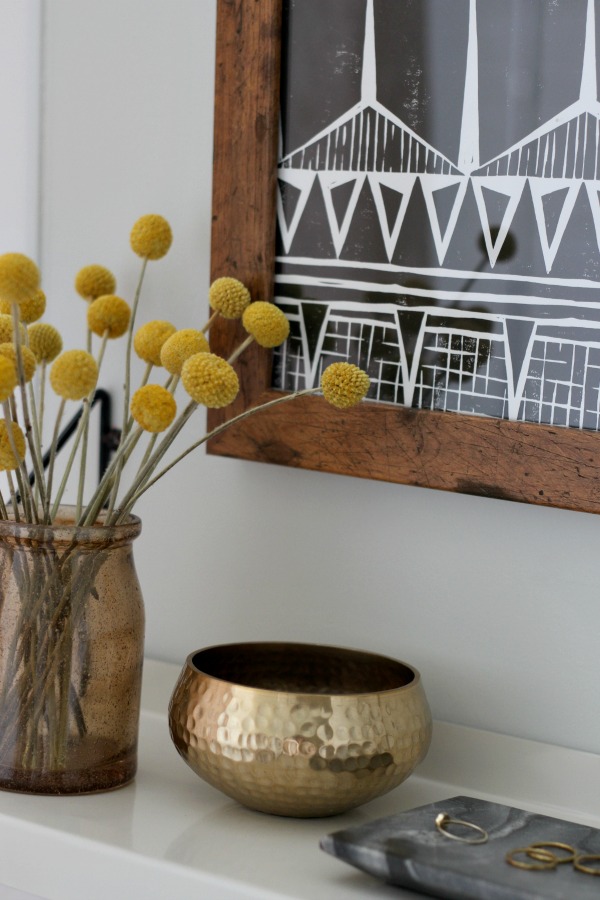
We installed a simple metal shelf above the toilet. It’s a great spot for artwork, flowers and jewelry catchalls. (The vase is actually a bathroom tumbler.) The shelf isn’t the highest quality but I like the way the metal brackets pick up on the pencil liner. I painted the heads of the screws black so they would be less conspicuous.
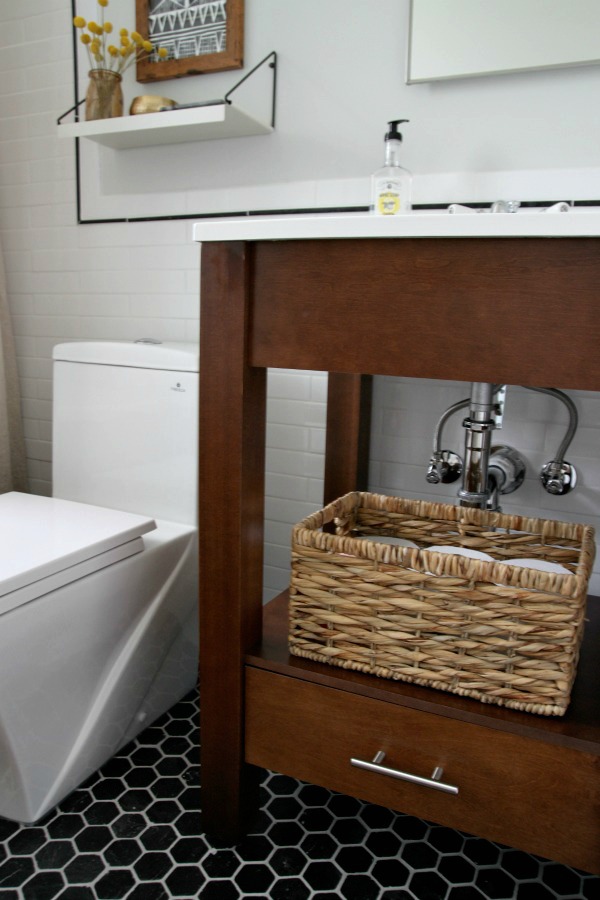
To keep things light visually, we chose an open vanity that stands up off the floor. I stash trash bags and a microfiber cloth in the bottom drawer. A woven basket holds toilet paper and a cup for rinsing the kids at bathtime. We couldn’t bear to drill into the vanity or wall tile to hang a toilet paper holder.
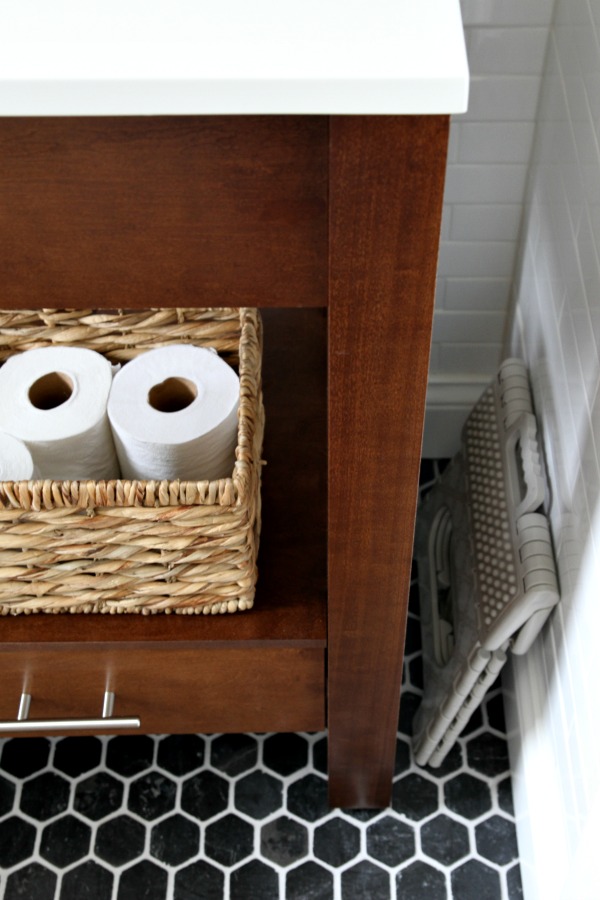
The door to the bathroom opens up into the room in front of the vanity. We needed a stool for our toddler to reach the sink but I didn’t want it to impede the opening / closing of the door. I found a small folding stool at HomeGoods that fit the bill. It isn’t much to look at but, thankfully, it folds up and slides in next to the vanity so we don’t have to look at it all the time.
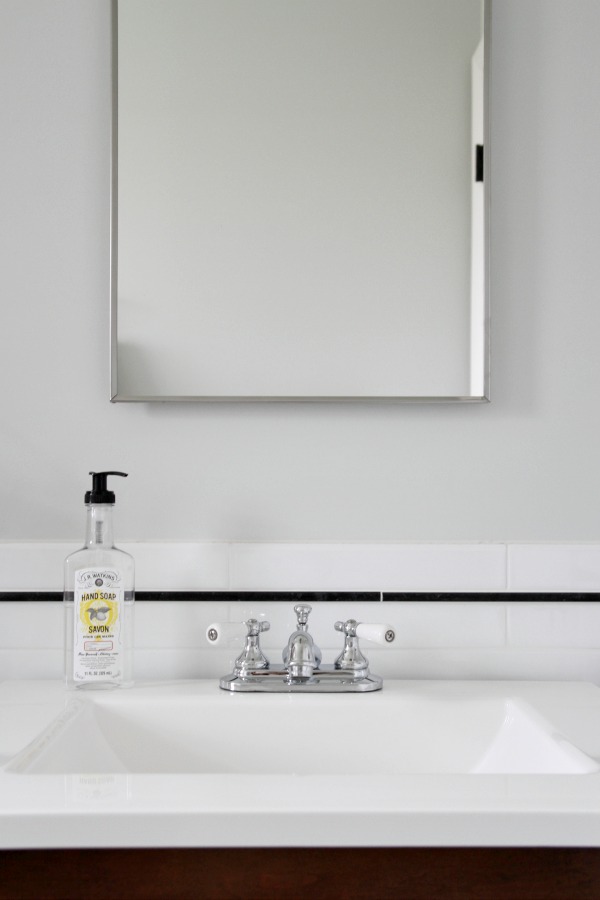
My only issue with the vanity is that the solid surface top is creamier than the bright white subway tile. I think it’s probably one of those things that no one else really notices but it stands out to me. The faucet matches the tub fixture. I adore the labeled porcelain handles.
We chose a simple, recessed mirror / medicine cabinet for the sink area. It has a narrow stainless steel frame. This is where the microfiber cloth in the vanity drawer comes in handy. I use it for quick once-overs to remove the kids’ fingerprints from the mirror.
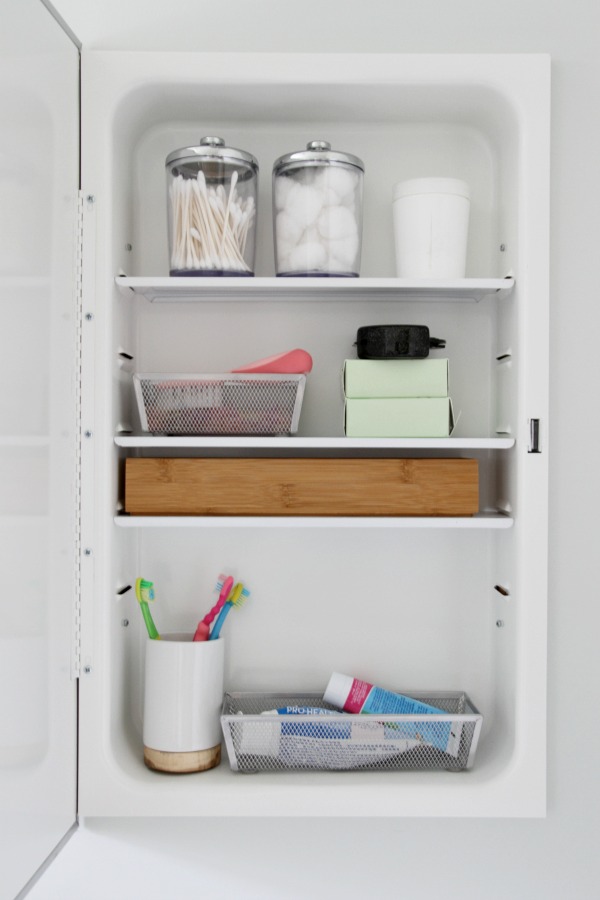
The mirrored door opens to reveal hidden storage. The shelves are adjustable. I used several small organizers to corral the kids’ toiletries.
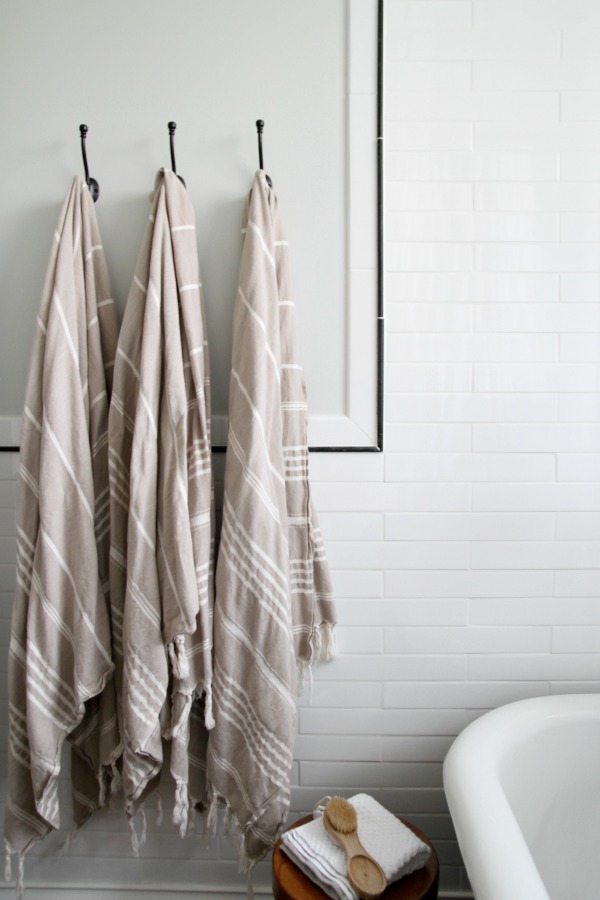
On the opposite side of the room, we installed a trio of wall hooks. There’s one hook for each kid. I found peshtemal towels that mimic the linen shower curtain.
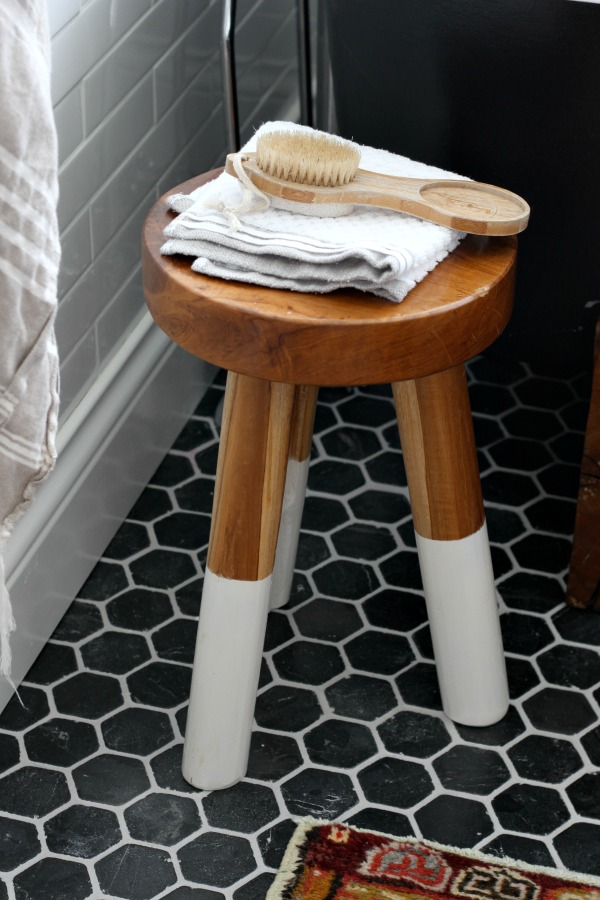
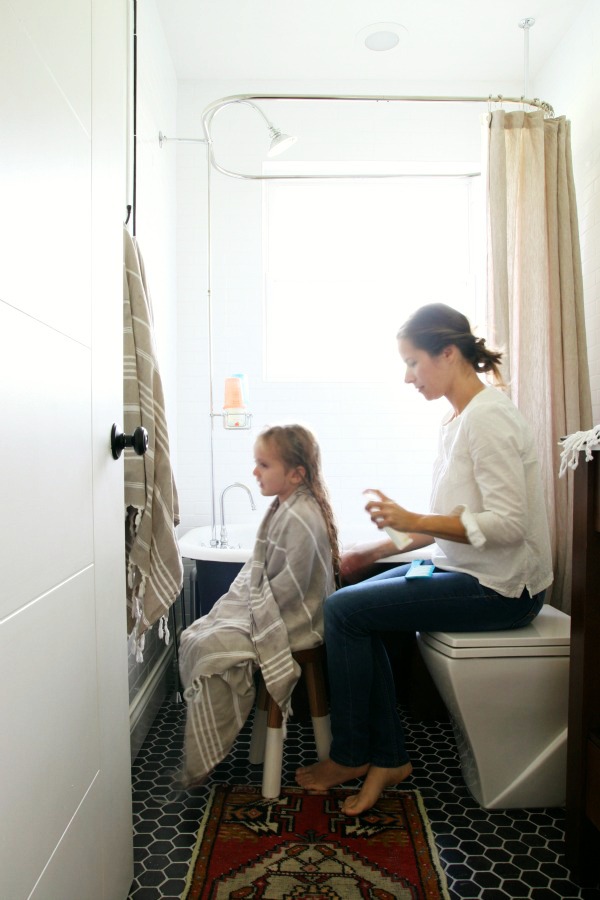
This stool was the missing piece of the bathroom reno puzzle! It finally arrived last week. Not only is it pretty cute, it’s functional too. It saves my back when I bathe the younger kids. And, I haven’t tried it yet, but I think it will be the perfect spot for a lit candle and a glass of wine when I give the tub a spin myself.
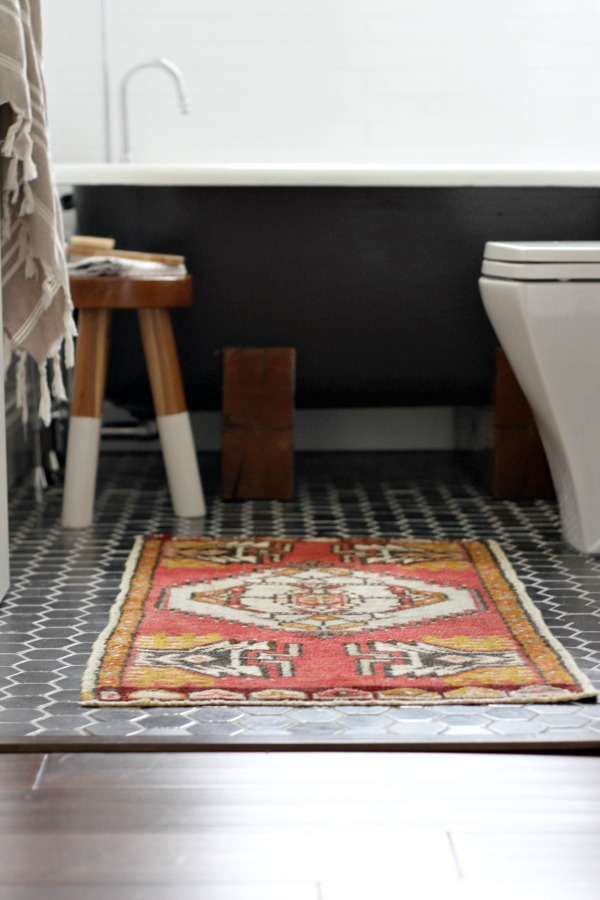
I bought a vintage rug to add some color and pattern to the room. The low profile allows the door to swing open without getting hung up on the rug.
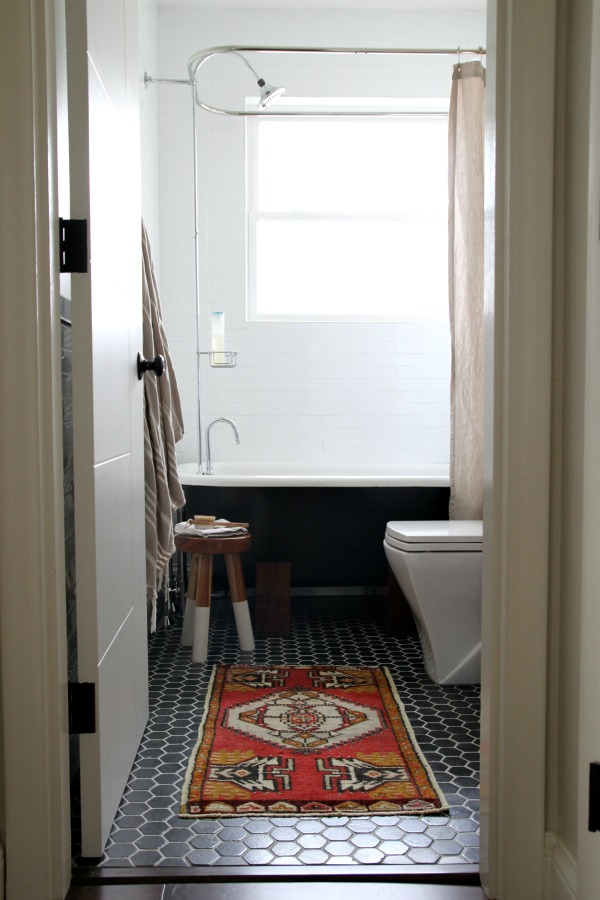
And that’s it! Since the bathroom is near the main living space, I wanted it to feel like a continuation of the great room. I repeated certain elements (subway tile, black & white contrast, rich wood tones, woven textures, vintage rug, etc.) for a cohesive look. The room really feels like a part of the house – not a separate, themed kids’ bathroom. Incorporating larger pieces (tub, vanity) that stand up off the floor visually lightens the tiny room and makes cleaning a breeze.
After sharing one bathroom for the last 2+ years, we feel completely spoiled now that we have TWO functioning bathrooms. No one is waiting for a turn. Everyone has their own towel hook. We’re able to give the two younger kids a bath while our oldest takes a shower in our bathroom to speed up the bathtime routine. Guests no longer have to walk through our bedroom to use the bathroom and they have their own shower, too. It’s nice having a bathroom so close to the main living space. You know, because walking down the hallway, through the master bedroom and into the master bath is just too much work. Like I said, spoiled. But our favorite thing is that we’re finally using previously wasted space. I don’t know how many times I apologized to guests about the state of the main bathroom during its gutted life.
We have two bathrooms. Life is good :)
Resources of note:
2″ x 12″ subway tile – imperial bianco gloss white from The Tile Shop*
black pencil liner – noir honed somerset from The Tile Shop*
wall grout – standard white unsanded from The Tile Shop*
floor tile – noir hex from The Tile Shop*
floor grout – whisper grey sanded from The Tile Shop*
wall paint – Ace Paints lost spur mixed in Clark + Kensington paint + primer in one
trim paint – Benjamin Moore super white
tub – vintage, craigslist
tub base – DIY
tub exterior paint – Sherwin Williams enamel latex color-matched to Benjamin Moore black jack
plumbing fixtures – Randolph Morris from Vintage Tub & Bath
fabric shower curtain liners – Wayfair
linen shower curtain – Restoration Hardware
shower curtain rings – Amazon
toilet – Fresca salerno dual flush square toilet from TradeWinds Imports
trash bin – Target
floor register cover – Lowe’s, spray painted matte black
wall shelf – Urban Outfitters
amber vase – Target (it’s actually a bathroom tumbler!)
dried craspedia – FayeMarie etsy shop
art print – Printwork etsy shop
frame – Amazon
vanity – Home Depot, discontinued
basket – HomeGoods
folding stool – HomeGoods
towel ring – Lowe’s, spray painted matte black
hand towel, washcloth – HomeGoods
recessed mirror / medicine cabinet – Wayfair*
wall sconce – Barn Light Electric Co.
rug – vintage from etsy
dip-dyed stool – Serena and Lily
wall hooks – Amazon
peshtemal towels – Amazon
*Denotes items from brands that kindly sponsored this project. We selected and installed the products on our own.
Interested in seeing how this bathroom came to be? More bathroom-related links…
RENOVATION
*https://www.housetweaking.com/2011/08/18/the-underdog-sans-scaffolding/
*https://www.housetweaking.com/2011/08/30/a-few-new-things/
*https://www.housetweaking.com/2011/09/13/behind-the-walls-i-mean-scenes/
*https://www.housetweaking.com/2011/10/11/new-windows-doors/
*https://www.housetweaking.com/2011/11/01/in-case-youve-never-seen-foam-insulation/
*https://www.housetweaking.com/2011/11/06/we-have-walls/
*https://www.housetweaking.com/2012/02/03/let-there-be-light-and-some-cabinets/
*https://www.housetweaking.com/2012/03/20/a-clawfoot-tub-declawed/
*https://www.housetweaking.com/2013/02/07/scratching-an-itch/
*https://www.housetweaking.com/2014/03/04/baby-steps-in-the-unfinished-bathroom/
*https://www.housetweaking.com/2014/03/13/tile-prep-thinking-ahead/
*https://www.housetweaking.com/2014/03/24/sometimes-diy-sucks/
*https://www.housetweaking.com/2014/04/02/the-noir-hex-is-in-tips-for-laying-pesky-sheets-of-tile/
*https://www.housetweaking.com/2014/08/25/the-bathroom-tiled-grouted/
FIXTURES & DECOR
*https://www.housetweaking.com/2011/09/07/thinking-about-a-bathroom/
*https://www.housetweaking.com/2011/09/14/splash-and-crash/
*https://www.housetweaking.com/2012/12/19/the-peshtemal-plunge/
*https://www.housetweaking.com/2014/06/26/black-pencil-liner-in-the-bathroom/
*https://www.housetweaking.com/2014/09/26/bathroom-update-baseboards-paint/
*https://www.housetweaking.com/2014/10/31/putting-the-bath-in-bathroom/
*https://www.housetweaking.com/2014/11/18/tub-cradle-base-how-we-did-it/
*https://www.housetweaking.com/2015/11/16/the-main-bathroom-a-year-later/
For ease, you can access this bathroom tour under the “see my house” tab in the sidebar along with a general house tour and individual room tours. Thanks for reading!
images: Dana Miller for House*Tweaking


DIY, family life, housekeeping, interior design, kid-friendly