...because home doesn't happen overnight.

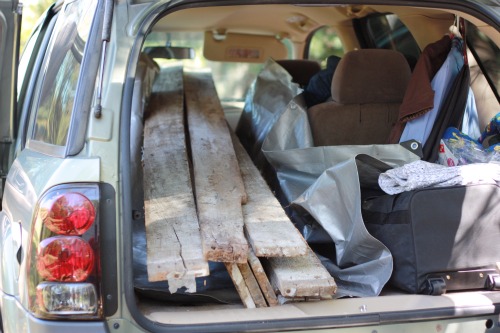
Back in August, Handy Hubby and I attended his grandmother’s funeral in Pennsylvania.  It was bittersweet.  Bitter because we were grieving the loss of a loved one but also sweet because we were able to bring home a part of his grandmother’s past.  You see, Handy Hubby’s grandmother had lived on a large farm for many years which was recently sold due to her husband’s death and her own deteriorating health. Many items were salvaged from the farm including old fence boards used to corral cattle.  After being asked several times if there was anything we’d like to have, Handy Hubby and I decided to give the worn fence boards a facelift.  So we loaded ’em into our SUV and brought ’em back to Ohio.  Let me tell you, that ride was interesting, dusty and uncomfortable.  The boards were long and extended all the way up through the front seats, in between Handy Hubby and me, and up onto the dashboard.  We couldn’t see each other.  The back gate barely shut. {And, no, the kiddos weren’t with us.}

We tried to cover up as much of the interior and luggage as we could with a tarp but nearly every surface was coated in a thick layer of dust by the time we got home.  As soon as we unloaded the boards, I cleaned and swept the whole car out.  It was disgusting!

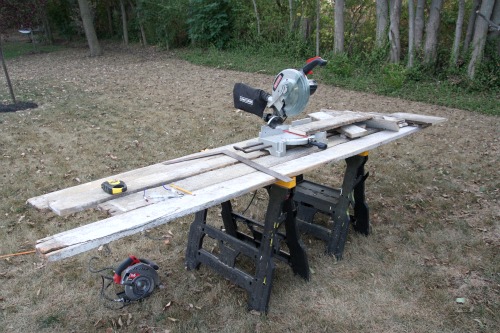
We devised a plan to use the boards for custom artwork/a makeshift headboard in our master bedroom and for a sliding door {coming soon!} to our master bathroom.  You got a peek at the art/headboard last week.  How did I come up with that idea?  Well, I couldn’t decide on artwork, a headboard or both above our bed.  I thought both would be a little much for our simple taste…not to mention more expensive than just one.  So, I decided to make artwork that could double as a headboard.  **I’ve got a serious {maybe even scary} thing for multitasking home decor.**  Handy Hubby cut the boards to size.

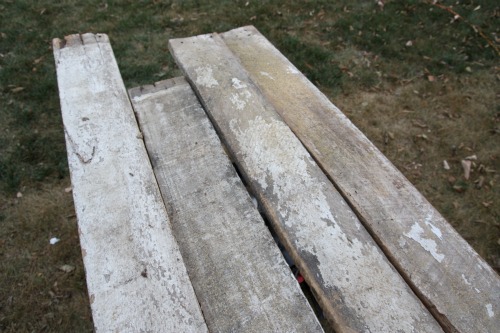
He managed to avoid using damaged portions of the fence boards.  We still wanted them imperfect though.

Next, he sanded them {wearing a mask, of course} and wiped them down with tack cloth.  He attached them together using two 1″x4″ lumber strips vertically along the backside. {I didn’t want the edges lined up perfectly.}  That left me with this blank canvas…

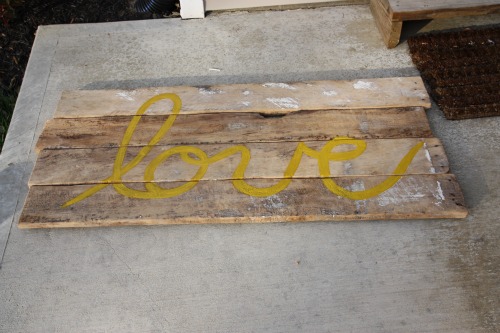
I wrote out “love” onto the wooden headboard with a piece of chalk…

…and then painted over top of it…

May I point out the little hole above the “v”?  It was unintentional but it’s the best lil’ place to slip your hand into and haul the headboard around.  Funny how that worked out.

The only money doled out for this project was for paint.  {Hint:  We still have a gallon left over for the rest of the fence boards.}  But who cares how much it did/didn’t cost?  This art/headboard/whatever-you-want-to-call-it means so much to us.  First of all, it’s originally from a place that was a huge part of Handy Hubby’s childhood…the family farm.  It’s a daily reminder of his beloved grandparents who are no longer with us.  It’s also the perfect example of how Handy Hubby and I work together on DIY projects.  I come up with some random, off-the-wall idea…Handy Hubby breaks out the power tools and brings it to life…I add a dose of personality and creativity to the final product.  Really, that’s usually how things work over here.  And in the end, we are left with this meaningful, heartfelt piece to view day in and day out. It’s a good life, I tell ya.

Have you been tag-teaming a recent project?  I’d love to hear all about it.

images: all by Dana Miller for House*Tweaking

74 Comments

30.November.2010

it’s lovely, and truly a one-of-a-kind…I lost my grandmother last year, too, so I can appreciate how special it is to be able to incorporate something into your home that will remind you loved ones…when my grandmother moved out of her home, she gave me the mugs that she and my grandfather used every day for coffee (plus the other two in the set that were ‘too bright’ for her tastes (pink and orange!), that are still like brand new. The mugs hang on a stand on my kitchen counter and I think of my grandparents every morning when I look at the mugs!

My better half and I do all of our DIY stuff ‘tag-team’. Mostly, it’s because I start some crazy project when he’s gone, and he comes home to find me elbow deep in grout or some such thing. But I’ve rescued him from a few frustrating home projects, too…we are a good team, more so as we’ve been together longer and know which buttons not to push (and when to take a break and ask for help.) When I was away on business, he made a bench in the garden without me–I was thrilled, but also sorry to have missed out on the fun!

30.November.2010

Carole – What a colorful way to remember your grandparents…literally. And kudos to you and your better half for taking on projects together!

30.November.2010

What an amazing project to work together on. My husband & I work on everything together. Hubby is the tool guy and I’m the creative one. ;-) We make a good team. We will be working on our Laundry Room between Christmas and NYE, so we will see how that room comes out and how long it really does take us. Thanks for always sharing your great ideas. :D

this is the headboard of my DREAMS! my husband were searching all over for old distressed doors to use as a headboard, but couldn’t find a perfect fit so we settled for a cute pistachio painted pair of screen doors. i just discovered your site through pinterest and i’m hooked and look forward to many more visits!

20.January.2011

Love this!!!! Sharing on fb!

20.January.2011

Very cute project!

20.January.2011

I love this headboard. Thanks for the great inspiration.

20.January.2011

I love this idea and I really love how you used yellow. It looks fantastic with the weathered wood.
~Tanya

20.January.2011

All I can say is, Uh my goodness. Just found you at My Sweet Savannah. I am in LOVE with this headboard, and with your style. You are a house tweaker after my own heart! I just subscribed to your blog and can’t wait to get your future posts.

All the best, Kerri
from My (Crazy) Decorating Addiction
mydecoratingaddiction.blogspot.com

21.January.2011

Oh, I am LOVING this headboard…..I can’t wait to do this for my girls room someday….thanks for the GREAT idea!!!!!!

21.January.2011

oh my gosh, I thought this project was amazing when I saw it posted on your site, but then to read the story behind it makes it that. much. better!!! i adore decor items that have REAL meaning… to the point where I am having to find a REASON to bring things into my house. my favorite find? milk bottles from the dairy that my great-grandfather worked for for his entire life, delivering by horse-drawn carriage. they took about six months of ebay searching to track down, it was so worth it. enjoy your new headboard!!!! :)

21.January.2011

I absolutely love the creativity of this, the rusticity, and the sentimentality of it. I’m inspired!

21.January.2011

Can I ask how you mounted the headboard to the wall above the bed? Thanks!

21.January.2011

That’s gorgeous! I need a new bed so I can make this! I just clicked over from Apartment Therapy. I would love to link to this if you didn’t mind.

21.January.2011

Soo creative! Love it!!!

22.January.2011

Love it! I’ve been looking for a unique way to create a headboard and you have just inspired me to do so.
A lovely way to remember your loved ones that have passed. Thanks for sharing!

22.January.2011

Rachel – Go for it! That’s what this blog is all about anyway…sharing ideas!

22.January.2011

Leanne – This post tells how Handy Hubby attached the headboard to the wall…

https://www.housetweaking.com/2011/01/12/up/

He used flush mount hangers.

22.January.2011

I love your headboard!!! We used an old door from my husbands great grandmothers farm in Georgia that we also hauled home inside the SUV with us.
I was wondering where you purchased your bedding?
Thank you. Kate

22.January.2011

I LOVE this headboard! I’ve been looking for a neat headboard to make, & thanks to you, I believe I know what I’m going to do!

24.January.2011

How did you hang it on the wall? Was it heavy? I am going to make one as well & just want to be prepared! :) Thanks for the tip!

24.January.2011

Ysenia – Here’s how Handy Hubby hung it…

https://www.housetweaking.com/2011/01/12/up/

13.February.2011

I love this so much! What a great (and functional — double hooray) way to preserve memories.

[…] sweet and rustic headboard. Typography is an obsession of mine. Especially is such simplistic presentations like this […]

20.February.2011

[…] so much of what Gadora digs: reusing and repurposing stuff otherwise ready for a landfill. Dana of house*tweaking gives us a how-to turn an old fence into a fancy new headboard. The Love Bed by […]

Wow what a fantastic and fun idea.

We made a stool out of my great grandfathers old boards. You can read about that project here if you extra boards :+) http://www.mrs-adventure.com/2010/04/dyi-knock-off-stool.html

15.March.2011

Rachael – Too cool!

30.March.2011

Is your bed a queen size? how did you decide on a width size? looks like its just a tad smaller than the bed width? I am doing a king and hoping i can get the same look for the king bed we’re making. So beautiful and the inspiration i was looking for our new bedroom where we are building everything ourselves.

30.March.2011

Tracy – Our bed is a queen size. The width was easy…the fence boards we used were in bad shape {splitting and some rotting}, so 48″ was as wide as we could make it with the pieces we had. {We needed to cut off the bad parts but make the head board as wide as possible.} Ideally, I would have liked to make it wider, but we were using what we had. Good luck with your bedroom!

31.March.2011

I just love your blog! Found it through Varnish. I’m a fellow tweakaholic and can’t wait to check out more!
Danika
http://www.gorgeousshinythings.blogspot.com

[…] and paint and you could do a whole lot of creating with minimal supplies and time. Check out this website if you are interested in learning more about how to create this charming […]

[…] headboard 1, headboard 2 […]

20.April.2011

I just learned of your site (specifically this project) from The Stories of A2Z and her story on decorating with pallets. I love the story of your headboard and the design is fantastic. Thanks for sharing! I’ll be following your blog from now on!

28.May.2011

I love this idea! You are very creative! What color paint did you use for love?
Heather

30.May.2011

Heather – It’s SW’s Auric.

[…]  to give credit where credit is due, Hannah at Young and Crafty was originally inspired by this DIY wood fencing headboard over at House […]

[…] for a project I’m dreaming up inspired by the projects featured here by Young and Crafty and House Tweaking. That is after it spends the appropriate amount of time hanging out in my garage, of course. Oh, […]

30.July.2011

Loved this so much I went and made my own…love it and it looks like something you would buy at pottery barn. Thanks so much for the idea.

[…] of “Love Reclaimed Wood Headboard” from House*Tweaking via […]

04.September.2011

Love this idea!! I have been married for twenty years and we have never had a headboard to our bed. I think this is going to be it. Although, I dont have any old fence boards boards to use, I do have a brother-in-law who is a sawyer at a saw mill and could probably hook me up with any boards I needed. I’m going to have to start measuring!!!!! Thank you for such a wonderful idea!!!

22.October.2011

hi there,

i’ve recently bookmarked your site. i absolutely love this headboard. we have a ton of old beaten pallet boards and are trying to come up with ideas for them. something like this would be great! i don’t know what i’d write on it, though.

[…] are some of the rooms that inspire me. Little pieces of them just draw me. This bedroom is found at House Tweaking, I love how this is a repurposed material, and makes the space feel homey (not to be mistaken with […]

09.January.2012

I just realized you call your spouse the Handy Hubby – I have a whole section on my blog with Handy Hubby posts :)

27.January.2012

How do you attach the headboard to your bed? Or does it just lean against the wall?

28.January.2012

Renee – All about how we hung the headboard here…

https://www.housetweaking.com/2011/01/12/up/

06.February.2012

thank you for the inspiration. I made something similar.

16.April.2012

I have to day I love the bed spread as well as throw cushions! Where did you get it, it’s beautiful! Also love the colour of the is it more taupe or grey?

30.April.2012

Did you put a coat of paint or sealant over the boards after you painted the yellow on?

30.April.2012

Antoinette – Never got around to it sealing the headboard although it’s a good idea!

[…] House Tweaking […]

08.June.2012

This is so awesome! What color yellow is that? It’s perfect!

09.June.2012

Benjamin Moore Auric.

01.July.2012

This is gorgeous. I also love the throw at the end of the bed – where is it from? I’ve been looking for something like it for a long time!

Thank you

03.July.2012

IKEA!

[…] House Tweaking: DIY Fence Board Headboard Share this:TwitterFacebookLike this:LikeBe the first to like this. Tags: cork, […]

15.August.2012

How did you attach the wood to the back of the headboard to make the fence pieces stay?

06.March.2013

may i ask what grit your husband used to sand it?

01.July.2013

Maybe an odd question, but which size paint brush did you use? The writing is flawless.

02.July.2013

Hmmmm…maybe 1 & 1/2″?

15.July.2013

This is amazing! Such a great idea. So much more fun than the boring, plain headboards. Awesomeeee.

19.September.2013

The two of you together have made something so special.
I was looking online for diy headboard ideas and after days of browsing
Your headboard stands out I keep coming back to see it again. Then I read your story and it brought me to tears.. a beautiful way to cherish your loved ones.I think its a work of
Art. The love bed. Its so meaningful, romantic and at the same time
Modern and fresh. The rustic wood looks so good with the color aucre.
It’s simply amazing

[…] @ The Idea Room Tufter Headboard Tutorial @ Orange Sugar Fence Headboard Tutorial @ House*Tweaking Slipcovered Headboard Tutorial @ Ticking and Toile Kitchen Cabinet Headboard Tutorial […]

[…] Fuente: housetweaking y housetweaking.com […]

[…] this headboard made from old fencing, found on House Tweaking, so […]

[…] with this headboard can find it”… and then i found it. You can see the tutorial here, and if you have a few days time & the desire to develop a HUGE case of the […]

[…] DIY Fence Love Headboard | House Tweaking […]

21.February.2015

Hello I love the idea and wanted to do something like this for my bedroom. How did you attach the wood with adhesive glue or nails

22.February.2015

See the hanging installation here…

https://www.housetweaking.com/2011/01/12/up/

[…] Project Credit and Tutorial – housetweaking […]

[…] Photo credit: housetweaking.com […]

[…] Photo credit: housetweaking.com […]

[…] wooden “love” headboard. Here is the […]

[…] atractiva de decorar el dormitorio. Aquí, aquí, aquí y aquí os dejo algunas ideas (incluyendo tutorial)… El de hoy es uno de los más bonitos que recuerdo y me lo he encontrado en dos blogs […]

[…] from a past project, or grab some wood pallets from your local home improvement store to create this DIY headboard! Top it with a coat of paint or your favorite phrase for a custom […]