...because home doesn't happen overnight.

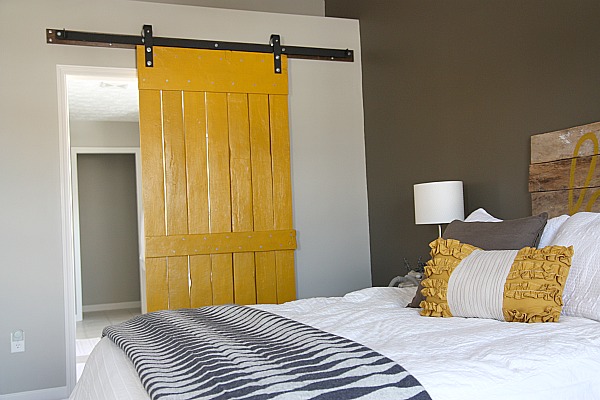
Wow!  The sliding barn door in our bedroom has caused quite a raucous.  104 comments??!! Yowsas.

Wanna know how we, I mean, Handy Hubby did it?  Good.  Because I’m going to tell you. However, there are so many steps involved that I’m breaking this DIY project up into 2 posts:  1) constructing the door  2) hanging the door.  That way you don’t get overwhelmed…or bored.  I’m warning you, there’s a lot of math, measuring and side notes involved.  Ready?  Let’s do this.

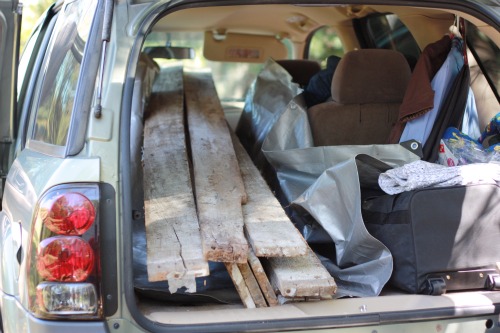
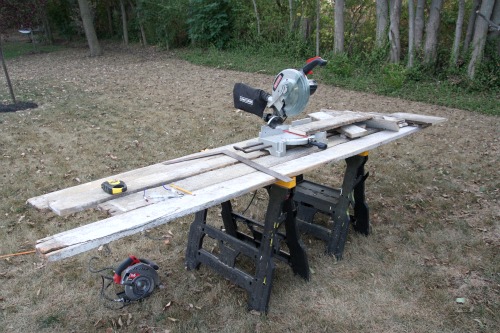
We hauled the original fence boards back from Pennsylvania where they once lived at Handy Hubby’s family farm.  Then we set to work figuring out how large we wanted the door to be.  We knew we wanted it to cover the entire master bathroom door frame {including the trim} if possible when in the closed position.  I say ‘if possible’ because when determining how wide you’d like the barn door to be, you must take into account the amount of wall space adjacent to the doorway where the door will rest when in the open position.  Otherwise, the door will not slide open completely.  Luckily, the space of wall to the right of our bathroom doorway was large enough to accommodate the width of door we wanted.  We measured the desired door width and then divided it by 5¾” {the width of each fence board} to get the number of fence boards we’d need for the door. We needed 7 fence boards to get a door width of ~41″.  Once the door width was established, we chose the length/height.  The ceiling in our bedroom is vaulted, so we wanted to hang the door well above the door frame because we knew the room could handle it.  We decided on 88″ for the door length/height. Handy Hubby cut the 7 boards to 88″ long with a miter saw.  {This was way back in the fall before snowpocalypse.  That should be a good indication of how long it takes us to get anything done over here.} On a side note…we inspected each board to determine which end to cut off.  In many instances, there was a ‘bad’ end that we wanted to get rid of.

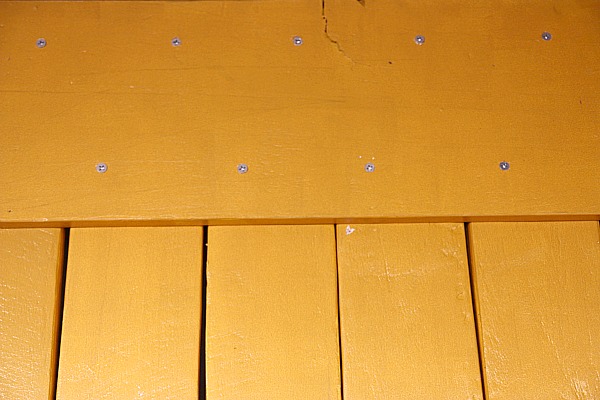
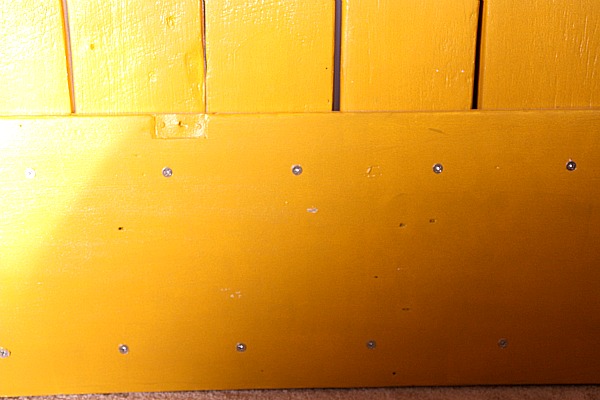
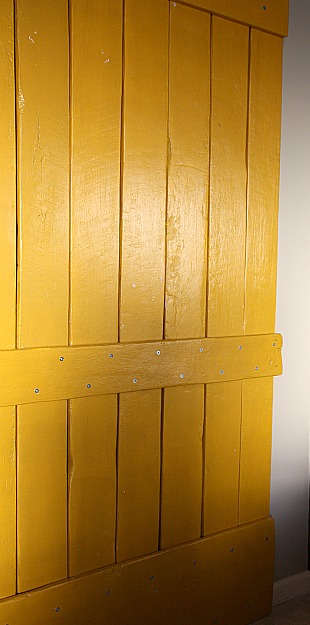
To hold the door together and give it more of barn feel, Handy Hubby cut 2 wider support boards to attach to the top and bottom of the door.  We also wanted 1 regular fence board placed horizontally about two-thirds of the way down the door for added stability and door handle installation.

Once all the boards were cut to size, they got a good sand job {I said sand job} from a palm sander.  Handy Hubby blew the sawdust off with the leaf blower {hey, use what you got!}, wiped ’em down with a damp rag, let them dry completely and rubbed them well with tack cloth.  Next came the priming and painting.  Handy Hubby brushed on 2 coats of oil-based primer {left over from our kitchen cabinet makeover} and rolled on {with a foam roller} 3 coats of semi-gloss latex paint.  The paint color we chose was Sherwin Williams Auric.

With the necessary boards all cut to size and painted, Handy Hubby proceeded to assemble the door.  He laid the boards out on our bedroom floor to square it all up, measuring corner to corner and tweaking until everything matched up.  The distance of each diagonal {the measurement from opposite top and bottom corners} should be equal.  Sorry, I don’t have a true work-in-progress image of this step but this might help…

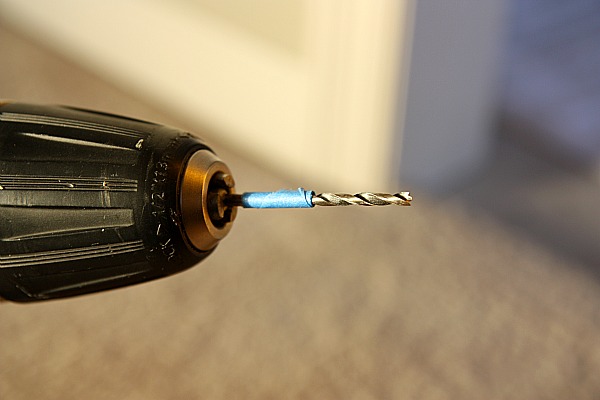
Handy Hubby pre-drilled holes for the wood screws into the horizontal boards, making sure not to drill all the way through the vertical boards below.  We didn’t want any screws popping through to the other side of the door since they would be seen from the bathroom.  **Handy Hubby Hint: Wrap a piece of painter’s tape around the drill bit at the depth you want your holes.  Drill in just to the tape line for a perfect hole every time!**

He alternated the placement of the holes so that the screw heads would have a kind of zig zag pattern.  Another side note…we had already selected our hanging hardware at this point, and Handy Hubby made sure NOT to drill the top horizontal board in places where the hardware would need to go later. More on that in Part II of this DIY post, but the thing to remember here is that you need to know what hanging hardware you’re using before you assemble the door.  Then came my moment of fame.  I stood on the boards to keep them from moving while Handy Hubby screwed everything together…the upper, middle and lower horizontal boards into the vertical boards. Essentially, each vertical board ended up with 6 screws in it – 2 from each horizontal support board.  We liked the look of the shiny, raw screw heads showing, so we chose not to touch them up.

Once the door was assembled, it was HEAVY!  Assembling the door in the bedroom kept us from having to lug the finished product around the house and up a flight of stairs.  It also made quite a sawdust mess in the bedroom, but that was an easy trade-off to aching backs and dinged up walls.

I’m not going to lie.  That door was propped up against our bedroom wall for weeks while we prepped the doorway and waited on the hardware to arrive.  I had visions of it toppling down on us in the middle of the night.  But it didn’t.  Thank goodness.  It definitely would’ve left a mark.  Before it was hung, I was already in love with all the scarred imperfections.  The nicks, scratches, crannies and cracks gave it a story. I even told Handy Hubby not to worry about fixing any damage that he’d done to the paint job while assembling the door.  He was happy to oblige.

So, that’s how Handy Hubby assembled the barn door with a teensy bit of help from me.  Take note that the only money we spent for this part of the project was on the gallon of paint.  And if you’ve made it through this entire post without yawning yet, you deserve a pat on the back.  And probably a link to where our sliding barn door hardware came from.  More on that tomorrow!

images:  all Dana Miller for House*Tweaking

91 Comments

10.February.2011

I LOVE that you created this in place of a bathroom door, it’s so innovative and the color choice is perfect! I can’t wait to see part II. Thanks for the inspiration!

10.February.2011

I absolutely love this! I have been wanting to do this in my home for so long. Would you mind sharing exactly which hardware system you chose and the cost. Thanks a lot :)

10.February.2011

To say this door is fabulous is a vast understatement. I came because I loved the pic of your headboard and I am REALLY loving the rest of the room. Can’t wait to see more!

10.February.2011

Dana & HH… you rock. Seriously.

This is one of the coolest things I’ve seen and so impressive that you guys did it yourselves!

10.February.2011

I LOVE how your bedroom is turning out. I would have never been bold enough to pick that yellow color, but it looks gorgeous! I especially love the bathroom barn door. I am thinking of trying the same hanging mechanism to fix my laundry room door. It currently opens into the room and blocks most of the storage space. Thanks for the inspiration! Looking forward to your next post.

10.February.2011

Just found your blog – I LOVE IT!!!! Love the barn doors, I have been begging my husband to let me do this in our bathroom.

10.February.2011

Love this! Thank you, Dana, for the details! I have been wanting a barn door for my headboard for a LONG time but I just need the wood (minor detail). Thank you!!

10.February.2011

I’m still drooling over this project!!! Gorgeous!!!

Amazing!! This is a wonderful project, so cool!

10.February.2011

This is pretty weak if you ask me!

11.February.2011

This project is so great! It adds so much personality and the color just pops. But wow did the unpainted door look absolutely beautiful too.

11.February.2011

wonderful!
i have had your headboard pinned to my inspiration board ( http://pinterest.com/sumthings/bedroom/ ) for weeks now. well, until yesterday, when i needed to show hubby what i was planning on building in our bedroom, i had never actually clicked through the pic to see where it came from! low and behold!!!! it’s YOU! and…even more amazingly…you were also the creator of my very next project…the barn door! how serendipitiously fantastic is that!?

so, just so you are fully prewarned. i am basically stealing your whole bedroom! ;) i have some interesting tweaking to do…so it will look my own. (i have to work with what we got, you know….low on cash, time, etc etc). but, the headboard and door are my true inspiration.
and..and…this couldn’t come at a better time. we just finished a big bathroom remodel and the barn door is exactly the finishing touch that is needed. now, i just have to find some old wood..and convince the hubs to build Just.One.More.Thing. ;)
f.y.i. your blog has totally earned a spot in my FAVES category on my blog reader! trust me, as a full time working mom of two…my faves are the mainstay of my blog reading!
loves to you!!
stephanie

11.February.2011

Stephanie – So glad that you have found inspiration for your bedroom! I don’t mind at all if you ‘steal’ ideas. I don’t think of it as stealing anyway….I like sharing.

11.February.2011

Toni – I think the raw wood looked great also. Now you can see why it was such a big deal for me to go with Handy Hubby’s suggestion and paint it. I really like it either way – natural and painted!

11.February.2011

yay! i like sharing, too!
do you have a pinterest account? i would LOVE to see your “little black book” go viral! if you sign up..i will totally follow you! ;)
i am not sure if they are still in beta…if so, and you want to join..let me know. i have invites left.
loves!

So gorgeous. This door looks amazing with the rest of the bedroom design (esp. the lovely headboard). And the bright yellow is perfect!!!

13.February.2011

Great looking door. Tell your husband great job. I really think that you guys are onto something here. My wife and I are in the middle of doing a house remodel but we are not daring enough to try something like that. At least not yet. Keep up the good work

Cheers,
Matt
http://www.mychicshanty.com

15.February.2011

Wow! So, so lovely!! Like everything in this site! :)

15.February.2011

i just discover your blog, really nice house, congratulations for making so many cute things… I’ll come ack to see your new post
have a nice day

15.February.2011

it is really beautiful…my husband and i just had one of these done for our bathroom, although we were not brave enough to try this project on our own – nicely done!

15.February.2011

Would you share how much the hardware cost? Thanks!

15.February.2011

Hi!
I just found your blog through Remodelaholic, and became a new follower.

Love, Love,Love this yellow barn door. It’s so unique, how did you think of this?

15.February.2011

Love the blog and the door. Especially the choice of color. And so cool to see it on Apartment Therapy just now!

15.February.2011

Kathleen – The barn door was probably an unconscious idea resulting from the fact the I lived in a barn with my family for the majority of my childhood. As much as I like modern decor, the juxtaposition of it with natural, rustic touches is what I love most. Also, the double doors that came with our builder home {and used to separate the master bedroom from the bathroom} were cumbersome and flimsy…always getting stuck. A pocket door or sliding door of some sort were our first ideas. Once we discovered the reclaimed wood {for free!}, we decided on a sliding barn door.

15.February.2011

Mary Sue – Check out DIY Sliding Barn Door Part II for all that info.

15.February.2011

I have been pushing this idea around for more than a year as a way to separate a large room from the rest of the house. A few hardware quotes of $600-800 kept turning me away, though. Just this week I had a decorator over to my house, and she suggested I look at the track from Tractor Supply Company. They’re certainly not as pretty, but at $100, I think I might have the gumption to go for it!
I also have planned on making my own doors from old lumber, so this tutorial came just in time! Thanks for sharing!!

15.February.2011

Thanks to Poppytalk for sharing this! It’s a fabulous idea, and I love your blog!

15.February.2011

Love this to pieces!

15.February.2011

i love the door, and i am in LOVE with the cute yellow pillow. do you mind sharing where you got this? i must have one!

15.February.2011

oops…..should have scrolled down more. thanks!!!

16.February.2011

Dana, this is fantastic! So unique. Love the juxtaposition of farmhouse and urban industrial.

17.February.2011
17.February.2011

I LOVE the door! My fiancé and I have been trying to come up with a solution for our ensuite because of a sloped ceiling on one side and this is perfect!!! Question…..what is the paint color on the wall behind the headboard?

17.February.2011

Karen – The darker, focal wall is Sherwin Williams Suitable Brown.

20.February.2011

Absolutely stunning!!

[…] I Love Yellow I really do love yellow. I don’t know why, but my eye is immediately drawn to it. If our loft wasn’t so open, I would put yellow in our bedroom along with our grey bedding. Check out this awesome yellow barn door from House*Tweaking. […]

[…] House*Tweaking for building and hanging the yellow sliding barn door pictured below (read details here and here).  My fascination with the sliding barn door has been renewed!  Apparently, I’m […]

[…] ce qui est de la réalisation, Dana Miller du blogue américain House*Tweaking nous explique comment faire (en anglais) . En résumé, il faut bien s’assurer que le mur contre lequel votre porte doit coulisser soit au […]

08.March.2011

I did a similar project with a found door.
I got the hardware from McMaster-Carr for under $100, in a galvanized steel look.
http://www.Mcmaster.com

[…] Apartment Therapy kindly featured this instructional post from House […]

[…] A DIY project by House*Tweaking: […]

08.July.2011

Thank you so much for posting the steps on how you did it! This just made my day.

02.August.2011

Awesome!!! Crud, now my brain is swirling on redoing all the doors here!!!
Thump
http://WWW.ThumperLane.com

18.August.2011

Hi! I LOVE this door! It only FURTHER increased my sliding door obsession.
I am hoping to make a pair of smaller doors like this for storage in a master bedroom along a knee wall. Do you know how much the slider frame kit cost? Since I am still in the planning phase I don’t have the exact dimensions to get a quote from the company.
THANKS!

22.August.2011

You’ve inspired some of my clients to add something similar to their own home. Nice touches to the interior.

19.September.2011

I am absolutely in love with this and plan to try to do the same for a loft entry. What color is that yellow? It is brilliant. Also, is the accent wall a brown or a grey? (I’d like to lift both paint colors if you they are a brand!)

19.September.2011

James – The mustard on the door is SW’s Auric. The darker wall is SW’s Suitable Brown.

[…] Sliding barn door in your room […]

08.October.2011

Hi, what a great idea and great photos too. I added a link to your post to my recent post about repurposing a door. Thanks for sharing your tip with my readers. Keep up the great work. http://www.manyhatsofamom.com

08.October.2011

Stephanie – I always appreciate a link! Thanks!

15.October.2011

I am SO glad I stumbled on your website. I love the sliding barn door project and am in the ‘thinking’ phase of doing something similar. My problem is that I don’t have a ‘Handy Hubby’! Do you think any of this can be accomplished alone? With perhaps a phone call to a brother who ‘might’ show up in a week or two?

16.October.2011

Karen – Other than actually moving and hanging the HEAVY door, all the other steps were more calculated in nature…as in measuring lots and lots before drilling/screwing/hanging. HH did need my assistance in holding some of the hanging hardware up on the wall while he was measuring. I also helped him when it came time to hang our heavy door. You need braun and brains for this one! The company from which we purchased our hardware was also very helpful in making sure we got the correctly sized hardware.

20.November.2011

Have you already posted DIY Sliding Barn Door: Part 2, hanging the door? I can’t find it. I so want to do this in my home. Looking for to reading more. Love your blog, thank you.

20.November.2011

[…] {image source from here} […]

22.December.2011

Can you tell us about the lovely blanket that’s folded at the bottom of the bed?

01.April.2012

This is awesome! I first saw a door like this through one of my favorite phone apps – Houzz. I was looking for instructions on how this was constructed. Would it be ok to link to your post from my site? I love posting others awesome DIY work – especially if there’s instructions. :) Great job!!

02.April.2012

Jacqueline – No problem! I love a good link.

[…] The hall leading to the back of the house was walled up when we converted that kitchen to our laundry room.  The kids now have a good sized closet.  Picture a bright yellow sliding door over the arched closet opening….much like this. […]

12.May.2012

Thank you so much for this tutorial! I have been drooling over the idea of a big chunky sliding barn door for our very similar master bed to bath hole-in-the-wall since we moved in and your tutorial makes me think it just might be possible! The color is gorgeous and oh that hardware. I am so inspired!

[…] Our big project will be figuring out how to create and install a sliding barn door in the entrance, similar to this one from House Tweaking. […]

Beautiful – I have to do this in my room! You’re featured on my blog today :-)

11.September.2012

Because my hubby is the unhandy hubby as am I, I was wondering if we could go to a door store and purchase a regular door and just hang it with farm door hardware. Do you think that will work?

[…] at the opposite end of the spectrum to the delicate paper and wood-frame Japanese shoji, is this stunning bright yellow barn door number belonging to Dana Miller, inspirational home decor blogger at www.housetweaking.com Share […]

03.November.2012

Beautiful door, beautiful blog! Have added a link to this project in my most recent post (www.smartsmallsimple.wordpress.com), hope that’s OK.
Your home is an inspiration, thank you so much for sharing it with us all. Can’t believe how pristine it looks with three kids – how DO you do it?!

22.December.2012

How well does the door seal sound? thinking about something like this for my master, but is it as “sound resistant” as a standard door?

[…] a tutorial on making and fitting a barn door visit  housetweaking.com where Dana desribes how she made the yellow one […]

[…] Shut the barn door! (DIY barn door tutorial) […]

21.January.2014

Could you share the yellow color of the door? Is it also Sherwin Williams? As you probably know finding the perfect yellow takes time, but I’m in love with yours!

21.January.2014

It is Sherwin Williams auric.

[…] Sliding doors – Not just ANY sliding door. Check these out! It’s a mesh between barn doors and …. well .. I’m not sure. But I like it. No. I love it. And no more doors swinging open and hitting people! (ok, so I was traumatized at an early age… but, still – these deem necessary!) […]

07.February.2014

Do u think the chalkboard paint technique can be done on the door..

10.February.2014

If you’re using reclaimed wood, the result might be too bumpy to write on but there’s no reason why you couldn’t do chalkboard paint.

[…] House Tweaking – DIY Sliding Bedroom Door Project […]

[…] is a needed a larger door?  You can build them (check out House Tweaking Blog) or you can check […]

[…] here! {Dowling Kimm via Desire To Inspire} The hardware choices can be just as artistic! {House Tweaking} This one is my favorite!!!  Dana and her husband MADE this door!  They used old barn […]

[…] the best of the outdoors into your interior. House Tweaking did just that by adding a sliding barn door to a […]

[…] barn door that I fell in love with in blogland! It was made by none other than the fabulous Dana at House Tweaking. Painted a bright yellow paired against grey walls it is a striking color on an old look. (Her […]

[…] Yellow Barn Door via House*Tweaking […]

[…] love this bright yellow upcycled barn sliding door!  What a fantastic statement piece! You can never go wrong with a yellow, white, and gray color […]

[…] Fonte das imagens 1 2 3 […]

[…] DIY Sliding Room Door – VIA […]

[…] House Tweaking: DIY Sliding Barn Door: Part I […]

[…] the best of the outdoors into your interior. House Tweaking did just that by adding a sliding barn door to a bedroom. […]

[…] DIY Barn Door {House Tweaking} […]

[…] House*Tweaking created this incredible sliding barn door in their master bedroom. It adds a pop of color and is […]

[…] door, so they are going to do one of those sliding barn doors on the outside of the room (kind of like this, but way less […]

[…] Diy sliding barn door – house*tweaking […]

05.October.2017

Is there a possibility that you have a photo of the other side of the door -Are the vertical boards sandwiched between another top and bottom board? I’m in the process of building two hinged barn doors for my barn. I have one finished, and have wide vertical boards for the other but they are shorter than the one I just completed. Love your ideas and how you used the reclaimed boards to make your slider.

[…] housetweaking […]