Thank you for all of the wonderful comments and encouraging words on the house tour! Seeing the before-and-after images next to each other was a little surreal even for us. Like, whoa, we actually bought that dump?! But mostly we feel happy about how much light and life are in this lil’ house now. Hopefully, you have a better understanding of the major renovations. I’d like to feature individual rooms and discuss them in more detail. First up, the living room!
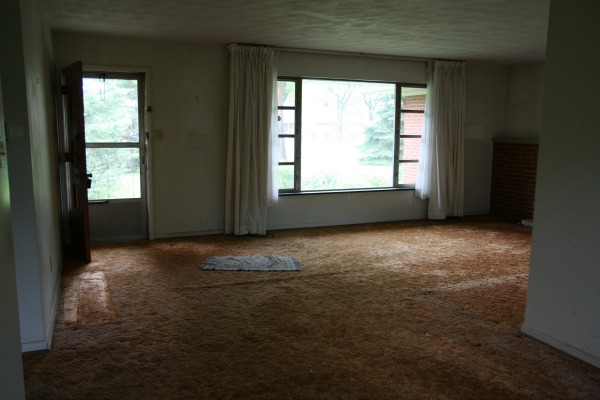
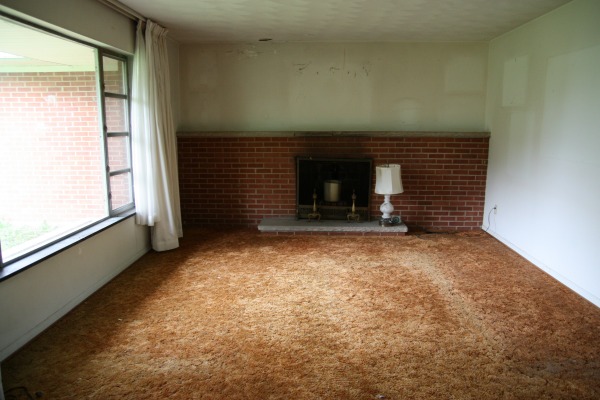
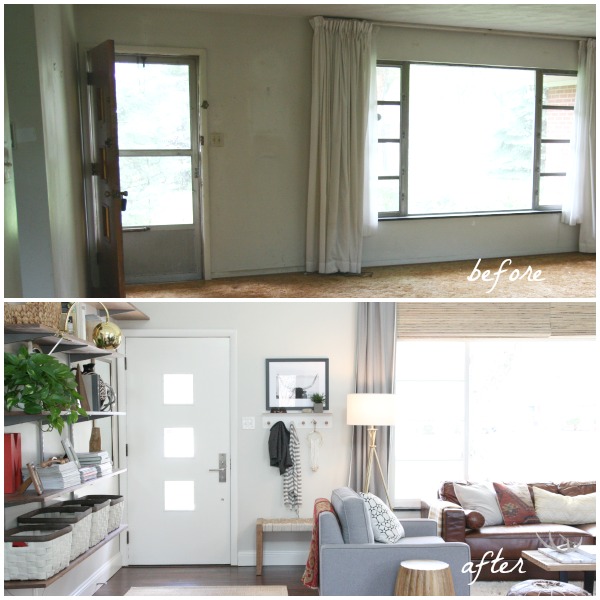
It came to us dirty and dated but we liked the large, south-facing window and the orientation of the fireplace.
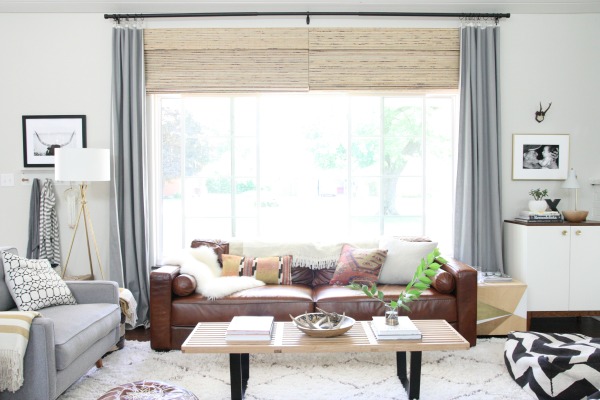
We had the aluminum window replaced with a better insulated vinyl one but we were adamant about retaining the look of the original. The center pane is fixed and the two outer panes are sliders. Whenever weather allows, the sliders are open. We salvaged the original slate windowsills throughout the home. I love the way this window frames the view behind the couch. It’s almost like a work of art and it brings in so much natural light. Plus, we enjoy watching the world go by.
For window treatments, we hung woven shades and gray linen curtains. I have a thing for natural textures so that’s where the woven shades come in and I read somewhere about hanging non-white curtains to distract from a less-than-perfect view. Just across the street is a nondescript shed painted hunter green soooo…yeah, gray curtains. The shades and curtains are functional but we leave them open 99.9% of the time. We don’t mind living in a fish bowl.
We replaced the orange shag carpet with engineered hardwood. (We’re on a concrete slab.) Installing the floors nearly did us in. We had to glue each and every plank to its neighbors and we did it all ourselves…while I was seven months pregnant. It was awful but we saved a ton of money by DIYing the install and we’re happy with the results. Although, next time (ha!) I think we’ll opt for something that’s easier to install.
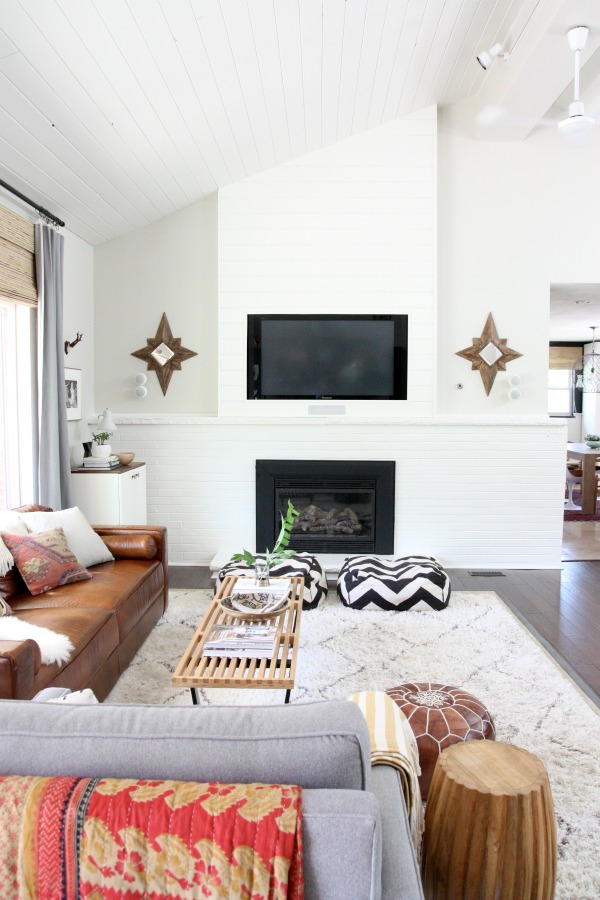
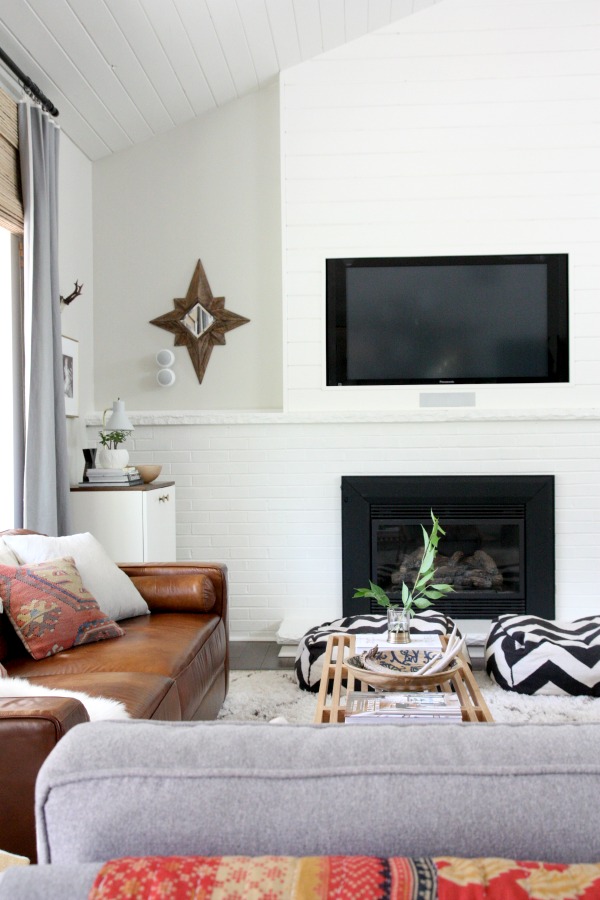
We tried living with the red brick fireplace surround for over a year but we ended up painting it out in white. It really lightens up the space and it’s much easier to clean now, too. We don’t regret painting it one bit but we do feel better knowing we gave the red brick a try. We had the wood-burning fireplace converted to gas with an affordable insert we bought via craigslist.
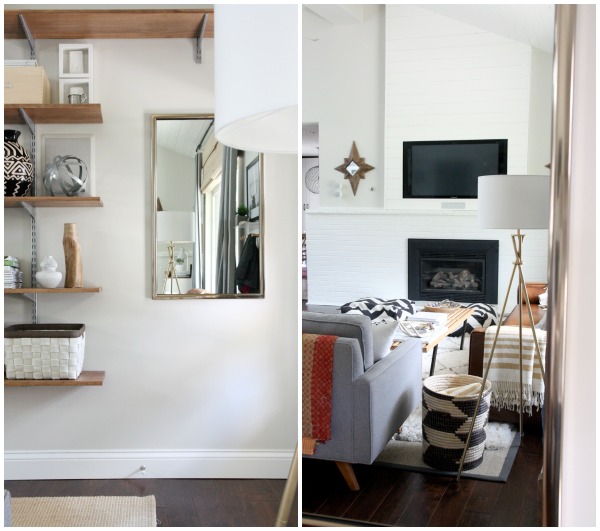
The TV was quite the conundrum. I was all for giving it up but Steve enjoys it…along with (what I think are) unsightly surround sound speakers. The TV / surround sound setup was a complete compromise. I don’t particularly care for TV’s mounted above fireplaces but, since we removed the wall separating the living room from the kitchen, we didn’t have much of a choice. Our solution was to run the TV and speaker wires up and over to the adjacent wall and house the media components in a small cabinet. (You can see the wires via related links at the end of this post.)
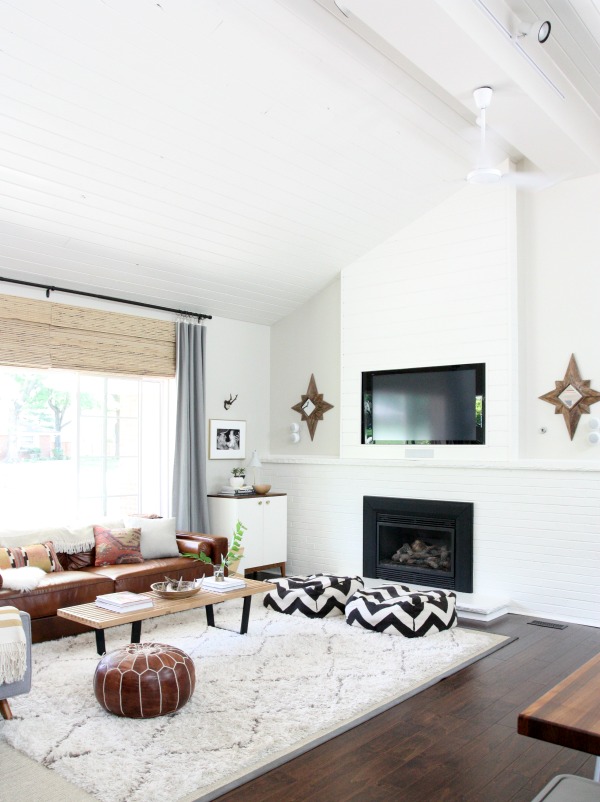
To make the TV less ominous, we DIY’d a planked bump-out above the mantel that reaches all the way to the vaulted ceiling, recessed the TV within and painted the planks to match the fireplace surround. The bottom plank is removable in case we ever need to service / replace the TV. This setup appeases Steve and me. He has his fancy TV and speaker system but the wires are hidden and the TV isn’t too obnoxious. It also makes for a great architectural feature. That was a happy accident.

I’ve tried disguising the dreaded “boob speakers” with decorative mirrors hung on either side of the TV. They’ve been up for over a year but I haven’t decided if they work. We’ve tossed around ideas to make this wall even more of a focal point. Contrasting paint? Grasscloth wallpaper? Who knows what it will look like in a year!
I designed a wood box that slips over an ugly subwoofer on the floor next to the media cabinet. Are you sensing a theme?
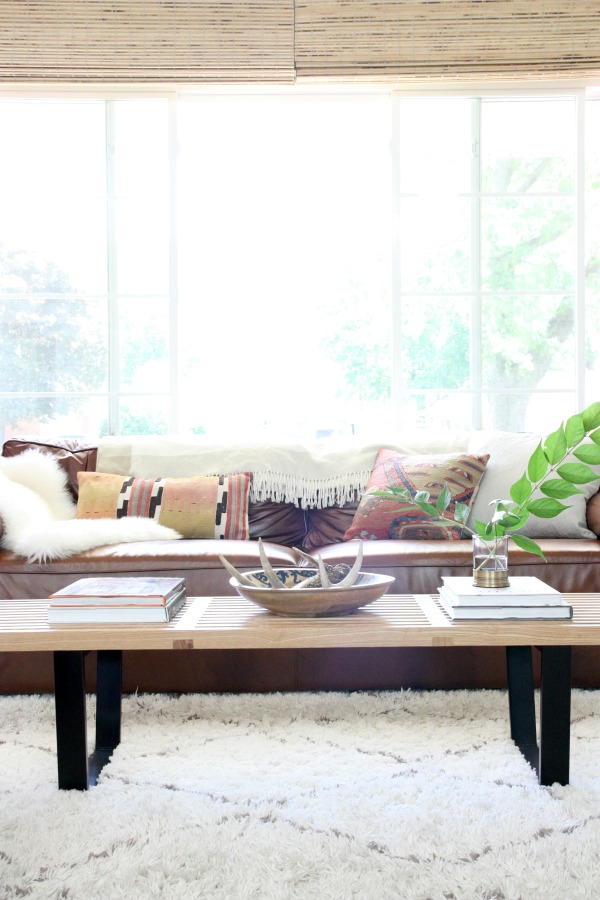
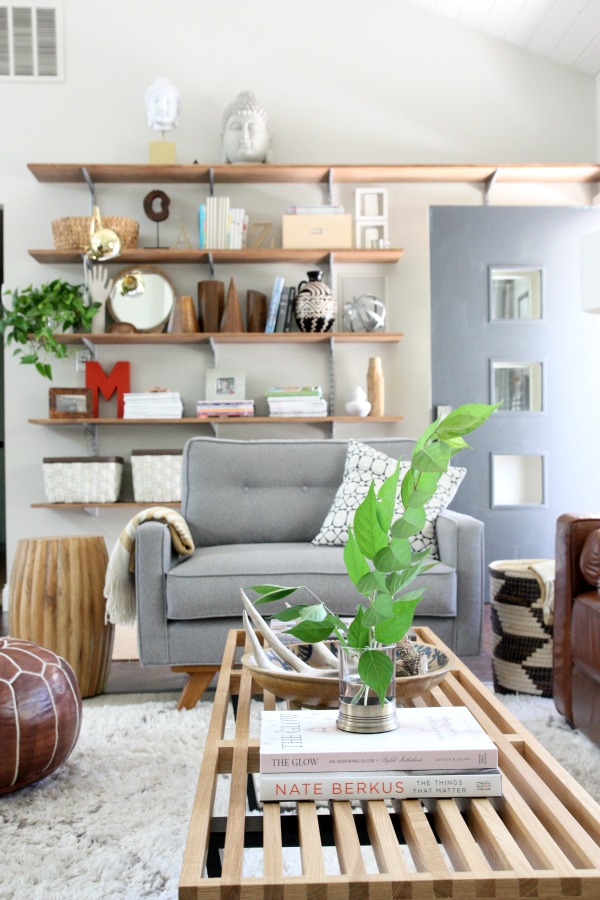
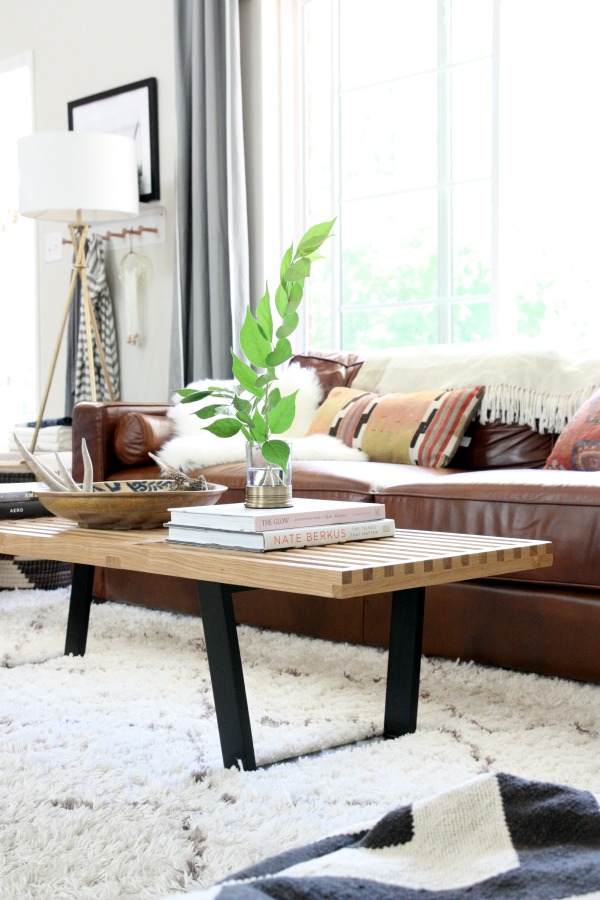
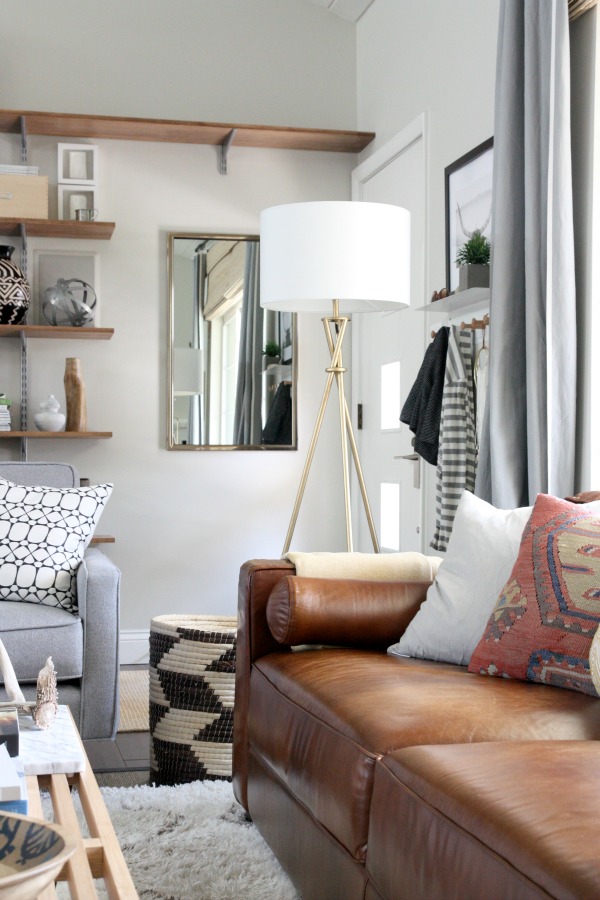
I played around with a few different furniture arrangements before settling on the one you see. We discovered that placing the sofa in front of the window gave us more open floor space and encouraged casual conversation. Someone sitting on the sofa can easily converse with someone in the kitchen and vice versa. And the scale of the sofa fits the window so well. (I strongly suggest moving around your furniture until it feels right. No harm, no foul and it’s free!) We also switched out a large, round coffee table for a slimmer, rectangular one to better suit the space.
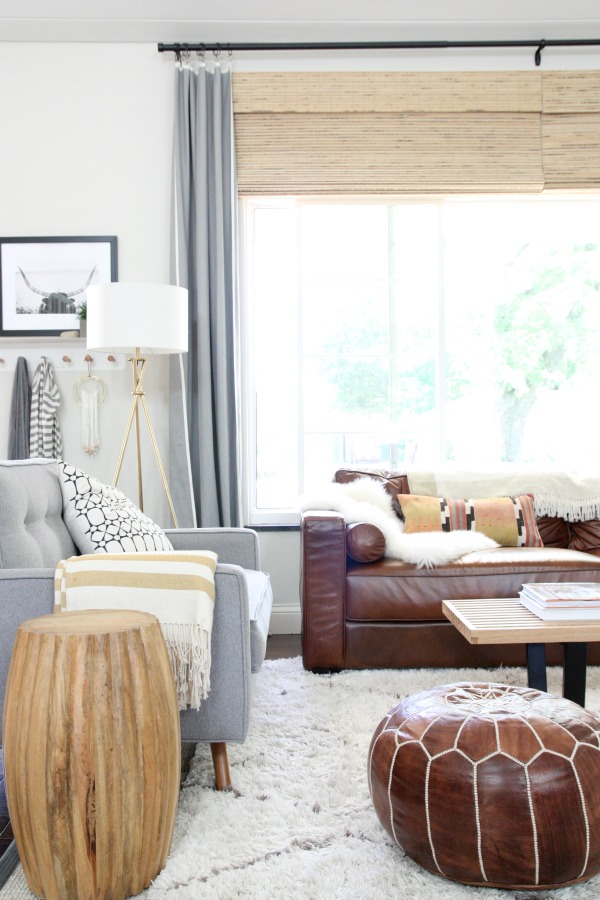
With such a major piece shoved up against the window / wall, it was important to “float” other pieces within the room. I positioned an oversized chair perpendicular to the sofa. Not only does this close off the conversation area, it also helps to separate the entry from the living room.
A shag rug layered over sisal defines the living room part of the main living space and gives the kids a soft place to romp. Bringing in the cloud-like rug upped the comfort factor 1000%. It’s where everyone wants to be.
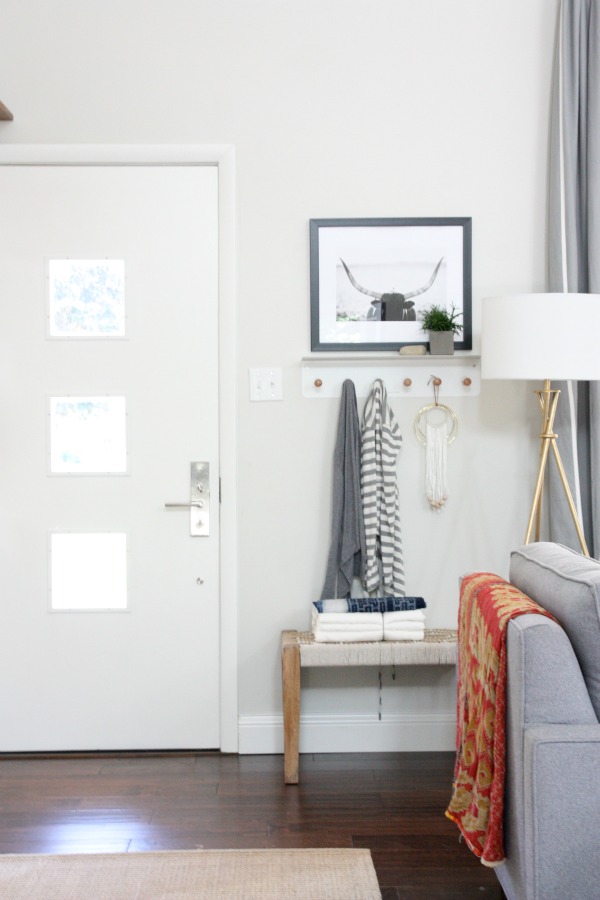
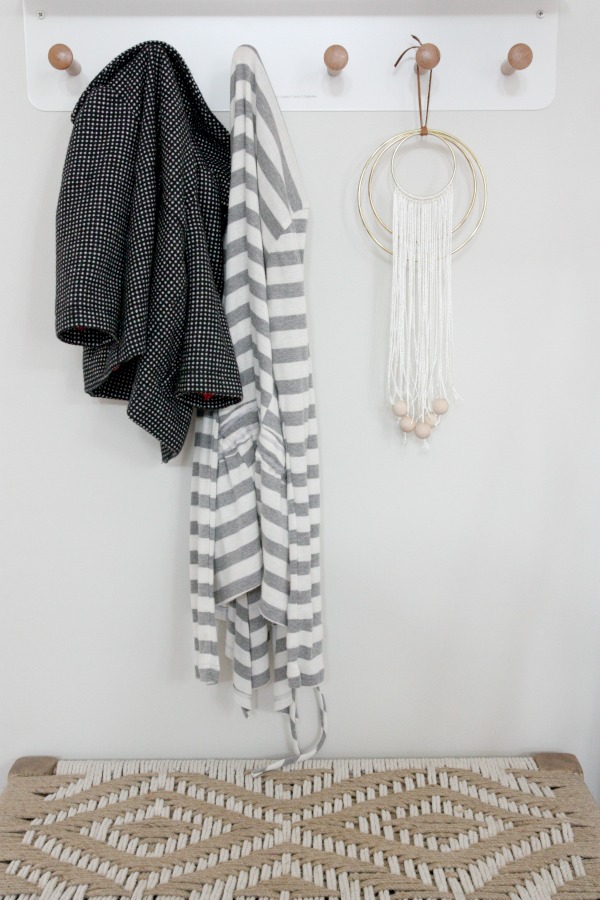
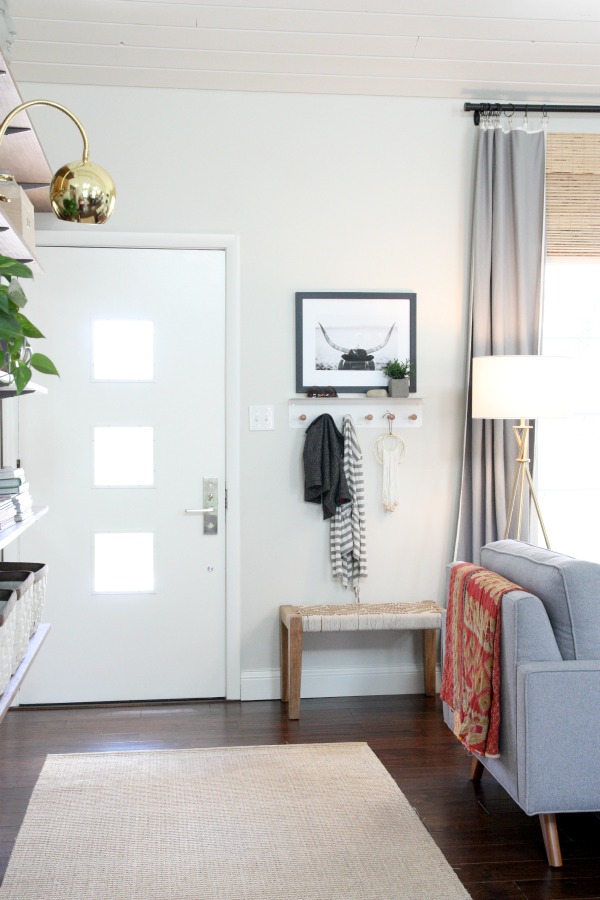
We don’t have a true entryway or foyer. The front door opens up into the living room. The small area behind the chair acts as our “entry.” Peg hooks give guests a place to hang their coats and the bench is a great spot for stashing deliveries until we open them.
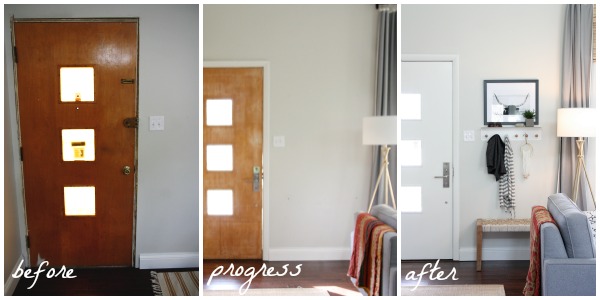
The front door is original but it was in sad shape when we bought the house. The previous homeowner had added numerous locks and light-blocking, privacy screens to ward off strangers. The only problem was it warded off everyone. In fact, we couldn’t use the front door (we normally enter through the garage or mudroom) for over a year after our move-in date. Our UPS man made deliveries through the window! Eventually, we rebuilt the door jam and rehabbed the door.
The old door was in such disrepair that at one point we considered getting rid of it and starting from scratch. We’re so glad we didn’t! It’s one of our favorite original features – albeit all gussied up.
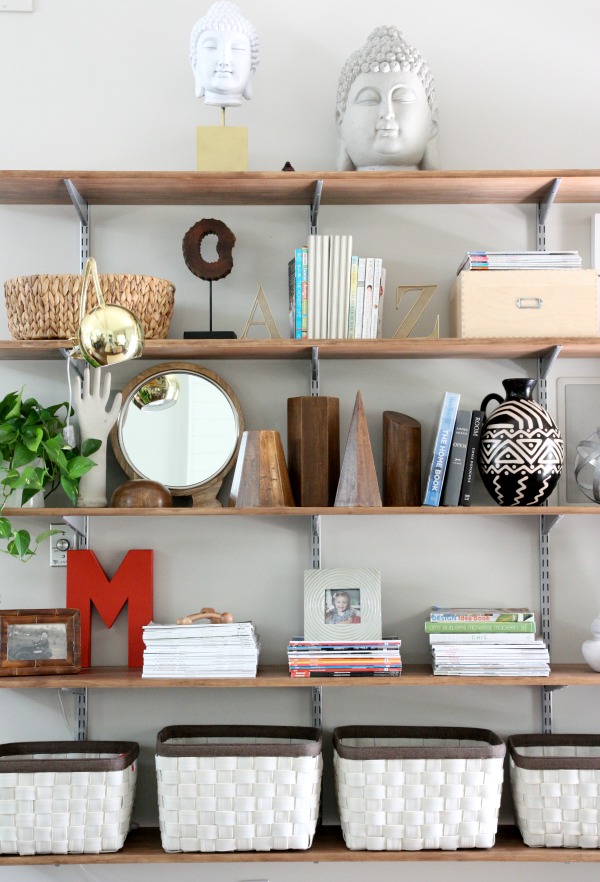
To bring down the height of the wall near the entry and balance out the TV wall on the opposite side of the living room, we installed simple DIY shelving. I display decorative items on the higher shelves safe from our toddler’s reach and use kid-friendly baskets on the bottom shelf for easy storage. And, bonus!, this shelving unit hides yet another pair of surround sound speakers.
So that’s the gist of the inner workings of the living room. As far as aesthetics, I really wanted this room to ooze comfort and coziness. We hang out here. We watch movies here. We read here. The kids play and wrestle here. We have family dance parties here. We entertain here. A lot of life happens here so the room didn’t need to be brightly colored or overly patterned. I feel like the room gets enough personality from its inhabitants. Did I mention we have three rowdy kids? This isn’t one of those look-don’t-touch living rooms. (I detest those.)
I’m drawn to neutrals, cozy textures, a mix of wood tones, leather upholstery, vintage & tribal patterns and hits of black and gold so those run rampant. But everything is kid-friendly. On movie night, the kids use the zig zag poufs as bean bags and they’re never without a stockpile of pillows and blankets.
I hope you enjoyed this BIG tour of our little living room ;)
Resources of note:
wall paint – Benjamin Moore tapestry beige
trim, ceiling, fireplace, TV wall, interior door paint – Benjamin Moore white dove
exterior door paint – Behr evening hush
flooring – Jasper engineered hardwood handscraped birch in Texas Brown via Build Direct
entryset – Emtek
peg hooks – West Elm
woven bench – Target
black & white bull photography print – Minted
string art – DIY
tripod floor lamp – Target
wall shelves – Lowe’s, DIY
sisal rug in entry – NaturalAreaRugs
gold clip-on lamp – Land of Nod
wood sculptures – Ballard Designs
woven baskets – HomeGoods
porcelain glove form – vintage
black & white vase – HomeGoods
vintage kantha on back of chair – ebay
oversized chair – Thrive Furniture’s Taylor chair in expectation grey, blonde stain
large sisal with gray border – Overstock
Keno Moroccan shag rug – RugsUSA
basket next to chair – Target
scalloped wood side table – Grandin Road outlet
patterned pillow on chair – Crate & Barrel
leather pouf – Joss & Main
leather sofa – Soho leather sofa by Elements Fine Home Furnishings (google for the best price)
fringed blankets – Target
sheepskin – Ikea
kilim pillow covers – vintage, etsy (try Sheepsroad or YASTK shops)
light gray squiggle pillow – HomeGoods
slat bench / coffee table – Overstock
gray curtains – West Elm
curtain rod – Amazon
curtain rings – Meijer
woven shades – petite rustique from Overstock
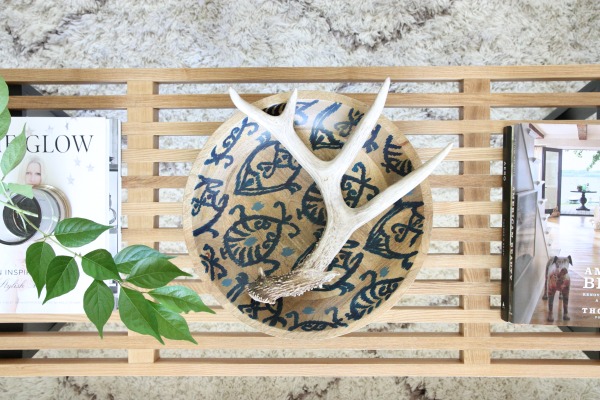
wood bowl on coffee table – Target
shed antler – ebay
various decor books – Amazon
brass-bottomed vase – Target (it’s actually a toothbrush holder)
zig zag floor poufs – West Elm
media cabinet – West Elm (I added vintage brass knobs)
gold task lamp – Target
“Generations” photography print – Steven L. Miller photography (custom gold frame from JoAnn’s)
faux roe deer antlers – One Kings Lane
gas fireplace insert – craigslist
tongue and groove planks – Home Emporium
Monrovian star mirrors – Joss & Main
ceiling fans – Amazon
In case you’re interested in seeing how this room has evolved, a few living room-related posts:
FURNITURE
*https://www.housetweaking.com/2011/12/14/we-bought-a-sofa-or-couch/
*https://www.housetweaking.com/2013/02/13/she-loves-me-she-loves-me-not-hey-girl/
*https://www.housetweaking.com/2013/04/23/rearranging/
*https://www.housetweaking.com/2013/11/06/media-cabinet-switcharoo/
*https://www.housetweaking.com/2014/03/19/its-just-a-really-awesome-chair/
DECOR
*https://www.housetweaking.com/2013/03/27/one-coffee-table-three-ways/
*https://www.housetweaking.com/2013/05/13/puppies-rainbows/
*https://www.housetweaking.com/2013/10/10/layers-in-the-living-room/
*https://www.housetweaking.com/2013/10/11/a-light-for-the-living-room-shelves/
*https://www.housetweaking.com/2013/12/18/steven-l-miller-photography/
*https://www.housetweaking.com/2013/12/23/a-little-bit-of-christmas/
*https://www.housetweaking.com/2014/03/25/diy-undercover-subwoofer/
*https://www.housetweaking.com/2014/04/08/diy-brass-string-hanging-art/
*https://www.housetweaking.com/2015/01/23/how-i-clean-the-wood-floors/
*https://www.housetweaking.com/2015/01/28/lots-of-little-things/
*https://www.housetweaking.com/2015/10/08/how-i-ruined-the-living-room-rug/
*https://www.housetweaking.com/2016/01/26/living-with-toys/
*https://www.housetweaking.com/2016/02/03/diy-wood-bead-styling-strand/
DIY SHELVES
*https://www.housetweaking.com/2013/08/01/library-day/
TV WALL
*https://www.housetweaking.com/2011/10/20/the-not-so-in-your-face-tv-plan/
*https://www.housetweaking.com/2012/08/20/honest-mondays-surround-sound/
*https://www.housetweaking.com/2013/11/26/planking-the-tv-wall/
*https://www.housetweaking.com/2013/12/09/the-tv-wall-is-built/
*https://www.housetweaking.com/2013/12/19/tv-wall-afters/
ENTRY
*https://www.housetweaking.com/2013/11/01/front-door-update/
*https://www.housetweaking.com/2014/04/24/my-front-entry-part-i/
*https://www.housetweaking.com/2014/04/25/my-front-entry-part-ii/
Thanks for reading!
images: Dana Miller for House*Tweaking


budget decor, DIY, family life, interior design, renovation