Once upon a time our bedroom was a very scary place.

From what we can discern, the previous owner used it as a painting studio. The room was home to dozens of canvases and numerous dressers holding art supplies when we first toured the house. The green shag carpet was horribly stained. One corner of the room showed signs of water damage. (We later learned from neighbors that a tree fell and damaged that corner of the house when Hurricane Ike barreled through in 2008.)
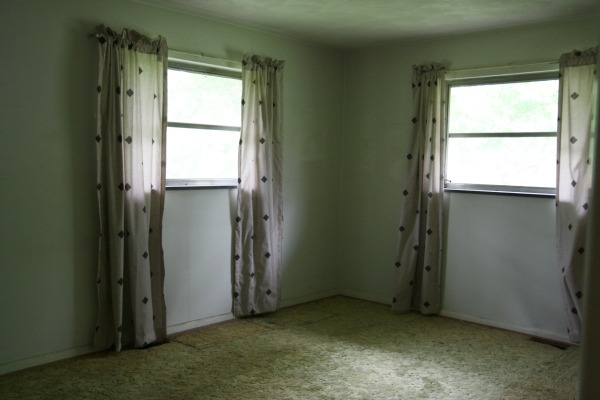
The room faces northeast and receives the least amount of natural light of all the rooms in the house. In the summer (shown here and in the “afters” below), the room takes on an eerie green glow.
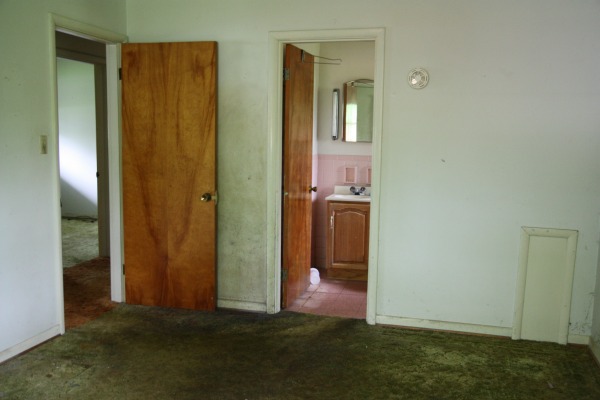
An adjoining bathroom – albeit small – was the only thing this room had going for it. Please notice the dark trail from the hallway to the bathroom. (!) I don’t even want to know. Let’s hope it was paint.

We added foam insulation to the exterior walls, ripped up the carpet, sprung for new windows, laid engineered hardwood flooring, installed chunky new baseboards and had the electrical upgraded to include a ceiling fixture. Among other things. Choosing a paint color for this room proved difficult. Before moving in, we painted it the same color as the main living space but the light hue looked very dingy in this room. I repainted the walls a warm gray with green-blue undertones that play nicely in the dim light. Sometimes it looks gray. Sometimes it looks green. Sometimes it looks blue. But it always feels calm and soothing – even under artificial lighting at night.
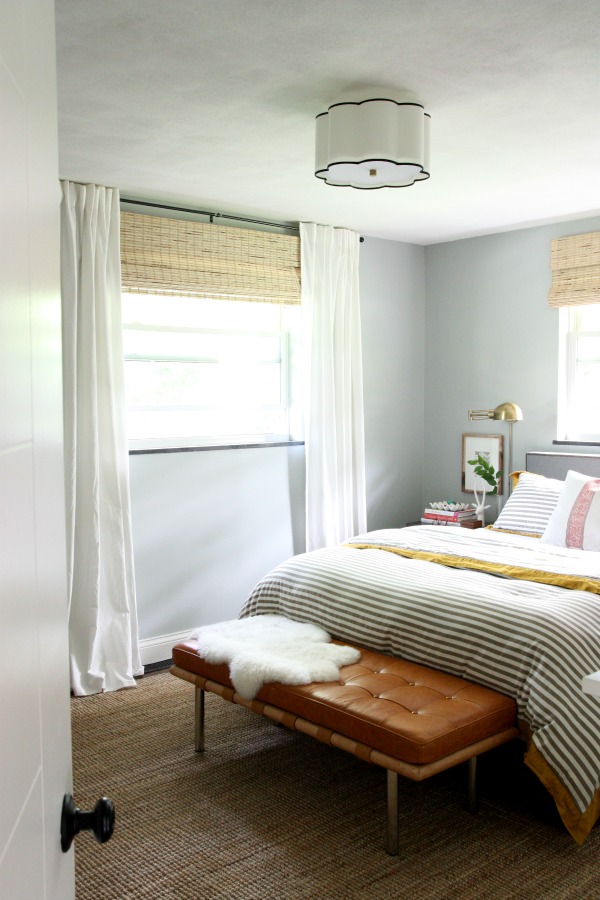
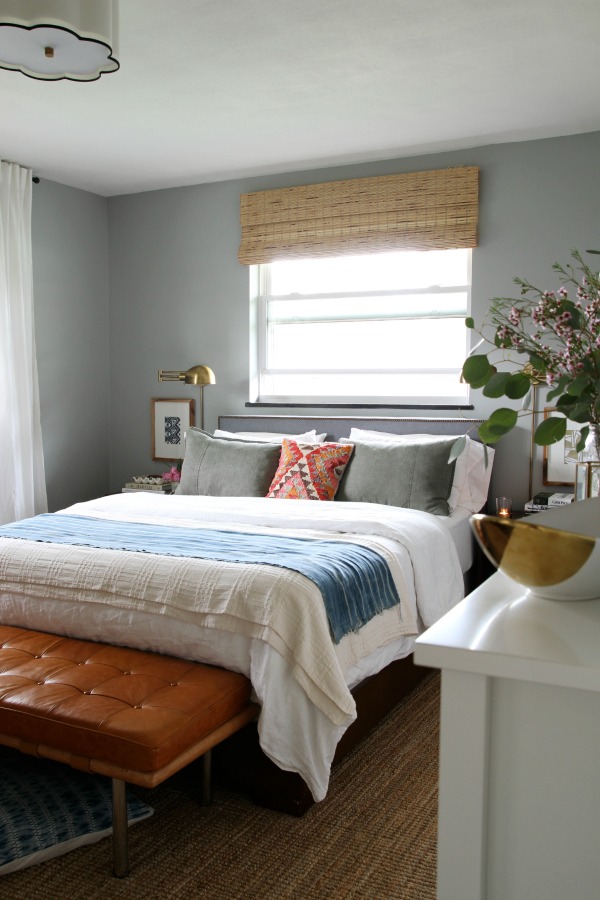
Placing the bed under the eastern window was our only viable option in this room. I initially bought a curved headboard but the lines were all wrong under the squarish window. I switched it out for the straight, upholstered one seen here.
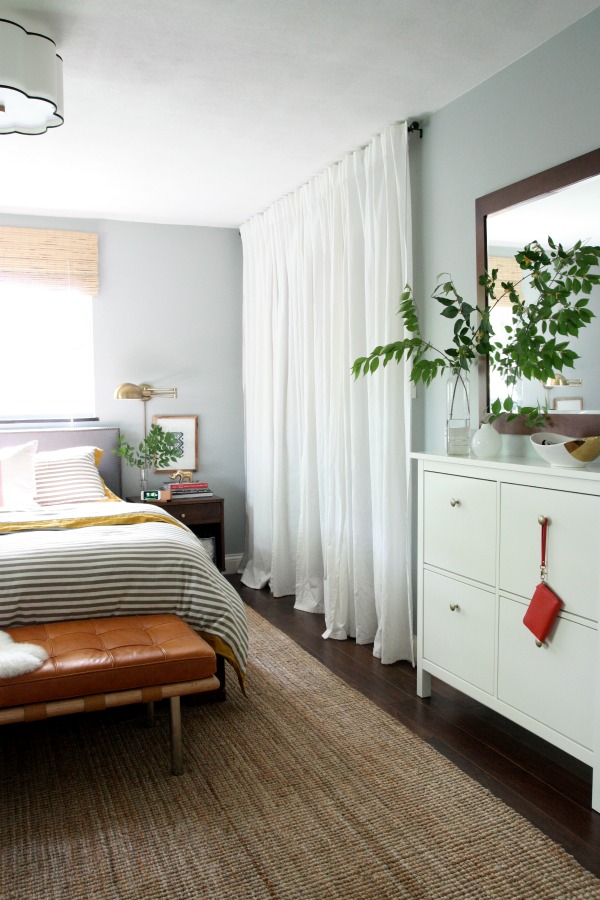
In each of the bedrooms, we ditched the closet doors in favor of curtain panels hung high and wide. For us, it’s easier to access the closet contents this way. The panels make it feel a little like a dressing experience, too, if that makes any sense. Most of the time, I stand inside the closet to dress. Hanging the curtains outside of the frame gave us a good 6″ of extra closet depth. All of Steve’s and my clothing is in this modest closet. Everything is organized with off-the-shelf wire racks and drawers. We were even able to incorporate two pull-out hampers (one for darks, one for lights) in the closet design. Shoes currently not in rotation are stored in the slim wall cabinet to the right of the closet.
We’ve been pleasantly surprised by how wonderful it is to have a pared down closet. Steve and I both enjoy expressing our styles via our wardrobes and, before living in this house, we were accustomed to large, walk-in closets. What we’ve found though is that we are much more focused on quality vs. quantity when it comes to buying clothing now. We’re spending less money on clothing by buying more long-haul pieces. Since space is limited (we have a set number of hangers and shelves) we subscribe to the “one thing in, one thing out” policy. And the closet is always tidy! Don’t let anyone fool you into believing you need a walk-in closet to be happy.
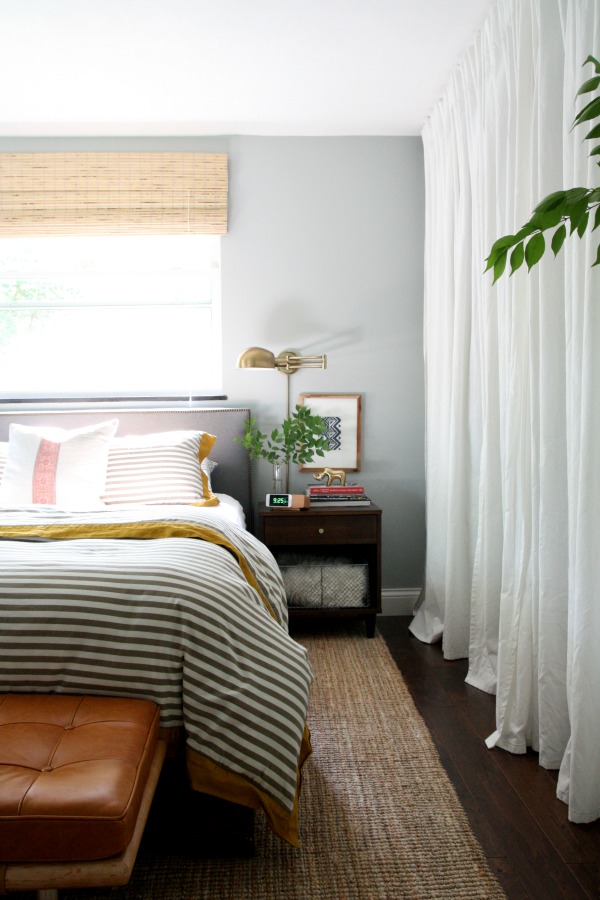
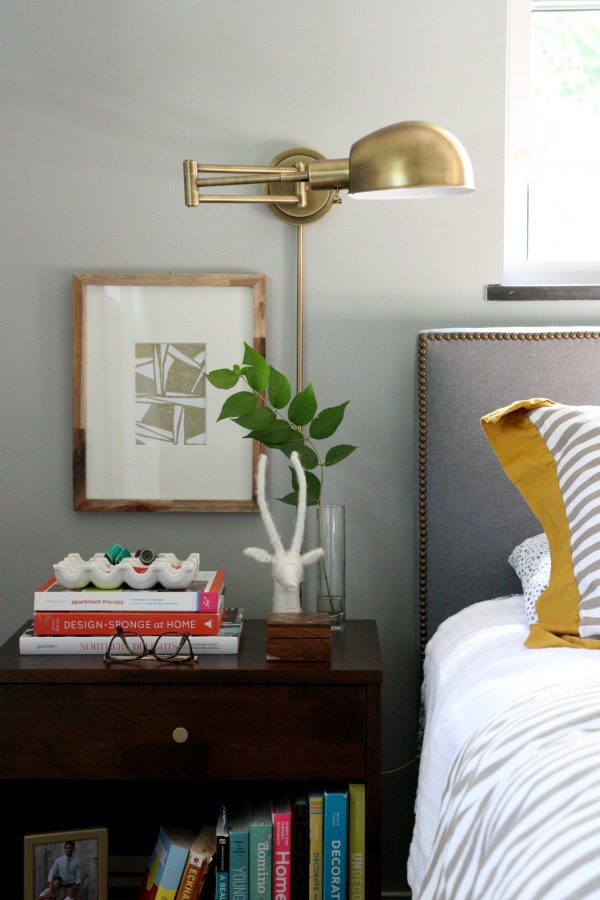
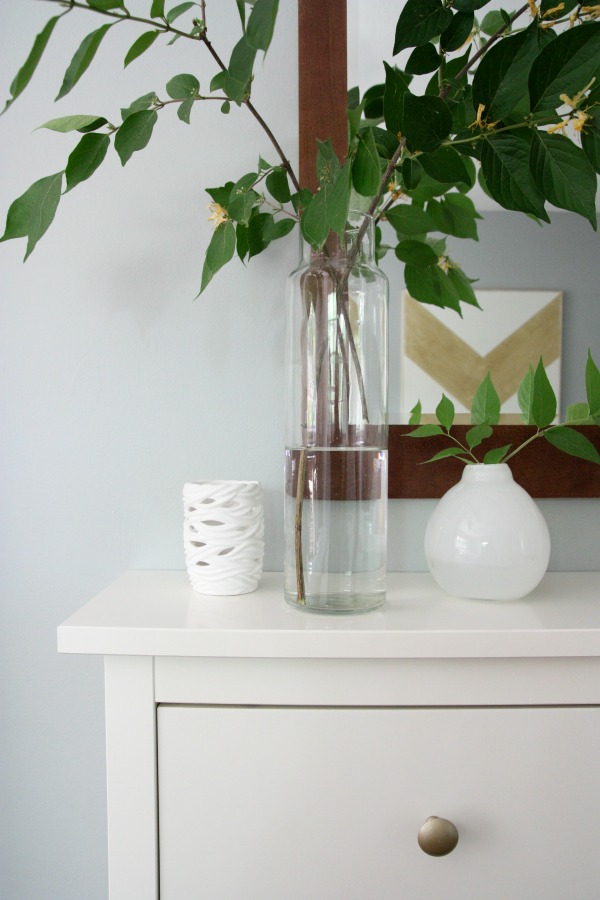
Matching sconces and nightstands flank the bed. Framed prints bridge the gap between the sconces and the top of the nightstands. We don’t keep too much bedside but I love having greenery (I clip it from the backyard) and a stack of books nearby.
For cohesion, we hung the same woven shades found throughout the house. For privacy, we installed blackout roller shades within each window frame. They aren’t visible until we pull them down at night. A nubby jute rug picks up on the woven blinds.

I tried to keep the bedding gender neutral with a striped duvet and embroidered hemp pillow. IMPORTANT ANNOUNCEMENT: I like stripes and natural textures.
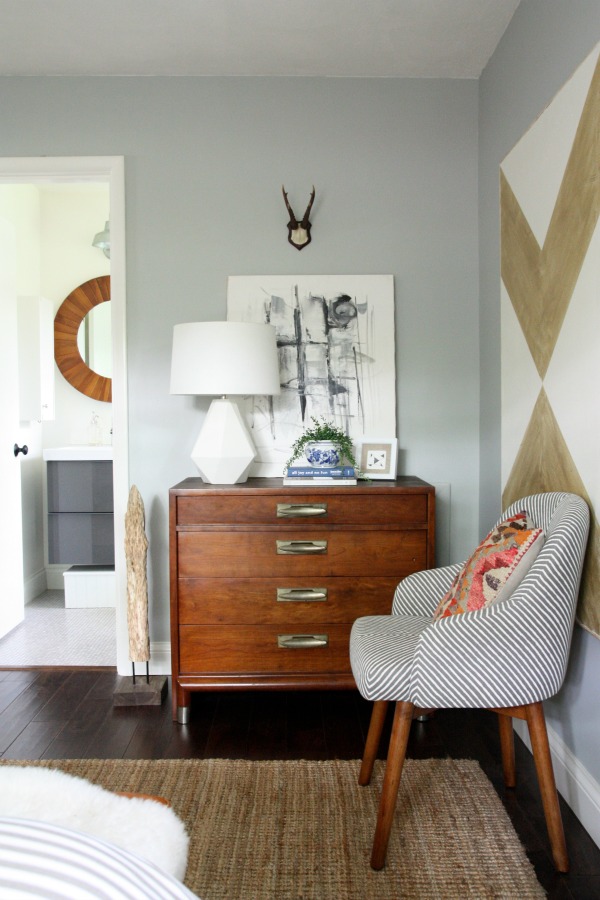
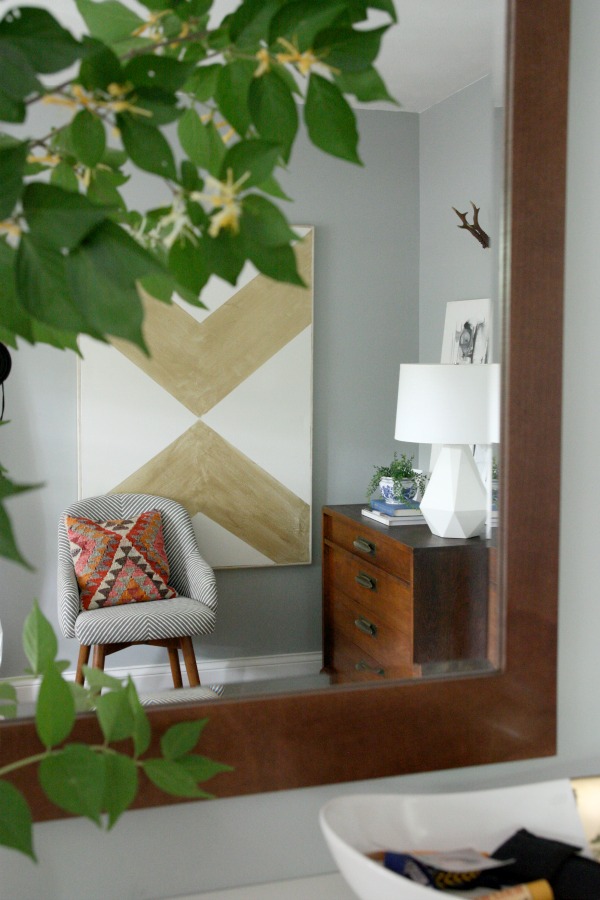
A vintage dresser sits opposite the bed. I think it’s my favorite craigslist find of all time. The black and white abstract art was painted by the previous owner. I leaned it against the wall to “try it out” nearly two years ago and liked the casual look so much I left it that way.
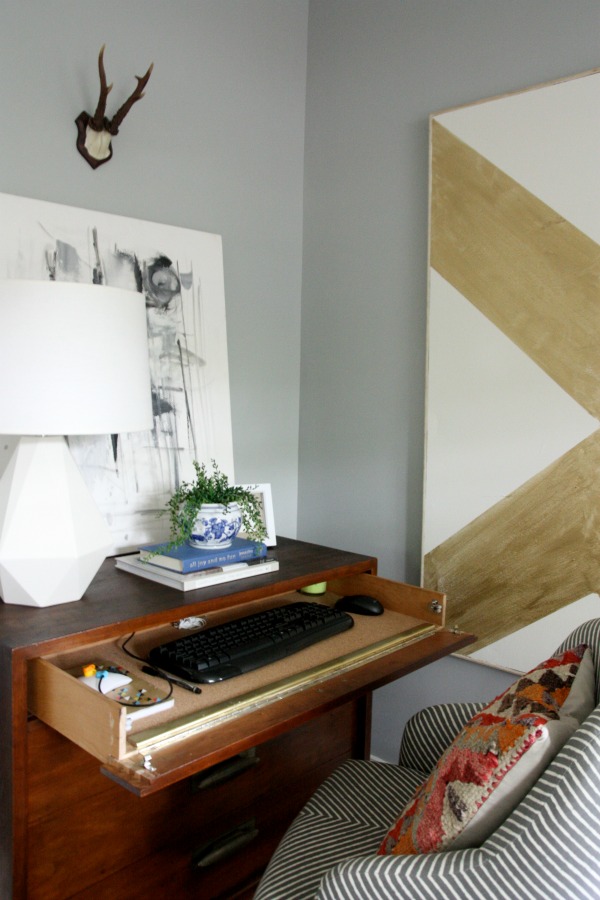
We rigged the top dresser drawer so that it’s hinged and can be used as a keyboard pull-out. It’s lined with cork so no mouse pad is needed. The “dresker” is the perfect place for Steve to take evening conference calls or work from home when necessary. I keep a wool blanket in the second drawer for freezing winter nights but the bottom two drawers are empty!
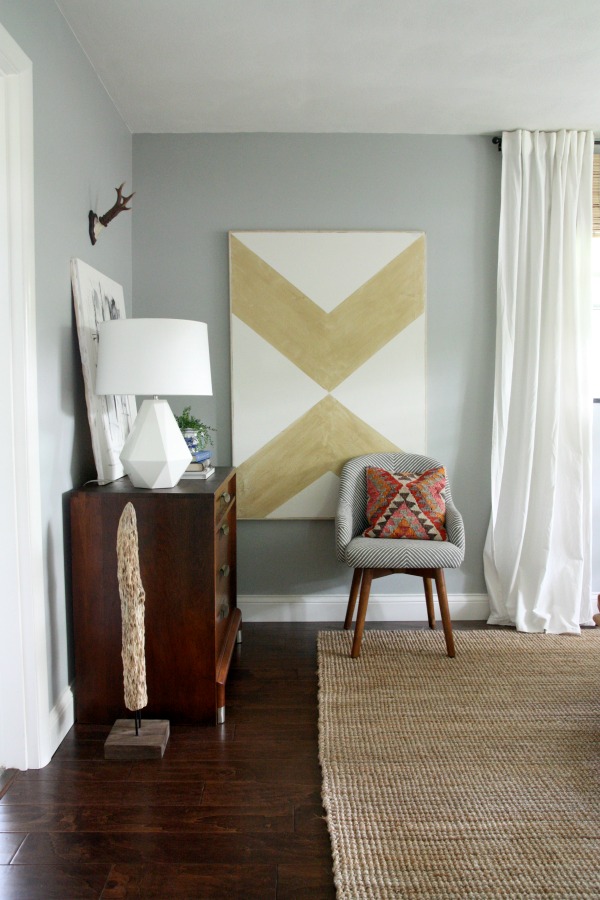
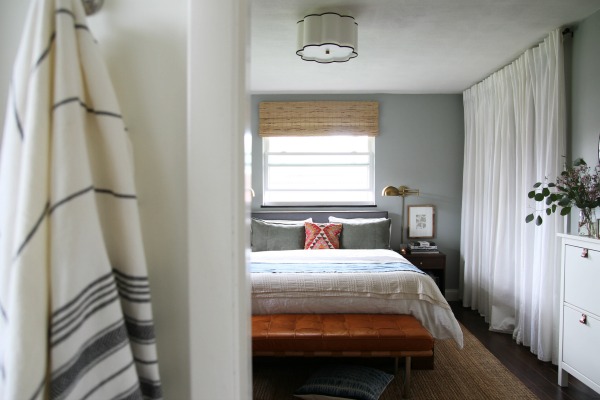
This is the view looking into the bedroom from the doorway. You can barely see the door frame to the bathroom on the left. The large canvas was a controversial DIY. (You can read more about it via a link near the end of this post. There’s an interesting discussion in the comments section.) I love it nonetheless.
It took us every bit of two years to get our bedroom just right. I can still remember the nights of insomnia staring at the ceiling contemplating this room. My goal was to create a peaceful place to retreat at the end of every busy day. I can’t say I won’t tweak things in here ever again but it does offer the calming respite I was hoping for. We sleep well.

UPDATE: I added DIY leather pulls to the shoe cabinet and switched out the rectangular mirror for a round one. You can read about that project here. I also refreshed our bed with a new mattress, linens and pillows. You can find the bedroom refresh here.
Resources of note:
wall paint – Benjamin Moore half moon crest
trim paint – Benjamin Moore white dove
flooring – Jasper engineered hardwood handscraped birch in Texas brown via Build Direct
ceiling fixture – Robert Abbey axis aged brass ceiling light
woven shades – petite rustique from Overstock
blackout roller shades – Levolor from Lowe’s
curtain panels – Ikea
curtain rods – Target
closet organization – ClosetMaid
bed – West Elm (discontinued)
headboard – West Elm nailhead upholstered headboard in brushed heather cotton, gray haze
duvet – DwellStudio draper stripe
white blanket – Target
embroidered pillow – OrientalTribe11 on etsy
sconces – House of Troy addison swing arm lamp in antique brass
nightstands – Vilas one-drawer nightstand from Overstock (I spray painted the knobs gold.)
wood frames – Target
art prints – printwork on etsy
yarn-wrapped gazelle – Target
Barcelona bench – Rove Concepts in palermo caramel leather
sheepskin – Ikea
9′ x 12′ jute rug – Overstock
shoe cabinet – Ikea (I spray painted the knobs gold.)
mirror – RSI from Wayfair
desk chair – West Elm saddle office chair
kilim pillow – Sukan on etsy
chevron art – DIY
dresser – vintage Willett via craigslist
lamp – Robert Abbey delta table lamp
black and white abstract art – estate sale
faux antlers – One Kings Lane
driftwood sculpture – thrifted
If you’re interested in seeing how this room evolved, here are a slew of bedroom-related links:
FURNITURE
*https://www.housetweaking.com/2012/08/10/recent-purchases-3/
*https://www.housetweaking.com/2013/06/11/i-like-to-move-it-move-it/
*https://www.housetweaking.com/2013/06/17/wayfair-in-the-house-lets-talk-about-my-bed/
*https://www.housetweaking.com/2013/09/06/a-desk-disguised-as-a-dresser-a-k-a-the-dresker/
*https://www.housetweaking.com/2014/02/17/a-bench-in-the-bedroom/
*https://www.housetweaking.com/2016/02/15/diy-leather-pulls-from-a-0-99-belt/
DECOR
*https://www.housetweaking.com/2012/03/29/looking-for-a-bedroom-light/
*https://www.housetweaking.com/2012/08/31/the-pursuit-of-a-casual-bedroom/
*https://www.housetweaking.com/2013/02/27/wayfair-in-the-house-swing-arm-wall-lamp/
*https://www.housetweaking.com/2013/06/05/i-dont-want-to-leave-my-bedroom/
*https://www.housetweaking.com/2013/06/17/wayfair-in-the-house-lets-talk-about-my-bed/
*https://www.housetweaking.com/2013/06/21/our-bedroom-window-treatments/
*https://www.housetweaking.com/2013/07/11/his-hers-nightstands/
*https://www.housetweaking.com/2013/08/01/wayfair-in-the-house-a-bedroom-mirror/
*https://www.housetweaking.com/2014/02/12/the-fruits-of-my-antiquing-adventure/
*https://www.housetweaking.com/2015/12/30/thoughts-on-bedside-sconces/
*https://www.housetweaking.com/2016/02/15/diy-leather-pulls-from-a-0-99-belt/
*https://www.housetweaking.com/2016/03/25/bedroom-refresh/
ORGANIZATION
*https://www.housetweaking.com/2012/06/14/closetsmaid-right/
*https://www.housetweaking.com/2013/10/25/making-the-most-of-small-closets-master-bedroom/
*https://www.housetweaking.com/2016/02/15/diy-leather-pulls-from-a-0-99-belt/
DIY
*https://www.housetweaking.com/2012/07/05/hold-the-door/
*https://www.housetweaking.com/2013/09/04/diy-hinged-drawer/
*https://www.housetweaking.com/2013/10/09/one-ticket-to-hell-please/
*https://www.housetweaking.com/2013/10/15/a-date-with-my-doors/
*https://www.housetweaking.com/2016/02/15/diy-leather-pulls-from-a-0-99-belt/
You can access this master bedroom tour along with a general house tour and individual room tours under the “See My House” tab in the side bar. Thanks for reading!
images: Dana Miller for House*Tweaking
Obligatory preamble rambling: When we were renovating our kitchen, I searched high and low for any information I could find on Ikea kitchens. The results were few and far between. We did end up with an Ikea kitchen (which we love) but I’d like to shed more light on Ikea kitchen renovations from the perspective of other real life homeowners. It’s something I wish we would have had access to when we were considering Ikea for our own kitchen remodel. Plus, it’s fun to see how others use Ikea to suit their personal style and needs in the kitchen. I hope you find these posts helpful and inspiring – whether you ultimately end up with an Ikea kitchen or not. Enjoy!

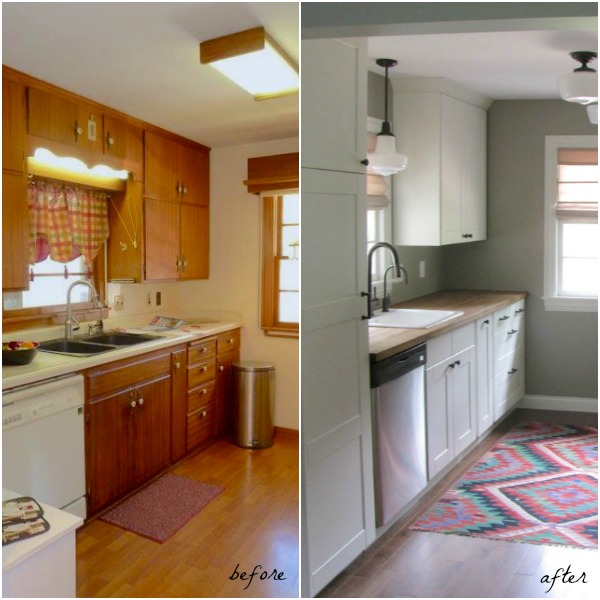
After renting for nearly a decade, Annie and Greg bought their first home in 2011. Since then, they’ve slowly been updating the 1950’s house located in southern Minnesota. With a job relocation to Seattle on the horizon, they decided to tackle the kitchen to get the most bang for their buck when they list the house in a few months. They considered making do with the original cabinets but realized a few coats of paint wouldn’t address the need for a better functioning layout and more counter space. Keeping their small budget and future resale in mind, they opted to source most of their kitchen components from Ikea. I asked Annie several questions about their experience. Find her answers and images of the newly remodeled kitchen below.
Which items in your kitchen hail from Ikea?
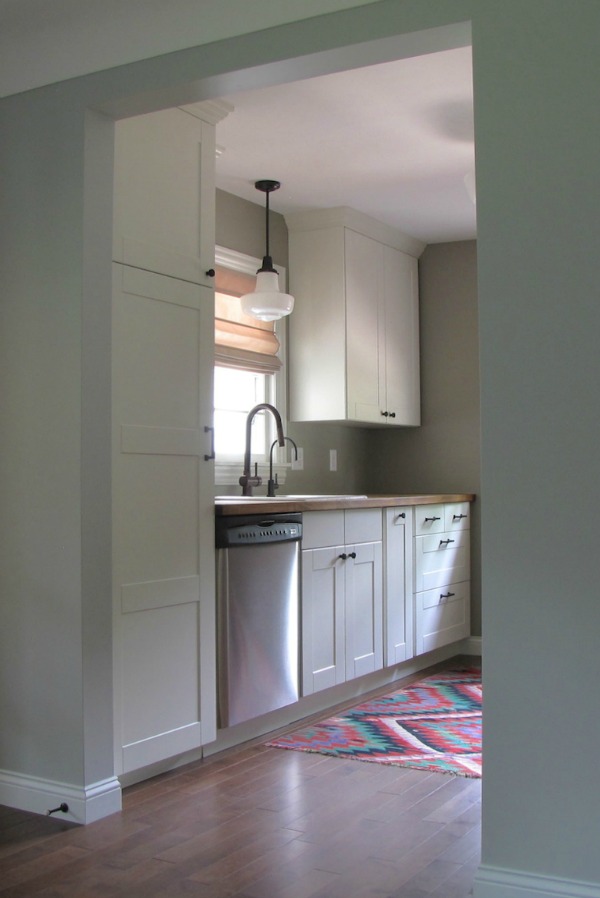
The cabinets, doors, drawer fronts and toe kick are all from Ikea.
What made you decide to source these items from Ikea?
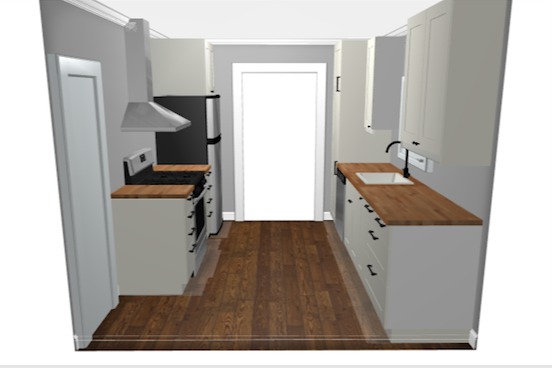
We never considered going elsewhere for those items due to our numerous trips to the Twin Cities Ikea where we’d snoop through their kitchen displays and dream. My husband, Greg, is a design and process engineer with a construction background and I’m a stickler for good design as well. Quality, design and function are important to us. Ikea delivered those aspects and fit our small budget. You can’t beat the hinges and door dampers on the soft-closing cabinets. We outfitted most of our 9′ x 10′ galley kitchen for ~$2,600. People don’t believe us unless they’ve also researched and / or created an Ikea kitchen.

Who designed your kitchen? What aesthetic were you aiming for?
The design was our own. We wanted to increase the amount of storage while not overwhelming the small space. We’re putting the house on the market in a few months to move to Seattle for my husband’s career. We’re trying to keep the same feel from room to room. Every bit of our house has been updated or renovated and the kitchen was the last room to finish on the main floor. I think it flows very well which goes to show Ikea’s versatility.
Did you assemble and install all Ikea kitchen components yourself? If not, what did you seek help with?
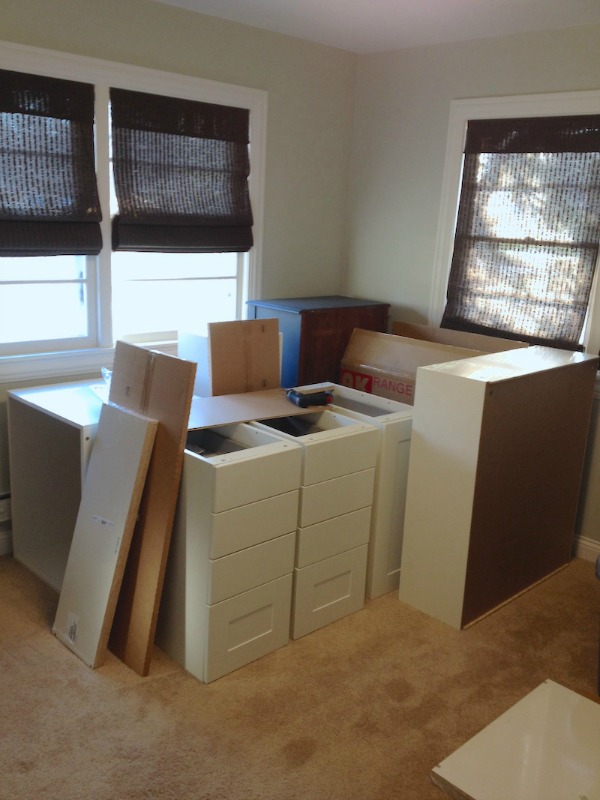
The two of us assembled and installed the cabinets. We read that putting the cabinets and drawers together was a pain but we didn’t have a problem. Once assembled, we stored the cabinets in the master bedroom to keep them away from our dogs and my accident-prone ways.

How did you customize your Ikea kitchen to suit your needs and preferred aesthetic?
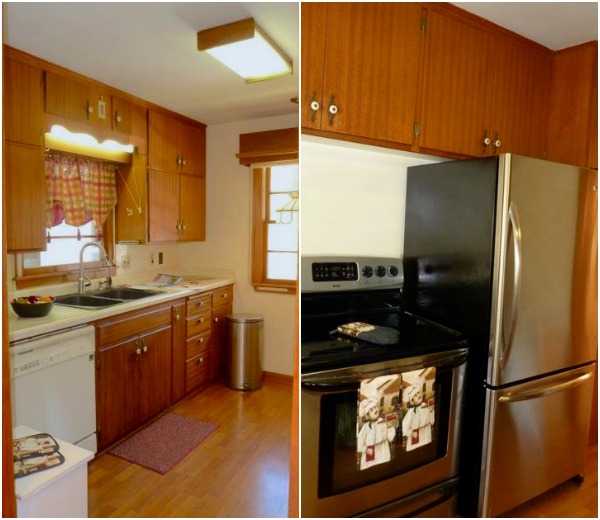
The original plan was to keep the old cabinets and paint them then add a new sink, faucet and countertop. One side of the 1952 kitchen had the stove and refrigerator next to one another with no counter space whatsoever which bothered us quite a bit. I’m short and the shelves in the old cabinets were hard for me to reach – even with a step stool. Once we started looking at the facts and what it would take to update the old cabinets, we realized it wouldn’t look or function any better. We said, nope, let’s go to Ikea. Let’s start fresh.
After that I started designing the space with the Ikea kitchen planner online. I took a few afternoons scattered over a few weeks to go over layout options with all the measurements. Then we took a Sunday to revise it together and arrive at the final design.
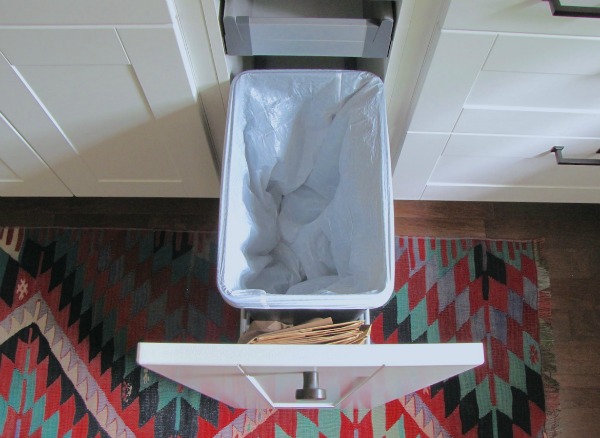
I pictured the new cabinets going nearly to the top of the 9′ ceiling to bring the eye up and make the space look larger. (That was one thing I liked about the old cabinets.) I wanted to make it look more custom with crown molding. The trash and recycling also have their own place inside of a pull-out base cabinet which we love. We definitely wanted a better layout and more storage. It’s odd that we have more storage now – I still have empty drawers and shelves actually! – even though we omitted upper cabinets by the stove in the new design. Less cabinets and more storage is pretty awesome.
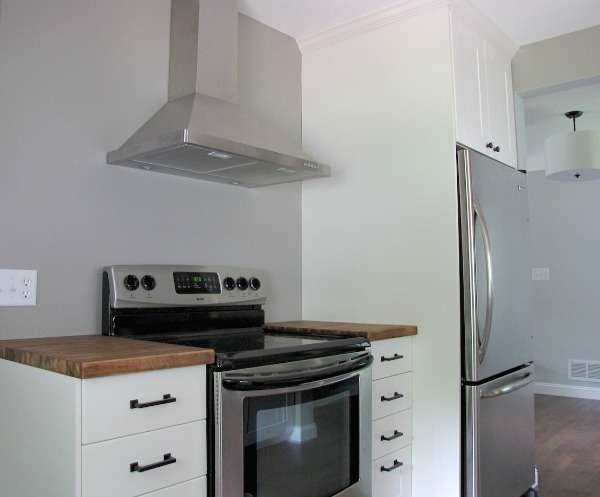
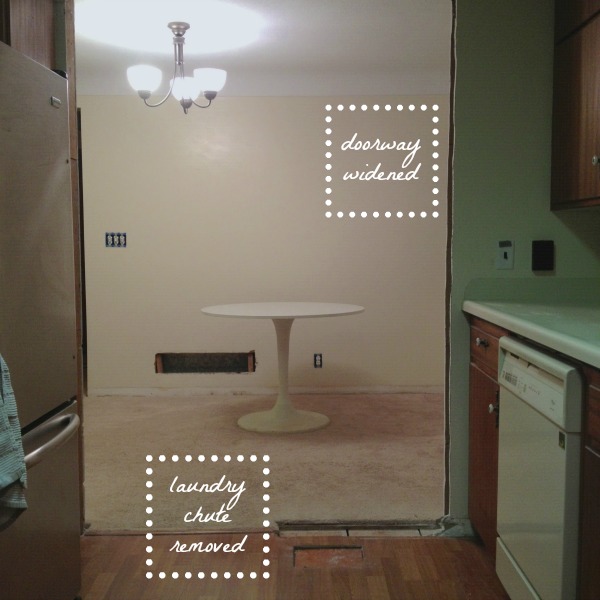
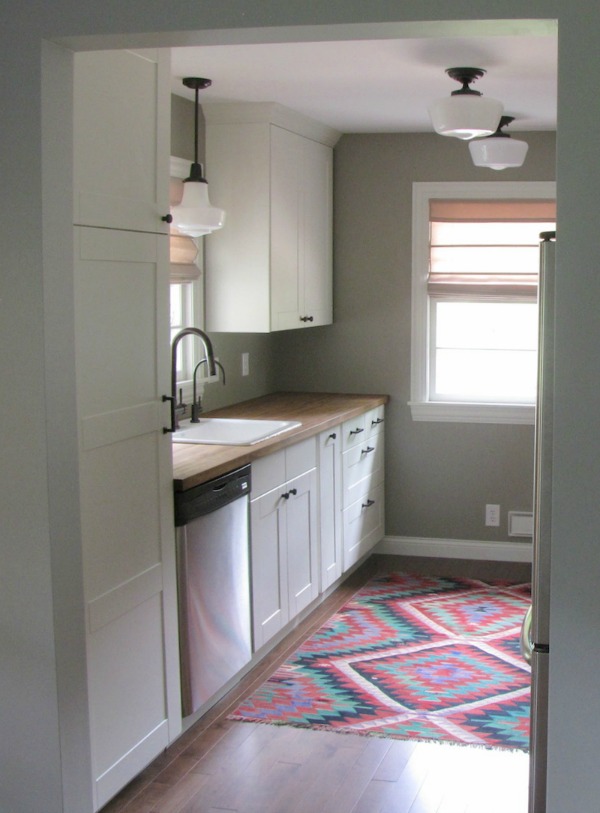
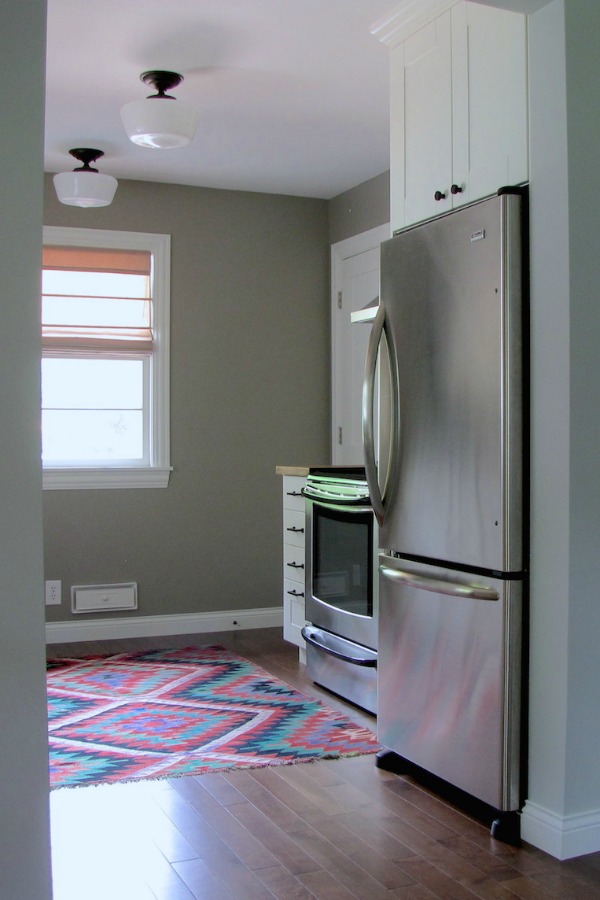
The fridge took some work because it is not counter-depth. We had to shorten the door opening by 7” to get a built-in look after removing a pocket door and widening the doorway. Today, the doorway goes with the scale of the house and makes the kitchen and dining room feel more like one space. Carpet is not my friend and it was in the dining room. Gag. We installed hardwood flooring in both rooms for added cohesion.
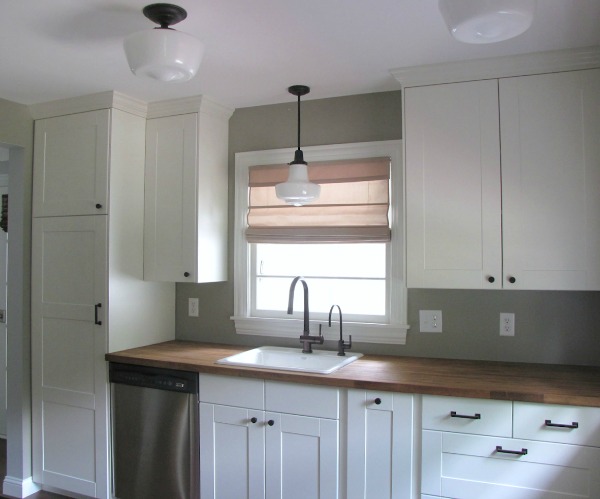
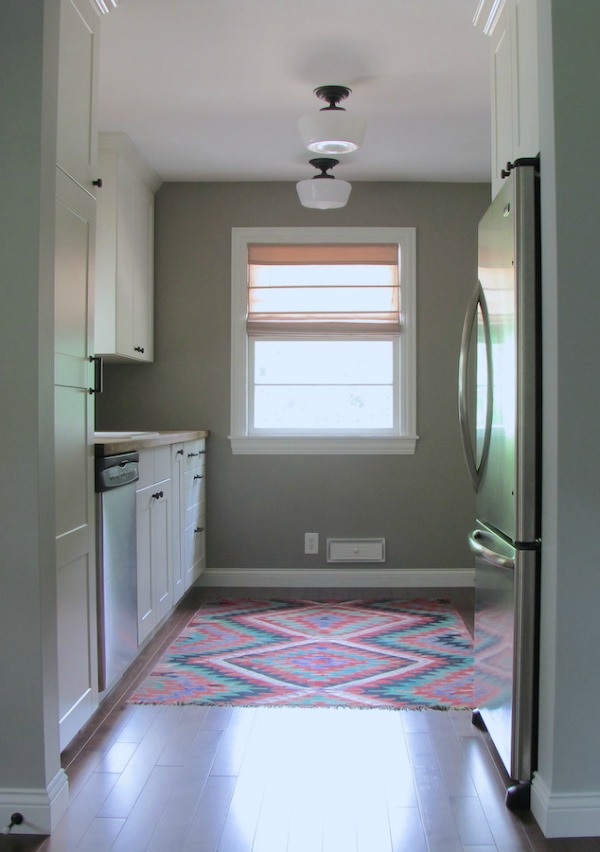
There were a few kitchens on my Pinterest board I was obsessed with which lead me to the hardware, the butcher block countertop and a single basin sink. My original idea for the countertops was soapstone but butcher block is more affordable and more forgiving. We work with wood furniture in our design / refurbishing business so it’s not a big deal for us to repair it. The more it ages, the better it looks to me. We didn’t install a backsplash because I think it’s a personal decision better left to the next owner…who I hope sends me a picture. I did consider a few backsplash options. We have subway tile in both bathrooms, marble in one bathroom and various of shades of gray throughout the house which were all tile options that caught my attention.
I wanted high contrast between the off-white ÄDEL cabinets and accessories so we used an almost matte black, oil-rubbed bronze in the details. The hardware has modern lines but the warm wood countertops and classic schoolhouse lights keep the room from leaning too contemporary. My taste tends to be modern rustic.
How long was it from design to the final product?
We did very little to the kitchen until October of 2012 when we removed the laundry chute the previous owner had in the kitchen. I ran into the chute cabinet at least three times a day. The two of us removed the pocket door and opened the doorway to a nice 55” from the 26” it had been. We didn’t start the real work until March of this year.
The Ikea kitchen sale started late February which was right after we finished renovating a bathroom. Mid-way into the sale we went to Ikea with our design, logged into our kitchen planner account and asked the kitchen specialists a ton of questions. A specialist printed off our list, added what was needed (an important step since not everything is correct or included on the list) and we had our total in about five minutes. $2,634 didn’t even qualify for the discount which was fine with us. At that time, Ikea had everything we needed in stock but since we were not purchasing that day we had to call ahead to inquire about availability – especially because of the ongoing kitchen sale.
We nailed down our finances a few weeks later then returned to Ikea to order our kitchen. It was only $99 to deliver to our home a little more than 30 minutes away.
Everything was in stock and could have been delivered a few days after ordering but we requested a later delivery to accommodate our schedules. The delivery company called on a Tuesday to say they would be in our area the following day. I called back and scheduled the drop-off which fell into a 5PM to 9PM time slot when we’d both be home from work. Wednesday rolled around and the delivery company left a voicemail at 2PM saying they would be at our house in 40 minutes and that if we couldn’t be there we’d have to reschedule. This was our only unhappy moment. (Ikea hires the delivery out so it’s not really much of a reflection on them.) Luckily, Greg was able to leave work early and arrive home just before the delivery truck. Nothing was damaged upon arrival and we signed off with the delivery company. Simple and fast.
I immediately checked the list. Everything was accounted for. We started putting the cabinets together that night for a few hours. It took three weekday evenings and a total of six hours to assemble most of the components. Having years of experience in his family’s construction business, Greg wanted to do the rest on installation day. He’s an engineer and was impressed with the assembly method. If you pour out the box contents correctly it practically puts itself together. A screw gun is handy, too.
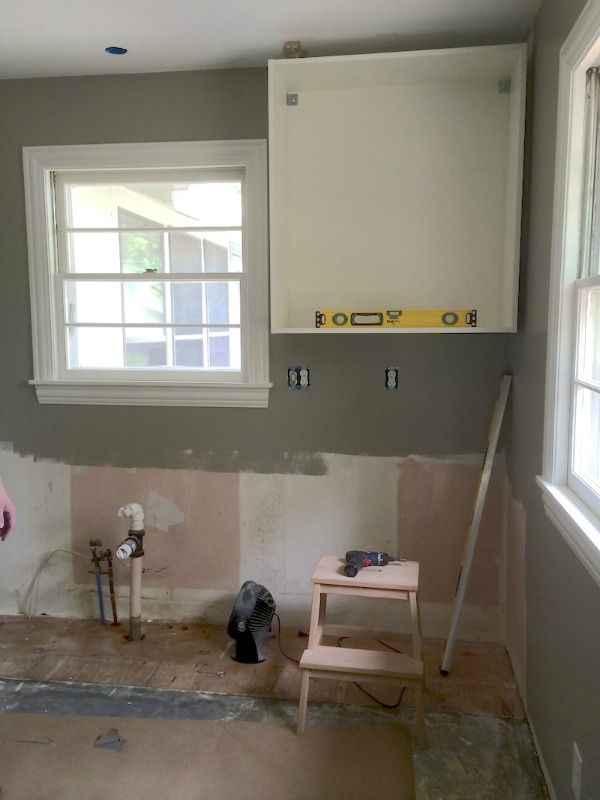
Installation was easy and we spread it out over two weekends. The suspension rail was simple to use and helped a lot since it was just the two of us. The problems we did encounter were part of the kitchen structure itself: uneven walls and ceiling. You know, stuff that goes along with older houses.
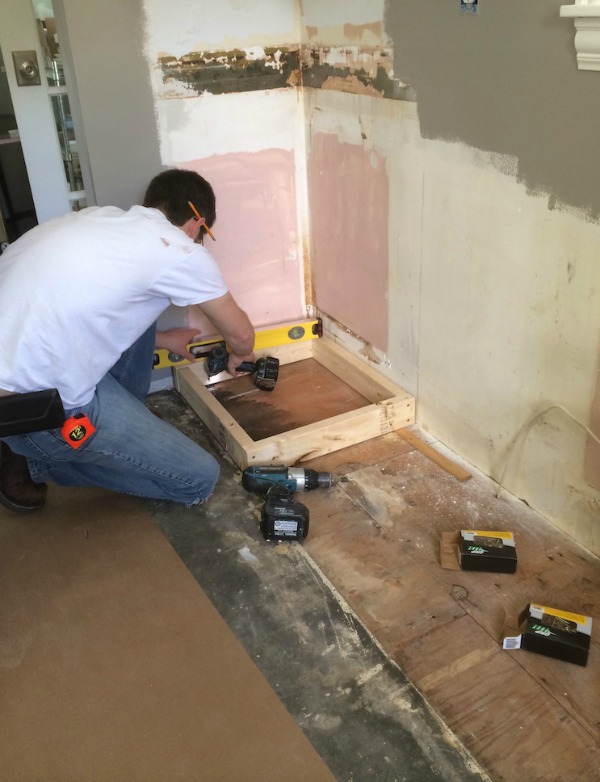
Custom framing came into play for the cabinet above the fridge and the tall pantry cabinet. Otherwise, the process was pretty straightforward.
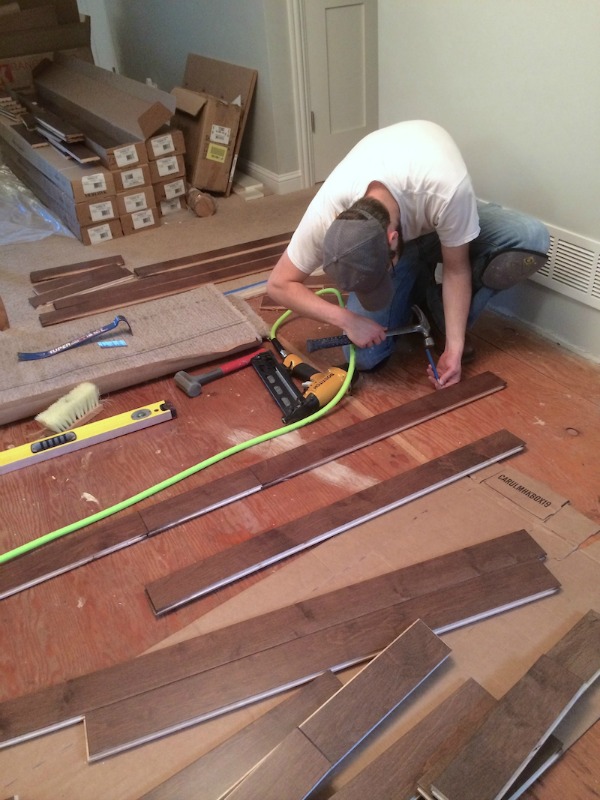
The flooring installation was aggravating compared to the cabinets. It took us a few weekday evenings in a row to knock it out. We were a tiny bit shy of toe kick in the end and we damaged a set of shelves at some point during installation. A trip to Ikea and $20 solved those issues.
How long have you lived with your Ikea kitchen? Have you encountered any problems?
The new kitchen has existed for about a month. Out of habit, we still find ourselves walking into the dining room looking for the fridge because that’s where we kept it during the reno. There haven’t been any concerns or problems. With our rambunctious pups, the floor has been scratched even though we use rugs. The cabinets are fine. I accidentally ram my step stool into them on a daily basis and they stand strong. I love this space now.
What is your favorite thing about your kitchen? Least favorite?
I love the flow and storage. And, although we kept resale in mind, there is still a lot of us in the design. We lived in nine rentals over the course of ten years before buying this house and nothing was even close to feeling like us. I’m also a food blogger on top of a DIY / home improvement blogger so the kitchen is the room in which I could spend all day and be happy. It’s my meal prep space, where I catch up with my husband over a glass of wine, where I break out in song and dance on the new hardwood floor and where the designer in me geeks out. Honestly, my least favorite thing is that we’re moving soon and that we waited so long to tackle the kitchen. I’m also bummed about not having found the items to display on my counters yet.
Would you recommend Ikea as a source for a kitchen remodel?
That’s a big yes. We recommend Ikea to anyone who will listen. If you create a design that truly fits your needs, seek advice from the kitchen specialists, prepare and organize your lists (I make a lot of lists) and materials, dedicate time to assembly and installation, accept that some problems might arise but that you will face them and all will be well, you can have a beautiful, quality Ikea kitchen. If things aren’t going together easily that means you are probably doing something wrong and need to take a step back. For example, we first put the base plate of the hinges on backwards.
Would you consider Ikea for a future kitchen remodel?
In our next (Seattle) house, kitchen renovations will come first and Ikea will be a big part of it.
Resources of note:
cabinet frames, cabinet doors, drawer fronts, toe kick – Ikea, ÄDEL off-white
trim, molding – Menards
wall paint – Benjamin Moore rockport gray
trim paint – color-matched to Ikea ÄDEL off-white and Benjamin Moore decorators white
hardware – myknobs.com
kilim rug – ebay, vintage
butcher block countertop – builder outlet store
butcher block finish – dark raw tung oil + citrus solvent (waterproof, food-safe, all natural)
sink – build.com
faucet – Signature hardware
water filtration faucet – Amazon
range hood – <$200 at Rakuten.com
dishwasher – craigslist, $60
refrigerator and stove – already owned
lighting – Home Depot, Lowe’s
blinds – JCPenney
flooring – American Carpet Wholesalers
dining room pendant – Overstock
Thank you so much Annie for sharing the details of your kitchen renovation!
How amazing is it that less cabinetry actually resulted in more storage?! This small kitchen is an example of thoughtful design at its best. I love Annie’s choice of hardware and lighting alongside the white cabinets and wood countertops. And don’t get me started on that vintage rug. Inevitably, making the decision to spend a little more on the kitchen reno to gain counter space and storage was a smart choice. The new layout and classic design are sure to be advantages over comps when the couple lists the home in the near future. You can follow the couple’s home improvement adventures over on their blog and you can see what Annie’s whipping up in the new kitchen on her food blog. (Pssst…the bathroom renovations are equally inspiring!)
If you’re in the mood for more Ikea kitchens, check out the rest of this series:
An Ikea Kitchen in Brooklyn
An Ikea Kitchen in Orange County
An Ikea Kitchen in Texas Hill Country
An Ikea Kitchen in Chesapeake
An Ikea Kitchen in a Barn (in France!)
An Ikea Kitchen in Cape Cod
And if you have an Ikea kitchen (it doesn’t have to be 100% Ikea) that you would be willing to share on House*Tweaking, please email me at housetweaking@gmail.com for consideration.
P.S. – Thanks to everyone who has already submitted an Ikea kitchen. I really, really, REALLY appreciate the time and effort you’ve put into bringing these posts to fruition. I have a slew of Ikea kitchens sitting in my inbox waiting to be featured. I apologize for the lapse in time between submission and the post going live. I’m buried in Ikea kitchens – in a good way! Keep ’em comin’!
images: Annie at The Wits


budget decor, DIY, inspiration, interior design, organization, renovation